
Related Manuals for Pride Rally


Summary of Contents for Pride Rally
- Page 1 Owner’s Manual The Ultimate In Style & Performance ® 21 Healey Road Dandenong, 3175 Victoria, Australia ACN # 088 609 661 www.pridemobility.com...
- Page 2 Using your Pride product safely depends upon your diligence in following the warnings, cautions, and instructions in this owner’s manual. Using your Pride product safely also depends upon your own good judgement and/or common sense, as well as that of your provider, caregiver, and/or healthcare professional.
-
Page 3: Table Of Contents
III. SPECIFICATIONS ........................9 IV. DESCRIPTION .......................... 11 BATTERIES AND CHARGING ................... 16 VI. OPERATION ..........................20 VII. COMFORT ADJUSTMENTS ....................22 VIII.DISASSEMBLY AND ASSEMBLY ..................24 IX. TROUBLESHOOTING ......................26 CARE AND MAINTENANCE ....................27 XI. WARRANTY ..........................28 Rally... -
Page 4: Introduction
At Pride, your safety is important to us. Please read and follow all of the instructions in this manual before you attempt to operate your Scooter for the first time. These instructions were produced for your benefit. - Page 5 I N T R O D U C T I O N My Authorized Pride Provider is: Name:_______________________________________________________________________________ Address:_____________________________________________________________________________ Phone Number:________________________________________________________________________ Quick Reference Information: Scooter Model:________________________________________________________________________ Serial Number:__________________________________________________________________________ Purchase Date:________________________________________________________________________ NOTE: If you ever lose or misplace your warranty card or your copy of this manual, call or write to us and we will be glad to send you a new one immediately.
-
Page 6: Safety
(slowest speed setting) to ensure a safely controlled descent. n Never drive your Rally across the side of an incline or diagonally up or down an incline, and do not stop, if possible, while driving up or down an incline. - Page 7 S A F E T Y These tests were conducted with the Rally’s seat in the highest position and adjusted backward on the seat base to its farthest rearward position. Use this information as a guideline. Your Rally’s ability to travel up inclines is affected by your weight, your Scooter’s speed, your angle of approach to the incline, and your...
-
Page 8: Safety Precautions
Make certain that the seat is locked into place and that the key is removed from the key switch before getting on or off of your Rally, and make certain that the seat is in a locked position when you are operating your Scooter. -
Page 9: Specifications
S P E C I F I C A T I O N S 30,5 cm 19 cm 80˚ 42 cm - 47 cm 9 cm Figure 4. Rally Dimensions 104 cm Length 45,75 cm 40,5 cm 53 cm - 73,5 cm... - Page 10 Lever lock system Ground C learance: 9 cm Rear basket, headlight, taillight, safety flag, single crutch holder, double crutch holder, oxygen O ptional Accessories: holder, w alker holder, cane/crutch holder (bracket mount), cane crutch holder (armrest mount), rearview mirror, cup holder Rally...
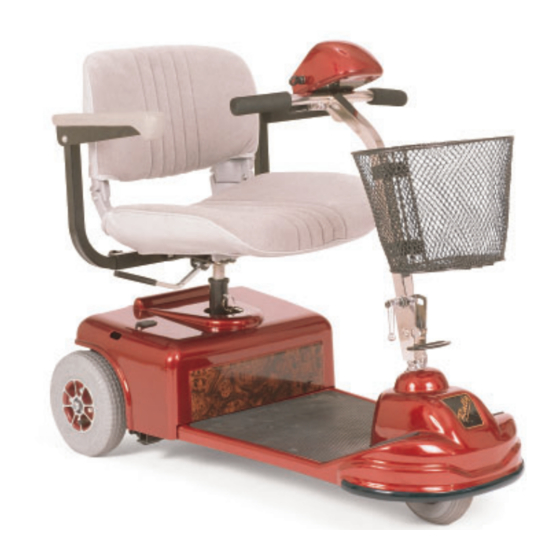
- Page 11 Figure 5. Seven Rally Components CONTROL CONSOLE ASSEMBLY The control console assembly houses all of the controls you need to drive your Rally; including, the key switch, the speed adjustment dial, the throttle control lever, the battery condition meter, the horn button, and the light switch (optional).
-
Page 12: Description
Figure 6. Control Console Assembly Throttle Control Lever This lever allows you to control the forward and the reverse speed of your Rally up to the maximum speed preset by the speed adjustment dial. n Place your right hand on the right handgrip and your left hand on the left handgrip. -
Page 13: Onboard Battery Charger
Rally. See VIII “Disassembly and Assembly” for instructions on removing the rear shroud. The anti-tip wheels are at the rearmost part of your Rally. See figure 7. ELECTRONIC... -
Page 14: Main Circuit Breaker
Rally’s motor and electronics from damage. n The main circuit breaker is mounted on the rear section of the Rally, near the manual freewheel lever. See figure 7. - Page 15 See figure 7. Anti-Tip Wheels The anti-tip wheels are an integral and important safety feature of your Rally. Do not, under any circumstances, remove the anti-tip wheels from your Rally. See figure 7.
-
Page 16: Batteries And Charging
B A T T E R I E S A N D C H A R G I N G You have the option to use either 32 AH or 17 AH batteries for your Rally. Your Rally was preset to use 32 AH batteries. - Page 17 “full day” of service. We recommend that you charge your Rally’s batteries for 8 to 14 hours after daily use. n If you use your Rally once a week or less, charge its batteries at least once a week for 12 to 14 hours at a time.
- Page 18 What type and size of battery should I use? We recommend deep-cycle batteries that are sealed and maintenance free. Both sealed lead-acid (SLA) and gel cell are deep-cycle batteries that are similar in performance in your Rally. Do not use wet-cell batteries, which have removable caps.
- Page 19 B A T T E R I E S A N D C H A R G I N G It may take a few days for the temperature of your Rally’s batteries to stabilize and adjust to their new room or ambient temperature.
-
Page 20: Operation
Release the throttle control lever to decelerate and come to a complete stop. n The electric brake automatically engages when your Scooter comes to a stop. NOTE: The rear wheel drive transaxle gives your Rally maximum traction with minimal steering effort on your part. - Page 21 5. Carefully and safely get out of the seat and stand to the side of your Scooter. 6. You may, if you wish, leave the seat facing to the side to facilitate getting on your Scooter the next time you operate it. Rally...
-
Page 22: Comfort Adjustments
SEAT HEIGHT ADJUSTMENT The seat can be repositioned to one of three different heights. See figure 11. 1. Remove the seat from your Rally. See VIII. “Disassembly and Assembly.” 2. Use the attached ring to pull and remove the ball detent pin from the lower seat post. -
Page 23: Seat Rotation
A D J U S T M E N T S FRONT-TO-BACK SEAT ADJUSTMENT SEAT You can reposition the Rally’s seat forward or rearward PLATFORM to one of three settings to adjust the distance between the seat and the tiller. See figure 12. -
Page 24: Viii.disassembly And Assembly
3. Lift the seat up and off of your Rally. See figure 15. 4. Gently lift the rear shroud off of your Rally. The rear shroud is held in place with reusable fasteners. See figure 16. - Page 25 3. Align the lower slots on the rear of the front section onto the corresponding pegs on the front of the rear section. See figure 19. 4. Gently pull up on the seat pedestal on the rear section of your Rally, so the rear section pivots into place. 5. The rear section pivots forward and locks in place with a “click.”...
-
Page 26: Troubleshooting
What if the main circuit breaker repeatedly trips? n Charge the Rally’s batteries more frequently. See V. “Batteries and Charging.” n If the problem continues, have both of your Rally’s batteries load tested by your authorized Pride provider. n Or, test the batteries yourself. Battery load testers are available at most automotive parts stores. -
Page 27: Care And Maintenance
M A I N T E N A N C E Your Rally requires a minimal amount of care and maintenance. If you do not feel confident in your ability to perform the maintenance listed below, you may schedule inspection and maintenance at your authorized Pride provider. -
Page 28: Warranty
(tyres, belts, bulbs, upholstery, plastic shrouds, motor brushes, fuses, batteries - see “Batteries,” below), or damage to the product caused by misuse or accident for which Pride or its agent cannot be held responsible. This warranty does not include labor or service calls.