Table of Contents
Advertisement
Advertisement
Table of Contents

Subscribe to Our Youtube Channel
Summary of Contents for Tonium Pacemaker
-
Page 2: Table Of Contents
Adjust FX and gain Kill all effects Reverse play 9.10 Set loop 9.11 Adjust loop 9.12 Split/double loop basic mixinG aDJusT seTTinGs charGinG pacemaker DeVice wiTh eDiTor supporT safeTy insTrucTions anD reGulaTion info 15.1 The FCC compliance statement 15.3 Industry Canada Statement... -
Page 3: The Pocket-Size Dj System
1 The pocket-size DJ system Pacemaker is a revolutionizing portable music player equipped with an extensive range of professional audio manipulation features enabling limitless mixing between two independent channels. Pacemaker device lets you • Mix, play and perform – at home, work and play • Prepare and preview your sets on the go • Bring your entire music library in your pocket 1.1 Optional set-ups... -
Page 4: In The Box
2 in the box Pacemaker device Power adapter and cord Strap www.pacemaker.net USB cable Audio cable Quick guide... -
Page 5: System Requirements
3 system requirements 3.1 Mac • Mac with built-in USB 2.0 port • Mac OS X v10.4.4 or later ( Intel ) • Pacemaker Editor for Mac Pacemaker Editor is included on the Pacemaker device hard-drive. To download the latest version, go to www.pacemaker.net/download 3.2 PC • PC with built-in USB 2.0 port • Windows XP Home or Professional or Vista • Pacemaker Editor for Windows Pacemaker Editor is included on the Pacemaker device hard-drive. -
Page 6: Interface And Functions
back to top 5 interface and functions 5.1 Basic functions 1 Display 2 rewind search or skip track 3 forward search or skip track 4 channel 1 select for input 5 channel 2 select for input 6 play play or pause track 7 cue set or launch at cue point 8 crossfade indicator 9 crossfader ch1/ch2 lineout blend... -
Page 7: Extended Functions
back to top 5.2 Extended functions With the P-switch held up. 1 p-switch enable extended input 2 rewind set/adjust loop in-point; split/double loop 3 forward set/adjust loop end-point; split/double loop 4 channel 1 view time played/time left 5 channel 2 view time played/time left 6 play reverse play 7 cue exit/re-enter loop 8 Touchpad navigate/adjust... -
Page 8: Display Layout
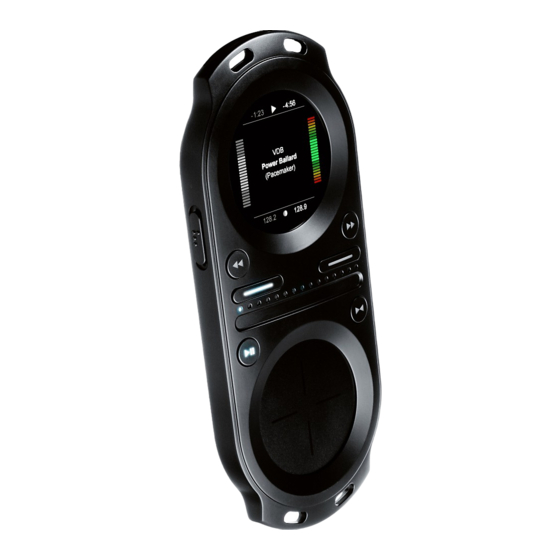
back to top 5.4 Display layout 1 Active channel 2 Channel 1 VU meter 3 Channel 2 VU meter 4 Channel 1 track BPM 5 Channel 2 track BPM 6 Channel 1 track time 7 Channel 2 track time Teddybears 8 Active channel track artist Cardiac Arrest 9 Active channel track title 10 Active channel track pitch - 0.24%... -
Page 9: Getting Started
6 Getting started Turning on To turn on your Pacemaker, press the Settings button. Turning off To turn off your Pacemaker, press the Settings button and select Shutdown from the menu. Alternatively, press Settings for more than four seconds. -
Page 10: Controlling The Two Channels
back to top 7 controlling the two channels controlling the two independent channels To activate and control a channel, press the appropriate Channel button. • The selected channel is activated and information about it is displayed in white on the display, whereas information about the passive channel is displayed in grey. • Any input will affect the active channel only. (Adjustments on the Crossfader will affect the audio output blend between both channels.) • To control the other channel, simply press the Channel button to activate it. Teddybears Cardiac Arrest - 0.24% 3:35 3:35... -
Page 11: Audio Effects And Manipulations
back to top 8 navigation and track selection select and play a track 1. Double-tap the centre of the Touchpad to access the track list. 2. Stroke the Touchpad vertically to move the cursor up and down the list. 3. Press Play to load and start playback of the selected track. Double-tap menu Filter library Select track... -
Page 12: Mix Functionality
back to top 9 mix functionality 9.1 Set cue point set the cue point 1. With a track playing on the active channel, press Play to DJ-pause the track at its current position • The track is stuttering at its current position • The Play and Cue buttons are blinking • The DJ-pause symbol is displayed at the bottom centre of the display 2. Move the track playback position fast forwards or backwards by pressing and holding Forward or Rewind. • The track is stuttering at its moving position • The Play and Cue buttons are blinking • The Forward or Rewind symbol is displayed at the bottom centre of the display 3. -
Page 13: Adjust Bpm
back to top 9.2 Adjust BPM change pitch With the P-switch held up, slide your finger along the Touchpad rim clockwise or anti-clockwise to increase or decrease the pitch. • The track pitch is changed • The relative pitch change is shown on the display • The BPM value of the track is changed • The current BPM value is shown at top of the display, on the active channel • When you’re happy, release the P-switch bend pitch Rotate along the Touchpad rim clockwise or anti-clockwise to temporarily accele- rate or decelerate the track speed. • The track pitch is temporarily changed. -
Page 14: Crossfader And Lineout
back to top 9.3 Crossfader and lineout set the lineout to channel 1 Slide your finger on the Crossfader from right to left and position the crossfade indicator at maximum left. • Only channel 1 is heard through the Lineout output set the lineout to channel 2 Slide your finger on the Crossfader from left to right and position the crossfade indicator at maximum right. • Only channel 2 is heard through the Lineout output set the lineout to blend channel 1 with channel 2 Slide your finger on the Crossfader and position the crossfade indicator between the channels. -
Page 15: Headphones Monitoring
back to top 9.4 Headphones monitoring set the headphone monitoring to channel 1 With the P-switch held down, slide your finger on the Crossfader to position the crossfade indicator at maximum left. • Only channel 1 is heard through the Phones output set the headphone monitoring to channel 2 With the P-switch held down, slide your finger on the Crossfader to position the crossfade indicator at maximum right. • Only channel 2 is heard through the Phones output Set the headphone monitoring at a blend between channel 1 and channel 2 With the P-switch held down, slide your finger on the Crossfader to position the crossfade indicator between the channels. -
Page 16: Headphones Volume Control
back to top 9.5 Headphones volume control adjust the volume level of the phones output With the P-switch held down, slide your finger along the Touchpad rim clockwise or anti-clockwise to increase or decrease the volume. Phones volume You can control the volume level of the lineout through the Settings menu. -
Page 17: Adjust Eq And Gain
back to top 9.6 Adjust EQ and gain adjust eq and gain Place your finger in the middle of the Touchpad and slide north, east, south or west, depending on what you want to adjust. When your finger reaches the rim of the touchpad, you can alter the value of the selected audio effect by sliding along the rim in either direction. Treble adjust Mid adjust Bass adjust Gain adjust Adjustments must be performed as one continuous gesture without releasing your finger from the Touchpad. EQ and gain level adjustments only apply to the current track. - Page 18 • The current filter parameter value is displayed. 2. Without releasing your finger from the Touchpad, slide along the rim clockwise or anti-clockwise to increase or decrease the value. 3. When you’re happy, release your finger from the Touchpad. available effects Pacemaker lets you add Roll, Echo and Reverb effects. Effects are adjusted through two parameters; dry / w et and time. The effects are accessed at specific locations on the Touchpad; Reverb at north / t op, Roll at east / r ight and Echo at south / bottom. adjust the time-parameter for an effect 1. With the P-switch held up, slide your finger twice from the centre of the Touchpad to the right to set Roll time, to the bottom to set Echo time, or to the top to set the Reverb time.
-
Page 19: Kill All Effects
back to top FX/filter adjustments only apply to the current track. Loading a new track will reset the FX / filter parameters to their default values. Only one two-parameter effect at the time can be activated. 9.8 Kill all effects instantly deactivate and relaunch effects adjustments 1. Press Kill all to instantly deactivate performed EQ, FX and filter adjustments. -
Page 20: Reverse Play
back to top 9.9 Reverse play reverse playback direction With the P-switch held up, press Play. • The track playback direction is reversed • The Play button is blinking • The Reverse symbol is displayed at the bottom centre of the display return to normal forward playback direction With the P-switch held up, press Play. • The track playback direction is returned to normal forward playback direction • The Play button is lit • The Play symbol is displayed at the bottom centre of the display Reverse play... -
Page 21: Set Loop
back to top 9.10 Set loop set loop in-point 1. With the P-switch held up, press Rewind to set the loop in-point. • The Rewind ( loop in-point ) button is lit, while the Forward ( loop end-point ) button is blinking • The Loop symbol is blinking at the bottom centre of the display set loop end-point 2. With the P-switch still held up, press Forward to set the loop end-point. 3. Release the P-switch. • The loop is now set and the track segment loops between the set in-point and end-point. • The Cue, Forward and Rewind buttons are blinking • The Loop symbol is displayed at the bottom centre of the display exit loop 4. With the P-switch held up, press Cue. • The track will assume normal playback from the previously set loop end-point • The Cue button is blinking • The Play symbol is displayed at the bottom centre of the display... -
Page 22: Adjust Loop
back to top 9.11 Adjust loop adjust the in-point of an activated loop 1. With the P-switch held up, press Rewind ( loop in-point ) . • The Forward button is lit, while the Rewind button is blinking 2. Keep the P-switch held up and search along the Touchpad rim clockwise or anti-clockwise to move the in-point forward or backward. 3. When you’re happy, release the P-switch. -
Page 23: Split/Double Loop
back to top 9.12 Split/double loop shorten a loop by splitting the distance from the in-point to the end-point 1. With the P-switch held up, press and hold Forward ( loop end-point ) . 2. Keep the P-switch held up and Forward pressed, while pressing and releasing Rewind to move the end-point halfway towards the in-point. 3. Repeat pressing and releasing Rewind for further splitting of the loop. 4. When you’re happy, release the Forward button or the P-switch. -
Page 24: Basic Mixing
back to top 10 basic mixing prepare a track on channel 1 With lineout and Phones connected 1. Activate Channel 1 2. Place the crossfade indicator at maximum left 3. Select Track ‘X’ from the track list 4. Press Play to start playing Track ‘X’ prepare a track on channel 2 5. Activate Channel 2 6. Set the phones crossfade indicator to channel 2 7. Select Track ‘Y’ from the track list 8. Press Cue to load Track ‘Y’ at first beat set cue point of track on channel 2... -
Page 25: Adjust Settings
back to top 11 adjust settings access settings Press and release Settings. adjust master volume This setting lets you adjust the master volume output for lineout. 1. Select Settings > Volume > by stroking right. 2. Adjust the master volume by sliding your finger clockwise or anti-clockwise along the Touchpad rim. switch from mix mode to play mode For playing music without using the full range of functions available in Mix mode. Play mode is more power efficient with up to three times longer operation time. - Page 26 1. Select Settings > Profile > Alerts > Lineout warning > 2. Toggle between Off / On by stroking right View status Select Settings > About > Status > restore pacemaker settings Select Settings > About > Restore all settings > • All preferences and settings are restored to default • Your tracks and mixes will not be effected...
-
Page 27: Charging
12 charging Pacemaker has a built-in battery. A fully charged battery last for about five hours in Mix mode, or about twelve hours in Play mode. If you leave Pacemaker unused for a while, you may need to charge it again. charge via power adapter 1. Connect the Pacemaker power adapter to your device using the jack labelled Power. 2. Plug the adapter into an AC outlet. • Pacemaker is fully operational while charging charge via usb 1. Connect the featured USB cable to your Pacemaker. 2. Connect the other end of the USB cable to your computer. - Page 28 Mix mode charging 2 Mix mode charging 3 ´• When your Pacemaker is connected to a power source and the power / m ode symbol is static white, the battery is fully charged. Battery charged Your Pacemaker will charge at different rates depending on the type of USB port you connect to. For optimal charging time, use the Pacemaker power adapter.
-
Page 29: Pacemaker Device With Editor
• Creating new mixes, as a stand-alone application install computer software 1. Connect Pacemaker to your computer via the featured USB cable. 2. Wait for Pacemaker to be connected. 3. Use Mac OS X Finder or Windows Explorer on your computer to navigate to the Pacemaker hard-drive. 4. Double-click it and find the Pacemaker Editor installation file for your operating system. 5. Double-click the Editor installation file and follow the instructions to install. software upgrades If you’re connected to the Internet while running Pacemaker Editor, you will auto- matically be offered available upgrades for the Pacemaker device and Editor. You can also manually check for latest upgrades of the Editor on www.pacemaker.net... - Page 30 137.0 03:25 Transfer tracks from the editor to your pacemaker 1. Select the tracks that you want to transfer from the Editor to your Pacemaker. 2. Drag and drop the selected tracks from the Editor to the Pacemaker track library.
-
Page 31: Support
Mind your ears! Using your headphones at a high volume may damage your hearing permanently. Adjust the volume of your Pacemaker to a safe level to avoid this from happening. If you experience ringing in your ears, lower the volume or stop using your Pacemaker. - Page 32 Use your Pacemaker in a place where the temperature is always between 0° to 35° C ( 32° to 95° F ) . Store your Pacemaker in a place where the temperature is always between -20° and 45° C ( -4° and 113° F ) . keep foreign matter out of your pacemaker Never use your Pacemaker or the power adapter nearby liquids, such as drinks, bathtubs, shower stalls, etc. If liquid gets into the device, it could cause a break-...
-
Page 33: The Fcc Compliance Statement
back to top 15.1 The FCC compliance statement This device has been tested and found to comply with the limits for a Class B digital device, pursuant to Part 15 of the FCC rules. These limits are designed to provide reasonable protection against harmful interference in a residential installation. This equipment generates, uses, and can radiate radio frequency energy and, if not installed and used in accordance with the instructions, may cause harmful interference to radio communications. However, there is no guarantee that inter- ference will not occur in a particular installation. If this equipment does cause harmful interference to radio or television reception, which can be determined by turning the equipment off and on, the user is encouraged to try to correct the interference by one or more of the following measures:... - Page 34 © 2007 Tonium AB. All rights reserved – all wrongs reserved. Pacemaker and the Pacemaker logotype are registered trademarks of Tonium AB registered in Sweden and other countries. Mac is a trademark of Apple Computer, Inc. registered in the US and other countries. Windows is a registered trademark of Microsoft Corporation in the US and other countries. All other product and company names are trademarks or registered trademarks of their respective owners ( men du är ändå alltid bäst ) .
Need help?
Do you have a question about the Pacemaker and is the answer not in the manual?
Questions and answers