Table of Contents
Advertisement
Advertisement
Table of Contents

Related Manuals for Sonoro Eklipse


Summary of Contents for Sonoro Eklipse
- Page 1 Instruction Manual...
- Page 2 GmbH & Co. KG Unter Goldschmied 6 50667 Köln Germany fon +49 221 - 16 79 29 - 0 fax +49 221 - 16 79 29 - 290 info@sonoro-audio.com www.sonoro-audio.com 12/08 The manufacturer continuously works on the further development of all types and models.
-
Page 3: Table Of Contents
Contents ....................... 5 Introduction ..................... 6 Safety Instructions ................. 6 Symbols in this Operating Manual ....................... 6 Intended Use ..........6 Children and Persons with Limited Cognitive Abilities ....................... 7 Power Supply ......................7 Batteries ........................8 Laser ......................8 Transport .................. - Page 4 Contents ......................33 Radio Playback ....................34 10.1 Search Station ..................... 34 10.2 Preset Station ..................35 10.3 Retrieve Preset Station ......................36 CD Playback ......................38 iPod Playback ......................40 AUX Playback ...................... 41 Trouble Shooting ......................43 Technical Data ........................
-
Page 5: Introduction
1. Introduction Congratulations on purchasing a sonoro eklipse. This operating manual provides you with all information concerning the correct and safe operation of the device. • Please read this operating manual in its entirety before using the device. • Keep these instructions at a safe place. -
Page 6: Safety Instructions
2. Safety Instructions 2.1 Symbols in this Operating Manual Important information relative to your safety is especially marked. It is imperative that you adhere to this information to avoid accidents and damage to the device: RISK! Warning concerning risks to your health and indication of potential risk of injury. -
Page 7: Power Supply
2.4 Power Supply The device is powered by electricity; therefore there is always a risk of an electric shock. For this reason, especially adhere of the following instructions: • Never touch the power plug with wet hands. • If you want to pull the plug from the power outlet, always pull directly on the plug. Never pull on the cable, it may rip. -
Page 8: Laser
2.6 Laser This device has been classified as a class 1 laser device. Laser beams can damage the eyes. Therefore, please adhere to the following: • Do not attempt to disassemble the device. • Risk prevention: Maintenance and repair work must only be performed through the manufacturer or the manufacturer‘s respective customer service. 2.7 Transport • To avoid damage to the inserted medium, please remove it from the device prior to trans- port/shipping. -
Page 9: Operation
2.9 Operation • Never insert any objects into the CD slot of the device other than the approved CDs. Special formats, mini CDs etc. will cause damage to your device. • Never place any other than the approved iPod types into the iPod docking station. 2.10 Use of Headsets •... -
Page 10: Disposal
2.13 Disposal Devices that are marked with the symbol on the left may not be disposed of with the regular household trash, but must be dropped off at a recycling center for electric and electronic devices. Batteries/ rechargeable batteries may contain toxic heavy metals and are subject to special refuse treatment. -
Page 11: Scope Of Delivery
3. Scope of Delivery Numerous accessories are necessary to receive the radio frequencies or to connect additional devices. They are part of the packet of the sonoro eklipse. • sonoro eklipse (with bag) • Remote control • Power supply unit with universal adapter •... -
Page 12: Supported Formats
4. Supported Formats Supported CD formats: • Compact Disc Digital Audio CD-DA, CD-R*, CD-RW* (* Playback depends on the CD quality and recording quality) Supported audio formats: • CD-DA, MP3, WMA Compatible iPod types with required operating manual: iPod model Adapter T2/ A Adapter T2/ B iPod adapter from... -
Page 13: Unpack Device And Start Operation
5. Unpack Device and Start Operation You may only use connecting cables and external devices that comply with this device in regard to electromagnetic compatibility and insulation quality. This device fulfills all relevant standards and guidelines in conjunction with US and European regulation. In the event of a device change that has not been coordinated with the manufacturer, the compliance with the standards and guidelines is no longer guaranteed. -
Page 14: Establish Power Supply
– Do not try to recharge standard batteries. This may present an explosion hazard. Do not try to open or short-out the batteries/ rechargeable batteries. - Leaking liquid in conjunction with an incorrect use of the batteries may cause skin irritations. In the event of contact with the liquid, wash it off with plenty of water. -
Page 15: Connect Antenna
5.4 Connect Antenna The sonoro eklipse has an internal antenna to receive the radio signal in the FM frequency range. If the reception is not sufficient at the set-up location or if you would like to receive additional FM or AM stations, attach the FM or AM antenna that came with the packet or hook up a respective home antenna. -
Page 16: Prepare Ipod Docking Station
5.6 Prepare iPod Docking Station Two universal dock adapters are included in the packet to ensure the secure positioning of your iPod in the docking station. Refer to the table on page 12 to find out which dock adap- ter is to be used. WARNING! Physical damage through improper operation! Pointy or sharp edged objects may damage the PIN connector. –... -
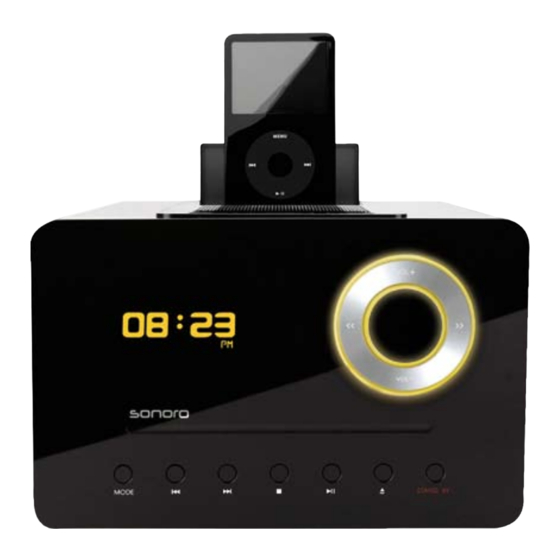
Page 17: Controls And Connectors
6. Controls and Connectors The controls of the sonoro eklipse facilitate fast and easy access to all functions. The operating functions are also accessible via the remote control unit. eklipse front: OLED display Shows the current time when the device is turned off, provides information about the active mode when the device is turned on. - Page 18 Plug in iPod with suitable dock adapter (refer to compatible iPod types on page 12). Open cover by briefly pressing it down. Loudspeaker Loudspeaker opening. Open Dimmer menu to set the display and wheel lighting. SLEEP Press briefly: Turn on/off automatic turn-off (Sleep Timer). Press and hold: Open Sleep Timer menu to set the time after which the device is supposed to turn off automatically.
- Page 19 Connection for theft protection. Power supply connection 12 V port for the power supply unit that came with the packet. LINE OUT Port of the eklipse for external audio devices. AUX IN Port for external audio devices. Headset Port for a headset.
-
Page 20: Remote Control
Remote control: << (Previous) FM/AM: Search for stations in lower frequency range. CD/iPod: Previous/Rewind. Menu selection: Switch to the next higher menu, exit Setup Menu. VOL+ All playback modes: Increase volume Menu selection (Setup Menu and iPod): Switch to previous menu setting (up). - Page 21 FM/AM: Program button for radio station 5. 6/MENU FM/AM: Program button for radio station 6. iPod: Open menu selection or switch to next higher menu. Battery compartment on the back 3/Previous/Rewind FM/AM: Program button for radio station 3. CD/iPod: Press briefly: Play previous title. CD/iPod: Press and hold: Rewind within title. 4/Next/Fast-forward FM/AM: Program button for radio station 4.
-
Page 22: Set Basic Functions
First of all, turn on the device to access the Setup Menu with all functions. 1. Press and hold the Menu button of the eklipse or the remote control until the Setup Menu appears. In the Setup Menu, the display shows the following information: The arrow points to additional settings in the list. -
Page 23: Set The Brightness Of Display And Click Wheel
The life expectancy of an OLED display diminishes with an increase of bright- ness. It is therefore recommended to set the brightness to low or medium. 1. Press and hold the Menu button of the eklipse or the remote control until the Setup Menu appears, and select the Dimmer menu item. -
Page 24: Set Time Format
The time and the display can be indicated in the 12-hour format or 24-hour format. This function is also available in the standby mode of the device. 1. Press and hold the Menu button of the eklipse or the remote control until the Setup Menu appears. -
Page 25: Set The Sound
7.5 Set the Sound The sound of the audio playback can be adjusted via the Bass and Treble setting 1. Press and hold the Menu button of the eklipse or the remote control until the Setup Menu appears. 2. Open the Audio menu item. -
Page 26: Reset Device To Factory Setting
If necessary you can reset all implemented settings, such as language and time formats and stored stations to the factory settings. 1. Press and hold the Menu button of the eklipse or the remote control until the Setup Menu appears. -
Page 27: Alarm Function
8. Alarm Function With the sonoro eklipse you can set your alarm to play the radio, your favorite CD or your iPod. All settings are activated via the Set Alarm function which can be activated directly via the ALARM button on the top of the device. Alternatively, you can also select the Set Alarm function in the Setup Menu. -
Page 28: Alarm Signal Via Radio, Cd Or Ipod
8.2 Alarm signal via Radio, CD or iPod 1. Press and hold the ALARM button on the top of the device. 2. Select the Source menu item and press the Menu button. 3. Selected the desired medium to sound the alarm. Press the Vol+ or Vol-button to choose a FM preset from your memory settings, that will start when the alarm goes off. -
Page 29: Set Alarm Volume
8.3 Set Alarm Volume 1. Press and hold the ALARM button on the top of the device. 2. Select the Volume menu item and press the Menu button. 3. Press the VOL+ or VOL- button to turn the volume up or down. NOTE! The audio playback always starts with the minimal volume and slowly increases to the set volume. -
Page 30: Turn Off Alarm Function After Alarm Goes Off
8.5 Turn Off Alarm Function After Alarm Goes Off • To turn off the alarm, press the ALARM, MENU or STAND-BY button. The alarm stays activated for the next day. • To activate the repeat alarm function (Snooze), press the SNOOZE button. The remaining time until the alarm sounds again will be indicated on the display. After the set time, the alarm will sound again. 8.6 Set Interval for Repeat Alarm Function (Snooze) 1. -
Page 31: General Functions Of The Audio Playback
9. General Functions of the Audio Playback Select the respective mode for the audio playback from the different media such as CD, iPod and radio via the MODE button. The buttons for the title selection, Forward/Rewind, Start, Pause and Stop for CD and iPod function in the same way. - Page 32 (FM-, AM mode) or it is at the position where it left off last (CD, iPod mode). External devices (AUX) are not controlled via the eklipse and therefore always start at the position of the current setting of the device.
-
Page 33: Radio Playback
10. Radio Playback 1. Turn on the device. The device always starts at the radio station that played last. 2. If the device starts in a different mode, e. g. because it was turned off in a different mode e. g. via the Sleep Timer, press the MODE button and select the FM or AM mode. In the Radio mode (FM and AM) the display shows the following information: Mode: FM or AM Saved program position if the station was saved in the program memory. -
Page 34: Search Station
If the reception is still too weak in spite of the external antenna, readjust the antenna or position the device at a different location. 10.2 Preset Station The sonoro eklipse offers ten program memory settings for every frequency band (FM and AM). Preset station via the device 1. -
Page 35: Retrieve Preset Station
Preset station via remote control NOTE! Only the programming positions 1–6 can be preset via the remote control. The program positions 7–10 can only be accessed on the device via the FAVOR button. 1. Set the station that you want to preset. 2. -
Page 36: Cd Playback
11. CD Playback WARNING! Physical damage through improper operation! Do not insert any mini CDs or audio carriers into the CD player that differ from the standard CD formats. Those may potentially not play properly and may not be ejected again. Only insert one CD at the time into the CD player. - Page 37 Adjust CD Playback To play back the titles on the CD you can select different play sequences. 1. Press and hold the Menu button of the eklipse or the remote control until the Setup Menu appears. 2. Open the SET CD menu item.
-
Page 38: Ipod Playback
The display shows the iPod symbol. The iPod is being recharged at the same time. You can operate the iPod via the buttons of the device or via the remote control. In this case, the buttons correspond with the following iPod buttons: Function iPod eklipse Remote control Open Menu Selec- Menu Stop... - Page 39 NOTE! If the Menu Selection is open on the iPod the Vol+ und Vol- buttons serve as navigation buttons. If the iPod menu is not active, they function as volume controls. • Turn off the iPod or end the iPod playback function. NOTE! The iPod playback is stopped during the switch into a different mode. When you switch back to the iPod mode the playback can be continued at the position that was played last by pressing the Start/Pause button.
-
Page 40: Aux Playback
1. Turn on the sonoro eklipse, press the MODE button and select the AUX mode. 2. Turn on the external device and start the playback on the external device. -
Page 41: Trouble Shooting
14. Trouble Shooting All electronic devices may experience malfunctions. This does not necessarily involve a defect on the device. Please check the following table to see if you can solve the problem yourself. Malfunction Possible cause Trouble shooting Device does not Power supply plug is not Connect the power supply unit properly turn on immedi-... - Page 42 Malfunction Possible cause Trouble shooting Poor AM recepti- AM antenna not connected Connect the AM antenna (refer to on quality chapter „Connect Antenna“ on page 15). AM antenna is not adjusted Change the position of the AM antenna. properly. Remote control Distance is too far Reduce the distance between the does not work or...
-
Page 43: Technical Data
15. Technical Data Device name sonoro eklipse AU-3000 and AU-3001 Measurements (width) approx. 6.3'' x 9.3'' x 5.5'' / 210 mm x 235 mm x 140 mm Weight approx. 7.3 lb / 3,3 kg Weight including packaging approx. 9.9 lb / 4,5 kg... - Page 44 Declaration of Conformity Manufacturer: sonoro-audio GmbH & Co. KG We herewith declares that the sonoro eklipse is in conformity with the EMC directive 2004/108/EC, the LVD directive 2006/95/EC and R&TTE directive 1999/5/EC; with respect to its conception and style of construction as well as its performance as issued by us.
-
Page 45: Warranty
16. Warranty The following applies to the filing of warranty claims - without thereby limiting your legal rights: • Warranty claims may only be asserted within a time period of no more than two years starting with the date of purchase. • Within the warranty period we will rectify all defects that are based on material or manu- facturing defects at our discretion either through repair or a replacement of the device. • Please contact your authorized dealer or send the defective device together with the warranty card and the proof of purchase to the service address. The repair or replacement of the device will not start a new warranty period.
Need help?
Do you have a question about the Eklipse and is the answer not in the manual?
Questions and answers