Advertisement
Quick Links
Antes de utilizar su nuevo producto Steren,
lea este instructivo para evitar
cualquier mal funcionamiento.
I M P O R T A N T E / I M P O R T A N T
La información que se muestra en este manual sirve únicamente como referencia
sobre el producto. Debido a actualizaciones pueden existir diferencias. Por favor,
consulte nuestra página web (www.steren.com) para obtener la versión más
reciente del instructivo.
The instructions of this manual are for reference about the product. There may
be differences due to updates. Please check our website (www.steren.com) to
obtain the latest version of the instruction manual.
P R E C A U C I O N E S / C A U T I O N S
• No intente abrir el control remoto, puede
ocasionar un mal funcionamiento y anular la
garantía.
• Siempre utilice un paño suave y seco para
limpiarlo.
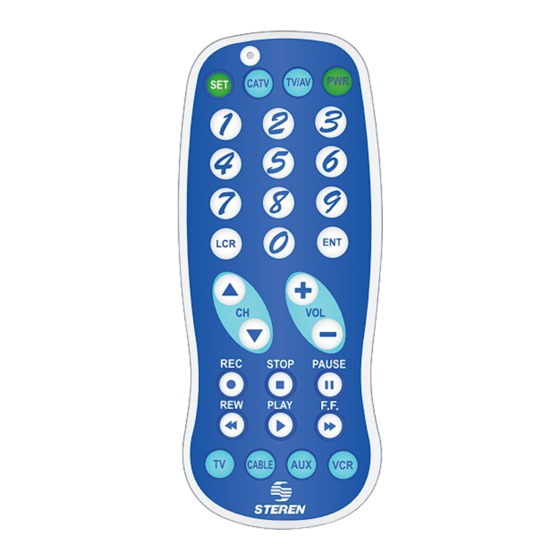
C A R A C T E R Í S T I C A S / H I G H L I G H T S
El RM-4 le permite manejar hasta cuatro
equipos distintos (TV, CABLE, AUX o VCR).
I N S T R U C C I O N E S / I N S T R U C T I O N S
- Gire la tapa del compartimento de baterías
en sentido contrario a las manecillas del reloj,
e inserte la batería de 3 V tipo botón (incluida).
Tenga cuidado de volver a colocar el sello
en su lugar.
Vuelva a colocar la tapa y gírela en sentido
contrario para fijarla.
- Cuando reemplace la batería, evite que el
control pase más de 5 minutos sin ésta.
Después de este tiempo se borrará la memoria
del control, y tendrá que programarlo de nuevo.
B Ú S Q U E D A A U T O M Á T I C A / A U T O M A T I C S E A R C H
1. Encienda el aparato que desea programar.
2. Presione SET. Sin dejar de oprimirlo,
presione el botón correspondiente al equipo
que desea vincular (TV, CABLE, AUX o VCR).
El LED indicador se encenderá.
3. Suelte ambos botones y vuelva a presionar
SET.
El LED comenzará a parpadear, para indicar
que el modo de búsqueda está activado.
4. Presione PWR repetidamente (consulte la
tabla de abajo para saber el máximo de veces
que podrá presionar este botón). Cuando el
equipo se apague, deje de oprimirlo.
Equipo / Device
•
TV
•
VCR
•
SAT/CBL
•
AUX
5. Presione de nuevo el botón correspondiente
al equipo que está programando (TV, CABLE,
AUX o VCR).
El control remoto guardará el código del equipo y
saldrá del modo de búsqueda.
6.
Oprima
PWR.
Si
el
equipo
enciende,
pruebe
otras
funciones
control para comprobar que se programó
correctamente.
En caso contrario, repita el proceso desde el
principio.
Evite que pasen más de 30 segundos
entre cada paso. Después de este tiempo el
control saldrá del modo de búsqueda, por lo
que tendrá que repetir el proceso desde el
paso 2.
El control puede requerir varios intentos para
programarse correctamente. Por favor, sea
paciente.
Before using your new Steren´s
product, please read this instruction
manual to prevent any damage.
• Do not attempt to open the remote, it may
cause a malfunction and void the warranty.
• Always use a soft, dry cloth to clean it.
RM-4 allows you to manage up to four different
devices (TV, CABLE, VCR or AUX).
- Turn the lid of the battery compartment
clockwise, and insert the 3 V button type
battery (included).
Take care to replace the seal.
Replace the cap and turn counterclockwise to
lock it.
- When replacing the battery, avoid take more
than 5 minutes. After this time the control's
memory will be erased, and you will need to
set it again.
1. Turn on the device to be programmed.
2. Press SET. While holding it down, press the
button corresponding to the device that you
want to link (TV, CABLE, VCR or AUX). The
LED indicator will light.
3. Release both buttons and press SET again.
The LED will begin to flash, indicating that the
search mode is activated.
4. Press PWR repeatedly (see the table below
for the maximum of times that you can press
this button). When the device is off, release
the button.
Total de códigos / Máximo de presiones
Code total / maximum presses
254
156
189
141
5. Press the button corresponding to the
device that is being programmed again (TV,
CABLE, VCR or AUX). The remote control
will store the device code and will exit search
se
mode.
del
6. Press PWR. If the device turn on, try
other control functions to verify that you
programmed the control correctly. Otherwise,
repeat the process from the beginning.
Do not take more than 30 seconds between
each step. After this time the control will exit
search mode, so you will have to repeat the
process from step 2.
The control may require several attempts to be
set correctly. Please be patient.
P R O G R A M A C I Ó N M A N U A L / M A N U A L P R O G R A M M I N G
1. Presione SET. Sin dejar de oprimir, presione
el botón correspondiente al equipo que desea
vincular (TV, CABLE, AUX o VCR). El LED
indicador se encenderá.
2. Ingrese el código correspondiente a la marca
de su equipo (consulte la lista anexa). El LED
se apagará.
3.
Presione
PWR.
Si
el
equipo
enciende,
pruebe
otras
funciones
control para comprobar que se programó
correctamente. En caso contrario, repita el
proceso desde el principio y pruebe con otro
código.
Evite que pasen más de 10 segundos
entre cada paso. Después de este tiempo el
control saldrá del modo de búsqueda, por lo
que tendrá que repetir el proceso desde el
paso 1.
Su equipo puede encender con varios códigos,
pero sólo uno permitirá controlar todas sus
funciones.
Pruebe
hasta
encontrar
adecuado. Si lo prefiere, utilice la Búsqueda
automática.
C Ó D I G O D E U N A P A R A T O P R O G R A M A D O / C O D E O F A P R O G R A M M E D D E V I C E
1. Presione la tecla correspondiente al equipo
programado (TV, CABLE, AUX o VCR).
2. Mantenga presionado SET y luego 1.
El número de veces que parpadee el LED
indicador será el primer número del código. (Si
no parpadea, el primer dígito será 0).
3. Repita el paso anterior presionando SET
y después 2 y 3, respectivamente, para
saber el resto del código. Todos los códigos se
componen de tres dígitos.
P R O B L E M A S Y S O L U C I O N E S / T R O U B L E S H O O T I N G
PROBLEMA / TROUBLE
•
Mi equipo no aparece en la lista de
códigos / My device does not appear in
the code list
•
El control remoto no controla los
equipos
The remote control does not control the
device
•
El LED indicador no enciende
The LED indicator does not light
E S P E C I F I C A C I O N E S / S P E C I F I C A T I O N S
Alimentación: 3 V
(1 pila tipo botón)
Dimensiones: 5 x 12,5 x 1 cm
Resistente al agua
El diseño del producto y las especificaciones pueden variar sin previo aviso.
Product design and specifications are subject to change without notice.
Producto: Control remoto universal multifuncional
Modelo: RM-4
Marca: Steren
Esta póliza garantiza el producto por el término de un año en todas sus partes y mano de obra, contra cualquier defecto de fabricación y
funcionamiento, a partir de la fecha de entrega.
1.- Para hacer efectiva la garantía, presente esta póliza y el producto, en donde fue adquirido o en Electrónica Steren S.A. de C.V.
2.- Electrónica Steren S.A de C.V. se compromete a reparar el producto en caso de estar defectuoso sin ningún cargo al consumidor. Los gastos de
transportación serán cubiertos por el proveedor.
3.- El tiempo de reparación en ningún caso será mayor a 30 días,contados a partir de la recepción del producto en cualquiera de los sitios donde
pueda hacerse efectiva la garantía.
4.- El lugar donde puede adquirir partes, componentes, consumibles y accesorios, así como hacer válida esta garantía es en cualquiera de las
direcciones mencionadas posteriormente.
ESTA PÓLIZA NO SE HARÁ EFECTIVA EN LOS SIGUIENTES CASOS:
1.- Cuando el producto ha sido utilizado en condiciones distintas a las normales.
2.- Cuando el producto no ha sido operado de acuerdo con el instructivo de uso.
3.- Cuando el producto ha sido alterado o reparado por personal no autorizado por Electrónica Steren S.A. de C.V.
El consumidor podrá solicitar que se haga efectiva la garantía ante la propia casa comercial donde adquirió el producto. Si la presente garantía se
extraviara, el consumidor puede recurrir a su proveedor para que le expida otra póliza, previa presentación de la nota de compra o factura respectiva.
DATOS DEL DISTRIBUIDOR
Nombre del Distribuidor _________________________________________
Domicilio _____________________________________________________
Producto _____________________________________________________
Marca _______________________________________________________
Modelo ______________________________________________________
Número de serie _______________________________________________
Fecha de entrega ______________________________________________
ELECTRÓNICA STEREN S.A. DE C.V.
Camarones 112, Obrero Popular, 02840, Del. Azcapotzalco, México, D.F. RFC: EST850628-K51
STEREN PRODUCTO EMPACADO S.A. DE C.V.
Biólogo Maximino Martínez No. 3408 Int. 2, 3 y 4, San Salvador Xochimanca,
Del. Azcapotzalco, México, D.F. 02870, RFC: SPE941215H43
ELECTRÓNICA STEREN DEL CENTRO, S.A. DE C.V.
Rep. del Salvador 20 A y B, Centro, 06000, Del. Cuauhtémoc, México. D.F. RFC: ESC9610259N4
ELECTRÓNICA STEREN DE GUADALAJARA, S.A.
López Cotilla No. 51, Centro, 44100, Guadalajara, Jal. RFC: ESG810511HT6
ELECTRÓNICA STEREN DE MONTERREY, S.A.
Colón 130 Pte., Centro, 64000, Monterrey, N.L. RFC: ESM830202MF8
ELECTRÓNICA STEREN DE TIJUANA, S.A. de C.V.
Calle 2a, Juárez 7636, Centro, 22000, Tijuana, B.C.N. RFC: EST980909NU5
Product: Universal remote control
Part number: RM-4
Brand: Steren
This Steren product is warranted under normal usage against defects in workmanship and materials to the original purchaser for one year from
the date of purchase.
1. This warranty card with all the required information, invoice or purchase ticket, product box or package, and product, must be presented when
warranty service is required.
2. If the product is in the warranty time, the company will repair it free of charge.
3. The repairing time will not exceed 30 natural days, from the day the claim was received.
4. Steren sell parts, components, consumables and accessories to customer, as well as warranty service, at any of the addresses mentioned later.
THIS WARRANTY IS VOID IN THE NEXT CASES:
If the product has been damaged by an accident, acts of God, mishandling, leaky batteries, failure to follow enclosed instructions, improper repair by
unauthorized personnel, improper safe keeping, among others.
a) The consumer can also claim the warranty service in the purchase establishment.
b) If you lose the warranty card, we can reissue it, if you show the invoice or purchase ticket.
In case your product fails or have questions, please contact your nearest dealer. If you are in Mexico, please call to our Call Center.
1. Press SET. While still pressing, press the
button corresponding to the device that you
want to link (TV, CABLE, VCR or AUX). The
LED indicator will light.
2. Enter the code corresponding to the brand
of your device (see attached list). The LED will
se
turn off.
del
3. Press PWR. If the device turns on, try other
control functions to verify that you programmed
the control correctly. Otherwise, repeat the
process from the beginning and try another
code.
Do not take more than 10 seconds between
each step. After this time the control will exit
search mode, so you will have to repeat the
process from step 1.
Your device may turn on with several codes,
but only one allows to control all its functions.
el
Try to find the right one. If you prefer, use the
automatic search.
1. Press the key corresponding to the
programmed equipment (TV, CABLE, VCR or
AUX).
2. Press and hold SET, then 1. The number of
times that the LED indicator flashes will be the
first number of the code. (If it does not flash,
the first digit is "0").
3. Repeat the previous step by pressing after
SET 2 and 3, respectively, to know the rest of
the code. All the codes are composed of three
digits.
SOLUCIÓN / SOLUTION
•
Utilice la búsqueda automática / Use the automatic search
•
Asegúrese de haber presionado la tecla correspondiente al
equipo que intenta controlar (TV, CABLE, AUX o VCR). / Make sure
you press the key corresponding to the device that you want to control
(TV, CABLE, VCR or AUX).
•
Pruebe todos los códigos correspondientes a la marca de su
equipo. / Try all the codes for your equipment brand.
•
Utilice la búsqueda automática / Use the automatic search.
•
Revise que la batería tenga carga y que esté colocada correctamente
/ Check that the battery is charged and that it is correctly inserted.
•
Revise que la batería tenga carga y que esté colocada correctamente
/ Check that the battery is charged and that it is correctly inserted.
Input: 3 V
(1 button type battery)
Dimensions: 5 x 12.5 x 1 cm
Water resistant
PÓLIZA DE GARANTÍA
CONDICIONES
En caso de que su producto presente alguna falla, acuda
al centro de distribución más cercano a su domicilio y
en caso de tener alguna duda o pregunta por favor llame
a nuestro Centro de Atención a Clientes, en donde con
gusto le atenderemos en todo lo relacionado con
su producto Steren.
Centro de Atención a Clientes
01 800 500 9000
WARRANTY
CONDITIONS
01 800 500 9000
Advertisement

Related Manuals for Steren RM-4


Summary of Contents for Steren RM-4
- Page 1 1.- Para hacer efectiva la garantía, presente esta póliza y el producto, en donde fue adquirido o en Electrónica Steren S.A. de C.V. El LED comenzará a parpadear, para indicar 2.- Electrónica Steren S.A de C.V. se compromete a reparar el producto en caso de estar defectuoso sin ningún cargo al consumidor. Los gastos de search mode is activated.
-
Page 2: Lista De Códigos / Code List
LISTA DE CÓDIGOS / CODE LIST Goldstar 025,046,047,091 Tatung 013,038,062,113 Sharp Goodmans 037,038,047,119 Teac 038,107,113,120 Sherwood Go Video Shinco Gradiente Technics 006,072 Skymaster Graetz Teknika 038,043,046,047 Sony 124,167,145(PS2) 037,057,065,082 Sylvania 037,060,082,085 Granada 066,072 072,080,107,120 Tatung 100,101,175,195 100,109,113,114 Grandin 038,047,119 Telefunken Teac 127,131,132,162 Grundig...
Need help?
Do you have a question about the RM-4 and is the answer not in the manual?
Questions and answers