Table of Contents
Advertisement
Advertisement
Table of Contents

Related Manuals for Engel EngelDroid


Summary of Contents for Engel EngelDroid
- Page 1 IP Receiver (ANDROID) ENGLISH Screens may differ from final product release...
-
Page 2: Table Of Contents
EngelDroid Home Screen ........ -
Page 3: About The Device
TV. It redefines home entertainment with a whole new level of interactive, intuitive and innovative TV experience. Powered by the latest Android 4.0 platform, With it, Internet live streaming & Video-on-demand, live TV, music, games and more, all instantly on your TV. High Connectivity Streaming Box With exclusive application, EngelDroid has a high connectivity, sharing media files among receiver, smart phone, tablet PC, and computers, using Samba, DLNA, UPnP. 1080P Full HD Video Decoding Support up to Full HD 1080P video decoding. Support online flash video up to 1080P. Support 480i to 1080P output display Web Browsing, Social Networking, Instant Messaging, Movies, and Music Launch favorite online sites onto the big TV screen. Email, chat and interact with... -
Page 4: Package Contents
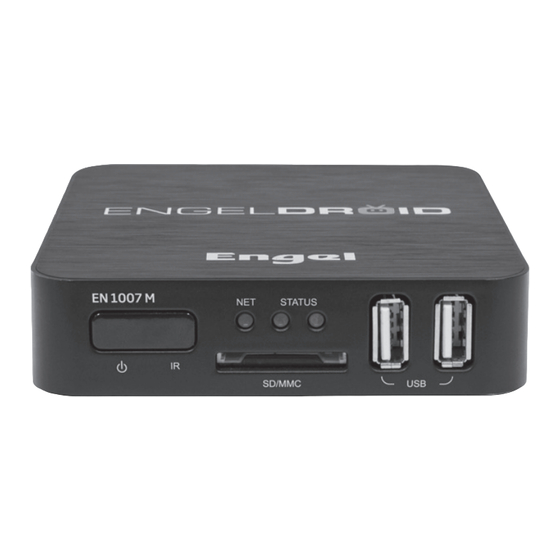
PACKAGE CONTENTS Package contents are listed below. For any missing items, please contact your dealer immediately. Product contents vary for diff erent models. 1. EN1007M receiver 6. Warranty card 2. MOTION remote control 7. Power supply 3. TWIST remote control 8. HDMI cable 4. MOTION USB sensor 9. RCA adapter 5. Quick guide 10. MOTION USB charger QUICK WARRANTY GUIDE CARD DESIGN AND CONNECTION 1. IR sensor and ON/Standby IR sensor and ON/Standby button 2. Networking led indicator Networking led indicator 3. SD/MMC card reader 4. Status indicator (ON/OFF) Status indicator (ON/OFF) 5. Two USB 2.0 inputs 6. Power supply input 7. -
Page 5: Motion Remote
Off No Ethernet connection Network ON - Amber Connected to the network Transmitting/Receiving data LED A- Off Complete initialization LED A- Amber Initializing Network LED B- Blue Connected to AC power supply LED B – Off No power is supplied to the device. Hardware Reset: In the event that your ATV freezes operation, you can press the “pinhole reset” button, located on the back the device, by using a sharp object such as a toothpick. MOTION REMOTE MOTION REMOTE 1. Navigation Key 2. Mute 3. Home 4. -
Page 6: Twist Remote
TWIST REMOTE TV side QWERTY side... - Page 7 0. INDICATOR LED: it lights when any key is pressed. 1. HOME: press to enter the EngelDroid home screen. Press and hold to see openned applications. 2. INPUT: to select the A/V input. 3. TV/RADIO: switch between TV and Radio. 4. POWER ON/OFF: suspend, shutdown, restart. 5. INFO: Android information. 6. MEDIA: no function. 7. PLAY/PAUSE: switch between play and pause playback. 8. STOP: stop program playback. 9. REC: no function. 10. REC LIST: no function. 11. PREV: back to previous media track. 12. NEXT: go to next media track. 13. FAST BACKWARD: searches backwards during media playback. 14. FAST FORWARD: searches backwards during media playback.
-
Page 8: Starting Up
STARTING UP 1. Plug in power adapter, and connect EN1007M receiver with TV through HDMI cable. 2. There are three screens appear while booting, first screen is the EngelDroid logo, second is the robotic logo, third screen is the Android text logo. Installation Wizard The first time you start up your ATV box, the installation wizard will bring you through a few screens to help you set up the principal settings: Language, country, time, etc. ENGELDROID HOME SCREEN After starting up your EngelDroid, will appear this main menu:... - Page 9 Note: If you want to access to Google Play menu (screen below) press “0” key on your remote control while you are on EngelDroid main menu. · The extended Home screen: Slide cursor with remote OK pressing horizontally on the screen or use left/right button, to go to the left or right side of the extended home screen. · Browsing Applications: Choosing on the left of screen to access to all apps. · Add a home screen items: (shortcuts, widgets, etc.), hold pressing your cursor on the screen at an empty location, then choose from the list.
-
Page 10: Main Menu Options
MAIN MENU OPTIONS DESCARGA TV Enjoy the largest audiovisual online contents for free: Television on demand, Movies, Series, Documentary, Sports, Reports, etc. Upgra- deable from MY APPS. MEDIAPLAYER Play High Definition movies, photos and music. Connect a USB me- mory or hard disk on the device USB input. GAMES Game colletion special for TV: adventure, puzzles, action, platforms, etc. Upgradeable from MY APPS. MY APPS Repository of all downloaded applications by the user from TV Mar- ket and the factory pre-installed ones. TV MARKET Special Android applications market for television and compatible with your receiver (available soon). Have general access to the In- ternet via browser / search engine. SETTINGS Place where set up your receiver. Especially useful for connecting to your router via Ethernet or via WiFi. WEATHER Specific application to know your city weather and forecasts. You can set up different locations and other web services offered by Yahoo Weather. You can access to this application from “My Apps”... -
Page 11: Top Notification Bar Icons
TOP NOTIFICATION BAR ICONS Notification icons: drag the top bar downwards to reveal the notification messages (if any) No network cable connected Internet LAN is connected, but Ethernet option has not been selected in setting Ethernet connected successfully Wireless network connected No 3G dongle found 3G dongle connected, but don’t select Mobile network in setting 3G dongle and signal found System Time: Display current system time Home: Go back to main screen. Back: Go back to the last screen. System Volume - System Volume + System Menu/Properties... -
Page 12: Applications Installation
APPLICATIONS INSTALLATION Click App Installer to install applications from SD card, SATA (Hard Driver Disk) or SDA (USB disk). For example, choose “sdcard” to scan applications in SD card. If you want to install all applications at one time, press menu button on the upper right corner to choose select all / unselect all, then press menu button on the upper right corner or press F1 button again to select Install/uninstall for installing. -
Page 13: Video Player
VIDEO PLAYER SD card, USB sda and SATA HDD can be found in video player when you connect them to the box. Choose one of them to playback. Click button to get video information, such as subtitle, resolution, video type and so on. -
Page 14: Browser
BROWSER Visit any website around the world. Read news, view online videos. Press left mouse button on the input window for a while, it will list all input methods you installed. The address (URL) of the current page. Some sites scroll the URL bar off the top of the screen, but you can drag the page down or press Menu to see it again. Set browser type. Set browser type to Andorid, Desktop, iPhone or iPad mode for diff erent web page view. The default is Android mode. This option is useful to improve the user experience. -
Page 15: Settings
SETTINGS Settings provide individual preference setting functions. You use the Settings application to configure how your device looks, sounds, commu- nicates, protects your privacy, and operates in many other ways. Many applications also have their own settings; for details, see the documentation for those applications. 1. Wireless & networks Use Wireless & Network settings to configure and manage connections to networks and devices via Wi-Fi and mobile networks. You also use Wireless & Network settings to configure connections between your phone and virtual private networks (VPNs), to connect your computer to the Internet using your box’s data connection. - Page 16 Wi-Fi settings Enter Wi-Fi settings menu, it will scan ambient Wi-Fi networks automatically. Choose useable Wi-Fi access point. Portable hotspot Go to Portable Wi-Fi hotspot settings to open and configure Wi-Fi hotspot The default Network SSID is AndroidAP of hotspot, it is opened. Choose WPA2 PSK to encrypt also is ok.
-
Page 17: Ethernet Settings
VPN settings Enter VPN setting to add VPN, there are four VPN types. Choose one of them, and click Menu button on the upper right corner or press F1 button on the keyboard to save / cancel settings. 2. Ethernet settings Enable Ethernet setting, it will connect to Ethernet automatically, you also can confi- gure Ethernet device by manual. -
Page 18: Display
3. Display Output mode: There are 480i-1080P options for HDMI and Ypbpr, and there are 480i and 576i for CVBS connection (better 576i). Display position: Adjust the display of the screen, avoid black edging and screen dis- play outside the TV issues. -
Page 19: Applications
Icon size: There are three options. It will remind you to restart the box to confirm your setting once select one of them. 4. Applications Go to Applications, you will see all options as below. Unknown sources It allows you to install non-Market applications. - Page 20 Compatibility Mode Run older apps in compatibility mode. This require rebooting. Manage applications. Manage and remove installed applications. Running Services View and control currently running services. Storage use View storage used by applications...
-
Page 21: Privacy
Development Access into debug mode by Ethernet/Wi-Fi connected. 5. Privacy It includes Back up my data and Automatic restore. Back up my data Back up application data, WI-FI passwords and other setting, to Google servers. Automatic restore If I reinstall an application, restore backed-up settings or other data. -
Page 22: Accounts & Sync
6. Accounts & Sync Back up application data, Wi-Fi passwords, and the other settings got Google servers. 7. Storage Check internal storage device and external device like SD card. -
Page 23: Language & Keyboard
8. Language & Keyboard Select language Press UP/Down buttons to choose language. Keyboard settings: Android keyboard is for 2.4GHZ wireless remote control. Remote controller input me- thod is for IR. -
Page 24: Date & Time
9. Date & Time Set up date and time zone. You also can use internet time as automatic update. 10. About device Shows model number and system version. It includes Legal information, U boot, Reco- very and Kernel version. 11. Add/Change Shortcuts, Widgets, Folders and Wallpapers. Press left mouse button on the home screen for a while to add Shortcuts, Widgets, Folders and Wallpapers. -
Page 25: Upgrade
UPGRADE To update your EngelDroid software press Upgrade icon on Google Play menu (remem- ber: press “0” key on your remote control while you are on EngelDroid main menu to enter into Google Play menu). You will find three different options: “Automatic update”, “Update interval” or “Manual update now”... -
Page 26: Notice
NOTICE Thank you for choosing this Engel product. We hope that you will enjoy using it and that it will give you satisfaction for many years to come. While you’re using EngelDroid product, we recommend that you pay attention to following items: · Do not open, service, or change any component. · Only qualified technical specialists are allowed to service the equipment. · Observe safety precautions to avoid electric shock · Check voltage before connecting to the power supply. Connecting to the wrong vol- tage will damage the equipment.
Need help?
Do you have a question about the EngelDroid and is the answer not in the manual?
Questions and answers