
Summary of Contents for KEC DVD-2
- Page 1 MODEL: DVD-2 / DVD-2T INSTALLATION INFORMATION & OPERATING INSTRUCTIONS THIS PRODUCT IS INTENDED FOR PROFESSI ONAL INSTALLATION ONLY FOR MOBI LE-SPECIFIC 12 VOLT DC-ONLY OPERATION PLEASE READ ALL INSTRUCTI ONS BEFORE USING THIS PRODUCT...
-
Page 2: Impor Tant Infor Mation
IMPORTANT INFORM ATION TO RE DUCE THE RISK O F ELE CTRIC S HO CK, DO NOT REMOVE THE CO VE R (OR BACK). NO US ER-S E RVICEABL E PARTS ARE INSIDE. REFER SERVICI NG TO QUA LI FIED SE RVICE PE RSONNEL. Thi s symbol i ndicates “... -
Page 3: Important Safety Instructions
IMPORTANT SAFETY INSTRUCTIONS CAUTI ON: PLEASE RE A D AND OBSE RVE ALL WARNINGS A ND INS TRUCTIONS IN THI S OWNER’S MANUAL A ND THOSE MA RKE D ON THE UNI T. RETAI N THIS BOOKLET FOR FUTURE RE FE RE NCE. This set has been designed and man ufact ured to assur e per sonal safety. -
Page 4: Important Safety Instructions
IMPORTANT SAFETY INSTRUCTIONS 13. Accessories, Cart s , and Stands Do not pl ace t his pr oduct on an unstable cart, stand, tri pod, bracket, or table. The prod uct may f all, causin g ser ious i njury to a child or adult , and serious da mage t o the product. Use only with a cart, st and, tr ipod, br acket , or t abl e r ecomme nd ed by t he manufact urer, or sold wit h t he pr oduct. -
Page 5: Table Of Contents
ANGLE Button – Viewing Scenes From Dif fering Angles PBC – Playback Control GOTO But ton – Locat ing A Specific Point On The Disc Viewing JPEG Files Reference Specif ications Menu St ructure Troubleshoot ing Guide KEC Mobile Applications Tri-Mode Re mote Controller # RC9799 –5–... -
Page 6: General Information About Discs
GENERAL INFORMATION ABOUT DISCS DVD’s (Digi tal Versati le Discs) can record up to 135 mi nut es’ of video, 8 diff er ent language audio t racks and subti tles in up t o 32 languages. You can enj oy ci nema-like video and cryst al clear sound with MPEG- 2 compressi on technol ogy an d Dol by Di git al surr oun d. -
Page 7: Care & Storage Of Discs
CARE & STORAGE OF DISCS How to handle a disc • Be car eful i n handli ng the disc. A slight flaw might affect t he picture on the scr een. • You can r emove a disc from i ts storage case wi thout di fficult y by pressing the center of the hol der. -
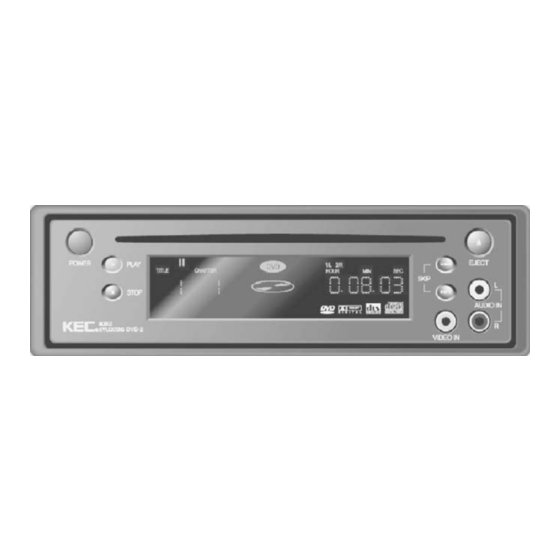
Page 8: Descr Iption Front Panel
DESCRIPTION – FRONT PANEL Turns t he power On/ Of f (When power is Off, AUX Inputs are On) POWER (DVD-2T: Press repeat edly to cycle bet ween Disc Play, TV Tuner & Of f) Disc Slot Discs are inserted and ejected here EJECT Eject s t he disc STOP... -
Page 9: Front Panel Display
DESCRIPTION – FRONT PANEL DISPLAY DVD/SVCD/VCD/CD/PBC/MP3 I ndicates the t ype of the disc in t he player Disc Graphi c Animation indicates t hat a disc in t he player is spinning Play/ Pause I ndicates the current operat ion mode Repeat /All I ndicates the current repeat play mode Chapter/Track... -
Page 10: Rear Panel
MAIN 12V DC I NPUT Connect to source of 12V DC power with the supplied cable Allows remote control of any KEC Mobile Applicat ions video product in R-LI NK I N/ OUT the R-LINK chain even if it is hidden from view. -
Page 11: Important Safety Instructions Regarding The Dc In Jacks
IMPORTANT SAFETY INSTRUCTIONS REGARDING THE DC IN JACKS IMPORTANT NO TI CE TO INSTALLERS: Permanent (hard-wired) DC installations should be perf ormed only by qualified personnel. DC Power for the DVD Players should be wired t hrough the IGNITI ON or ACCESSORY switch ONLY (Power should not be available to the DVD Player when the vehicle is not running for an extended period of time). - Page 12 DESCRIPTION – REMOTE CONTROLLER –12–...
- Page 13 Use to choose play or repeat mode. 9. VOLUME 25. DISPLAY Adjusts the audio output levels of the DVD-2 t o Press the button to display the disc’s elapsed t ime and total playing t ime. equalize its output wit h other program sources in Press again to show addi t ional informat ion the vehicle (VCP, Video Game, et c).
-
Page 14: Remot E Cont Roller Handling Precautions
Speci al Note on R-Li nk Operati on If you are utilizing KEC’s R-LINK Syst em, the remote cont roller may be pointed at t he remot e sensor of any component (LCD, DVD or VCP) connect ed in t he R-LINK chain. -
Page 15: Video Connections To Tv Or Monitor
CONNECTIONS – VIDEO CONNECTIONS TO TV OR MONITOR Connect the audio cables between the AUDI O OUT (L/R) jacks on the back of your DVD player and the corresponding Audio I nput jacks on your TV or Monitor (if t here is only a single Audio Input jack on your TV, connect the audio cable from t he left jack of your DVD player). -
Page 16: Audio Connections
Audio Input jacks on your audio system. • Alternat ely, connect the audio cables from the back of t he DVD-2 t o an external audio processor such as a wireless headphone t ransmitter or an audio receiver or an FM transmitt er. -
Page 17: Antenna Connect Ion (Dvd-2T Only)
CONNECTIONS – ANTENNA CONNECTION (DVD-2T ONLY) Connect a TV antenna or CATV cable to t he 75Ω ant enna jack on t he back of the DVD-2T. Be sure to unplug all connections t o t he power source bef ore making any ot her connections. Setting t he DVD-2T for Ai r or Cable Channel Reception: For regular ant enna use, t he TV Mode should be set to “AIR”... -
Page 18: Before Playing A Disc
BEFORE PLAYING A DISC To play a disc, turn on t he TV or monitor and select the video input source to which the DVD-2 is connected (e.g. VIDEO 1, 2 or 3. ) If the DVD-2 is connected to a separate sound syst em, turn on the audio system and select the audio input to which t he DVD-2 is connected. -
Page 19: Pl Aying A Disc (Dvd/Vcd/Cd)
Pressing the PLAY button will resume playback of t he movie from t he point where you left of f. Last Position Memory will funct ion even if the POWER is t urned off. When power is rest ored, t he DVD-2 will locat e the previous posit ion and begin playback. -
Page 20: Playing An Mp3 Or Wma Audio File
PLAYING AN MP3 OR WMA AUDIO FILE Insert the MP3 or WMA disc. • Make sure that the disc' s label is facing up (recorded side facing down). • Insert the disc int o t he slot. As t he disc is being scanned, “Loading” will be displayed. In approximat ely 25 seconds (longer with more comple x discs), it will be recognized as an MP3 or WMA disc, a directory will be displayed on screen and t he 1 song will aut omatically be played... -
Page 21: Dvd-2 Setup Menus General Information
DVD-2 SETU P MENU – GENERAL INFORMATION The DVD-2 SETUP menus allow you to set t he def ault (or initial) condit ions for the DVD Player. Many of these initial settings can be overridden f or each disc t hat you view via the selection menus provided on each individual DVD dis c. -
Page 22: Language Setup Menu
The Language Menu let s you select t he audio soundt rack language as well as the language shown in subtitles, on-screen displays (OSD) and DVD dis c menus. You may also use t his menu to reset all of the DVD-2 Setup Menus to the manuf acturer's initial (default ) sett ings. -
Page 23: Video Setup Menu
This unit is preset t o NTSC at t he fact ory. Do not change this setting unless you will be using the DVD-2 in a country t hat uses the PAL Syst em. An incorrect setting will result in a very poor black &... -
Page 24: Audio Setup Menu
MP3/WMA: Select PCM or Of f. CD/VCD: Select Raw, Of f or PCM. Note: The Volume + / – butt ons on the DVD-2 remote control do not aff ect t he level of t he Digital Audio Out put. –24–... -
Page 25: Parent Al Control Password & Rat Ing Set Up Menu
The DVD-2 is equipped with a password feature. It is designed to prevent children from changing the rating level set by t heir parents. Follow the 2 steps below to set t he Rat ing Level & Password: Step 1: Selecting Rating Level (DVD Only) Press SETUP t o call up the Setup menu. -
Page 26: Advanced Operation & Special Featur Es
ENTER butt on to select it . The MODE Button – Shuffle & Repeat Play The DVD-2 can randoml y or selectively repeat Chapters or Titles on t he disc. Press the MODE butt on during disc playback to display the Play Mode menu. -
Page 27: A-B But Ton - Repeating A Select Ed Section
”Off ” will appear on the screen and normal playback will resume. NOTES • Repeat Play only works with disc s f or which the elapsed time appears on the DVD-2 display window. • Repeat Play may not work correctly with some specially programmed discs. -
Page 28: Goto But Ton - Locat Ing A Specific Point On The Disc
The GOTO Butt on – Locating A Specific Point On The Disc The DVD-2 can be directed t o locat e the desired screen or select ion by elapsed time, tit le, chapt er or track. To locat e a specific point by elapsed t ime: Press the GOTO butt on. -
Page 29: Reference
REFERENCE SPECIFICATIONS Model : DVD-2 & DVD-2T Power Requirement s DC 12V 2A Power Consu mpt ion General Weight 2. 93 lb (1.33Kg) Dimen sions (W×D×H) 6. 89” × 7” × 1.97” (175 × 178 × 50 mm) Operating Temperature / Humidit y 30º... -
Page 30: Troubleshooting Guide
Is DVD Player or TV/Monitor set t o NTSC wit h PAL disc? No sound or poor quality sound. Is audio output level set to zero (refer to Item #9 on DVD-2 Remot e Cont roller diagram)? Are audio cables correctly and securely conne cted? -
Page 31: Kec Mobile Applications Tri-Mode Remote Controller # Rc9799
Connect an R-Link cable f rom the DVD-2’s R-Link Output to the R-Link jack on the rear panel of the KEC VCP. All KEC component s may now be remot e controlled by point ing any of t he KEC remote cont rollers at the remot e sensor on any of the KEC components. - Page 32 For additional information or for the locati on of an authori zed service center, pl ease contact KEC Mobile Appli cations / KTV USA, Inc. at (800) 524-1216 or (973) 470-9191 KTV USA, Inc. • 1 Madison Str eet • East Rutherford, NJ 07071 • 800 524- 1216 / 973 470- 9191...
Need help?
Do you have a question about the DVD-2 and is the answer not in the manual?
Questions and answers