Table of Contents
Advertisement
Advertisement
Table of Contents

Related Manuals for MaxTronic Orion 410ST

Summary of Contents for MaxTronic Orion 410ST
- Page 1 MaxTronic Orion 410ST RAID Enabled NAS System User Manual...
-
Page 3: Table Of Contents
Limited Warranty ....................iv EMC Certificate ......................iv 1 Introducing Orion 410ST Product Features ....................... 1 Package List ....................... 1 Components of the Orion 410ST ................2 Front View ....................... 2 Back View........................ 2 Important Notice ...................... 3 2 Getting Started Hardware Installation ....................5 Power Connection.................... - Page 4 Downloading Diagnostic Mode Logs ..............81 Logging Out/Shutting Down ................. 82 Logout ........................82 User Level Access ....................83 Password Setup ..................... 83 File Manager ......................84 Backup - sync ......................84 Logout ........................84 Appendix ....................85 Orion 410ST FTP Setting Guide ................85...
- Page 5 Maxtronic Orion 410ST User Guide IP sharing unit setup (Broadband Router)0 ............85 IP sharing unit (Broadband Router) D-link DI704up0....................85 Enabling passive mode for the FTP tool0.............. 90...
- Page 6 Maxtronic Orion 410ST User Guide...
-
Page 7: Preface About This Manual
Preface About this Manual This manual is designed to make the Orion 410ST NAS System as easy to use as possible. Information contained in this document has been checked for accuracy, but no guarantee is given that the contents are correct. Information and specifications are subject to change with- out notice. -
Page 8: Safety Instructions
Orion 410ST NAS System on a bed, sofa, rug, or other similar surface. Do not place the Orion 410ST NAS System near or over a radiator or other heat source. Refer to the rating plate for the correct voltage and ensure that the... - Page 9 3-wire grounded type of power cord. This power cord will only fit into a grounded type of power outlet. If an extension cord or a power center is used with the Orion 410ST NAS System, make sure that the total current consumption of all products plugged into the wall outlet does not exceed the ampere rating.
-
Page 10: Limited Warranty
Co., Ltd. and its local representatives will be responsible for the repair without charging. MaxTronic International Co., Ltd. is not responsible for any damage or loss of data, deemed to be caused by its products. It is highly recommended that users conduct the necessary backup practices. -
Page 11: Introducing Orion 410St
RAID 0, RAID 1, RAID 3, and RAID 5. The availability of cooling fans and hot- swap features make the Orion 410ST with RAID function is more reliable and easier to use. Product Features •... -
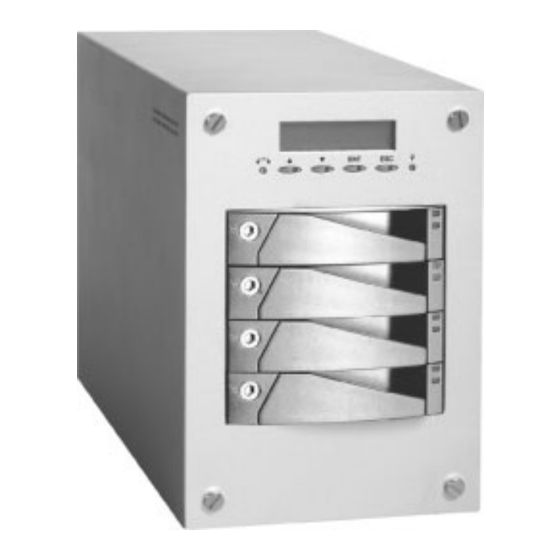
Page 12: Components Of The Orion 410St
Maxtronic Orion 410ST User Guide Components of the Orion 410ST Front View LCD screen Power Network LED indicator LED indicator Control buttons HDD caddy (x4) LED indicators HDD caddy Lock (x4) HDD caddy Back View LAN Connector UPS Connector System Fan... -
Page 13: Important Notice
Maxtronic Orion 410ST User Guide Important Notice Follow the procedures below carefully to initialize your Orion 410ST NAS System: 1. Connect the power cord and LAN cable. 2. Remove the HDD caddy(s) from the system. 3. Power on the system. -
Page 15: Getting Started Hardware Installation
2. Connect the three-pin power plug into a power outlet. Turn on the Power Press the power switch at the rear side of the Orion 410ST. Turn off the power To shutdown the system properly, please use the “Shutdown” function in the administrator tools via web browser. -
Page 16: Network Connection
Maxtronic Orion 410ST User Guide Network Connection Use the provided LAN cable to connect to network. Before the network is connected, the Net- work LED indicator will be lit orange. 1. Insert one end of the LAN cable into the router. -
Page 17: Hard Disk Drive Installation
3. Pull out the handle of the HDD caddy. 4. Pull out the HDD caddy and remove from the tray (four caddies). 5. Power on the system, and the Orion 410ST NAS System will perform startup self-con- figurations. 6. Wait until the self-configuration is complete,... - Page 18 The original caddy order need not be the same when re-inserting the caddies back into the Orion 410ST. Do not install the HDD(s) into the Orion 410ST NAS System while it’s powered off under any conditions. The following are exceptions: 1.
- Page 19 Maxtronic Orion 410ST User Guide Disk and Caddy Assembly To install new HDD(s) into the Orion 410ST is easy, for it supports hot-wrap, and it is unnec- essary to shutdown the system when removing a HDD or replacing one drive.
-
Page 20: Using The Front Control Panel
Maxtronic Orion 410ST User Guide Using the Front Control Panel By using the front control panel of the Orion 410ST, the user can easily configure basic sys- tem settings. Elements contained in front control panel: • 4 control buttons • 2 LED indicators besides control buttons •... -
Page 21: Led Indicators
Description Shows the Orion 410ST is powered on and is Power Green operating normally. If the indicator is flashing, the Orion 410ST is con- nected to the Network. Network Status Orange If the indicator is off, please check all connections. - Page 22 Maxtronic Orion 410ST User Guide Caddy LED indicators 2 LED indicators on each HDD caddy show the HDD status. Upper LED Lower LED LED Indicators Color Description Green Indicates normal operation of the HDD Upper LED Indicates HDD malfunction Blue...
-
Page 23: Orion 410St System Setup
This chapter introduces how to use the front control panel to configure basic hardware setup. System Boot-up Every time the Orion 410ST is booted, the system will automatically performs self configura- tion. This includes checking system memory size, HDD detecting, Network connections, and other system applications. -
Page 24: System Login
The administrator can change network settings under 1Network this menu. 11Channel 0 Since the Orion 410ST provides only one LAN connector, only ‘Channel 0’ will be shown. Press ENT to proceed. 111 CH0 Status 1. Press ENT to view detailed CH0 status informa- 11Channel 0 tion. - Page 25 IP address, which is displayed on the front LCD screen. On first startup, the Orion 410ST initiates DHCP/BOOTP to select all available IP address in network. If manual input of an IP address is needed, acquire the IP address from the Internet service provider.
- Page 26 Maxtronic Orion 410ST User Guide 113 Netmask After the system IP address is set, the administrator also needs to set a sub-network mask IP address. Setting the sub-network mask IP address: 1. Use the up or down button under the 11 11Channel 0 Channel 0 submenu to enter the ‘113CH0 Net-...
- Page 27 115CH0 HW ADDR changed. 0.6.12.0.20.6 116 DHCP Status If the LAN supports DHCP server, the Orion 410ST will detect the configuration. The default status is ‘ON’. To disable DHCP, please following the steps below: 1. Use the up or down...
- Page 28 Maxtronic Orion 410ST User Guide 2 System 21 Clock Users can change time and date settings under this 2System menu 21Clock Press ENT to proceed. 211 Date 1. Use the up or down button under the 21Clock 21Clock submenu to enter the ‘211Date’ and 211Date press ENT to confirm.
- Page 29 • Yes: Reboot the system • No: Exit the query screen and go back to the ‘221Reboot System’ submenu. Orion 410ST 3. If ‘Yes’ is selected, the Orion 410ST will start rebooting automatically. Rebooting... 222 Halt System 1. Use the up...
- Page 30 5. Enter the exact value of each digit to confirm the Confirm Passwd password. • When you first use the Orion 410ST, you should change the default password immediately, to ensure security. • The changed administrator password should be stored in a safe loca- tion for future reference.
-
Page 31: Resetting The Administrator Password
2. Press ENT to enter the menu. 3. A flashing gray square appears. Enter Serial No 4. Enter the serial number of this Orion 410ST NAS System. • This will reset the administrator password back to the factory default. • Perform this option only when the new administrator password is for- gotten or lost. -
Page 33: Configuring The User Interface
4 Configuring the User Interface There is another easy way to configure the Orion 410ST through your web browser if DHCP is available in your network environment. Using User Interface 1. Open your Internet browser. 2. Type the IP address of the Orion 410ST into the browser address bar to access the user interface. -
Page 34: System Status
Maxtronic Orion 410ST User Guide System Status System Information This screen displays detailed system informa- tion, including: • Vendor name: Displays the manufac- turer’s name. • Product name: Displays the name of the product. • Model name: Displays the product model •... -
Page 35: Network Information
Maxtronic Orion 410ST User Guide Network Information This screen displays all network settings: • NIC • Setup method • IP address • Subnet mask • Gateway • DNS server • MAC address • Current speed Active Users This screen displays all active users. Active users are on-line users who have connected through smb, afp or ftp. - Page 36 Maxtronic Orion 410ST User Guide System Log This screen displays all system events in the form of a log. Three colors represent different log information: • Information (Black): Represents all sys- tem usage messages. • Warning (Yellow): Represents all sys- tem warning messages.
-
Page 37: Quick Configuration
This screen allows you to configure the Orion 410ST quickly and effectively. Setting the Server Name All Orion 410ST NAS Systems have a default factory name. As the administrator, you can change this to a name of your choice. To change the server name: 1. - Page 38 To change the date and time: 1. Select the correct date, time, area and city from the drop down boxes. 2. NTP server setting: To configure the Orion 410ST to connect to a NTP server to update the date and time settings, follow these steps: –Select ‘Yes’...
- Page 39 Maxtronic Orion 410ST User Guide 4. The Orion 410ST will update the system information. 5. A confirmation message will appear. Click ‘Next’ to proceed to the next step...
- Page 40 Maxtronic Orion 410ST User Guide Setting the Network Besides being able to set network settings via the front panel, you can also change network settings in the user interface. 1. If the IP address or subnet mask address are changed, modify the fields, entering the new IP and subnet mask addresses.
- Page 41 Maxtronic Orion 410ST User Guide 5. If ‘Reboot’ is selected, a reboot warning message appears. 6. The system will reboot. 7. Once rebooted, click ‘Login’ to log into the Orion 410ST browser interface again. If ‘Next’ is selected, the ‘Volume setting’ screen will appear.
- Page 42 Maxtronic Orion 410ST User Guide Adding Volume As the administrator, you can set up volumes quickly and effectively on this screen: 1. Click ‘Add’. 2. In the next window, there are five types to choose from: Single disk, RAID 0, RAID 1, RAID 3, and RAID 5.
- Page 43 Maxtronic Orion 410ST User Guide 5. The new volume is complete. Click ‘Add’ to create another new volume, or click ‘Next’ to proceed to the next step.
- Page 44 Maxtronic Orion 410ST User Guide Setting User Level Only as the administrator can you enable or disable this function. Settings can only be changed when ‘enable’ is selected. To set the user level: 1. Select the required user level from the drop down box.
- Page 45 Maxtronic Orion 410ST User Guide As the administrator, you can now adjust other settings in more detail via the administrator tools in the user interface. For any help needed whilst using the user interface, click on ‘Help’ in the top right corner.
- Page 46 Maxtronic Orion 410ST User Guide...
-
Page 47: Administrator Tools
Maxtronic Orion 410ST User Guide 5 Administrator Tools As administrator of the Orion 410ST NAS System, you have an array of tools at your dis- plays. This section outlines the primary options and their functions. Administrator Login • Once the Orion 410ST NAS System has booted, enter the IP address in your web browser window to bring up the administrator login screen. -
Page 48: Instant Configuration
System Setup Screen The System Setup screens contains all the necessary information in order to configure the Orion 410ST to operate correctly with your system. For instructions on how to configure Server Name, Password, Language, and Time please refer to“Quick Configuration” on... -
Page 49: Snmp
Maxtronic Orion 410ST User Guide – Update: Click to save changes. – Cancel: Click to cancel any changes made. SNMP To enable SNMP, the following parameters are required: • SNMP Status: Click ‘Enable’ to activate SNMP. • Authentication alert: Click ‘Enable’ to enable authentication alert. - Page 50 Maxtronic Orion 410ST User Guide Backing Up Select ‘Backup’ and click ‘OK’. A dialog box appears, asking for the administrator password: Enter the administrator User Name and password to complete the backup of the system settings. This will save a backup file to the local hard disk of your computer.
-
Page 51: Factory Defaults
Maxtronic Orion 410ST User Guide Factory Defaults This option reverts the system to the factory default settings. Before proceeding with this option, be sure to make a backup of the configu- ration file. All settings will be erased and reset to the default values. -
Page 52: Updating Firmware
Maxtronic Orion 410ST User Guide Updating Firmware Updating firmware is a crucial operation if the Orion 410ST is to remain in optimal working order. You can acquire the latest version of firm- ware from your local dealer and load it onto the system from this screen. -
Page 53: For Windows
Maxtronic Orion 410ST User Guide For Windows The Orion 410ST NAS System supports Windows SMB network communication protocols to enable data sharing between clients with Windows-related operating systems. Three security levels are available from the drop down box. Select ‘enable’ to enable Windows network con- figuration. - Page 54 Maxtronic Orion 410ST User Guide ADS Level The Orion 410ST supports ADS trees in multiple domains. Select ‘ADS level’ from ‘Security level’ drop-down box. If the network environment is set up to access user information via a Windows Server 2000 or Windows Server 2003 Active Directory Service (ADS), the system will authenticate the user names and passwords from selected domain controller.
-
Page 55: For Unix
Maxtronic Orion 410ST User Guide For Unix The system supports UNIX-compatible systems to enable data sharing between clients with the NFS communication protocol. • Check ‘Enable NIS domain’ to get authenti- cation for user access. • Enter the NIS domain name. - Page 56 Maxtronic Orion 410ST User Guide Set up the ‘Host name’, ‘Privilege’ and ‘Root access’ as below: Use the ‘mount’ command from NFS clients to mount the Orion 410ST mount: command to mount file system -t nfs: indicates the file system type to NFS ---.---.-.---: IP address of the NAS...
-
Page 57: For Apple
Maxtronic Orion 410ST User Guide For Apple The system supports the Apple Talk communi- cation protocol to enable data sharing between clients using the Mac OS systems. This section outlines the settings of required parameters. • Check ‘Enable’ to enable Apple Talk. - Page 58 Maxtronic Orion 410ST User Guide Make sure the IP address shown in the network setup screen is the same as that of the NAS system. If not, replace with the correct IP address. Select the ‘Apple Talk’ tab. Check the ‘Make AppleTalk Active’ option and then open your Safari web browser.
- Page 59 Maxtronic Orion 410ST User Guide Connecting via SMB is a similar process. Select ‘Connect to server’ from the ‘Go’ menu. Enter the NAS IP address and click ‘Connect’. Select a mount and click ‘OK’. Log into the system.
-
Page 60: Ftp
Maxtronic Orion 410ST User Guide The system supports FTP (File Transfer Proto- col) to share data between FTP clients. The FTP network screen will appear as below: If there is a fixed IP available and the system is behind a... -
Page 61: Storage Setup Settings
Maxtronic Orion 410ST User Guide Storage Setup Settings The Storage Setup menu allows the administra- tor to configure various settings according to the disks and volumes installed. The following information is displayed: Disk Information: • Name: Displays the name of the HDD. - Page 62 Maxtronic Orion 410ST User Guide Volume Information: • Name: Displays storage volume name. • Type: Displays storage volume type. • Capacity: Displays storage volume capacity. • Used Space (MB): Displays the amount of space in use. • HDD: Includes one of more HDDs. Displays the HDD combination used by the storage volume.
-
Page 63: Volume Setup
Maxtronic Orion 410ST User Guide Volume Setup The following shows the options available in the Volume Setup menu: The following options are available: • Add: Creates a new storage volume. • Delete: Deletes a specific storage volume. • Modify: Select a storage volume and click ‘Modify’... - Page 64 Maxtronic Orion 410ST User Guide Deleting a volume To delete a volume, select the volume you wish to delete and click ‘Delete’. You will be prompted to confirm the delete action. Click ‘OK’ and the volume will be deleted. Formatting a volume Select the volume you wish to format from the ‘Volumes’...
-
Page 65: Share Setup
Maxtronic Orion 410ST User Guide Share Setup This applies to share folders in a storage vol- ume and stores them in a cross-platform net- work to allow the clients using SMB, NFS, Apple Talk or FTP. Click on ‘Share Setup’ and the following screen will appear: To create a new share folder, click ‘Add’. -
Page 66: N-Sync Setup
Maxtronic Orion 410ST User Guide N-Sync Setup N-Sync is a replication utility based on the rsync tool. Like rsync, N-Sync’s client-server architecture makes replication of files and folders easier from local share to remote share and vice versa (from source to destination). - Page 67 Maxtronic Orion 410ST User Guide • Local Shares: Displays all local shares. • Sync-OP: Select from the drop-down box. You can either synchronize operations includ- ing synchronization from local share to remote share (=>) or from remote share to local share (<=).
- Page 68 Maxtronic Orion 410ST User Guide Adding a profile Input profile name and comment then click “Add Profile” to confirm new profile added. Click “Modify Profile” and you will be taken through a series of configuration screens. 1 Local Share Setup: •...
- Page 69 Maxtronic Orion 410ST User Guide 4 Schedule Setup: • Check the synchronize frequency from the ‘Frequency’ list. • Select the required variable from the drop down box. • Select ‘Finish’ to end configuration or ‘Back’ to return to the previous screen.
- Page 70 Maxtronic Orion 410ST User Guide Deleting a profile • Select the profile you wish to delete from the ‘Select profile’ list. • Click ‘Delete profile’. Disabling a profile • Select the profile you wish to disable from the ‘Select profile’ list.
- Page 71 Maxtronic Orion 410ST User Guide N-Sync Log N-Sync log keeps records of all N-Sync jobs. • Date: Displays the start date of the job. • Time: Displays the start time of the job. • Profile: Displays the profile name. If the log entry is generated by the N-Sync Client, this field will be replaced by ‘---’.
-
Page 72: User Privilege Settings
Maxtronic Orion 410ST User Guide User Privilege Settings This menu is used to set system groups and user privileges. Groups Click ‘Groups’ in the menu to go to the ‘Group Setup’ screen. The Group Setup screen details the contents of each user group. - Page 73 Maxtronic Orion 410ST User Guide Adding a Group Click ‘Add’ to add a new group. This will allow you to set up a series of users at the local level. Name: Enter a name for the new group. Group ID: Displays the group ID. When a new group is created, the system assigns it a unique ID number.
-
Page 74: Users
Maxtronic Orion 410ST User Guide Deleting a Group Select a group in the ‘Group setup’ screen and click ‘Delete’. A prompt will appear. Click ‘OK’ to delete the group. Modifying a Group Select a group in the ‘Group setup’ screen and click ‘Modify’. -
Page 75: Adding Users
Maxtronic Orion 410ST User Guide Adding Users For all created local users and Windows domain users, the system will automatically create ‘Home’ shares (for each user in Volume 1; the system administrator can find all ‘home’ shares) contents from file manager Click ‘Add’... -
Page 76: Deleting Users
Maxtronic Orion 410ST User Guide Deleting Users Select the name in the ‘User Setup’ screen and click ‘Delete’. A prompt will appear. Click ‘OK’ to delete the user. When a user is deleted, all the contents in its personal folder will be erased. - Page 77 Maxtronic Orion 410ST User Guide Modifying Users Select the name in the ‘User Setup’ screen and click ‘Modify’. You can change any user details here. • User: Enter the new user name. • Real Name: Enter a new full user name.
-
Page 78: Quotas
Maxtronic Orion 410ST User Guide Quotas The quotas section allows viewing and modification of the quota allocated to a user or storage volume. The system provides two ways of viewing the quota: • User Quota: Limits the quota of each user in each storage volume. -
Page 79: Privilege Setup
Maxtronic Orion 410ST User Guide Privilege Setup If ‘Read Only’ or ‘Deny Access’ privilege is applied to a group, all members in the group have identical priveleges. If ‘Writable’ is applied then the privilege will depend on the users individual set- tings. - Page 80 Maxtronic Orion 410ST User Guide Adding a new NFS client privilege – Export path: Displays the export path of the privilege. – Hostname: Check ‘All Hosts’ or enter a new hostname. – Privilege: Select privilege setting from the drop-down box.
-
Page 81: File Manager
Maxtronic Orion 410ST User Guide File Manager Note that the User privilege setting mentioned in the previous section is ‘Share’ level and a higher grade than ACL (Access Control List) ‘File’ level permission. If the ‘share’ level has been set up with limited privilege, as ‘Read Only’ for example, then all sub-directories and files with ACL level settings for ‘Writable’... - Page 82 Maxtronic Orion 410ST User Guide ACL settings • Replace ACL on all child objects with ACL shown here: Check to replace the ACL shown here on all child objects. • Groups/Users: Displays all users and groups. Entries marked with ‘@’ indicate a group.
-
Page 83: Backup-Sync
Maxtronic Orion 410ST User Guide Backup-sync This function provides the Orion 410PT NAS System with the ability to access client data through corresponding network protocols. SMB and AFP are supported. The duplicate client data can be loaded into the system’s specified data volume as a copy of data backup. -
Page 84: Jobs
Maxtronic Orion 410ST User Guide Jobs Adding Jobs Adding jobs will configure the backup settings for each system user. Each job is identified by a job ID, which is generated automatically. • Owner: Displays the users ID. • Network type: Select either AppleTalk or Samba from the drop down menu. - Page 85 Maxtronic Orion 410ST User Guide Modifying Jobs Select the job you wish to modify, and click ‘Modify’. • Owner: Displays the user ID. • Network type: Select a new network type from the drop-down box. • From IP address: Enter the new IP address of the source host from where backup is made.
- Page 86 Maxtronic Orion 410ST User Guide Adding Schedules When a job setting is added, the GUI will advise you to configure a schedule for that job. The schedule is when and how often a job will be triggered. Select a job and click ‘Schedule’.
-
Page 87: Logs
Maxtronic Orion 410ST User Guide Deleting Schedules • Select a schedule on the ‘Schedule List’ screen. • Click ‘Delete’. • A prompt will appear. Click ‘OK’ to proceed or ‘Cancel’ to cancel. Modifying Schedules Click ‘Modify’ to open the ‘Modify Schedule’ screen: All settings can be modified from this screen. -
Page 88: Backing Up Jobs
Maxtronic Orion 410ST User Guide Backing Up Jobs Click on ‘Jobs backup’ to save backup copies of jobs. Allows you to backup/restore previous configu- rations to/from a file that includes job configu- ration and schedule configuration data created by the backup sync function. -
Page 89: Diagnostic Mode
Maxtronic Orion 410ST User Guide Diagnostic Mode Diagnostic mode is run to collect system information, identify problems, and log them for later viewing. • Run Time: Select the length of time for the diagnostic mode to run, from the drop-down boxes. - Page 90 Maxtronic Orion 410ST User Guide Click ‘OK’ to bring up the ‘Diagnostic Log’ screen. This displays the time remaining for diagnostics. To stop the diagnostic mode, click ‘Stop’. A prompt will appear:...
-
Page 91: Downloading Diagnostic Mode Logs
Maxtronic Orion 410ST User Guide Downloading Diagnostic Mode Logs • Click ‘Download’ to download previous diagnostic mode logs. • A prompt for network password and username will appear. • Enter username and password. • A download prompt will appear: – Open: Click to open the log directly after download –... -
Page 92: Logging Out/Shutting Down
• OK: Click to confirm shutdown. • Cancel: Click to cancel and return to the previous screen. The Orion 410ST NAS System can be shut down directly from the GUI. As with the logout sequence, a confirmation screen will appear. -
Page 93: User Level Access
Maxtronic Orion 410ST User Guide Reboot: Click to reboot the system. A second confirmation screen will appear: • OK: Click to confirm system reboot. • Cancel: Click to cancel and return to the previous screen. User Level Access A client user may access the NAS via the web browser without the need to go through the Adminstrator. -
Page 94: File Manager
Maxtronic Orion 410ST User Guide File Manager A client user may also view all files and folders belonging to them, as well as config- uring their ACL prvilege. See “ACL set- tings” on page 72 for more details. Backup - sync... -
Page 95: Appendix
Appendix Orion 410ST FTP Setting Guide If only one fixed public IP is available and the Orion 410ST is located behind the NAT, you will need to set up a passive IP address and port. 1 First, check the ‘Manually Passive IP address and port’... - Page 96 Private IP: Enter the fixed private IP address. If there is only one fixed public IP available, the private IP address must be the same as the Orion 410ST LAN port IP address 1 Enter 21 in the ‘Private port/Public port’ field (the standard FTP port number).
- Page 97 Private IP: Enter the fixed private IP address. If there is only one fixed public IP available, the private IP address must be the same as the Orion 410ST LAN port IP address 1 Enter 548 in the ‘Private port/Public port’ field (the standard AFP port number).
- Page 98 Private IP: Enter the fixed private IP address. If there is only one fixed public IP available, the private IP address must be the same as the Orion 410ST LAN port IP address 1 Enter 80 in the‘Private port/Public port’ field (the standard WEB port number).
- Page 99 Private IP: Enter the fixed private IP address If there is only one fixed public IP available, the private IP address must be the same as the Orion 410ST LAN port IP address 1 Enter the passive port range (30000-50000) in the‘Private port/Public port’ field.
-
Page 100: Enabling Passive Mode For The Ftp Tool0
Enabling passive mode for the FTP tool To connect with the Orion 410ST through the FTP protocol, you can use the preferred FTP tool. Because there is only one fixed public IP is available, make sure the FTP tool with pas- sive port option is enabled.
Need help?
Do you have a question about the Orion 410ST and is the answer not in the manual?
Questions and answers