Table of Contents
Advertisement
Advertisement
Table of Contents

Related Manuals for Grundig Sonoclock 890 WEB


Summary of Contents for Grundig Sonoclock 890 WEB
- Page 1 ELECTRONIC INTERNET KITCHEN RADIO Sonoclock 890 WEB...
-
Page 2: Table Of Contents
CONTENTS ------------------------------------------------------------------------------------------------ SONOCLOCK 890 WEB Special features Packing contents CE declaration SET-UP AND SAFETY Environmental Note OVERVIEW Controls The remote control CONNECTION AND PREPARATION Connecting the power cord Connecting an MP3 player or a USB memory stick Connecting an external device... - Page 3 Switch-on timer Sleep timer Reminder timer SPECIAL SETTINGS Registering on the GRUNDIG homepage Creating lists of favourites Searching for radio stations that are not provided by V-Tuner Calling information Registering the device with the WLAN router with individual settings in...
-
Page 4: Sonoclock 890 Web
Packing contents Sonoclock 890 WEB Remote control 1 lithium battery 3 V CR 2025 Operating manual Device holder CE declaration You can find the CE declaration for Sonoclock 890 WEB in the form of a pdf file on the enclosed CD-ROM. -
Page 5: Set-Up And Safety
SET-UP AND SAFETY ------------------------------------------------------------ Please note the following instructions when setting up the system: This device is designed for the playback of audio signals. Any other use is expressly prohibited. If you want to set up the device on wall shelves or in cupboards, please ensure that the device is adequately ventilated. -
Page 6: Environmental Note
SET-UP AND SAFETY ------------------------------------------------------------ Thunderstorms are a danger to all electrical devices. Even if the de- vice is switched off, it can be damaged by a lightning strike to the mains. Always remove the mains adapter during a thunderstorm. If malfunctions occur due to static electricity charges or brief mains voltage surges, reset the device. -
Page 7: Overview
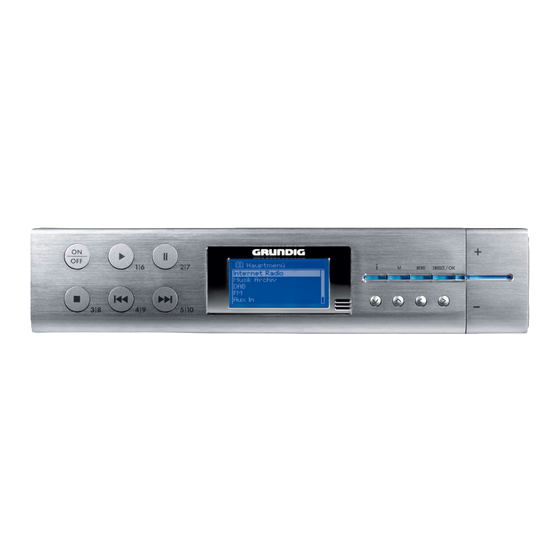
OVERVIEW ---------------------------------------------------------------------------------------------- Controls The front of the device ON/OFF Switches the device in and out of standby mode. In radio mode: station button 1/6. In music archive mode: starts playback of a track. In radio mode: station button 2/7. In music archive mode: pauses playback. In radio mode: station button 3/8. - Page 8 OVERVIEW ---------------------------------------------------------------------------------------------- Displays information about the Internet, DAB and FM radio stations. Confirms the default settings are restored. Switches between the Internet radio, music archive, DAB, FM and Aux input sources. MENU Opens the menu. SNOOZE/OK In the menu: selects and confirms options. In alarm mode: interrupts the alarm signal.
- Page 9 OVERVIEW ---------------------------------------------------------------------------------------------- The back of the device Headphone jack for connecting a stereo headphone set with a jack plug (3.5 mm). The loudspeaker of the device is automatically switched off. AUX IN Audio signal input (stereo/mono) for con- necting an external device. USB port type B.
-
Page 10: The Remote Control
OVERVIEW ---------------------------------------------------------------------------------------------- The remote control Switches the device to standby mode and from standby mode to the last input source selected. Switches between the Internet radio, music archive, DAB, FM and Aux input sources. 1 ... 0 Number buttons for various inputs. In radio mode: Selects Internet, DAB and FM stations stored on preset channels 1 to 10. - Page 11 OVERVIEW ---------------------------------------------------------------------------------------------- In music archive mode: selects the previous track. In music archive mode: selects the next track. In music archive mode: pauses playback. Activates the setting for alarm time 1. Activates the setting for alarm time 2. Sets the sleep timer. Press and hold down: activates the reminder timer (NAP) settings.
-
Page 12: Connection And Preparation
The device is ready for connection to an MP3 player or USB memory stick. The device is only able to play MP3 data formats after a software update. The software update is available on www.grundig.com. Important: The device must be switched off while the USB connection is being made. -
Page 13: Connecting The Headphones
CONNECTION AND PREPARATION ---- Connecting the headphones Insert the headphone plug (3.5 mm) into the » « socket on the device. – The loudspeaker of the device is switched off. Important: Excessive volume levels when using headphones or earphones can damage your hearing. Note: You can also use the »... -
Page 14: Lan Connection To The Internet
---- LAN connection to the Internet Telephone socket Splitter Modem/router Sonoclock 890 WEB Music archive on the computer Note: Switch the device off before you connect it to the internet. Connect the Ethernet socket of the modem/router to the »LAN«... -
Page 15: Wlan Connection To The Internet
The substance of the building at the installation site can also affect this. Telephone socket Splitter Modem/router Laptop Sonoclock 890 WEB Music archive on hard drive (AS – Network Attached Storage) Note: The lines represent the function. Internet radio Music archive (audio streaming) -
Page 16: Mounting The Device
CONNECTION/PREPARATION ---------------------- Mounting the device The loudspeaker is located on the bottom of the device. To obtain optimal sound, attach the device holder on the bottom of the device before mounting. Push the device holder into the recess on the bottom of the device until it latches into place. -
Page 17: Settings
SETTINGS ---------------------------------------------------------------------------------------------------- Menu navigation When you first switch on the device, the display will show the Grundig logo, followed by the main menu. › Internet Radio In the main menu, you can select the »Internet Radio«, »Music Music Archive Archive«, »DAB«, »FM«, and »Aux« sources, or the »System setup«... - Page 18 SETTINGS ---------------------------------------------------------------------------------------------------- Press » « or » « to select the »Time setup« option and press Λ Network setup »OK« to confirm. › Time setup Press » « or » « to select the »Auto update« option and press Λ Sleep »OK«...
-
Page 19: Registering The Device With The Wlan Router
SETTINGS ---------------------------------------------------------------------------------------------------- Setting the time zone This setting allows you to set a time zone for the location of the network update. In the »Time setup« menu, press » « or » « to select the »Set Λ Time Zone« option and press »OK« to confirm. Time Zone Press »... - Page 20 SETTINGS ---------------------------------------------------------------------------------------------------- Note: If the network name (SSID) is suppressed on the WLAN router for security reasons, the network cannot be found. In that case, it has to be entered manually. Go to the main menu © »System setup« © »Network setup« © »SSID« and enter it there (for man- ual configuration in WLAN mode, see page 50).
-
Page 21: Settings For The Music Archive Mode With A Computer
SETTINGS ---------------------------------------------------------------------------------------------------- Settings for the music archive mode with a computer If you wish to use the “Shared folders” function, you have to enter the user name and password in the device so that it can access these folders on a computer (or an external hard drive). This is not necessary for the “Shared media”... -
Page 22: Searching For And Saving Dab Stations
SETTINGS ---------------------------------------------------------------------------------------------------- Searching for and saving DAB stations Your device has a DAB (Digital Audio Broadcasting) receiver unit which enables crystal-clear radio reception in CD quality, i.e. without hissing or crackling. DAB stations are combined into ensembles (multiplexes) at regional and national levels. - Page 23 SETTINGS ---------------------------------------------------------------------------------------------------- Manual station search If the automatic station search is not successful, you can search for DAB stations manually. Press » « to open the DAB menu. Station list Press » « or » « to select the »Manual tune« option and press Λ...
-
Page 24: Setting Dynamic Range Control (Drc) For Dab Stations
SETTINGS ---------------------------------------------------------------------------------------------------- Setting Dynamic Range Control (DRC) for DAB stations When you activate Dynamic Range Control (DRC), you can hear quiet sounds better in a loud environment. Press » « to open the DAB menu. Full Scan Press » « or » «... -
Page 25: Searching For And Saving Fm Stations
SETTINGS ---------------------------------------------------------------------------------------------------- Searching for and saving FM stations Setting the search mode › There are two different automatic station search modes. Scan setting Audio setting Press » « to open the FM menu. Main menu Press » « or » «... -
Page 26: Restoring The Default Settings (Reset)
SETTINGS ---------------------------------------------------------------------------------------------------- Restoring the default settings (reset) This function enables you to reset all the custom settings back to the default settings (Internet, DAB and FM stations, time, alarm times and network access data are deleted). You should execute the reset function if the device has been con- nected to another network or if you move to another reception area. -
Page 27: General Functions
GENERAL FUNCTIONS ---------------------------------------------------- Switching on and off Switch on the device from standby with »ON/OFF«. – The last input source used is automatically selected. Switch the device to standby with »ON/OFF«. – Display: the current time and date. Note: The only way to disconnect the appliance from the mains is to pull out the plug. -
Page 28: Listening With Headphones Or Earphones
GENERAL FUNCTIONS ---------------------------------------------------- Listening with headphones or earphones Insert the headphone plug (3.5 mm) into the » « socket on the back of the device. – The loudspeaker of the device is switched off. Important: Prolonged listening with the head phones or ear phones at loud volumes can damage your hearing. -
Page 29: Internet Operation
INTERNET OPERATION -------------------------------------------------- Selecting the Internet radio input source Press »M« to select the »Internet Radio« input source. Press »MENU« to open the menu of the current source. Press » « or » « to select the »Main menu« option and press Λ... -
Page 30: Selecting Internet Radio Stations According To Search Criteria
INTERNET OPERATION -------------------------------------------------- Selecting Internet radio stations according to search criteria Searching for Internet radio stations according to genres Press » « or » « to select the »Stations« option and press »OK« Λ Location to confirm. › Genre Press » «... - Page 31 INTERNET OPERATION -------------------------------------------------- Searching for Internet radio stations by name Press » « or » « to select the »Station« option and press »OK« Λ Location to confirm. Genre Press » « or » « to select the »Search stations« option and press Λ...
-
Page 32: Saving Internet Radio Stations To Presets
INTERNET OPERATION -------------------------------------------------- Selecting Internet radio stations which the Internet provider has added recently Press » « or » « to select the »Stations« option and press »OK« Λ Genre to confirm. Search stations Press » « or » « to select the »New stations« option and press Λ... -
Page 33: Selecting Internet Radio Stations For The Favourites List
INTERNET OPERATION -------------------------------------------------- Selecting Internet radio stations for the favourites list You can find out how to create a list of favourite Internet radio stations in the chapter on special functions on pages 45 to 47. Press » « or » «... -
Page 34: Selecting Podcasts
INTERNET OPERATION -------------------------------------------------- Selecting podcasts Podcasts are radio programmes that are available irrespective of broadcasting times. You could think of podcasts as audio files. They sometimes consist of a series of episodes that can be downloaded automatically through a feed. Press »MENU«... -
Page 35: Music Archive
MUSIC ARCHIVE -------------------------------------------------------------------------- Audio streaming ... This function enables you to play back tracks from a music archive in MP3 and WMA format on the device. The music archive can be stored on a computer or an external hard drive.. -
Page 36: Navigating The Music Archive Menu
MUSIK ARCHIVE -------------------------------------------------------------------------- Navigating the music archive menu In the music archive menu, press » « or » « to select the Λ »Browse« option and press »OK« to confirm. Note: You can only select the »Browse« option by pressing the »... -
Page 37: Dab Operation
DAB OPERATION ------------------------------------------------------------------------ Selecting the DAB input source Press »M« to select the »DAB« input source. Press »MENU« to open the menu of the current source. Internet Radio Press » « or » « to select the »Main menu« option and press Λ... -
Page 38: Displaying Dab Station Information
DAB OPERATION ------------------------------------------------------------------------ Displaying DAB station information To display information on the current DAB station, press »i« repeatedly. – The following displays remain on: Station name. The bit rate e.g. »128 kbps«. The name of the current station’s DAB ensemble (multiplex). Radio Galaxy –... -
Page 39: Fm Mode
FM MODE -------------------------------------------------------------------------------------------------- Selecting the FM input source Press »M« to select the »FM« input source. Press »MENU« to open the menu of the current source. Internet Radio Press » « or » « to select the »Main menu« option and press Λ... -
Page 40: Displaying Rds Station Information
FM MODE -------------------------------------------------------------------------------------------------- Displaying RDS station information If the DVD receiver receives an RDS station, the station name appears in the display (»[No name]« appears in the display if no information is available). The station and track information appears as ticker text (radio text) (»[No RadioText]«... -
Page 41: Timer Mode
TIMER MODE ---------------------------------------------------------------------------------------- Your device has three timer modes: – The switch-on timer, which switches the device on at two set times and wakes you with an alarm or music. – The sleep-timer, which switches the device off at a time you set. –... -
Page 42: Cancelling The Alarm For The Day
TIMER MODE ---------------------------------------------------------------------------------------- Press » « or » « to select the »Volume« option and press »OK« Λ to confirm. Mode: Internet Use » « or » « to set the alarm volume and press »OK« to con- Λ Last listened firm. -
Page 43: Sleep Timer
TIMER MODE ---------------------------------------------------------------------------------------- Press » « or » « to select the »On« option and press »OK« to Λ switch it to »Off«. – The alarm function is deactivated. Press » « or » « to select the »Off« option and press »OK« to Λ... -
Page 44: Reminder Timer
TIMER MODE ---------------------------------------------------------------------------------------- Reminder timer Time setup Setting the reminder timer In the main menu, press » « or » « to select the »System - Sleep Λ einstellung« option and press »OK« to confirm. Alarms Press » « or » «... -
Page 45: Special Settings
Creating lists of favourites You can copy radio stations, which the V-Tuner Internet service makes available for GRUNDIG customers, into a favourites list. This gives you swift access to your favourite radio stations. You can only conduct this process on a PC. - Page 46 Note: To check the radio stations, select the start page and click on the favourites group. You will see the new radio stations. Exit the “GRUNDIG INTERNET RADIO TUNING SERVICE” Internet page with the »Logout« button. Note: Radio stations that are no longer required can be deleted from the favourites group.
- Page 47 Note: To check the radio stations, select the start page and click on the favourites group. You will see the new radio stations. Exit the “GRUNDIG INTERNET RADIO TUNING SERVICE” Internet page with the »Logout« button. Note: Radio stations that are no longer required can be deleted from the favourites group.
-
Page 48: Searching For Radio Stations That Are Not Provided By V-Tuner
PC. Start the internet browser on your PC. Enter the address “www.grundig.radiosetup.com”. – The “GRUNDIG INTERNET RADIO TUNING SERVICE” page appears. Enter your e-mail address and password and confirm. Click the “My added radio stations” line If radio stations are already available, click the »... -
Page 49: Calling Information
SPECIAL SETTINGS ------------------------------------------------------------------ Calling information You can call up information on your device and the network in use. Settings cannot be made in this menu. Press »MENU« to open the menu of the current source. Press » « or » «... -
Page 50: Registering The Device With The Wlan Router With Individual Settings In
SPECIAL SETTINGS ------------------------------------------------------------------ Registering the device with the WLAN router with individual settings in the network These settings require advanced knowledge of the configuration of networks. Press »MENU« to open the menu of the current source. Press » « or » «... - Page 51 SPECIAL SETTINGS ------------------------------------------------------------------ Use » « or » « to enter the primary and then the secondary Ethernet Λ DNS, and press »OK« to confirm. Primary DNS – You are prompted to enter the SSID. 255.253.251.250 Note: The SSID (Service Set Identifier) is the code of the WLAN network, and is used to identify this wireless network.
- Page 52 SPECIAL SETTINGS ------------------------------------------------------------------ Use » « or » « to enter the encryption level and press »OK« to Λ Open confirm. – You are prompted to enter the key. You enter the key in the same way as the SSID (see page 51). ›...
-
Page 53: Information
INFORMATION ------------------------------------------------------------------------------ Technical data This device is noise-suppressed according to the applicable EU directives. This product fulfils the European directives 2006/95/EC, 2004/108/EC and 1999/5/EC. This device conforms to the safety regulation DIN EN 60065 (VDE 0860) and therefore the international safety regulation IEC 60065. Never open the device casing. -
Page 54: Troubleshooting
Cables that have accidentally been disconnected and flat batteries for the remote control will impair functioning. If the follow- ing measures do not resolve the problem satisfactorily, please visit www.grundig.com or contact your specialist dealer. General faults Problem Possible cause/remedy No sound. -
Page 55: Messages From The Device
INFORMATION ------------------------------------------------------------------------------ Messages from the device Message Possible cause/remedy Connection failed – WLAN network is deactivated; switch on the WLAN network. – Range problem: move the device closer to the router or install an external repeater. – Other networks are transmitting on the same channel; change channel settings on the router, then repeat the registra- tion procedure. -
Page 56: Licence Conditions
INFORMATION ------------------------------------------------------------------------------ Licence conditions This product is protected by the intellectual property rights of the Microsoft Corporation. The use or distribution of such technology outside of this product is prohibited unless under licence from Microsoft or an authorised subsidiary. Content providers use the digital rights management technology for Windows Media contained in this device (“WM-DRM”) to protect the integrity of their content (“Secure Content”) so that their intellectual property, including copyright, in such content is not... -
Page 57: Glossary
INFORMATION ------------------------------------------------------------------------------ Glossary Boot loader version Boot loader is a software application that is loaded by the firmware of a device from a boot-capable medium and then executed. The boot loader then loads further parts of the operating system. Domain name system The domain name system (DNS) is one of the most important services on the Internet. - Page 58 INFORMATION ------------------------------------------------------------------------------ Network name (SSID) The network name (SSID – service set identifier) is the term used for the identification of a wireless network that is based on IEEE 802.11. Every wireless LAN has a configurable SSID, which uniquely identi- fies the wireless network.
- Page 59 INFORMATION ------------------------------------------------------------------------------ Router A router is a network component that links several computer networks. The router analyses (on the basis of layer 3 information) the network packages of a protocol it receives and forwards it to the intended destination network. Conventional routers work on layer 3 of the application layer.
- Page 60 Grundig Multimedia B.V. Atrium, Strawinskylaan 3105 • NL-1077 ZX Amsterdam • http://www.grundig.com...
Need help?
Do you have a question about the Sonoclock 890 WEB and is the answer not in the manual?
Questions and answers