Table of Contents
Advertisement
Advertisement
Table of Contents

Related Manuals for Kenmore Zig-Zag 1232


Summary of Contents for Kenmore Zig-Zag 1232
- Page 1 INSTRUCTIONS MODEL 1232oZIGo SEWING MACHINE...
- Page 2 Sears, Roebuck Dear Homemaker: You have just invested in a very fine stretch fore using your new Kenmore carefully read this booklet ate and care for your machine Specific instructions are given on threading, ing, oiling, This will help you...
-
Page 3: Table Of Contents
TABLE CORITEr_TS Section Section Section Section Knowing Your Sewing Identifying Parts Installing Machine Converting to Free-arm Winding the Bobbin Threading the Bobbin Threading of Top Thread Using the Controls Adjusting Tension Adjusting Bobbin Tension Checking Tensions Stitch Width Control Stitch Length Controf Reverse Stitch... -
Page 4: Stretch Stitch Control
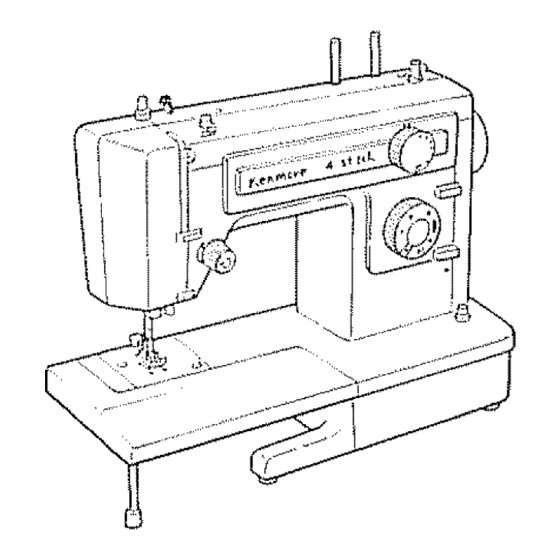
1. Needle Plate 2, Presser Foot 3, Thread Guide 4, Needle Clamp Sinew Thread Guide 64 Top Thread Tension Control Face Cover Thread Guide Face Cover Plate 9o Take-up Lever Upper Thread Guides 11, Stitch Width Control 12,, Stretch Stitch Control 13. -
Page 5: Pressure Regulator
20, Electric C ord Receptacle 21 Nomenclature Plate 22,,Clutch Knob 23, Hand Wheel 24 Bobbin W inder 25 Thread Spool Pins 26. Bobbin W inder Tension D isc 27,,Pressure Regulator 28 Presser FootLever 29, Thread C utter 30, Presser Foot T humb Screw 31, Feed Dogs... - Page 6 install machine in cabinet, tion machine head cabinet that holes bottom match those board Insert screws tighten into (Follow instructions provided Sears Cabinet Screws supplied with cabinetl) A separate base and cover carry the machine when needed install machine in carrying machine into base, with...
- Page 7 (/i _(}?.i_:./:_Z i i!ct!7_ ?.!' ::!iiii ' ii ,11}:= !i ¸::_.7.1; Remove extension table machine folding support and pulting table to the left ii!!i!}}i ¸, i& _:i::i ii'_ii :!!i_. !i:ii_ 'V:_:_ _11 i '_ ! _111i:_ from To replace leg up the free arm to its originaf (Fig...
- Page 8 _i'.:i i i,;] ii::.! [ ,i ":-i-ii:;iE {] [,: {:,:!, i{_ i iG ® ® 1, Release clutch by turning knob toward you, 2, Draw thread from spool through bobbin winder tension shown,, 3, Pull end of thread th[ough hole in bobbin as shown,.
- Page 9 T' : ?:::: i;:: :::(:!i ::£ :ID:(i'::,i (:_: ::" ::-i: : i:::! 9 :::: £:::J?i: _i:::::!' ® Remove extension machine pulling left. Open the shuttle cover. 2,, Raise needle to its highest position by rotating hand wheel toward you,, 3, To remove bobbin case from shut- tle, putt open latch of bobbin case, 4, Pul! bobbin...
- Page 10 -T _i _:_ _.-!_ _ il _ :'_i "_ _i_- _ :::T _ i:_ 'T ii _:_ _ _ 19 Place thread spoot with thread coming from spool Draw thread through thread guides. Holding stationary with right hand, end of the thread between discs as shown.
- Page 11 Probably the most important your thread tension. The pressure on these discs is regulated ber, the tighter the tension There are many reasons one fabric may not be correct the stiffness of the fabric, ing sewn, as wel! as the type It is best to test the stitching...
- Page 12 Bobbin t ension r equires adjusting less f requently than theupper thread tension. If thestitchis satisfactory but theseam is puckered, it maybenecessary loosen t hetension o nboththetopandbottom threads.. Be sure tobalance them asindicated onPage 9 . When adjusting the tension on the bobbin case, make slight adjustments screwdriver.
- Page 13 Theeasiest wayto check t ensions istosew amedium zig zag stitch on the fabric you wilt be using, Use the appropriate type of thread and needle., Use different colors of thread on the bobbin and upper spool Sew a line of medium zig-zag stitches The bobbin thread should not show on the top of the fabric Adjust the top tension if necessary to achieve the stitcll formation mentioned...
- Page 14 Thiscontrol r egulates thewidthof thestitchyouselect.. THEHIGHER T HE NUMBER-THE WIDER THESTITCH. Youmay varyyourzigzag s titchwidth byadjusting thiscontrol tothesetting y oudesire. This control must b eseton,, , ,,,,, position inorder t odostraight stitching° Thestitchlength control HIGHER THE NUMBER-THE The number on stitch length control stitches per' inch.
- Page 15 : ::L:::::: T:: i !:¢::::V WIDTH LENGTH : :::L:¸...
- Page 16 REVERSE _II _-...
- Page 17 __,_ i _ :!_i! _ :_i' ii ¸__'/i:i ¸¸/ _ i i: :/,!i ¸ ii In addition obvious regulators and controls to aid you in using your i: ¸ :::_ !: i !! _/:i ! /:: :::i :::/i:i ', i ¸_;//:_ Push down the outer ring of the pressure...
-
Page 18: Sewing Light
:!ii!_ii!! Fig. 1 provides the motor must be on, switch,, If you are interrupted sewing and must leave the machine un- attended, cidentally, Fig. I The sewing light is located in the face cover as shown,, To replace the bulb, turn the light off and open the face cover,. -
Page 19: Seam Guides
Cornering Guide Seam guides are printed on either side of the needle plate to aid you in guid- ing your fabric, THE GUIDE EXTENDING ALONG SIDE OF THE NEEDLE "ALL IMPORTANT" SEAM LINE The cornering guides are convenient when turning a square corner from the fabric edge,. - Page 20 F iat side away from Use KENMORE the needle should conform size of the thread and both should be Fig° 1 suitable to the fabric (See next page), Never use a bent needle or one with a blunt point.. Fig, 1_ shows you the exact length of your needle.
- Page 21 D:i_£i:::iE;=:::): i;::£, _::!'!::-:i;i::!iL:::!ii£iL;_ iLi;q_);3: :;::L:_::!L!I::i::T:;;IIiCI:I :!:::!://: ::::: :::::or: : ::16-PU RPLE : I8_GREE ::_iil]i:_ii:L!i:!_-ii THREAD Polyester Core/Cotton Wrap Fine Mercerized Silk 50 Mercerized Polyester CoretCotton Wrap Silk 50 Mercerized :14-R ED : : Mercerized Heavy-Duty Polyester Core/Cotton Wrap Silk Heavy Duty Mercerized Cotton...
- Page 22 have been gwen a variety A. Zigzag Foot B.. Satin Stitch C. Zipper Foot NOTE: Additionat feet and attachments through the catalog. Please select attachments low bar. i_ _"_ _ iii _ _i i_5:::_ i!_¸ _i_ _ :._ _T change raise the presser bar to its highest tion lifting...
- Page 23 Nowthatyouarefamiliar w iththecontrois o il yourmachine andwiththeac- cessories provided f or [tiemachine, youare ready tostart t osew withyournew l<enmore sewing m achine Below aresome good habits tofolloweach t imeyou sitdown tosew: 1,, Test the needte it should should be the correct afraid to change your...
- Page 24 GARMENT CONSTRUCTOON You will find in garment construction temporary and permanent,. 1, Temporary stitching-Usually single layer' of fabric,, The various types of temporary stitching Basting Stay stitching Guide line marking 2 Permanent stitching-This gether, Much of this stitching therefore must be good looking.. The best length stitch to use for medium inch.
- Page 25 TURNING A SQUARE To turn a square corner 5/8" fabric edge, stop stitching needle piercing reaching the cornering guide as shown.. Raise presser foot, stitching line will align with seam guide on side needle Lower presser foot stitching in new direction. ZgGZAG STiTCHiNG SETTINGS...
- Page 26 • • :!:-: ::i¸ _, !::: L:, •• STRAgGHT STRETCH STgTCHING SETTINGS Stretch Stitch Control ... Vertical Stitch Width Control Stitch Length Control ... 6 Zigzag Presser Foot Use this stretch stitch with fabric and other fabrics that stretch,. Sew as you do with regular straight stitch seaming,.
- Page 27 Aftertl_ebasic constr[_ction finishing t ouches to beclone Toaidyourcompletion ofyourgarment, theKen- more t_as b een d esigned todothefollowing t asks thatformerly h ad tobedone byhand Closely spaced zigzag stitches are called satin stitches This is an attractive stitch used for appliqueing, buttonhole Whenever you are using this stitch, it is well to remember to loosen the tension of the top thread slightly.
- Page 28 BUTTONHOLEMAlt{.QN SETTINGS Stretch Stitch Stitch Width Stitch Length Satin Stitch Always make a practice buttonhole a scrap of fabric you plan to use, Try the buttonhole wil! use,, Always use an interfacing garment where Tissue paper used, stitching, if it is used. Mark the buttonhole ends and also the center"...
- Page 29 Depending upon the fabrics buttonholes, may slightly the center by varying the stitch Lower Presser stitch to left toward you and raise needle, Fig, 4 Stitch Width make bartack raise needle Fig. 5 Stitch Zone and sew other stopping a few stitches length and raise needle, Fig.
- Page 30 ZIPPER the center hole of the foot instruc- has been inserted, finish shifting foot to side sewing through side notch Bar Sewing Machine ZIP- (6757) "invisible which will be at any stores of Sears Roe- Simpsons-Sears...
- Page 31 BUTTON SEWING SETTINGS Stretch S titch Control ... Horizontal Stitch Width Control ..Must b e StitchLength C ontrol ... :_i_ Zigzag P resser Foot Align two holes of button with slot of presser foot and lower foot hold the button securely, Turn hand wheel manually...
-
Page 32: Darning
DARNBPJG SETTINGS Stretch S titch Control ... H orizon[al Stitch Width Control Stitch Length Control ... _i# No Presser Foot Remove presser foot, stretch fabric be- tween embroidery hoops centered Draw the bobbin through the fabric by holding the top thread and taking one stitch at the... - Page 33 This sewing machine can be used like a flat bed machine, easily to free arm machine by removing extension table free enables tubular types of pieces Just slip the sleeve or pants free arm as shown above.. will find many...
- Page 34 "1- rr p- 0 _ OC O: O_ O= mt,- ,.or_ -i:I -,=_ :3...
- Page 36 Ca ing Lever-_ Shuttle Assembly ShuttIe Race Cover Pointed --_ hook Shuttle Shuttle driver Shuttle Race iVlachine Fig 1 Cleaning the feed dogs with brush,, To insure your machine, keep essential times, Using a small brush, Fig 1 lint that accumulates area and around Fig,.
- Page 37 Remove arm cover plate to oil points indicated in top of machine head. To re- move cover plate, loosen up two top screws and lift the cover plate as illustrated below,,...
- Page 38 ODLI[_G Uf'_J DE RSI_©E Tilt machine head back and remove bottom covers to oil points indicated underside of machine, To remove bottom covers, remove screws (A), (B}, (C}, and (D) as shown below, ® ® --- A...
- Page 39 Open face cover plate and oil points in illustration...
-
Page 40: Parts List
PARTS LIST... - Page 41 iPAR3TS L!S_ All partslistedherein maybeordered f romanySears, Roebuck andCo,or Simpsons -Sears Limited store orservice center. WHEN ORDERING REPAIR PARTS, A LWAYS GIVETHEFOLLOWING INFORMATION: 1,PART NUMBER 3, MODEL N UMBER If the parts youneed arenotstocked l ocally, yourorder w il! beelectronically transmitted toaSears Repair Parts D istribution Center forexpedited handling, Re[.No., Part N o,,...
- Page 43 ON ELECTRICAL in material or workmanship equipment of the sewing machine, and speed control ON ALL PARTS AND MECHANICAL mechanical o! the sewing machine, described above, simply contact throughout United States..
- Page 44 Sears Service Center and most Sears, Roebuck and Co.o i:i: ::: Be sure to provide all pertinent facts when you call or visit. The model number of your Sewing Machine will be shown on your nomenclature plate on the back of your Sewing Machine.
Need help?
Do you have a question about the Zig-Zag 1232 and is the answer not in the manual?
Questions and answers