
Related Manuals for Tecovision LED19AHRLCBC

Summary of Contents for Tecovision LED19AHRLCBC
- Page 1 DIGTAL LED/LCD TELEVISION WITH EDGE LED LIGHTING MODLE: LED19AHRLCBC, LED22AFRLLBB, LED24AFRLFBC...
-
Page 2: Table Of Contents
CONTENTS Safety Precautions About this manual / Safety Information Product disposal Safety precautions Handling the LED/LCD screen User Guidance Information Device Overview Desktop Mounting / Wall Mounting Connecting an Antenna Remote Control Precautions / How to use remote control Basic Use Turning on the TV / Selecting Input Source Operation Channel Menu... - Page 5 head...
-
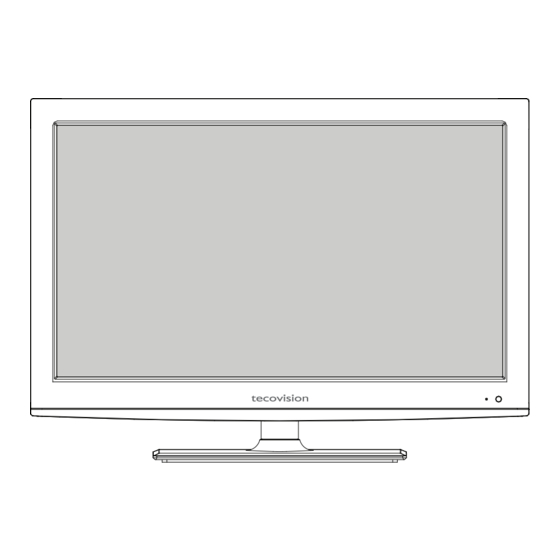
Page 8: User Guidance Information
User Guidance Information Device Overview 1.POWER button 2.VOL+/- button - Adjust Volume 3.CH+/- button - Change Channel 4.MENU button - Display OSD menu. 5.INPUT button - Display Input Source menu. 6.Standby LED 7.Remote Sensor... - Page 9 User Guidance Information Device Overview DC IN HDMI1 RF IN Connecting the Power Cable 1. Connect the small round plug on the power adaptor cable to the power input socket at the rear of the set. 2. Connect the mains cable between the power adaptor and the mains supply.
-
Page 10: Desktop Mounting / Wall Mounting
User Guidance Information When wall mounting TV use only a wall bracket approved by the manufacturer. This device is compatible with standard 100mm X 100mm mounting bracket using the 4 points on the back of the unit as marked in the image below. -
Page 11: Connecting An Antenna
User Guidance Information Connecting an Antenna... -
Page 12: Remote Control
Remote Control... - Page 13 Remote Control...
-
Page 14: Precautions / How To Use Remote Control
User Guidance Information Precautions Remove battery Insert two Replace the cover. AAA batteries. battery cover. CAUTION : Risk of explosion if battery is replaced by an incorrect type. Dispose of used batteries according to the national code (Recycling program). How to use remote control The remote control should be operated within 30 feet (7m) and 30 to the left and the right of the IR sensor at the front of the TV. -
Page 15: Turning On The Tv / Selecting Input Source
Turning on the TV Media Component HDMI1 HDMI2 TIPS: You can also use the DTV button on the remote control to instantly select the DTV source. -
Page 16: Channel Menu
Channel Menu Press MENU button to display the main menu. Press ◄ / ► button to select CHANNEL in the main menu. Au to Tu n i n g ATV Ma n u a l Tu n i n g CHANNEL D TV Ma n u a l Tu n i n g C H A N N EL... -
Page 17: Dtv Manual Tuning
Channel Menu Press ▼ / ▲ button to select AFC. Press ◄ / ► button to select On or OFF. Press ▼ / ▲ button to select Search, then press OK button to start tuning. Press Red button on your remote control to save the settings and press MENU button to return back to the previous menu. -
Page 18: Signal Information
Channel Menu Signal Information Press ▼ / ▲ button to select Signal Information, the press the OK button to see the detail information about the signal. Si g n a l In fo rma ti o n Channel 29 F requency 538.00MHZ Q uality 96 Strength 84... -
Page 19: Picture Menu
Picture Menu Press MENU button to display the main menu. Press ◄ / ► button to select PICTURE in the main menu. Picture Mode Standard Contrast Brightness Color PICTURE Tint Sharpness Colour Temp Cool Noise Reduction Middle Move Move Return Select Exit Exit... - Page 20 Picture Menu NOTE: Contrast : This item can adjust the highlight intensity of the picture, but the shadow of the picture is invariable. Brightness : This item can adjust the brightness of the entire picture, it will effect the dark region of the picture. Colour : This item can adjust the saturation of the Colour based on your own preference.
-
Page 21: Sound Menu
Sound Menu Press MENU button to display the main menu. Press ◄ / ► button to select SOUND in the main menu. Sound Mode Standard Treble Bass SOUND Balance Auto Volume SPDIF MODE AD Switch Move Return Select Exit Move MENU Return Exit... - Page 22 Sound Menu NOTE: Balance : This item can adjust the speaker’s output, it enables you to listen to best sound balance at your position. Auto Volume : This item can be used for reducing the difference between channel and program’s volume automatically. It makes the overall volume to be even.
-
Page 23: Time Menu
Time Menu Press MENU button to display the main menu. Press ◄ / ► button to select TIME in the main menu. Clock 20/Jul 13:12 Time Z one NSW/ACT Sleep Timer T IM E Auto Standby OSD Timer Move Return EXIT Exit Move... -
Page 24: Lock Menu
Lock Menu Press MENU button to display the main menu. Press ◄ / ► button to select LOCK in the main menu. Lock System Set Password Block Program Loc k Parental Guidance NO BLOCK Key Lock Hotel Mode Move Exit Move Return Return... -
Page 25: Parental Guidance
Lock Menu Press ▼ / ▲ button to select the program you want to lock, then press Green button on your remote control. (To unlock program, input the password you set.) Press OK button to save setting and menu button to back to the previous menu. Parental Guidance Press ▼... -
Page 26: Clear Lock
Lock Menu Max Volume Press ▼ / ▲ button to select Max Volume, then press ◄ / ► buttont to adjust the value. After set the Max Volume, the volume can’t be adjusted above the max volume. Import (USB Clone Function) Press ▼... -
Page 27: Setup Menu
Setup Menu Press MENU button to display the main menu. Press ◄ / ► button to select SETUP in the main menu. OSD Language English T T L an g u ag e West Hearin g Imp aired Of f PVR F ile Syst em SET U P Asp ect Rat io... -
Page 28: Aspect Ratio
Setup Menu Aspect Ratio Press ▼ / ▲ button to select Aspect Ratio, then press OK button to enter sub-menu. Press ▼ / ▲ button to select Aspect Ratio . (Available options: Auto, 4:3, 16:9, Zoom1, Zoom2). Blue Screen Press ▼ / ▲ button to select Blue Screen, then press OK button to select On or Off. First Time Installation Press ▼... -
Page 29: Screen Menu (Only For Pc)
Screen Menu (Only for PC) Auto Adjust H-Offset V-Offset SCREEN Size Phase Position Reset Move Move Return Return Select Exit Exit Move E X IT Exit M E N U Return Select Select EXIT MENU 1. Press ▼ / ▲ button to select the option that you want to adjust in the SCREEN menu. 2. -
Page 30: Electronic Progrm Guide (Epg)
Electronic Progrm Guide (EPG) Press the EPG button on the remote control to enter EPG menu. P RO G RA MME G UIDE 21 Mar 2007 03:00-06:00 21 Mar 2007 05:39 For the best way to start your day, wake up to Australia's number one breakfast show with DAVID KOCH and MELISSA DOYLE for all the latest news, sport and weather. - Page 31 Electronic Progrm Guide (EPG) Display Press the GREEN button to display the detail information about the program. Schedule Press the YELLOW buttton to see the Schedule List you have done before. (Record or Remind task) Schedule List Delete 05:41 21th Mar Time Date Programme Title...
-
Page 32: Personal Video Recorder Mode (Pvr)
Personal Video Recorder Mode (PVR) Record When you are watching DTV, you can press ● button to start Record mode. TV will display a record control menu. Press ● button to display or hide the record control menu. Stop Record Press ■... -
Page 33: Time Shift
Personal Video Recorder Mode (PVR) Use RED button to delete the selected video. Use GREEN button to see the detail of the selected video. Use OK button to start playback the selected video. Use ◄/► button to select playback control icon in record control menu, then press OK button to execute. TIPS: The ►... -
Page 34: Media Player Mode
Media Player Mode Note: Before operating Media menu, plug in USB device, then press INPUT button to set the Input Source to Media. Press ▼ / ▲ button to select Media in the Source menu, then press OK button to enter. Press ◄... - Page 35 Media Player Mode Press DISPLAY button to display or hide control menu. Press ◄ / ► button to select function icon in control menu, then press OK button to excute. Press ■ or EXIT button to return back to previous menu. TIPS: The button on the remote control is as same as function icon in control menu.
- Page 36 Media Player Mode Music Press ◄ / ► button to select MUSIC in the main media menu, then press OK button to enter. USB2.0 MUSIC TEXT PHOTO MOVIE Press ◄ / ► button to select drive disk you want to watch, then press OK button to enter. Press ◄...
- Page 37 Media Player Mode Press ◄ / ► button to select the file you want to watch in the file selecting menu, then press OK button to play. MUTE R e p e a t A l l Press DISPLAY button to display or hide control menu. Press ◄ / ► button to select function icon in control menu, then press OK button to excute.
- Page 38 Media Player Mode Movie Press ◄ / ► button to select MOVIE in the main media menu, then press OK button to enter. USB2.0 MUSIC TEXT PHOTO MOVIE Press ◄ / ► button to select drive disk you want to watch, then press OK button to enter. Press ◄...
- Page 39 Media Player Mode Text Press ◄ / ► button to select TEXT in the main media menu, then press OK button to enter. USB2.0 MUSIC TEXT PHOTO MOVIE The most of the TEXT function are the same as the PICTURE.
-
Page 40: Operation Instruction
Media Player Mode Press DISPLAY button to display or hide control menu on the bottom of TV screen. Press ◄ / ► button to select function icon in control menu, then press OK button to excute function as the following table shows it. Item Supported Mode Function... -
Page 41: Maintenance And Service
Maintenance and Service Troubleshooting... -
Page 42: Specifications
Maintenance and Service Specifications Model 19” LED TV 22” LED TV 24” LED TV Panel Size 23.6” 18.5” 21.5” Brightness LED Edge Backlight LCD Panel 1000:1 1000:1 1000:1 Contrast Ratio Max.Resolution 1366 x 768 1920 x 1080 1920 x 1080 VIDEO YPbPr AUDIO(L/R)
Need help?
Do you have a question about the LED19AHRLCBC and is the answer not in the manual?
Questions and answers