Table of Contents
Advertisement
Quick Links
Advertisement
Table of Contents

Related Manuals for Sirius Satellite Radio SV1 SIRIUS One


Summary of Contents for Sirius Satellite Radio SV1 SIRIUS One
- Page 1 SV1 SIRIUS One SIRIUS Satellite Radio Plug and Play User and Installation Guide...
-
Page 2: Table Of Contents
Satellite Radio Plug and Play Receiver lets you enjoy SIRIUS Satellite Radio’s digital entertainment in your vehicle, home, or boat. Use this guide to familiarize yourself with all of SV1’s features and capabilities. For the latest information about this and other SIRIUS products, please visit http://www.siriusradio.com. - Page 3 © 2005 SIRIUS Satellite Radio Inc. ® “SIRIUS,” the SIRIUS dog logo, channel names and logos are trademarks of SIRIUS Satellite Radio Inc. “NFL” and the NFL Shield logo, and the NFL Sunday Drive name and logo are registered trademarks of the National Football League.
-
Page 4: Safety Precautions
Safety Precautions • If the LCD display on the Receiver becomes damaged or broken, do not touch the liquid crystal Warning fluid. The fluid can be dangerous to your health. If Take the following precautions to prevent fire and the liquid crystal fluid contacts your body or avoid personal injury: clothing, immediately wash it off with soap and •... -
Page 5: Fcc Warning
• Reorient or relocate the receiving antenna. FCC Warning • Increase the separation between the other This equipment may generate or use radio equipment and the Receiver. frequency energy. Changes or modifications to this • Connect the other equipment to a different circuit equipment may cause harmful interference unless from that to which the Receiver is connected. -
Page 6: Package Contents
Package Contents The following items are packaged with the SV1 SIRIUS One. Check the package to be all of the items are included. If any of the items are missing, please contact the retailer where you purchased the product. Alcohol Swab and SV1 SIRIUS One ®... -
Page 7: Installation
Installation The location should be easily reachable and provide Installation of your SV1 SIRIUS One is easy: good visibility of the Receiver. 1. Choose a location in your vehicle where you will Mounting the Receiver mount the Receiver, either on the visor, the Attach the desired mounting device, suction cup dash, or the windshield. -
Page 8: Installing The Magnetic Antenna
Sedan/Coupe : Mount the antenna along the rear Depending upon your mounting choice, clip the Receiver to the visor, or, use the velcro strips to centerline of the vehicle roof, located at the rear of mount the Receiver to the dash, or, if you are using the roof near the rear window. - Page 9 Convertible : Mount the antenna along the centerline of the trunk lid, with the rubber antenna cable cover/ tail directed toward the rear window. Route the cable from the lowest point of the rear Clean the area where the antenna and rubber window into the trunk.
-
Page 10: Connecting The Receiver
ANTENNA PROTECTIVE MATERIAL period, avoid car washes and other contact with the (UNDERSIDE) (RED SIDE) antenna and rubber antenna cable cover/tail. ADHESIVE RUBBER ANTENNA STRIP CABLE COVER/TAIL ANTENNA CABLE RUBBER ANTENNA CABLE COVER/TAIL peel the yellow protective material from the adhesive strip and adhere the adhesive strip to the VEHICLE MOUNTING SURFACE... -
Page 11: Activating Your Sirius Subscription
Activating your SIRIUS Subscription subscription. Before you can listen to the SIRIUS service, you need to subscribe to the SIRIUS Satellite Radio service. 1. Be sure that the Receiver is correctly installed 4. To listen to the audio from your Receiver, you will... - Page 12 search for a quiet frequency to use. Refer to the 7. When you have successfully subscribed to the section titled, FM Transmitter in this User Manual SIRIUS service, and the Receiver has been for instructions on how to tune the FM transmitter updated with your subscription information, an to other FM frequencies.
-
Page 13: Sv1 Sirius One Receiver Basic Operation
SV1 SIRIUS One Receiver Basic Operation holding enables “Preset Tune Mode”, which allows for viewing and listening of stored presets with the channel up/down buttons. 4. Preset Number Buttons (1-5): Sets and selects preset channels. Also used to directly tune channels by entering the channel number. -
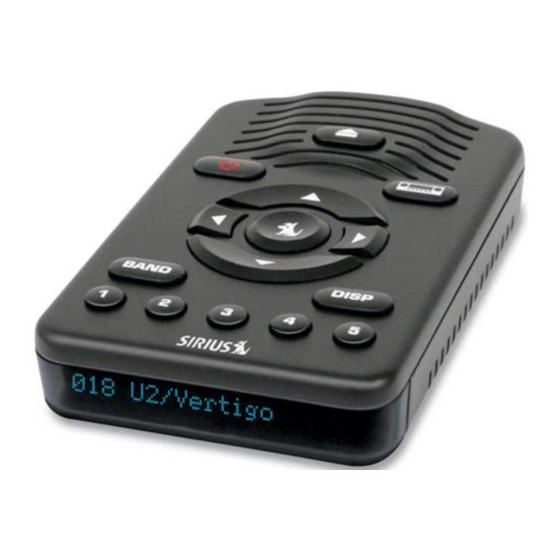
Page 14: Remote Control
Remote Control 1. Power Button : Turns the Receiver power On and Off. 2. Number Buttons (0-9): Used for directly selecting channels and for presets. 3. BAND Button: Switches between preset bands A , B, C, D, and E. 4. MUTE Button: Mutes the audio. BAND DISP 5. -
Page 15: Changing Channels
Pressing the category previous or next button will After you have successfully activated your SIRIUS cause the Receiver to display a listing of the subscription, and the Receiver has received the previous or next channel category. subscription information from the SIRIUS signal, the default display screen will be displayed. -
Page 16: Selecting Channels Directly
and the channel up and down buttons to scroll through the available channels in each category to find the channel to which you want to listen. When you have found the channel you wish to listen to, press the select button to tune to the channel. The new channel will begin playing and the display will revert to the default display screen for the new channel. -
Page 17: Advanced Features
Advanced Features favorite channel. The band and preset number Channel Presets (BAND) will then be displayed to confirm that the channel has been stored. You can store up to 30 of your favorite channels as presets for quick recall access. The preset channels are stored in 5 bands, A, B, C, D, E, and F each containing 5 channel presets, and are numbered 1 to 5. -
Page 18: Searching For A Channel Preset (P.tune Mode)
Searching for a Channel Preset (P.TUNE Mode) Empty presets are not displayed. To quickly search through all of your presets in the 3. To exit the P.TUNE mode, press and hold the P.TUNE mode, do the following: BAND button for approximately 1 second, until the default display screen is displayed. -
Page 19: Menu Options
If no FM frequencies have been preset when the FM button. The preset will now display the new FM Preset button is pressed, the Receiver will default to frequency. To select the preset, press the MENU a frequency of 88.1 MHz. button. -
Page 20: Fm Transmitter
To exit menu options, or any of the other menu FM Presets option screens, repeatedly press and release the To create or add to a list of FM preset frequencies, MENU key on the remote control until you are do the following: returned to the default display screen. -
Page 21: Fm On/Off
adjacent FM stations. These are the On” or “FM Off”, and press the select button. frequencies which should be added to the FM To exit the FM On/Off menu, press the MENU presets list. button. 4. Using the channel up and down buttons, display Display Options the frequency you wish to select for the preset The Receiver’s display screen can be adjusted for... -
Page 22: Parental Control
display. Use the channel up and down buttons, to When access to a locked channel is attempted adjust the brightness/contrast. The bar graph will using the direct channel entry method, the “Enter move to indicate the change. Code” screen is displayed and the channel cannot be accessed until the correct code is entered. -
Page 23: Edit Code
be any four digit number from 0000 to 9999. 5. To lock or unlock a channels, use the channel up and down buttons to display a channel, and press If you should exit this prompt without entering a the select button. code, you will be prompted to set a code next time you enter the Lock/Unlock option. - Page 24 If you should exit this prompt without entering a prompt will appear. Enter the new Parental code, you will be prompted to set a code the next Control code. time you enter the Edit Code option. To change the Parental Control code, do the following: 1.
-
Page 25: Audio Level
1. Use channel up and down buttons to display the “Signal Indicator” menu option, and press the If you have forgotten your Parental select button. Control code, call SIRIUS Customer Service for help. Audio Level The Audio Level menu option adjusts the level of the audio output of the Receiver. -
Page 26: Factory Default
Factory Default the select button. 2. Use the channel up and down buttons to display The Factory Default option will restore most every feature of the Receiver to the original factory “Yes” to restore all settings to the settings from settings. - Page 27 4. If Yes is chosen, the Receiver will revert to the original factory settings. 5. When the Factory Default is complete, the Receiver will place you in Channel 184 the SIRIUS preview channel and display, “Call 1-888-539- SIRIUS to Subscribe”. The Receiver is still subscribed to the SIRIUS service.
-
Page 28: Troubleshooting
Troubleshooting This section lists several common problems and suggested solutions. If, after trying the suggested solutions listed here, you are still unable to resolve the problem you’re having with your Receiver, contact your installer, dealer, or retailer for more help. Problem Cause and Suggested Solution Receiver does not power on... -
Page 29: Specifications
Specifications Satellite Frequencies ..................... 2322.293/2330.207 MHz Terrestrial Frequencies ......................2326.250MHz Power Requirements ................9-16 Volts, Negative Ground, DC Audio Output ..................... 550mVrms (+/- 50mVrms) Total Harmonic Distortion (THD) ....................... <0.2% Signal-to-noise (S/N) ...................... Greater than 73dB Fuse Requirement ......................... 2A ATC Receiver Dimensions (Width x Length x Height) ........... -
Page 30: 12 Month Limited Warranty
12 MONTH LIMITED WARRANTY SIRIUS Satellite Radio Inc. (the “Company”) warrants to the original retail purchaser of this product that should this product or any part thereof, under normal use and conditions, be proven defective in material or workmanship within 12 months from the date of original purchase, such defect(s) will be repaired or replaced with new or reconditioned product (at the Company’s option) without charge for... - Page 31 Please record the SIRIUS ID (SID) in the space provided below: SIRIUS ID: SIRIUS Customer Service: 1-888-539-7474 SIRIUS Product Support: 1-800-869-5590 customercare@sirius-radio.com SV1 Receiver User and Installation Guide...
- Page 32 SIRIUS Satellite Radio Inc. 1221 Avenue of the Americas New York, NY 10020 1-888-539-7474 www.sirius.com SV1 (081105a)
Need help?
Do you have a question about the SV1 SIRIUS One and is the answer not in the manual?
Questions and answers