Table of Contents
Advertisement
Advertisement
Table of Contents

Summary of Contents for Hawx Pro DG
-
Page 2: Table Of Contents
Table of Contents Components How the system works Quick Operation Guide Key Definitions and Operation Master Transmitter Collar Receiver Dog & Gun Control Prepare devices Charge the Master Transmitter Charge the Receiver Operation LED Indicator Chart Find the Best Intensity Level for your Dog Range of Dog &... -
Page 3: Components
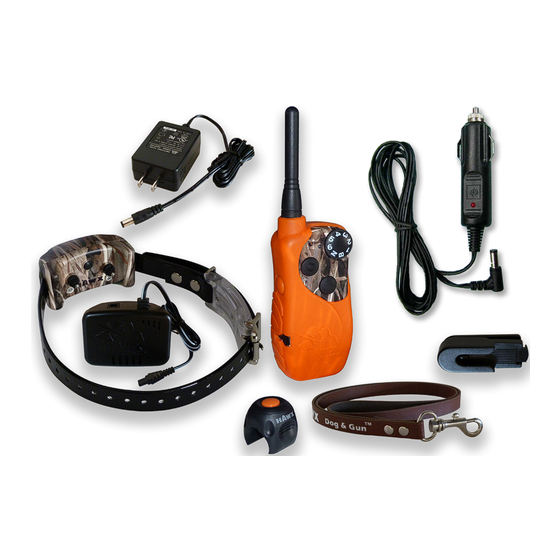
Components How the system works The Hawx Dog & Gun is a multipurpose training and hunting solution. The Master Transmitter and the Dog and Gun control provide the ultimate flexibility and control whether you are hunting or training. The Dog and Gun control (DG) allows split second correction or reinforcement. - Page 4 The Pro DG hunter/trainer has a 1 mile range. The DG hunter/trainer has a 1/2 mile range. The range may vary depending on how high you hold the Master Transmitter; vegetation and weather conditions can also affect the range.
-
Page 5: Quick Operation Guide
Quick Operation Guide Your Hawx system is ready to go and is set on default factory Hunter Mode 11. Upper Button = Continuous Lower Button = Momentary Side Button = Tone Toggle switch Up = Dog 1 Toggle switch Down = Dog 2 Dog &... - Page 6 Operation of Dog & Gun Button In Hunter mode the Dog & Gun button is paired to the Lower button - Momentary. Turn Off when not in use, move selector back to Training (T) mode to save power. Set or Change Intensity The factory default Dog &...
-
Page 7: Key Definitions And Operation
Key Definitions & Operation Master Transmitter The Master Transmitter sends a signal to activate the e-collar which delivers a harmless stimulation to the dog. The transmitter is waterproof and submersible, it also incorporates a 2.4 GHZ receiver for Dog & Gun remote control. -
Page 8: Collar Receiver
Back 7. Dog & Gun Switch/Training Selector Switch • This activates the control for the Dog & Gun transmitter. DG = Dog & Gun mode. T= Training mode. 8. Customizing Mode Button • This allows you to customize the system from factory settings. - Page 9 Performance Comfort Wings (PC Wings) The design that provides comfort and better contact performance. The performance of long contacts with the feel of short contacts. See page 17 for fitting. Stretch E-Strap Stretches as your dog breathes. Auto pressure gauge for ultimate performance and comfort. See page 14 for fitting.
-
Page 10: Dog & Gun Control
Dog & Gun Control (DG) Dog and Gun control offers you the ability to mount a control on your gun, or keychain, and put the master training transmitter in your pocket. This micro button sends control signals to the collar receiver, providing fast reaction and ease of use. -
Page 11: Prepare Devices
Prepare the Devices Charge the Master Transmitter • Lift the rubber cover protecting the Charging Jack. • Connect the Transmitter Charging Wire to the Master Transmitter. • Connect the AC adapter or car adapter to the Charging Cradle. • Plug the AC adapter into a 120V AC outlet, or plug the car charger into car power. •... -
Page 12: Operation
Operation (Training Mode) To turn collar receiver ON: Press, then wait for two confirming tones, and release the Power Button. The light will flash periodically. To turn collar receiver OFF: Press, wait for the one long confirming tone and release the power button. Light will stop flashing. -
Page 13: Find The Best Intensity Level For Your Dog
Transmitter Indication LED Green Orange Green Orange Collar / Receiver Indicator Note – Low battery is indicated by any light going red. Re-charge your unit. Operation LED Color LED Status Charging Orange Green Green Green Find the Best Intensity Level for your Dog All dogs respond differently to different levels of stimulation. -
Page 14: Range Of Dog & Gun Control And Best Location Of Your Transmitter
Find your dog’s recognition level: Every dog is different, so you can’t predict where your dog’s recognition level will be. Watch closely for any slight change in behaviour that may tell you the dog is feeling the stimulation. 1. Set the Master Transmitter’s intensity at level 1 and press Continuous stimulation button for 1 to 2 seconds. -
Page 15: Fitting The E-Collar
Ninety-nine percent of all collar issues are caused by improper fitting of the collar. The contact points must have direct contact with your dog’s skin at all times. To ensure proper fit, comfort and performance Hawx e-collars provide two exclusive technologies. -
Page 16: Performance Comfort Wing Technology
Position the collar so you can read Hawx, then insert Right and Left wings. Removing or changing wings Hawx provides three styles of fit: no wings, (conventional mode), small wings, or large wings. These can be used for all types of dogs with different coats and neck sizes. -
Page 17: Operation Of Dog & Gun
Operation of Dog & Gun Dog & Gun mode allows the gun mounted button to send a signal to the collar receiver via the Master Transmit- ter. The Dog & Gun switch allows easy transition between training mode and Dog & Gun mode. After pairing & setup, the Dog &... -
Page 18: Setting Dog & Gun Transmitter Intensity Level
Setting Dog & Gun Transmitter Intensity Level Once paired and setup, your Gun transmitter will be matched to one of the buttons on your transmitter. Note: You can change intensity levels at any time by repeating the above. You can move back and forth from training mode to D&G mode by moving the selector button. - Page 19 The Dog & Gun buttons can be mounted directly into the stock. We recommend that you take your gun to an approved installation dealer in your area for professional installation and warranty. Dealers are shown on the Hawx website (www.hawxdoggun.com) under Support. The following is a do-it-yourself mounting instruction. You should only attempt this after a number of prac- tice installations on wood.
-
Page 20: Configure A New Mode / Selecting Or Changing Modes
Configuring a new mode The Hawx system provides up to 27 different modes to provide custom key functions for any kind of training or hunting environment. In addition, if you can’t find the mode that meets your requirements, you can re- quest a custom mode. -
Page 21: Mode Chart And Remote Training Systems
Mode Chart and Remote Training Systems NOTE: The transmitter is set at factory default, on model 11 Continuous (upper button), Momentary (low button), Tone (side button), Dog #1 and Dog #2 – toggle position. From the configuration chart, pick the model that best fits your type of training style or hunting style. Note the model # you would like to select. - Page 22 E-Collar Modes Orientated to 3 or More Dogs Mode Toggle Toggle Intensity (level set by (level set by intensity (up/ dial intensity dial) (level set by dial) down) intensity dial) High Dog 1 Dog 2 Dog 3 Upper Medium Dog 1 Dog 2 Dog 3 Momentary...
- Page 23 Mode Toggle Toggle Intensity (level set by (level set by intensity dial intensity dial) (level set by dial) down) intensity dial) High Medium Momentary 1 dog Down Side Launcher Sound High High Momentary Vibrate/Tone 1 dog Down Upper Launcher Sound High High Momentary Vibrate/Tone...
-
Page 24: Add A New Collar (Pairing) And Selection Of Tone Or Vibrate
Adding another collar for Two-Dog operation A Hawx transmitter can be adjusted for two-dog operation by moving the toggle switch to the other posi- tion, either up or down. Follow instructions above. Pair collars for Three or Six-Dog System This feature uses all three buttons for each dog on a three-dog system, and the toggle switch for a six-dog system. -
Page 25: Selecting Beeper Or Tone Control
Six-Dog Operation In this mode, you can control collar receivers 4, 5 and 6 by moving the toggle switch to the down position. For six-dog operation (only available in mode 13 and 15): Repeat the above steps but, for pairing 4, 5 and 6 collars, make sure the toggle switch is in the down position. -
Page 26: Pairing A Dog & Gun Button
To turn OFF the Beeper Collar remotely: • Flip the Toggle Switch to the down position. • Press the Upper Button** on the Master Transmitter. *The Power Switch on the Beeper Collar must be in the Standby position for the remote on/off to work. To save battery life, the Power Switch should be in the off position. -
Page 27: Add A Remote Launcher (Pairing)
Any type of launcher or bird release can be controlled by using a Bumper Boy receiver (see products at www. bumperboy.com). Hawx electronics power all Bumper Boy retriever training products. Launcher controls are supported in modes 16 to 27. Refer to customization charts (pages 21 to 22). -
Page 28: Auto Run Operation
Auto Run Operation Runs multiple launcher units like a field trial. Now you can set your Auto Run to a customizable delay sequence, ranging from 1 - 6 seconds, and customizable sound or sound and launch feature. Hands Free Operation Auto run mode launches multiple units with a customizable sequential delay between marks (1 - 6 seconds). -
Page 29: Pairing A Dog & Gun Button For Auto Run
Pairing a Dog & Gun button for Auto Run (Launcher Control) Note: Before pairing Auto Run the transmitter must be in a mode or model that supports launcher control (see Mode Chart pages 21 to 22). Test your unit by turning on launcher receivers (make sure they are unloaded). Press once to start, press again to pause, press once more to restart. -
Page 30: Master Transmitter And E-Collar Rechargeable Batteries
Button. The LED will flash 3 times, indicating that the 1st digit of ID code has been selected. 5. While the LED is still on, turn the Selector Dial to select the 2nd digit of ID code. Then press the Side Button. - Page 31 • Plug in the new battery. • Close the case and put the screws back in. To Replace the Dog & Gun Battery The coin battery used for DG is 3V Lithium, 1620. • Remove the DG from the gun clip or gunstock by pushing a small screwdriver under the slot indicator marks on the bezel.
-
Page 32: Troubleshooting
The Master Transmitter is not with the e-collar. communicating with the e-collar • You may have accidentally switched the Master Transmitter with another Hawx system. • Observe if the indicator lights flash on the master transmitter and then the e-collar. - Page 33 • You may need a new battery, or the Charger The battery is not taking any charge may not be working. • Check the red light on the charging cradle. • Dog may be shielded by structures such as metal fences, chain-link dog enclosures, screen doors, buildings, etc.
-
Page 34: Fcc Compliance
4. Limitation of liability In no event shall Hawx Outdoors Inc. be liable for any direct, indirect, punitive, incidental, special or conse- quential damages. Hawx Outdoors Inc. shall not be liable for any damages arising out of or connected with the use or misuse of this product.
Need help?
Do you have a question about the Pro DG and is the answer not in the manual?
Questions and answers