
Related Manuals for Invoxia NVX 610

Summary of Contents for Invoxia NVX 610
- Page 1 Welcome NVX 610...
- Page 3 Welcome to the invoxia world !
-
Page 4: Box Contents
Box contents NVX 610 base NVX 610 handset Smart holder x 3 Tablets & iPhone 5 and cable stand Bienvenue NVX 610 Ethernet cable AC adapter iPhone / iPod This welcome booklet adapters... -
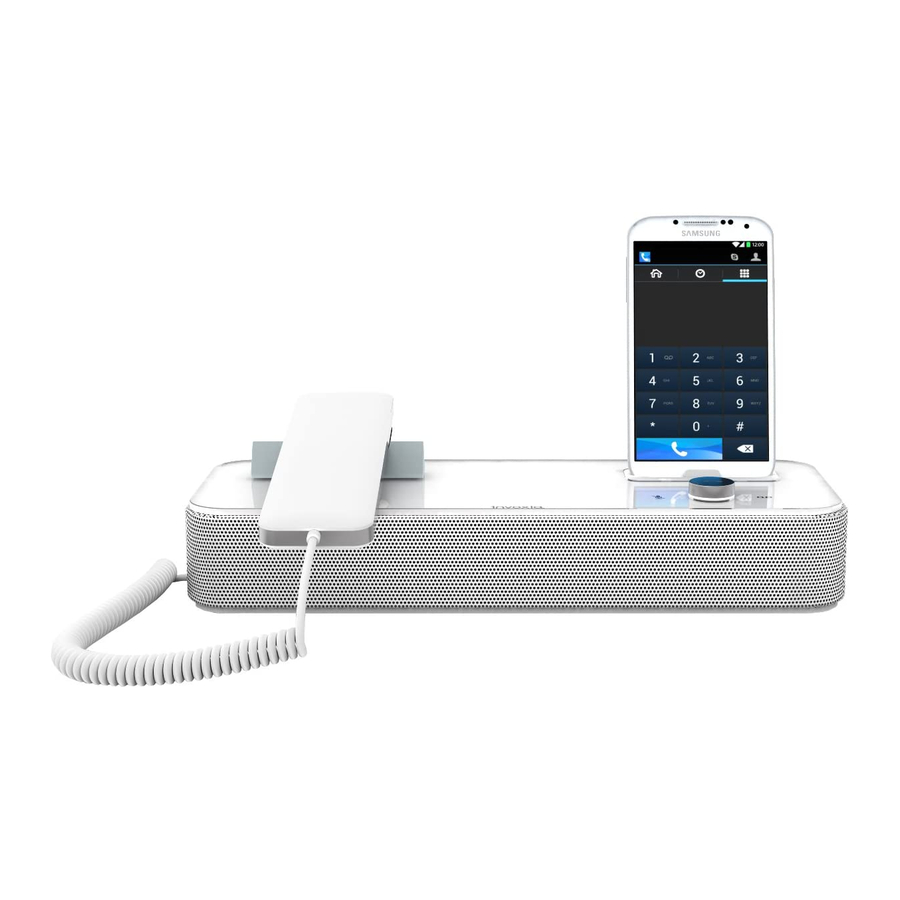
Page 5: Your Invoxia Phone
Your invoxia phone Secrecy mode Adjust volume/Receive and End a call Messages Designed and produced by invoxia, Paris... - Page 6 Set up Positioning Place your phone near your network socket (and near your mains supply socket if you are using a mains power adapter). Connecting the base This phone is powered by PoE (Power over Ethernet), if your network is compatible, or through your mains AC 100-240V supply.
- Page 7 2. Place the smart holder on the base. It will cleverly fit in the right place (if the poles are magnetically repelled, simply turn it around horizontally 180º).
- Page 8 3. Insert your iPhone/iPod adapter To connect a di erent model, remove the adapter and insert another one. 4. Insert the tablet and iPhone 5 removable stand in the slots at the back of the base.
- Page 9 5. If you are using the mains supply, plug the mains power adapter into the back of the base and into an active wall socket. 6. Plug one end of the Ethernet cable into the ETH connector at the back of the base and into your network telephone socket.
- Page 10 7. Connect your phone to your computer by attaching an Ethernet cable between the PC port at the back of the base and the Ethernet port on your computer (cable not supplied). 8. Press the On/Off button at the back of the base.
- Page 11 Installing the handset 1. Plug the cord of the handset into one of the USB ports at the back of the base. Slide the cord into place through the interstices under the base. 2. Place the handset on the Smart holder on top of the base.
- Page 12 Installing the iPad and iPhone 5 To remove the tablet and iPhone 5 stand, or to attach it at a later date, simply unplug the power adapter, Ethernet cables and handset, then plug them all back in once the stand has been attached. Insert the iPad or iPhone 5 connector in the dedicated slot.
- Page 13 Connecting your iPhone/iPod/iPad During the following connections between your iPhone/iPod/iPad and the invoxia base, make sure your iPhone/iPod/iPad is unlocked so the invoxia app can start running automatically (whether placed on the dock or connected via Bluetooth). 1. Place your iPhone or iPod on its dock on top of the base and/or place your iPad vertically or horizontally on...
- Page 14 2. Follow the instructions on your iPhone/iPod/iPad to configure your invoxia phone based on your network provider’s settings. 3. Once the installation is complete, you are ready to enjoy the full power of your invoxia phone.
-
Page 15: Need Help
: you will easily find your Contacts, Recents, Keypad and Voicemail. Need help? Please visit the www.invoxia.com website for more information. You can view your phone’s full user guide at www.invoxia.com/en/support. «Made for iPod», «Made for iPhone», and «Made for iPad» mean that an electronic accessory has been designed to connect specifically to iPod, iPhone, or iPad, respectively, and has been certified by the developper to meet Apple performance standards. - Page 16 Experience your phone !
Need help?
Do you have a question about the NVX 610 and is the answer not in the manual?
Questions and answers