Table of Contents
Advertisement
Advertisement
Table of Contents

Related Manuals for Invacare Ben NG


Summary of Contents for Invacare Ben NG
- Page 1 Invacare® Ben NG Ben NG User Guide User Guide...
-
Page 2: Table Of Contents
Contents Page Useful Symbols In This Manual Warranty Terms & Conditions Limitation of Liability Introduction Intended Use Safety & Operating Limits Weight Limit Safe Slope Reaching For An Object From A Wheelchair Transferring To Another Seat Tilting (Balancing On The Rear Wheels) & Obstacle Climbing Steps, Stairs Or Obstacles Over 50mm High Upward &... - Page 3 Types of Lap Belt 15.2 Lap Belt Adjustment Routine Checks & Maintenance Transportation 17.1 Using your wheelchair as a seat in a vehicle 17.2 Transporting your wheelchair as luggage Storage Cleaning Product End Of Life ISO 7176 part 15 Contacting INVACARE...
-
Page 4: Useful Symbols In This Manual
Useful Symbols In This Manual WARNING! This symbol warns you of danger! Always follow the instructions to avoid injury to the user or damage to the product! NOTE: This symbol identifies general information which is intended to simplify working with your product and which refers to special functions. -
Page 5: Warranty Terms & Conditions
Warranty Terms & Conditions Standard INVACARE Terms This is to certify that your wheelchair is warranted by INVACARE Ltd. for a period of 2 years for parts and 5 years for frames. 1. Only INVACARE chairs purchased at full price are warranted against defective workmanship and materials. -
Page 6: Limitation Of Liability
Limitation Of Liability This warranty does not extend to the consequential costs from fault clearance, in particular freight and travel costs, loss of earnings, expenses, etc. • Natural wear and tear • Inappropriate or incorrect use • Defective assembly or setting-up by the purchaser or third parties •... -
Page 7: Introduction
The document also gives a brief indication of the options that can be used as an alternative to the standard features. Ben NG & Ben NG HD wheelchairs are designed for outdoor and indoor use, and can be folded to be placed in most vehicles. The maintenance and safety checks mentioned in the manual should be carried out within the time scales covered. -
Page 8: Intended Use
The Ben NG HD wheelchair has, in its heavy duty transit or self propel format (20”, 22” and 24” seat widths), been designed to accommodate users who weigh up to a maximum of 160kg (25 stone), have all limbs intact and have sufficient upper body strength to maintain a safe position within the wheelchair without the addition of supporting aids. -
Page 9: Safety & Operating Limits
Weight Limit The maximum user weight limit is 127kgs (20 Stone) for Ben NG chairs with a seat width of 15” - 18” wide chairs. The maximum user weight limit is 160kgs (25 Stone) for Ben NG HD 20” to 24” wide chairs. -
Page 10: Safe Slope
Forward facing downhill = 21° ° ° ° Sideways, across slope = 18.5° ° ° ° Based on these results Invacare estimate the maximum safe slope (dynamic) as 9 degrees However, the maximum safe slope could vary depending on the ability of each individual. -
Page 11: Reaching For An Object From A Wheelchair
Reaching For An Object From A Wheelchair (Note: All images showing a self propel wheelchair are for illustrative purposes). The limitations on reaching out from a wheelchair shown in Figure 1 have been produced using a representative sample of wheelchair users. Only the arms should extend beyond the seat of the wheelchair. - Page 12 Leaning Forwards (Figures 3, 4 & 5) With the wheelchair as close as possible to the object you wish to reach, only reach out to take what is within arm’s length in normal sitting position.
- Page 13 Leaning Backwards (Figures 6 & 7) With the wheelchair as close as possible to the object you wish to reach, only lean back for objects that are within arm's length in normal sitting position.
-
Page 14: Transferring To Other Seats
Do not try to pick something up from the floor if this would upset your balance. It is possible to move from and to a manually propelled chair if the following guidelines are followed. INVACARE does not recommend any particular method for transferring: This is the responsibility of a medical adviser who should consider your level of disability and type of wheelchair. -
Page 15: Iso 7176 Part
When transferring, either to get out of or return to your wheelchair, make sure that the manual brakes on the rear wheels are on to prevent the wheel moving (Figure 11). Turn both castors towards the seat to which you wish to move. - Page 16 If possible, swing the legrest hangers out to the side to clear the passage (Figure 13). If possible, remove the armrest on the side between the wheelchair and the other seat (Figure 14).
- Page 17 Note: Never stand on the footplates (Figure 15).
-
Page 18: Tilting (Balancing On The Rear Wheels) & Obstacle Climbing
Keep your back straight and bend at the knee to tilt the wheelchair. Never exert too much force. The medical team in charge of the user will advise you in the methods best suited to your morphology. The INVACARE approved distributor will provide you with information on the risks of using the wheelchair incorrectly if the wheelchair has removable parts such as armrests or leg rests. - Page 19 Method 2 - Negotiating the obstacle backwards (Figure 17) The helper should stand on the pavement and turn the wheelchair until the rear wheels are against the kerb. Tilt the wheelchair backwards to the point of equilibrium and, in a continuous movement, pull the wheelchair until the rear wheels mount the kerb and pass onto the pavement.
-
Page 20: Steps, Stairs Or Obstacles Over 50Mm High
Steps, Stairs Or Obstacles Over 50mm High We recommend that you take very great care when taking a wheelchair up or down stairs. Two people are required for this. ADVICE TO THIRD PERSONS: Make sure that you grip onto fixed, non-removable parts only. Use the following procedure for going up stairs (Figure 18): Tilt the wheelchair to its point of equilibrium. -
Page 21: Upward & Downward Slopes (Operating Limits)
Upward & Downward Slopes (Operating Limits) Always go straight up and down slopes otherwise the wheelchair might overturn (Figure 19). -
Page 22: Heat And Fire Warnings
Heat and Fire Warnings The wheelchair is made from metal and plastic materials and, as with all products made with such materials, it can absorb heat from the sun when used outdoors or exposed to sunlight through windows etc. This can result in the surfaces of the wheelchair becoming hot, so take care in using it and touching the surfaces if it is left or used in such an environment. -
Page 23: Use
Unfolding & Folding The Wheelchair To Unfold: (Figure 20) Unfold the wheelchair by taking hold of the armrest or the side of the chair nearest to you, tip the chair sideways (lifting the rear wheel and the caster from the ground) and press on the tube supporting the seat upholstery until it is fully down. -
Page 24: Folding & Unfolding The Wheelchair
To fold: (Figure 21) Lift the footplates. Release the backrest tension bar if where fitted. Using both hands, take the centre of the seat fabric at the front and back edges and raise it. Or, tilt the wheelchair to one side and close it using the handles on the back rest or the armrests. -
Page 25: Summary Of Safety Instructions
Summary of instructions for use for improved safety - User weight limit for Ben NG is 127kgs (20 Stone) for chairs with a seat width of 15” - 18” wide chairs. - User weight limit for Ben NG HD is 160kgs (25 Stone) for 20” to 24” wide chairs. -
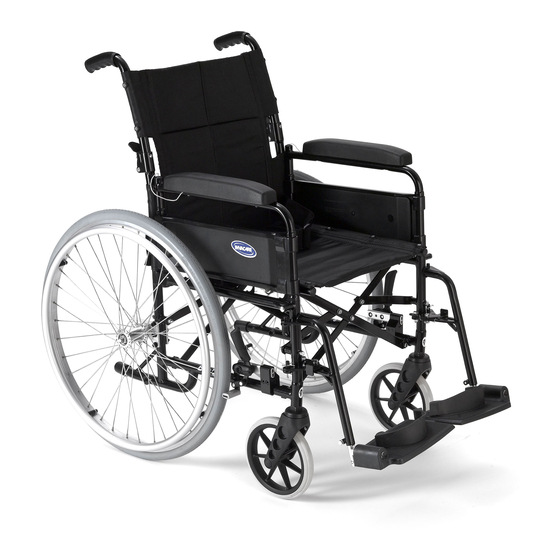
Page 26: General Descriptions
General Descriptions Each wheelchair is specially designed to meet the requirements of its user. This manual describes how to adjust the chairs in this range, enabling you to find out how to adjust the wheelchair to suit your needs. General descriptions Your wheelchair has a number of main parts which will be mentioned throughout this manual. - Page 27 Features 1. Armrest Assembly 2. Seat Canvas 3. 1. Armrest Assembly 2. Seat Canvas 3. Swing Away Legrest Hanger 4. Footplate Assembly Legrest Hanger 4. Footplate Assembly 5. Front Castor 6. Brake Assembly 5. Front Castor 6. Brake Assembly 7. Rear Wheel 8. Folding Chassis 9. Backrest 7.
- Page 28 Serial Number Label Pencoed Technology Park, Pencoed, Bridgend CF35 5AQ UK. Tel 01656 776200 Example of the serial number label which can be found on the side frame of the wheelchair.
-
Page 29: Backrest
Backrest (Photograph 1, 2 & 3) The backrest can be folded at the middle by means of a locking mechanism and can be operated by either the user or an attendant. To fold the backrest of the wheelchair, stand behind and simultaneously pull the lever situated at each side of the backrest frame (see below). -
Page 30: Seat
This model requires no adjustment. Just check regularly that the fixing screws are tight. If the washers are loose, these screws should be tightened. If the problem continues, contact your INVACARE retailer and ask him to change the mounting for safety reasons. -
Page 31: Armrests
Armrests The armrests are fitted in pairs on the wheelchair. When The armrests are fitted in pairs on the wheelchair. When removing them, remember that there is one armrest for removing them, remember that there is one armrest for the right hand side and another for the left hand side. the right hand side and another for the left hand side. -
Page 32: Chassis
Chassis Side Frames The side frames provide the mounting points for the rear wheels and the The side frames provide the mounting points for the rear wheels and the castors. Adjustment: No adjustment is possible on this series of wheelchair. Adjustment: No adjustment is possible on this series of wheelchair. - Page 33 Standard position Assembly Instructions Wheel Mounting Block. 3 x M6 bolts and nyloc nuts are used to secure the mounting block to the 3 x pre drilled holes in the rear of the frame. The Self propelled wheel can then be located at two positions, standard, and set-back for added stability.
-
Page 34: Castors
Do not fix the mounting block in forward facing position. CASTORS (Photograph 8) Standard front wheels have a diameter 190mm (7.5”) and a width of 30mm (7.5”). Heavy Duty wheels are available with a width of 45mm (1.75”). Forks The fork connects the chassis and the wheel. Adjustment: The forks do not require adjustment. -
Page 35: Manual Brakes
Manual Brakes (Photograph 9) The manual brakes are designed to secure the wheelchair when stationary. They are not intended to slow down the wheelchair or to be used as support during a transfer. They must be operated simultaneously. In order to engage the brake, push the handle (A) forward. The handle folds back to facilitate transfers. -
Page 36: Footrest & Elevating Legrest
Footrests Swing away footrest supports (Photograph 10 and 11) The footrest supports can be swung away to the outside/rear of the wheelchairs to free the front of the wheelchair and making it easier for the user to transfer to another seat. They can also be completely removed. -
Page 37: Elevating Legrests
To remove the support, carry out the same operation as for swing back, remove the “R” clip and lift the support upwards. To refit it, offer the support in the open position, align the holes (B) on the pivots (C) and press down. Rotate the support to the locked position. - Page 38 Note: The elevating legrests are fitted in pairs to the wheelchair. When adjusting or removing, remember that there is one elevating legrest for the right hand side and another for the left hand side. Footplate Assemblies Independent footplates for footrest supports (Photograph 14) The footplate assemblies comprise of an adjustment tube and footplate and are intended solely as a foot support when you are sitting in the wheelchair...
-
Page 39: Heel Support Straps
Independent footplate assemblies for elevating leg rests (Photograph 15) The foot rests comprise a pair of mounting tube and rest assemblies and are intended solely as a foot support when you are sitting down. Each footplate assembly can slide into the elevating legrest on the appropriate side and its height can be adjusted. -
Page 40: Backrest Extension
Backrest Extension (Photograph 16 & 17) The backrest extension has two uprights (B) and backrest extension upholstery. The locating pegs should only be fitted to the push handles of the backrest by a qualified technician. When refitting, make sure that it is firmly fixed onto the locations fitted to the backrest tubes. -
Page 41: Lap Belt
Lap Belt TYPES OF LAPBELT: 15.1 The lap belt is commonly used to assist wheelchair users to maintain an optimal sitting posture. Correct use of the lap belt is intended to help the user, especially those with limited sitting balance, to remain safe, comfortable and well positioned in their wheelchair. -
Page 42: Lap Belt Adjustment
A lap belt is a standard accessory included with the purchase of your wheelchair, this will have been factory fitted, or fitted by your INVACARE supplier / dealer, who would have provided you with a demonstration of operation and fitting, etc. The lap belt is commonly used to assist wheelchair users to maintain an optimal sitting posture. -
Page 43: Routine Checks & Maintenance
The angle of the front forks is correct The castors are both in contact with the ground at the same time If the symptoms persist when the nuts, bolts and screws have been tightened, consult your approved INVACARE distributor. - Page 44 Checking The General Condition For maintenance operations, consult your distributor who has all the necessary information. Ask your distributor to inspect your wheelchair thoroughly annually, and carry out in depth maintenance. Regular maintenance allows defective or worn parts to be identified and improves the normal operation of your wheelchair. The following table shows what to check when the wheelchair is delivered, each week, each month and at 6 monthly intervals.
- Page 45 Checks to be made: Weekly Monthly delivery Monthly 6. Arm Pads Check that the padding is in good condition 7. Seat and backrest upholstery Check that it is in good condition 8. Rear Wheels Wheel nut and sealed bearings correctly tightened No excessive lateral movement or binding when they are lifted from the ground and turned, quick release axles correctly locked 9.
-
Page 46: Transportation
Using your wheelchair as a seat in a vehicle INVACARE always advises that a wheelchair secured in a vehicle will not provide the equivalent level of safety and security of vehicle seating systems and recommends transfer to the vehicle seating, but also recognizes that it is not always practical for the user to be transferred. - Page 47 7. The occupant should be restrained independently of the wheelchair by a suitably approved passenger safety belt or harness. Pelvic restraint or lap belts supplied with the wheelchair may be used in addition to but never as a substitute for approved passenger restraints.
-
Page 48: Transporting Your Wheelchair As Luggage
17.2 Transporting your wheelchair as luggage When you are transporting your wheelchair you can easily remove certain parts to make the chair smaller and lighter. 1 Start by removing the armrest assemblies; refer to guidance provided in section 7 2 Remove the legrest / footrest assemblies; refer to guidance provided in section 12 Be careful not to trap your fingers between frame and legrest. -
Page 49: Storage
Storage When you will not be using your wheelchair for a prolonged period, the following precautions will help to keep it in perfect condition. Store the wheelchair in a clean, dry place. Do not put heavy objects on top of it. Cover it with a dust sheet to keep it dust-free. -
Page 50: Product End Of Life
Even though your wheelchair has been designed to provide a long and trouble free life it is inevitable that wear, tear and usage will eventually render the product unusable. • INVACARE recommends that the average usable life of this product is five years, providing the product has been correctly maintained according to the manufacturer’s recommendations. - Page 51 ISO 7176 PART 15: REQUIREMENTS FOR INFORMATION DISCLOSURE THE WHEELCHAIR CONFORMS TO THE FOLLOWING STANDARDS: TEST REQUIREMENT TEST REQUIREMENT METHOD METHOD Overall Length with Seat Angle Plane ISO 7176 Pt 8: Static, Impact and Fatigue 1065 ISO 7176 ISO 7176 Legrest Strength Pt 5...
-
Page 52: Contacting Invacare
Contacting Invacare For questions or support, please contact your authorised INVACARE dealer. They have the necessary experience, equipment, and knowledge concerning your wheelchair which enables them to offer you an all round satisfactory service. Should you wish to contact us directly, we are at your service under the following addresses and telephone... - Page 53 Ulrich Alber GmbH, Vor dem Weissen Stein 21, D-72461 Albstadt-Tailfingen Tel: (49) (0)7432 2006 0, Fax: (49) (0)7432 2006 299 info@ulrich-alber.de España: Invacare SA, c/Areny s/n, Polígon Industrial de Celrà, E-17460 Celra (Gironà) Tel: (34) (0) 972 49 32 00, Fax: (34) (0)972 49 32 20 contactsp@invacare.com France:...
- Page 54 Invacare BV, Celsiusstraat 46, NL-6716 BZ Ede Tel: (31) (0)318 695 757, Fax: (31) (0)318 695 758 mobility@invacare.com care@invacare.com Norge: Invacare AS, Grensesvingen 9, Postboks 6230, Etterstad, N-0603 Oslo Tel: (47) (0)22 57 95 00, Fax: (47) (0)22 57 95 01 norway@invacare.com island@invacare.com Österreich:...
- Page 55 County Dublin Ireland Tel: +353 1 8107084, Fax: +353 1 8107085 ireland@invacare.com www.invacare.ie United Kingdom: INVACARE Ltd, Pencoed Technology Park, Pencoed, Bridgend, CF35 5AQ Tel: (44) (0)1656 776222, Fax: (44) (0)1656 776220 UK@invacare.com WWW.INVACARE.COM Ben NG User Guide Part Number: 1551536...
Need help?
Do you have a question about the Ben NG and is the answer not in the manual?
Questions and answers