
Related Manuals for Eagle Eye DV207

Summary of Contents for Eagle Eye DV207
-
Page 1: User Manual
Smallest Full Feature Pocket DVR With high resolution in the world USER MANUAL Please read this user manual carefully and thoroughly before any attemptto Install and operate this product and retain it for your future reference. -
Page 2: Table Of Contents
CATALOG INTRODUCTION …………………………….………………………………….2 WARNING ……………..……………..…..……………………………………… 3 FEATURES…………………………….…..……………………………………...4 APPLICATION………………………….………………………………………..5 GETTING STAETED ……………………………………………………….….. 6 Identifying the parts of the main unit … …………………………………..………6 Identifying the parts of the camera ……………..………………. ……………….6 LCD screen indicators ………………………………………………..…………..7 Recording Mode…………………..………………………………..…………7 Playback Mode……………………………………………..……………………..7 INSTALLATION………………………………………………………….……8-9 Battery installation……………………………………………...…………………8 Parameters for battery using……………………………………………………….8 Mini SD Card installation…………………………...……………………….…….9 BASIC OPERATION ..…………………………………………..…..………10-13... -
Page 3: Introduction
DV207 a high-tech product, just meets a plenty of needs of people and market. It possesses a series of advanced functions including digital photography, voice memory, sound trigger recording, high speed USB data transferring and USB charging. -
Page 4: Warning
WARNING To prevent fire or shock hazard, do not expose the unit to rain or moisture. Attention The electromagnetic fields at the specific frequencies may influence the picture of the recorder. Be sure to read the following before using the recorder and the mini camera. -
Page 5: Features
FEATURES l Mini design of the main unit, equip the button camera, easy to be used in kinds of situation. l Support flash memory rewrite automatically. l One key switch easily between regular mode and motion sensor mode of recording l Audio and video isochronous record in real time, the video will be auto memory into AVI format, convenient to play in the computer and upload to internet. -
Page 6: Application
APPLICATION Mountain bike video camera equipment Snow video camera equipment Sky video camera equipment... -
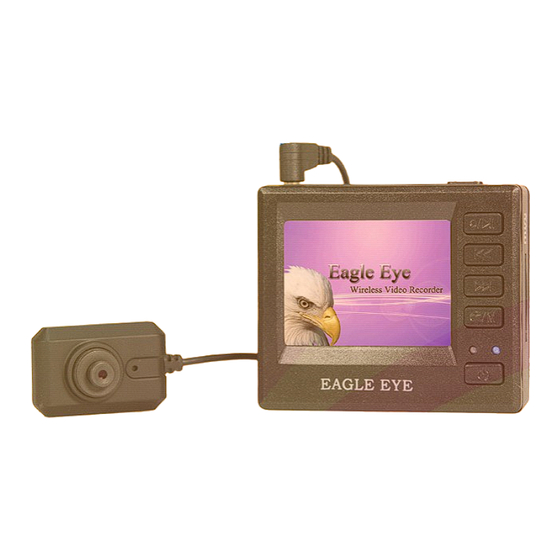
Page 7: Getting Started
GETTING STARTED Identifying the parts of the mini DVR 1.2"TFT LCD Screen 7.FWD/Select key 2.AV In jack to connect with the Mini camera/TV 8.REV/Select key 3.USB jack to connect with PC 9.Mini SD Card Slot 4.AV Out jack to connect with TV 10.Return key 5.Record/Playback switch 11.LED Indicators... -
Page 8: Lcd Screen Indicators
LCD screen indicators Welcome Picture Recording Mode: ① Recording symbol ② Current time ③ Video files ④ Record time ⑤ Card icon( if memory card available) ⑥ Available memory ⑦ Battery capacity ⑧ Current time ⑨ Picture quality of recording ⑩Record content ( AV means audio and video included) Circular record Playback Mode:... -
Page 9: Installation
INSTALLATION Battery installation Open the back cover: Insert the battery Insert the battery with the label side up and the connectors facing each other. Attach the battery cover and lock it The battery of head unit is the same as Sony Ericsson (BST-33). Parameters for battery using: Capability Charging time... -
Page 10: Mini Sd Card Installation
Mini SD Card installation Install the Mini-SD card correctly according to the illustration The head-unit support 128Mb~16GB 的 Mini SD card Quality High Medium Battery time Resolution Approx. 1 hour ≤45MB ≤36MB ≤20MB 720x576 and 40 minutes Approx.1 hour and ≤43MB ≤33MB ≤18MB... -
Page 11: Basic Operation
BASIC OPERATIONS Please insert the Mini Camera connector into the AV input jack of the main unit under “OFF” state. Long press to power on the main unit. Start Recording ① , the screen will display pictures that shot by the camera。 Glide [R/P] button to [R] side ②... -
Page 12: Video Content View
: Video content view ① Glide [P/R] button to [P] side. ② choose the video storage folder. ③ confirm and enter. Video folders Video files ④ er enter the video folders, use to choose the video files that you want to play, for example, play choose and press... -
Page 13: Delete The Video Files
Delete the video files: ①Press to choose the file you want to delete, and then long press Enter the files delete interface. ② ALL: Delete all video f iles under folders, press delete. ③ Current: Delete the s elected video file, press delete. -
Page 14: Connect With Other A/V Device
Connect with other A/V device: Instruction: ① Glide [R/P] button to [ R] side, and enter record mode. ② 2.5mm connector Insert the video cable ( )into the main unit via the AV input jack, connect the RCA connector with the camera. Attention : yellow –... -
Page 15: Connect With Pc
Connect with PC: ① Connect the USB and MINI USB with computer and the main unit separately. ② After connect with computer, DV207 will display “ USB Connect”, recharge indicator always on. Remark: Connect with computer at power on states, can not operate as it is External Hard Drive. - Page 16 ③ Open “my computer” to check if there has the removable hard disk ,called “NO_NAME” . Picture details: ④ Open the video files in the folders. ⑤ Check the video files in the folders, and play it by the default media player in your computer.
-
Page 17: System Setting
SYSTEM SETTING Glide [P/R] button to [R] side., turn on the player by long pressing , and then press till “Setup” menu appear on the screen. 1.Recording mode setting: Press enter REC Setting,press to select your preference setting。 Press enter REC Mode,press choose record mode,then press to select, press exit setting... -
Page 18: Resolution Setting
Resolution setting: Press to choose the resolution setting menu,press confirm and enter the setting; Press to choose the resolution,press to save setting Press exit setting. Press to choose the resolution setting menu,press confirm and enter the setting;... -
Page 19: Record Content Setting
Press to choose the resolution,press to save setting Press exit setting. Record content setting: Press to choose the setting menu,press confirm and enter the setting。 Press to choose the preference setting,press confirm。press exit setting. -
Page 20: Video Time And Date Setting
Video Time and date setting Press to choose the setting menu(If you prefer the video files display the time/date),press to confirm and enter setting. Press to do the prefer setting,press to confirm, press exit setting. -
Page 21: Auto Cover Setting
Auto cover setting: 5、 Press to choose the setting menu(If you prefer to delete the oldest video files automatically while the memory is full for continuous record). press to enter setting. Press to do the prefer setting,press confirm. Press quit. -
Page 22: Choose Memory
Choose memory Long press ,enter setting menu, use to choose the Storage, Press enter. Choose the storage device by Press confirm setting. press quit menu. Support 16GB Mini-SD storage card in max. -
Page 23: Current Time And Date Setting
Current Time and Date setting: Long press ,enter setting menu, choose time and date by , press enter menu. press to choose Date Format, press enter. to choose the suitable display form, press confirm. press quit. - Page 24 Press choose Date Setting, press do setting Press choose setting content, press amend, quiit by Press choose Time Setting, press enter setting Press choose setting content ,use amend, press store the setting and quit. Long press quit the setting menu..
-
Page 25: Language Setting
Language setting: Long press enter setting menu, use choose Language, Press confirm and enter menu choose the suitable language,press confirm. Press quit. Long press quit setting menu. -
Page 26: Video Output Setting
Video output setting: Please connect the AV cable of the head-unit with the TV correctly, like illustration: Yellow: Video Output Red: Audio R Output White: Audio L Output While insert the video cable into the head-unit, the LCD of the head-unit will off, and the external monitor will display the picture of the head-unit, Glide the [R/P] switch at [P] place, and then the monitor will display all video file folders in the head-unit storage, illustration below:... - Page 27 Please long press enter setting menu refer the video system. choosing PAL system, press confirm; press quit. While insert the video cable into the head-unit, and [R/P] switch at [R] place, the external monitor will display the picture that the camera catching. Illustration:...
-
Page 28: Automatic Power Off
Power saving mode: Long press enter setting menu. Press choosing Power Save. press enter. enter the setting of “power off”.. Press choose Power Off. Press Press confirm. Quit. -
Page 29: Automatic Lcd Off
Automatic LCD off: Long press enter setting menu. choose Power Save. Enter by choose LCD Off. Press enter setting. Press choose prefer setting. confirm. Quit. -
Page 30: Format Memory
Format memory: Long press enter setting, choose Format. enter. Press choose Yes or No. confirm. quite. There without any notice before format process, so please take attention before your operate. If you choose “yes” to do the format, the system will format the current memory that store the video files. -
Page 31: Software Update
Software update: Copy the update software into the Mini-SD card, and insert into the head-unit. Long press enter setting menu. to choose update menu. Press will update software automatically. Attention: Please stop any operation during software updating, it will continue 3 minutes, the head-unit will power off automatically after successful update. -
Page 32: Revert The Default Setting
Revert the default setting: Long press enter setting menu Press choose default Press enter setting menu. Press choose the setting. Yes: Go back to the factory setting. No: Quit without any change. Press quit. -
Page 33: Memory Information
Memory information Long press enter setting, illustration below: Press to check the storage information: Check system version: Long press enter setting, .choose the version menu by Quit. DV207.21th Aug, 2009, first version.. -
Page 34: Parameters
PARAMETERS DV207 2inch TFT LCD 640*240 Video system PAL/NTSC Video resolution D1 720*576@25 fps D1 720*480@30 fps Frame rate 640*480@30fps QVGA 320*240@30fps Video format AVI (MPEG-4) Audio format Built-in flash memory 128MB~2G(optional) Memory compatibility Mini SD Card USB Jack High-speed USB 2.0 AV In Jack 3 rings with 2.5mm... -
Page 35: Accessories
ACCESSORIES Camera Buttons&Screws AV output cable AV in/5V out cable USB cable Li-ion Battery AC charger User manual Mini SD card Vehicle power charger (optional) (optional) - Page 36 We will not inform you if there is any modification for user maual in future .
Need help?
Do you have a question about the DV207 and is the answer not in the manual?
Questions and answers