Table of Contents
Advertisement
Quick Links
Advertisement
Table of Contents

Related Manuals for LOBSTER 485

Summary of Contents for LOBSTER 485
-
Page 2: Table Of Contents
Table of Contents Safety Precautions ....3 Entering Text .......38 Profile ........79 Java ........131 Changing the Text Input Language ..39 General (Menu 3-1) ....79 Downloads (Menu 8-1) ..131 Unpacking ......4 eZi English Mode ....42 Install Application (Menu 8-2)..131 Setting ........81 Your Phone ......5 ALPHABET Mode ....45 Memory Status (Menu 8-3) ..132 Time/Date Set (Menu 4-1) ..81... -
Page 3: Safety Precautions
Safety Precautions Unpacking Read these simple guidelines. Failure to comply with them may be Your package contains the following items: dangerous or illegal. For more detailed safety information, see “Reference Information” on page 142. Road safety comes first Respect special regulations Do not use a hand-held mobile Follow any special regulations in phone while driving;... -
Page 4: Your Phone
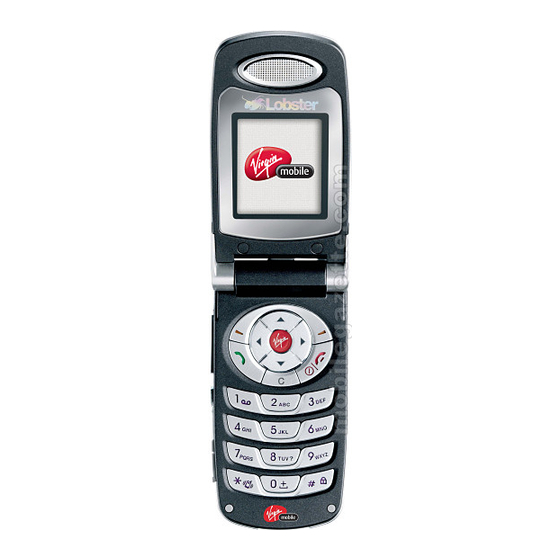
Your Phone Closed View Your Phone’s parts The following illustrations show the main elements of your phone: Antenna Open View Earpiece Sub LCD Display Left soft key Right soft key Internet Service/Confirmation key Navigation/Hot keys End/Power on-off key Clear key Rear View Folder Camera... - Page 5 Your Phone Key(s) Key(s) Description Key(s) Description Performs the functions indicated by the text above In Menu Mode, cancels your input and returns them, on the bottom line of the display. to Stanby Mode. In Standby Mode, this key can be used to access ` Enters numbers, letters and some special the Internet browser.
-
Page 6: Display
Your Phone Icons Display The display has three areas. Icons Description Icons area Signal Strength : Shows the received signal strength. The greater the number of bars, the stronger the signal. No Service : Appears when you are outside a service area. Text and graphic area When it is displayed, you cannot make or receive calls. -
Page 7: Sub Lcd
Your Phone Icons Sub LCD Your phone has an external LCD screen on the folder. When the folder is Icons Description closed, it indicates that you have an incoming call or message. It also alerts you when you have set an alarm at the specified time by flashing Battery Status : Shows the level of your battery. -
Page 8: Led Select
Your Phone Getting Started LED Select Installing a SIM Card Your phone has a unique color LED on the folder. It flashes to indicate When you subscribe to a mobile network, you are provided with a plug- various phone’s status. The LED blinks in the following colors depending in SIM card loaded with your subscription details, such as PIN, optional on the status: services available and so on. - Page 9 Getting Started Install a SIM card. To do so: Reinstall the battery. To do so: ① Slide the metal lock as shown. ① Place the battery so that the tabs on its end align to the slots at the top of the phone. ②...
-
Page 10: Charging The Battery
Getting Started When charging is finished the LED turns to blue unplug the Charging the Battery adapter from the AC wall outlet and from the phone. To remove the adapter from the phone, press the buttons on both sides of the Your phone is powered by a rechargeable Li-ion battery. -
Page 11: Switching The Phone On Or Off
Getting Started Switching the Phone On or Off Your Phone’s Modes Open the folder. Standby Mode Press and hold the key for more than one second to switch Standby is the most basic state of your phone. The phone goes into the phone on. -
Page 12: Locking The Keys
Getting Started Using the Soft Keys Your phone offers a set of functions that allows you to customize it. Locking the Keys These functions are arranged in menus and sub-menus, accessed via the two soft keys ( ). Each menu and sub-menu allows you Use the Key Lock feature to make sure that the keys are not pressed to view and alter the settings of a particular function. - Page 13 Using the Soft Keys To view the various functions/options available and select the one Using the Soft Keys required : Press the appropriate soft key. Press the Select the: soft key or the • Function displayed key. • Option highlighted Move up or down key.
-
Page 14: Call Functions
Using the Soft Keys Call Functions Example Example Setting the Display Language Making a Call When the idle screen displays, press the soft key to To make a call enter Menu Mode. In Standby Mode, enter the area code and phone number. Scroll through the menus until you reach the Setting menu, by pressing the... -
Page 15: Making An International Call
Call Functions Ending a Call Adjusting the Volume If you want to end a call, press the key. Or, simply close the folder to During a call, if you want to adjust the voice volume, use the volume end a call. keys on the left side of the phone. -
Page 16: Answering A Call
Call Functions Answering a Call Viewing Missed Calls When someone calls you, the phone alerts you by ringing, blinking the If you are unable to answer a call for any reason, you can find out who color LED and displaying the call alert screen. is calling you, if this service is available so that you can call the person back. -
Page 17: Quickly Switching To Manner Mode
Call Functions Putting a Call on Hold Quickly Switching to Manner Mode You can place the current call on hold whenever you want. You can quickly switch your phone to Manner Mode with a touch of By doing this, you can make or receive another call while you have key. -
Page 18: Muting The Microphone
Call Functions Muting the Microphone Using the Scratch Pad You can temporarily switch your phone’s microphone off so that the Your phone has a convenient feature for entering a phone number other person cannot hear you. while you are on a call as if it were a note pad: Example : You wish to say something to another person in the room During a call, just key in a phone number. - Page 19 Call Functions Sending DTMF Tones Using the Message Service Each time you press the keys, your phone sends out DTMF (Dual Tone Your phone receives an incoming message during a call. You can read it Multi-Frequency) which are set at the factory. DTMF tones are required immediately without disconnecting the call.
-
Page 20: Using The Ear-Microphone
Call Functions Entering Text At many times when using your phone, you will need to enter text, Using the Ear-microphone such as when storing a name in Phonebook, creating a greeting note, writing a text message or scheduling events on your calendar. Using the ear-microphone supplied with your phone, you can answer an incoming call without holding the phone. -
Page 21: Insert Symbol
Entering Text Insert Text Template Changing the Text Input Language The Template mode enables you to enter simple sentences into your This mode allows you to change text input language. text. Press the soft key and select 'Insert text template' to enter into it. -
Page 22: Ezi English Mode
Entering Text Insert EMS Content eZi English Mode This mode enables you to enter EMS cntents into your text. This mode allows you to enter English words with only one key press per letter. Each key on a keypad has more than one letter - a single Press the 'ADD' soft key and select 'Insert EMS content' to enter press on the 5 key could be J, K, or L. - Page 23 Entering Text Typing English Words Shifting the Case To type a word, press the keys corresponding to the letters you need. To change the case of the word, press the key repeatedly when the Remember the following as you are typing: word highlights.
-
Page 24: Alphabet Mode
Entering Text List of characters available: ALPHABET Mode When typing in the ABC mode, press the key labeled with a character: Characters in the Order Displayed - Once for the first character ’ - Twice for the second character and so on. This method is called Multi-tap Typing. -
Page 25: Using The Menus
Entering Text Using the Menus The phone offers a range of functions that allows you to tailor it to your Shifting the Case needs. These functions are arranged in menus and submenus. To change the case of words, press the key. -
Page 26: Accessing A Menu Function By Using Its Shortcut
Using the Menus Accessing a Menu Function by Using Its Shortcut List of Menu Functions The list shows the menu structure available and indicates the number The menu items, menu, submenus and setting options are numbered assigned to each option. and can be accessed quickly by using their shortcut numbers. - Page 27 Using the Menus 1-1 : Write Message 1-6 : Voice Mail 1. Message 1. Message 1-1-1 : SMS 1-6-1 : Call Voicemail 1-1-2 : MMS 1-6-2 : Voice Center 1-2 : Inbox 1-7 : Info Message 1-2-1 : SMS 1-7-1 : Read 1-2-2 : MMS 1-7-2 : Receive 1-7-3 : Topics...
- Page 28 Using the Menus 2-1 : Call History 3-1 : General 2. Call Register 3. Profile 2-1-1 : Missed No. 3-1-1 : Activate 2-1-2 : Received No. 3-1-2 : Personalise 2-1-3 : Dialled No. 3-1-2-1 : Alert Type 3-1-2-2 : Ring Tone 3-1-2-3 : Ring Volume 2-2 : Call Duration 3-1-2-4 : Message Tone...
- Page 29 Using the Menus 4-1 : Time/Date Set 4-4 : Phone Settings 4. Setting 4. Setting 4-1-1 : Time Set 4-4-1 : Language 4-1-2 : Date Set 4-4-2 : Main LCD 4-4-3 : Sub LCD 4-2 : Alarm Set 4-4-4 : Backlight 4-4-5 : Screen Saver 4-2-1 : Set Alarm 4-4-6 : LED Select...
- Page 30 Using the Menus 5-1 : Phonebook 6-1 : Shooting 5. Organizer 6. Camera 6-2 : Special Effects 5-1-1 : Name Search 5-1-2 : Group Search 6-3 : Album 5-1-3 : Add Entry 6-4 : Configuration 5-1-4 : Speed Dials 5-1-5 : Caller Groups 5-1-6 : PB Manage 7-1 : Othello 5-1-6-1 : Own Number...
-
Page 31: Message
Message Menu 1-1-1 Creating and Sending a New Message The Messages option is a network service and may not be supported by your network. You can send a message by a text messaging system, You can write and send a text message of up to 160 alphanumeric provided that the service is supported by your network. -
Page 32: Inbox (Menu 1-2)
Message Menu 1-1-2 Inbox Menu 1-2 You can write and send a multimedia message using the New In this menu, you can view SMS/MMS messages 1. Message Multimedia Message option. you received. 1 Write Message In Standby Mode, press the soft key twice to enter 2 Inbox 3 Outbox... - Page 33 Message Use the key to scroll through the contents. Menu 1-2-2 In this menu, you can view the messages you received and reply, Press the soft key to use the options. forward or delete them. To return to Standby Mode, press the key.
-
Page 34: Outbox (Menu 1-3)
Message Use the key to scroll through the contents. Outbox Menu 1-3 In this menu, you can send and delete the messages Press the soft key to edit the message text or use the 1. Message saved in the outbox. options. -
Page 35: Voice Mail (Menu 1-6)
Message Voice Center Menu 1-6-2 Voice Mail Menu 1-6 Allows you to store or change the number of your voice message center Voice Mail is a network feature. If the voice Mail is 1. Message required when listening to your voice messages. You must obtain this provided by your network, you can access the Voice 1 Write Message number from your service provider. -
Page 36: Settings (Menu 1-8)
Message The following options are available: Settings Menu 1-8 Read : Allows you to read CB messages. You can set several features for the message service 1. Message Receive : Lets you view the last received messages. on your phone. 3 Outbox Topics : Allows you to receive broadcast messages from a particular 4 Draft... - Page 37 Message The following options are available: Menu 1-8-2 SMSC : Allows you to store or change the number of your SMS center To customize your phone for the message service: required when sending and receiving messages. You must obtain this number from your service provider.
-
Page 38: Call Register
Call Register Received No. Menu 2-1-2 Call History Menu 2-1 You can view the last 30 numbers of the calls you received. Your phone Your phone keeps track of calls made from your 2. Call Register records these numbers only when you are subscribed to the Caller Line phone, received calls and missed calls. -
Page 39: Call Duration (Menu 2-2)
Call Register Dialled No. Menu 2-1-3 Call Duration Menu 2-2 You can view the last 30 numbers that you dialled, whether or not they This menu allows you to view the timers for 2. Call Register connected successfully. calls that you made and received. 1 Call History 2 Call Duration To view the dialled numbers:... -
Page 40: Gprs Counter (Menu 2-4)
Call Register Total Received Menu 2-4-4 GPRS Counter Menu 2-3 Shows the total volume of data received. Using this menu, you can check the volume of 2. Call Register packets sent or received. Reset 1 Call History Menu 2-4-5 2 Call Duration Access the Personal menu, and select the GPRS 3 GPRS Counter You can use the Reset option to reset the GPRS counter;... -
Page 41: Profile
Profile This menu allows you to set up the sound options fitting for specific The following options are available : (Menu 3-1-2) situation in advance. How to set up the specific options are all the same. Alert Type : You can select an alert mode for incoming calls. Please, refer to the General Mode below. -
Page 42: Setting
Setting Many different features of your phone can be customized to suit your Date Set Menu 4-1-2 preferences. This option enables you to set the current date in the format you prefer in one screen. The following options are available: Time/Date Set Menu 4-1 Date Format : Select a date format. - Page 43 Setting Set Alarm Alarm Sound Menu 4-2-1 Menu 4-2-2 To set an alarm: Allows you to select an alarm sound. 14 piecies of melody and downloaded melody are available. Press the soft key when Set Alarm is highlighted. Power Off Alarm Menu 4-2-3 Select one of Alarm 1 through 3 and press the soft key.
-
Page 44: Call Setting (Menu 4-3)
Setting Call diverting can be set up in the following ways : Call Setting Menu 4-3 All Voice Calls : All voice calls are diverted. Some of the following menu functions are network If Busy : Calls are diverted if you are already on another line. 4. - Page 45 Setting To set your call diverting options: Call Waiting Menu 4-3-2 This network service enables you to be informed when someone is Select the situation when you want to divert a call. trying to reach you during another call. ●You can select among If No Reach, If Busy, If No Reply, All Calls and Cancel All.
- Page 46 Setting Answer Mode Data Transfer Mode Menu 4-3-4 Menu 4-3-8 This menu allows you to select how you answer when an incoming call Your phone is capable of sending and receiving digital data and fax call comes in. Your phone is preset to answer when you press the when connected to a computing device, such as a laptop, desktop, soft key.
- Page 47 Setting Using a Fax Call Using a Data or Fax Call Choose "(Single No.) Fax" item in phone menu. To be able to use data or fax services, you need application software such as a data or a fax program. Before using these functions, you need to connect your phone to the computer and Connect the phone to your computer with the cable.
-
Page 48: Phone Settings (Menu 4-4)
Setting Sub LCD Menu 4-4-3 Phone Settings Menu 4-4 You can set an image to be displayed on the front LCD in Standby 4. Setting Mode. 1 Time/Date Set Sub LCD Contrast (Menu 4-4-3-3) 2 Alarm Set 3 Call Setting Your Sub LCDs have contrast settings that can help you see the screen 4 Phone Settin.. -
Page 49: Security Settings (Menu 4-5)
Setting Phone Lock Menu 4-5-2 Security Settings Menu 4-5 Using this menu, you can lock your phone to keep it from being used by Using this menu, you can activate use of the password 4. Setting unauthorised people. When the phone is locked, you cannot use any for the Personal menu and change the password. - Page 50 Setting Call Barring To activate the call barring, select the Set Barring. Menu 4-5-3 The call barring network service allows you to restrict your calls. To deactivate the call barring, select the Cancel Barring. When you select this option, you are prompted to enter a password. ●The phone sends your setting to the network and the network's acknowledgement displays.
-
Page 51: Gprs Setting (Menu 4-6)
Setting 1. Enter the current PIN and press the soft key. Closed User Group Menu 4-5-5 2. Enter a new PIN and press the soft key. The following options are available : To clear the last entry, if necessary, press the soft key. -
Page 52: Network Select (Menu 4-7)
Setting Network Select Factory Set Menu 4-7 Menu 4-8 The Network Selection feature enables you to This menu allows you to reset the phone. Resetting 4. Setting 4. Setting automatically or manually select the network used the phone restores the default value of all of the 2 Alarm Set 3 Call Setting when roaming outside of your home area. -
Page 53: Organizer
Organizer The phone searches for the names on the list containing that Phonebook Menu 5-1 character(s), and then displays the first name in that section of the list. You can store phone numbers and their corres- 5. Organizer pounding names in the phone memory. If you want another entry, press the key to scan through 1 Phonebook... - Page 54 Organizer Add Entry Press the key to move to the next field. Menu 5-1-3 ●4 Phone Number fields and 1 E-mail field are available. You can store a phone number in the internal Phonebook in two ●Press the key to activate the field. different ways.
- Page 55 Organizer To store a phone number by using the Phonebook menu: Press the key to go to the Group Select field. ●Press the key to change to the caller group you want. In Standby Mode, press the soft key. Press the soft key.
- Page 56 Organizer Speed Dials When you find the name, press the soft key. Menu 5-1-4 ● The name displays on the Speed Dials list. Once you have created Phonebook entries, you can assign a speed dial To return to Standby Mode, press the key.
- Page 57 Organizer To change or delete the speed dial assignment : Caller Groups Menu 5-1-5 You can use caller groups to add Phonebook entries to a caller group so In Standby Mode, press the soft key. that the phone alerts you in a particular ring when the person in the ●The PHONEBOOK options display.
- Page 58 Organizer You can use the following PB Manage Memory Status options : This option allows you to check how many entries are currently stored in Phonebook; SIM card and Phone memories. You can also see the capacity of Own Number both memories.
-
Page 59: Scheduler (Menu 5-2)
Organizer Scheduling a New Event Scheduler Menu 5-2 You can schedule up to 50 events for one day. When you enter this menu and go to Monthly View 5. Organizer to see it, the calendar displays with today 's date Highlight a date on the calendar referring to “Scrolling 1 Phonebook highlighted. - Page 60 Organizer Viewing Schedule on a Particular Day Viewing Specific Events You can find an event using its date, type and note. Highlight a date on the calendar, referring to “Scrolling through the Calendar” on page 115. On the calendar, press the soft key.
-
Page 61: Deleting Events
Organizer Deleting Events Viewing the Calendar in Another Format The calendar is in monthly format by default. You can change the Highlight a date on the calendar, referring to “Scrolling calendar to weekly format for the current view. through the Calendar” on page 115. On the calendar, press the soft key to access the Press the... -
Page 62: Changing The Calendar Settings
Organizer Changing the Calendar Settings File Manager Menu 5-3 On the calendar, press the soft key to access the 5. Organizer Scheduler options. 1 Phonebook 2 Scheduler Press the key to highlight Setup and press 3 File Manager soft key. Select an option by pressing the key and change the setting by pressing the... -
Page 63: Camera
Camera Zoom : Use the to adjust the zoom from 1 to 5 level. Exposure : Use the to adjust the contrast from 1 to 8 In this menu, you can take a photo, save it as an image photo or PBook level. -
Page 64: Special Effects (Menu 6-2)
Camera Special Effects Configuration Menu 6-2 Menu 6-4 In this menu, you can take a photo with various sticker In this menu, you can select Shutter Sound, Album 6. Camera 6. Camera frames or couple frames. Lock, Set Save Name or Auto Save function. 1 Shooting 1 Shooting It has the same functionalities as the Shooting menu... -
Page 65: Application
Application This menu allows you to use your phone as your assistant providing you Performing a Calculation with various convenient features, such as Scheduler and Calculator. Enter the first number using the numeric keys. ●The number displays in the upper box. Othello Menu 7-1 �... -
Page 66: Unit Converter (Menu 7-3)
Application Unit Converter World Time Menu 7-3 Menu 7-4 This menu allows you to convert a unit into another This feature allows you to check the current time for 59 7. Application 7. Application unit, such as inches to centimeters. major cities around the world. -
Page 67: Java
Java Downloads Memory Status Menu 8-1 Menu 8-3 In this menu, you can run Java application that default In this menu, you can view the total and used 8. Java 8. Java contents and downloaded contents. Once you have memory amounts for Java contents. 1 Downloads 1 Downloads downloaded contents, they are added to the list. -
Page 68: Internet
Internet Your phone comes equipped with a WAP (Wireless Application Protocol) Homepage Browser, making it possible for you to access the Wireless Web. Note that this feature may be unavailable or vary depending on your This menu connects your phone to the Internet. 9. -
Page 69: Bookmarks
Internet Viewing Bookmark Bookmarks Press the key to access the Internet menu and press You can set a bookmark for most pages so that they 9. Internet soft key to select the Bookmarks. can then be accessed directly from any web page. Homepage Bookmarks save you time by reducing the number of Bookmarks... -
Page 70: Enter Address
Internet Enter Address Settings In this menu, you can manually enter the address of a In this menu, you can configure the browser with 9. Internet 9. Internet web page and go there immediately. different connection type, proxy address and browser Homepage Homepage options. -
Page 71: Browser Options
Internet Connection Browser Options In this menu, you can set the connection. In this menu, you can set the browser options. You should select a profile before using this function. Following options are available Enable CSS : Allows you to enable CSS(Cascading Style Sheet). Following options are available Enabling CSS option will improve the time of download and render, Bearer : Allows you to set bearer by selecting CSD or GPRS. -
Page 72: Reference Information
Internet Reference Information Rename Profile Access Codes In this menu, you can change the name of profile currently selected. There are several access codes that are used by your phone and its SIM card. These codes help you protect the phone against unauthorised use. Cache In this menu, you can decide whether you use cache or not and clear Phone Password... -
Page 73: Using The Batteries
Reference Information PIN2 Barring code The PIN2, supplied with some SIM cards, is required to access some The 4-digit barring password is required when you use the Call Barring functions, such as changing unit counts. These functions are only function. You can obtain the password from your service provider when available if support by your SIM card. -
Page 74: Safety Information
Reference Information ●Battery charging times depend on the remaining battery charge and Safety Information the type of battery and charger used. The battery can be charged and discharged hundreds of times, but it will gradually wear out. When Traffic Safety the operation time (talk time and standby time) is noticeably shorter than normal, it is time to buy a new battery. -
Page 75: Electronic Devices
Reference Information Other Medical Devices Electronic Devices Operation of any radio transmitting equipment, including cellular Most modern electronic equipment is shielded from radio frequency phones, may interfere with the functionality of inadequately protected (RF) signals. However, certain electronic equipment may not be shielded medical devices. -
Page 76: Potentially Explosive Atmospheres
Reference Information Potentially Explosive Atmospheres Vehicles Switch off your phone when in any area with a potentially explosive Only qualified personnel should service the phone, or install the phone atmosphere and obey all signs and instructions. Sparks in such areas in a vehicle. - Page 77 Before a phone model is available for sale to the public, it is tested to Radio Frequency (RF) Signals confirm compliance with the guidelines. The tests are performed in This Lobster 485 model meets international standards for exposure to positions and locations (e.g. at the ear) that conform to a uniform radio waves.
-
Page 78: Care And Maintenance
Reference Information ●Do not paint it. Paint can clog the device’s moving parts and prevent Care and Maintenance proper operation. Your phone is a product of superior design and craftsmanship and ●Use only the supplied or an approved replacement antenna. should be treated with care. -
Page 79: Glossary
Glossary Airtime Hands-Free Actual time spent talking on the wireless phone. Most carriers bill A feature that permits a driver to use a wireless phone without lifting or customers based on how many minutes of airtime they use each holding the handset - an important safety feature for automobiles, month. - Page 80 Glossary Roaming Voice Mail Use of your phone when you are outside your home area (when Computerised answering service that automatically answers your calls travelling for example). when you are not available, plays a greeting (optionally in your own voice) and records a message. SDN(Service Dialing Numbers) Telephone numbers supplied by your network provider, giving access to Wireless...