Advertisement
Quick Links
Installation Instructions
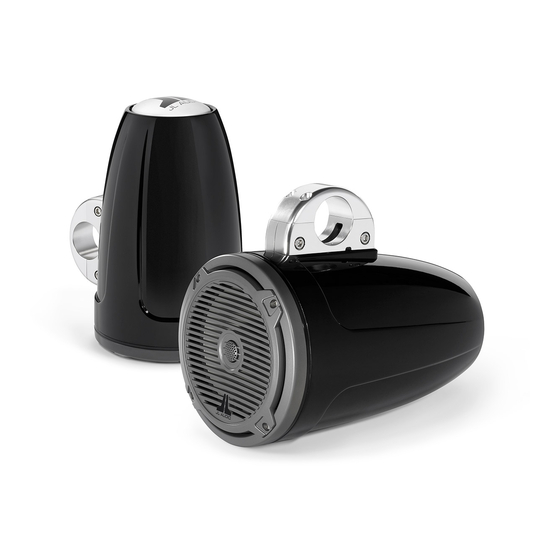
M770-ETXv2
MX770-ETXv2
Marine Enclosed Tower Coaxial Speaker System
ETXv2 Mounting Clamps (Sold Separately in Pairs) are required to complete installation of this product.
Available Models:
M-MCPv2-MC
M-MCPv2-1.315
M-MCPv2-1.660
M-MCPv2-1.900
Choose your installation method:
Horizontal Mounting Option
Page 2
M-MCPv2-2.000
M-MCPv2-2.250
M-MCPv2-2.375
M-MCPv2-2.500
Vertical Mounting Option
Page 6
Advertisement

Related Manuals for JL Audio M770-ETXv2


Summary of Contents for JL Audio M770-ETXv2
-
Page 1: Installation Instructions
Installation Instructions M770-ETXv2 MX770-ETXv2 Marine Enclosed Tower Coaxial Speaker System ETXv2 Mounting Clamps (Sold Separately in Pairs) are required to complete installation of this product. Available Models: M-MCPv2-2.000 M-MCPv2-MC M-MCPv2-2.250 M-MCPv2-1.315 M-MCPv2-2.375 M-MCPv2-1.660 M-MCPv2-2.500 M-MCPv2-1.900 Choose your installation method: Vertical Mounting Option... - Page 2 Align the upper and lower clamps around the Slide a cable tie through the front hole on the top of tower. Hand tighten the four 1/4 - 20 x 1-1/4" the enclosure. machine screws into the clamp. 2 | JL Audio - MX770-ETXv2 / M770-ETXv2 Installation Instructions...
- Page 3 Strap the enclosure to the tower with the cable tie. Tighten the tie leaving approximately 6" between the enclosure and the tower. Connect the wires from the enclosure to the wires exiting the tower. Cut the cable tie and slide the excess wire into Push the tower enclosure tabs inside the clamp and the tower.
- Page 4 Align the enclosure and clamp assembly to the Remove one of the 1/4 - 20 x 1-1/4" machine desired position. screws. Apply Loctite®, reinstall and fully tighten. Repeat the process for the other three screws. 4 | JL Audio - MX770-ETXv2 / M770-ETXv2 Installation Instructions...
- Page 5 Remove adhesive backing and install the JL Audio logo badge (Sport Grille Models Only). Apply silicone along the inner ring on the back Align the rear cap to the desired angle and press it of the enclosure.
-
Page 6: Vertical Mounting Instructions
Apply Loctite® to the two 5/16 - 18 x 1-1/4" enclosure using the two #8 x 3/4" thread machine screws, thread them into the lower half of forming screws. the clamp, and fully tighten. 6 | JL Audio - MX770-ETXv2 / M770-ETXv2 Installation Instructions... - Page 7 Crimp the supplied butt connectors on the wire and Slide the excess wire into the tower. connect the wires from the enclosure to the wires exiting the tower. Align the upper and lower clamps around the Align the enclosure and clamp assembly to the tower.
- Page 8 Pull the speaker out of the enclosure and rotate it to Reinstall the speaker with the speaker the desired angle. mounting screws. Remove adhesive backing and install the JL Audio logo badge (Sport Grille Models Only). 8 | JL Audio - MX770-ETXv2 / M770-ETXv2 Installation Instructions...
-
Page 9: Driver Specifi Cations
Do not let acetone come in contact with the enclosure. It will permanently mar the surface. Driver Specifi cations: MX770-ETXv2 M770-ETXv2 Continuous Power Handling 70 Watts / channel 100 Watts / channel (RMS Method) Frequency Response 55 Hz - 25 KHz (±... - Page 10 10369 North Commerce Parkway • Miramar, Florida • 33025 • USA JL Audio®” and the JL Audio logo, “Stealthbox” and the Stealthbox logo are registered trademarks of JL Audio, Inc. “Ahead of the Curve” and its respective logo is a trademark of JL Audio, Inc.
Need help?
Do you have a question about the M770-ETXv2 and is the answer not in the manual?
Questions and answers