Table of Contents
Advertisement
Advertisement
Table of Contents

Subscribe to Our Youtube Channel
Related Manuals for InFocus MyVideoPhone MVP100

Summary of Contents for InFocus MyVideoPhone MVP100
-
Page 3: Table Of Contents
CONTENTS Phone Overview .........................................4 Front Side ........................................4 Back Side........................................5 Control Panel ......................................6 Phone Capabilities and Requirements ................................8 Menu Overview ........................................9 Status Icons ........................................9 Use the Soft Keys .....................................10 Navigate the Menu System..................................11 Incoming and Outgoing Calls ...................................12 Make a Call .......................................12 Respond to a Call ......................................13 Hold and Resume Calls .....................................14 Transfer Calls ......................................14... - Page 4 Change the System Settings Admin PIN ..............................33 Reset the Phone to Factory Default Settings ............................34 Upgrade the Software ....................................35 Define Network Settings ...................................36 Define Lines #1 - 3 ....................................37 The InFocus Portal ......................................38 Maintenance ........................................39 Clean the LCD screen ....................................39 Clean the phone ......................................39 Troubleshooting .......................................40 Appendix ..........................................41...
- Page 5 Page 3...
-
Page 6: Phone Overview
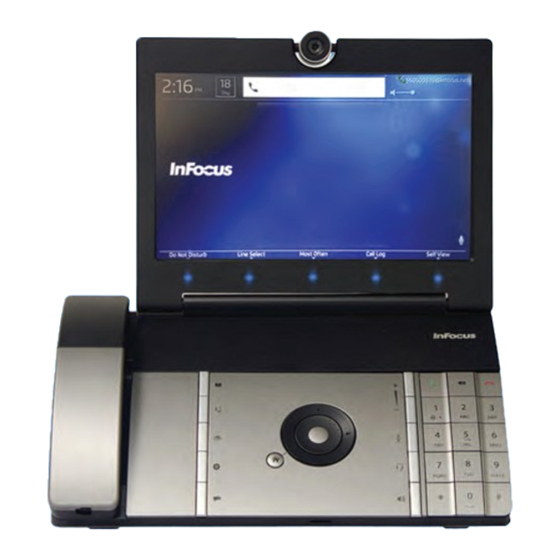
PHONE OVERVIEW FRONT SIDE Camera LCD screen Soft key LEDs Speaker/Microphone Handset USB 2.0 Port and cord SD slot Control Panel Feature Description Camera Use for video calls. The camera can be adjusted up and down 20°. LCD screen Displays video calls and menu functions. Handset and cord Provides audio for calls that use the handset. -
Page 7: Back Side
BACK SIDE Security Lock slot Power cord jack USB 2.0 Port Rear Support Leg Handset cord routing PC jack Handset jack LAN jack Headset jack Feature Description USB 2.0 Port Use with a USB thumb drive to import wallpaper images and ring tones. Rear Support Leg Use to raise and lower the phone’s height. -
Page 8: Control Panel
CONTROL PANEL Arrow keys Scroll wheel Keypad Home key Function buttons Function buttons Select key Function Buttons Description Contacts Press to access your personal contact list. Use the scroll wheel and arrow keys to navigate through the list. Missed Calls Press to review the details of all missed calls. - Page 9 Navigation Keys Description Home key Press to go to the previous menu screen. Also returns you to the Home screen. Use to navigate through the menu system. If the Call History is visible, the left and right arrow keys Arrow keys will toggle between the Call History, Contacts, and Most Often (called) lists, and the up and down arrow keys navigate through the displayed list.
-
Page 10: Phone Capabilities And Requirements
By default, the phone is linked to InFocus' SIP service, however you are free to use any SIP provider. Your phone has three lines (Line 1, Line 2 and Line 3) which can support different SIP services. Each line can accept many calls; however only one active call is allowed at a time. -
Page 11: Menu Overview
MENU OVERVIEW STATUS ICONS Current Date and Time Outbound Calling Number Volume Level Your SIP Number 6:30 301350000@infocus.net Status Icons Do Not Disturb Line Select Most Often Call History Self View Soft Key Labels Status Icons Description Volume Level Indicates your current speaker volume. -
Page 12: Use The Soft Keys
USE THE SOFT KEYS Up to five context sensitive soft keys are available depending on the menu or feature you are working with. Touch the blue LED directly below the soft key to activate the option. Context-Sensitive Press the blue LED under the soft key to activate the option... Soft Keys Do Not Disturb Toggles the "Do Not Disturb"... -
Page 13: Navigate The Menu System
NAVIGATE THE MENU SYSTEM Press the Settings button to open the menu system. Use the soft keys, scroll wheel, arrow keys to move through the menu system. To make changes to a menu item, press the Select button and: If the option is a slider bar (such as LCD Brightness), use the scroll wheel (or arrow keys) to make adjustments. The right and down arrow keys increase the level, and the left and up arrow keys decrease the level. -
Page 14: Incoming And Outgoing Calls
INCOMING AND OUTGOING CALLS MAKE A CALL 6:30 301350000@infocus.net Do Not Disturb Line Select Most Often Call History Self View Lift the handset or go to the next step to dial hands-free. Use the keypad to enter the SIP or PSTN number. The number will appear in the outgoing call box. Note: PSTN is an optional service. -
Page 15: Respond To A Call
RESPOND TO A CALL 6:30 301350000@infocus.net 30140@infocus.net Calling... Other Answer Ignore To accept a call, you can: • Press the green Call button. • Press the Select button. • Touch the Answer soft key. • Pick up the handset. -
Page 16: Hold And Resume Calls
HOLD AND RESUME CALLS 6:30 301350000@infocus.net 01:03 Hold Transfer To put the caller on hold: Touch the Hold soft key. To resume the call: Touch the Hold Queue soft key. Touch the Resume soft key. TRANSFER CALLS Touch the Transfer soft key. -
Page 17: Turn Call Forwarding On/Off
TURN CALL FORWARDING ON/OFF Press the Settings button. Touch the User Settings soft key. The Call Features submenu displays. 6:30 301350000@infocus.net USER 1 2 3 4 Call Features Call Forward Mode Auto Answer Mode Forward All Calls To Auto Answer Mute... -
Page 18: Answer Calls Automatically
Touch the Save soft key to exit the menu system and save your changes. ANSWER CALLS AUTOMATICALLY Press the Settings button. Touch the User Settings soft key. The Call Features submenu displays. 6:30 301350000@infocus.net USER 1 2 3 4 Call Features Call Forward Mode Auto Answer Mode... -
Page 19: Turn Do Not Disturb On/Off
TURN DO NOT DISTURB ON/OFF Touch the Do Not Disturb soft key from the main screen. The Do Not Disturb icon blinks. 6:30 301350000@infocus.net 1250@infocus.net Do Not Disturb Line Select Most Often Call History Self View Touch the Do Not Disturb soft key again to turn off the feature. The Do Not Disturb icon disappears. -
Page 20: Missed Calls
REVIEW MISSED CALLS The Missed Calls contains details on all missed calls, so that you can easily call the person back. Press the Missed Calls key. 6:30 301350000@infocus.net 01:44 PM 10/22/12 Mary Jones 00:00:00 Missed Calls 08:03 AM 10/22/12... -
Page 21: Add A Personal Contact
ADD A PERSONAL CONTACT Although you may be able to add contacts through your service provider (the InFocus portal provides this option), you can also add a contact from the phone itself. Press the Contacts or Missed Calls button. Note: The Most Often or Call History soft key can also be used. -
Page 22: Review Status Information
You can find the software version, serial number, MAC address and provisioning information of your phone, and information related to your call, by pressing the Settings button and reviewing the read-only Status information. Press the Settings button again or the Home key to go back to the main screen. 6:30 301350000@infocus.net STATUS System Call Status Software Version 0.0.6... -
Page 23: Other User Settings
Press the Settings button. Touch the User Settings soft key. The Call Features submenu displays. 6:30 301350000@infocus.net USER 1 2 3 4 Call Features Call Forward Mode... -
Page 24: Adjust The Lcd Brightness
You can adjust the brightness of the LCD panel. Press the Settings button. Touch the User Settings soft key. Touch the Next soft key until the Display/Sound submenus display. 6:30 301350000@infocus.net USER 1 2 3 4 Display Sound LCD Brightness... -
Page 25: Adjust The Screensaver
You can activate the screensaver feature and change the time interval it appears. Press the Settings button. Touch the User Settings soft key. Touch the Next soft key until the Display/Sound submenus display. 6:30 301350000@infocus.net USER 1 2 3 4 Display Sound LCD Brightness... -
Page 26: Set Standby Parameters
System Standby and Standby Timer features. Press the Settings button. Touch the User Settings soft key. Touch the Next soft key until the Display/Sound submenus display. 6:30 301350000@infocus.net USER 1 2 3 4 Display Sound LCD Brightness... -
Page 27: Adjust The Ring Volume
You can adjust the volume of the ringtone by pressing the volume up and down keys on the keypad while the phone is ringing or by using the following method: Press the Settings button. Touch the User Settings soft key. Touch the Next soft key until the Display/Sound submenus display. 6:30 301350000@infocus.net USER 1 2 3 4 Display Sound LCD Brightness Ring Volume... -
Page 28: Adjust The Key Tone
You can turn the key tone on or off. Press the Settings button. Touch the User Settings soft key. Touch the Next soft key until the Display/Sound submenus display. 6:30 301350000@infocus.net USER 1 2 3 4 Display Sound LCD Brightness... -
Page 29: Change The Ring Tone
Contact, go to the Contacts list and navigate to Edit. Press the Settings button. Touch the User Settings soft key. Touch the Next soft key until the Display/Sound submenus display. 6:30 301350000@infocus.net USER 1 2 3 4 Display Sound LCD Brightness... -
Page 30: Change The Camera Settings
White Balance, Brightness or Contrast needs to be adjusted, you can make these adjustments in this menu. Press the Settings button. Touch the User Settings soft key. Touch the Next soft key until the Camera submenu displays. 6:30 301350000@infocus.net USER 1 2 3 4 Camera Brightness Mode Auto... -
Page 31: Define Date And Time Settings
You can personalize the date and time formats, and choose between automatic SNTP time synchronization or manual time/date entry modes within this menu. Press the Settings button. Touch the User Settings soft key. Touch the Next soft key until the General/Wallpaper submenus display. 6:30 301350000@infocus.net USER 1 2 3 4 General Wallpaper System Name Wallpaper... -
Page 32: Change The Wallpaper Image
Navigate to Wallpaper. Press the Select button. Navigate to InFocus to use the default wallpaper, or choose one of the other standard wallpaper options, or create a customized wallpaper. To add a custom wallpaper, save an image (*.jpeg, *.jpg, *.png; maximum 2MB) onto a USB 2.0 thumb drive or SD card and insert the thumb drive/card in the right-hand slot on the phone. -
Page 33: Administrative/It Features
A PIN is required to access the phone's Advanced Settings. By default, this PIN is "1234," but this can be changed by the IT Administrator. See"Change the System Settings Admin PIN" on page 33. Press the Settings button. Touch the System Settings soft key. 6:30 301350000@infocus.net STATUS System Call Status Software Version 0.0.6 Remote URI... -
Page 34: Define The Provisioning Mode And Authentication Code
Select On to turn on the provisioning mode or Off to turn off this feature. By default, this feature is on which allows the system to be configured by the InFocus.net server automatically. If you do not want to use the InFocus.net service, turn this feature off to allow manual configuration. -
Page 35: Change The System Settings Admin Pin
The IT administrator can redefine the factory default System Settings Administrator PIN, so that Advanced Setting items are protected. Note: Accomplishing a Factory Reset resets the PIN to "1234". Access the System Settings menu. The Auto Configure/System submenu displays. 6:30 301350000@infocus.net ADMIN 1 2 3 4 5 Auto Configure System... -
Page 36: Reset The Phone To Factory Default Settings
System Settings Admin PIN. All user settings and the phonebook will be lost. Access the System Settings menu. The Auto Configure/System submenu displays. 6:30 301350000@infocus.net ADMIN 1 2 3 4 5 Auto Configure System Serial Number... -
Page 37: Upgrade The Software
Insert a USB 2.0 thumb drive or SD card with the software upgrade into the right-hand side of the phone. Access the System Settings menu. The Auto Configure/System submenu displays. 6:30 301350000@infocus.net ADMIN 1 2 3 4 5 Auto Configure... -
Page 38: Define Network Settings
The IT administrator defines the network settings for the phone in this menu. Access the System Settings menu. Touch the Next soft key until the IP Settings/DNS Settings submenu displays. 6:30 301350000@infocus.net ADMIN 1 2 3 4 5 IP Settings DNS Settings... -
Page 39: Define Lines #1 - 3
DEFINE LINES #1 - 3 Although the IT administrator can define Lines 1, 2, and 3 via the InFocus portal (http://www.InFocus.net), the IT administrator can also make adjustments in the Admin > Account (1-3) submenus. Access the System Settings menu. -
Page 40: The Infocus Portal
The InFocus portal (http://www.InFocus.net) is where your messages, contact lists, registration information, etc. are stored. You can access this information from anywhere you have an internet connection. Additional services are also available through the InFocus portal. You can obtain a Vanity SIP address, order a 10-digit phone number (so you can call any phone), port your existing number, and more. -
Page 41: Maintenance
MAINTENANCE CLEAN THE LCD SCREEN Apply a LCD screen cleaner to a soft, dry cloth. Lightly wipe the cleaning cloth over the LCD screen to remove fingerprints, dust and grime. WARNING: Do not spray anything on the LCD screen. CLEAN THE PHONE Unplug the phone from power. -
Page 42: Troubleshooting
(See "Program Call Forwarding" on page 15). Calls will not be forwarded if the Forward Numbers are left blank or if Call Forward Mode is set to Off. Also check InFocus portal Call Forwarding settings at http://www.InFocus.net. For additional troubleshooting support, please contact:... -
Page 43: Appendix
International Business Machines, Inc. Microsoft, PowerPoint, and Windows are trademarks or registered trademarks of Microsoft Corporation. Adobe and Acrobat are trademarks or registered trademarks of Adobe Systems Incorporated. InFocus, In Focus, and INFOCUS (stylized) are either registered trademarks or trademarks of InFocus Corporation in the United States and other countries. - Page 44 The phone can also receive power using the PoE (Power over Ethernet) standard IEE 802.3af-2003. The phone must not consume more than 12.95W. This document applies to regulatory model INV100. InFocus reserves the right to alter product offerings and specifications at any time without notice.
-
Page 45: Safety Information
WARNING: Use the power cord provided. WARNING: Only use replacement parts specified by InFocus. Unauthorized substitutions may result in fire, electrical shock or injury, and may void the warranty. WARNING: Wash hands after handling the cables supplied with this product. -
Page 46: Warranty
Warranty, is defective in material or workmanship during the warranty period, then InFocus, at its option, will REPAIR, REPLACE or RE- FUND the Product. InFocus' sole obligation is to supply (or pay for) all labor necessary to repair the Product found to be defective within the Limited Warranty period and to repair or replace defective parts with new parts or, at the option of InFocus, serviceable used parts that are equivalent or superior to new parts performance, but shall not exceed the return of the amount of the purchase price paid by the purchaser. - Page 47 BE AFFECTED IF ANY REMEDY PROVIDED HEREIN SHALL FAIL OF ITS ESSENTIAL PURPOSE.Where applicable national or state law prohibits the exclusion or limitation of liability, InFocus excludes or limits its liability to the maximum extent permitted by national law. Limitation on Bringing Action - No action, regardless of form, arising out of the agreement to purchase the Product may be brought by purchaser more than one year after the cause of action has accrued.
Need help?
Do you have a question about the MyVideoPhone MVP100 and is the answer not in the manual?
Questions and answers