
Related Manuals for Vulu 1

Summary of Contents for Vulu 1
- Page 1 VULU 01 VULU STROLLER Instruction Manual PLEASE KEEP INSTRUCTIONS FOR FUTURE REFERENCE...
- Page 2 POSITIONS...
- Page 3 SAFETY GUIDELINES AND INSTRUCTIONS MUST ALWAYS BE FOLLOWED BEFORE MAKING USE OF THIS PRODUCT. PLEASE RETAIN THESE INSTRUCTIONS FOR FUTURE REFERENCE. THIS PRODUCT COMPLIES WITH PRODUCT SAFETY STANDARD AS/NZS 2088:2009 WARNING FOLLOW THE MANUFACTURER’S INSTRUCTIONS. PUT ON ALL THE BRAKES WHENEVER YOU PARK THE STROLLER. ALWAYS APPLY THE BRAKES WHENEVER THE STROLLER IS STATIONARY.
-
Page 4: What's Inside
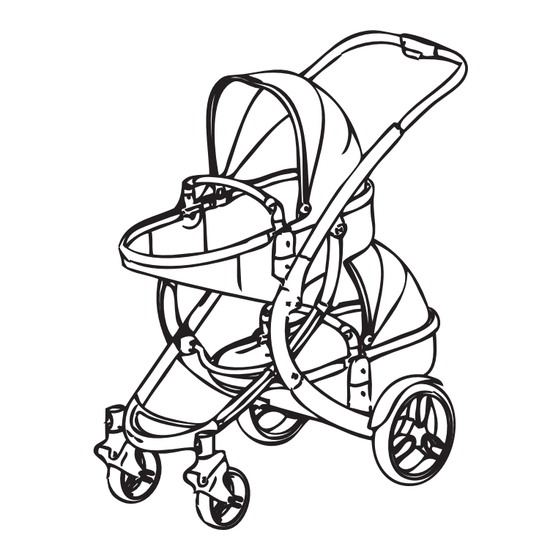
WHATS INSIDE PARTS LIST: MAKE SURE YOU HAVE THE FOLLOWING 1. 2X REAR WHEELS 2. 2X FRONT WHEELS 3. 2X REAR MUDGUARD 4. 2X REAR SEAT ADAPTER (SOLD SEPARATELY) 5. HANDLE BAR (MAIN SEAT) 6. CANOPY (MAIN SEAT) 7. CANOPY SECOND SEAT (SOLD SEPARATELY) 8. -
Page 5: How To Assemble
HOW TO ASSEMBLE UNFOLD THE FRAME Unclip the latch from the Pull the frame away from the When pulling the stroller away frame. handle. from the handle make sure you keep you ngers away from the joints. Pull the handle upwards. You should hear the handle bar locking into place the sould of a click. -
Page 6: Attaching The Front Wheels
HOW TO ASSEMBLE ATTACHING THE FRONT WHEELS Slide front wheel (2) into the front axel Repeat on both sides. hole. he wheel should click into place. To use the stroller in swivel To lock the front wheels, To remove the front wheel: Press the button mode the front lock on the press downwards on the on the top of the front axel to release the front... -
Page 7: Attaching The Rear Wheels
HOW TO ASSEMBLE ATTACHING THE REAR WHEELS Slide the mudguard (3) onto the rail on the Slide the Mudguard until it clips into position. rear axel. You will hear it click. To remove the mudguard just slide it the opposite direction. To remove the wheel press on the middle Place the wheel into the hole located on the rear axel. - Page 8 HOW TO ASSEMBLE ATTACHING THE SECOND SEAT UNIT TO THE FRAME (SOLD SEPARATELY) Place the seat unit (8) over the openings To remove the seat from the frame press on the frame. It should click into place. the release buttons located on each side of the seat unit (8) then lift.
-
Page 9: Attaching The Basket
HOW TO ASSEMBLE ATTACHING THE BASKET Once they are through the openings Then you can strap the middle velcro To assemble the basket place the attach them to the velcro slots on the strap on the assist tube. 3 velcro straps through the 3 bottom of the seat unit. - Page 10 HOW TO ASSEMBLE ATTACHING THE HOOD AND BUMPER BAR The assembled canopy should look Insert the ends of the Canopy (7) Match the zipper ends together like this. into the slots located on the and then pull it upwards. sides of the seat unit (8) To close the canopy push it To use the canopy pull it inwards.
- Page 11 HOW TO ASSEMBLE CONVERTING THE SEAT UNIT TO A BASSINET Press the button located on the top Unclip the straps located on the of the stroller seat. Recline the seat bottom of the seat unit. unit until it lays at. The Assembled bassinet should look Strap the velcro around the bar Curl the material on the base...
-
Page 12: Adjusting The Position
HOW TO ASSEMBLE ADJUSTING THE POSITION To adjust the angle of the seat press the The back rest can adjust to three sections. button located at the top of the seat unit and push the seat in the direction you need. ADJUSTING THE BACKREST Then Pull the belt to the desired To adjust the backrest, lift the backrest... -
Page 13: Adjusting The Handle
HOW TO ASSEMBLE ADJUSTING THE HANDLE To adjust the handle press the middle handle button and pull to the desired position USING THE BRAKES To Apply the brakes push the red brake lever downwards. To remove the brakes kick the red brake lever upwards. - Page 14 HOW TO ASSEMBLE FOLD THE FRAME Remove all seats and children before you Once the handle has been loosened commence unfolding. Press the release button on push the handle downwards. the side of the stroller (1) and (2) then push the button the handle (3) and push the handle inwards (4).
- Page 15 HOW TO ASSEMBLE HOW TO USE THE 5-POINT HARNESS: SHOULDER STRAPS WAIST STRAPS WAIST STRAPS FIG. 1 FIG. 2 CROTCH STRAP THIS STROLLER HAS BEEN DESIGNED WITH A 5-POINT HARNESS FOR THE SAFETY OF YOUR CHILD. CAREFULLY PLACE YOUR CHILD INTO THE SEAT AND BRING THE WAIST STRAPS AROUND THE CHILDS WAIST AND OVER THE CHILDS SHOULDERS.
-
Page 16: Warranty Against Defects
WARRANTY AGAINST DEFECTS ALL LOVE N CARE/VULU PRODUCTS ARE GUARANTEED FOR TWELVE MONTHS FROM THE DATE OF PURCHASE. OUR GOODS COME WITH GUARANTEES THAT CANNOT BE EXCLUDED UNDER THE AUSTRALIAN CONSUMER LAW. YOU ARE ENTITLED TO A REPLACEMENT OR REFUND FOR A MAJOR FAILURE AND FOR COMPENSATION FOR ANY OTHER REASONABLY FORSEEABLE LOSS OR DAMAGE. -
Page 17: Cleaning And Maintenance
CLEANING AND MAINTENANCE ALL LOVE N CARE PRODUCTS HAVE ONE YEAR WARRANTY FROM THE DATE OF PURCHASE. IT IS RECOMMENDED TO REGULARLY INSPECT AND MAINTAIN MOVEMENT OF LOCKING DEVICES AND SECURITY OF ESSENTIAL COMPONENTS. REGULARLY CHECK ALL PARTS FOR WEAR AND TEAR. LUBRICATE IF TIGHT. DO NOT USE SPRAY LUBRICANTS, SIMPLY WIPE CLEAN AFTER USE. - Page 18 Contact Us Head Office: Brisbane Western Australia Love N Care Pty Ltd. 7-9 Eileen Street 5 Modal Crescent 297-299 Canterbury Rd, Revesby Underwood QLD 4119 Australia Canning Vale WA 6155 Australia NSW 2212 Australia Contact No: 07 3290 4217 Contact No: 08 9455 4972 Contact No: 02 9774 4655 Fax: 07 3209 5019 Fax: 08 9455 4728...
Need help?
Do you have a question about the 1 and is the answer not in the manual?
Questions and answers