Advertisement
Quick Links
Introduction
Thank you for purchasing the LINDY USB 2.0 HDD Docking Station. Now
you have the convenience and speed of connecting 2.5" or 3.5" SATA hard
drives to your USB enabled computer without the need for a complicated
drive housing.
Features
•
Supports all 2.5" and 3.5" SATA hard drives
•
High Speed USB 2.0 480Mbps interface
•
Hot Swapping for quick drive exchanges
•
Plug and Play installation
•
Eject button for safe removal of your hard drive
•
Compatibility: Windows XP/Vista/7, Linux, Mac OS 10.3 or later
Package Contents
•
USB 2.0 HDD Docking Station
•
USB Cable
•
Multi-Country Power Supply
•
This manual
© LINDY ELECTRONICS LIMITED & LINDY-ELEKTRONIK GMBH - FIRST EDITION (Oct. 2011)
USB 2.0 HDD Docking Station
Hardware
Installation
1. Connect the USB cable to the matching port on the
back of the docking station and your computer
2. Connect the power cable to the back of the docking
station and to the mains power supply
3. Firmly insert your SATA Hard Drive face down with
the connectors aligned to the SATA interface
4. Turn on the Docking Station using the power switch
5. No driver is required; allow your computer to detect
and install the Docking Station
6. Once your computer has finished installing the
Docking station it is ready to use
Disk Ejection
1. Ensure that the Power and Activity light is not
flickering and that no data transfer is in place
2. Firmly press down on the Eject button
3. The Hard Drive will be ejected from the SATA
connection and may now be removed.
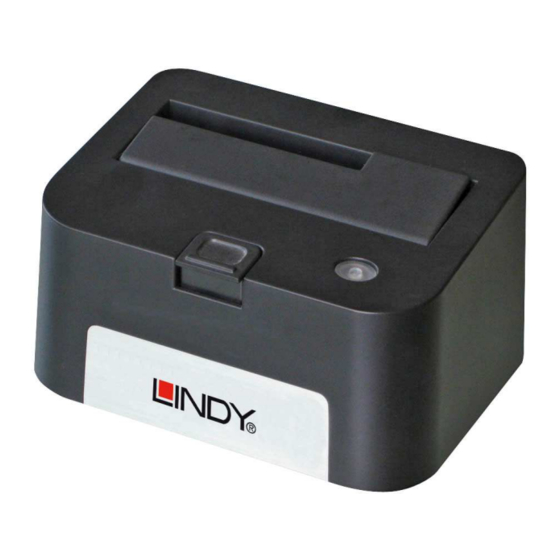
1. SATA Interface
2. Eject Button
3. 2.5" Drive Slot
4. 3.5" Drive Slot
5. Power & Activity LED
Advertisement

Subscribe to Our Youtube Channel
Related Manuals for Lindy USB 2.0 HDD Docking Station


Summary of Contents for Lindy USB 2.0 HDD Docking Station
- Page 1 USB 2.0 HDD Docking Station Introduction Hardware Thank you for purchasing the LINDY USB 2.0 HDD Docking Station. Now you have the convenience and speed of connecting 2.5” or 3.5” SATA hard drives to your USB enabled computer without the need for a complicated 1.
- Page 2 WEEE in leggi statali in varie misure. Fare riferimento alle leggi del proprio Stato quando si dispone di un apparecchio elettrico o elettronico. Per ulteriori dettagli fare riferimento alla direttiva WEEE sul riciclaggio del proprio Stato. LINDY No 42736 Edition, Oct. 2011 www.lindy.com...
Need help?
Do you have a question about the USB 2.0 HDD Docking Station and is the answer not in the manual?
Questions and answers