
Summary of Contents for Allvag HioPOS Plus
- Page 1 User Manual Before you connect, start or configure your new point of sale terminal, please carefully read the User Manual...
- Page 2 Copyright This publication, including all photograhs, illustrations and software, is protected under international copyright laws, with all rights reserved. Neither this manual, nor any of the material contained herein, may be reproduced without written consent of the author. Disclaimer The information in this document are subject to change without notice. Trademark recognition All product names used in this manual are the properties of their respective owners and are acknowledged.
-
Page 3: Table Of Contents
Index Box Content Components identification I/O connectors Connecting Peripheral devices Tilt angle of the screen POS Dimensions Inserting the thermal paper roll HioPOS Configuration HioPOS Use Sale Configutarion POS Movements Cash count Purchase Consults Statistics Accesories Backup... -
Page 4: Box Content
Box Content 3 “ Thermal paper roll Touch terminal with printer, customer display, Wifi Power supply cable User Manual Use License Before you connect, start or configure your new point of sale terminal, please carefully read the User Manual. User Manual Use License Page... -
Page 5: Components Identification
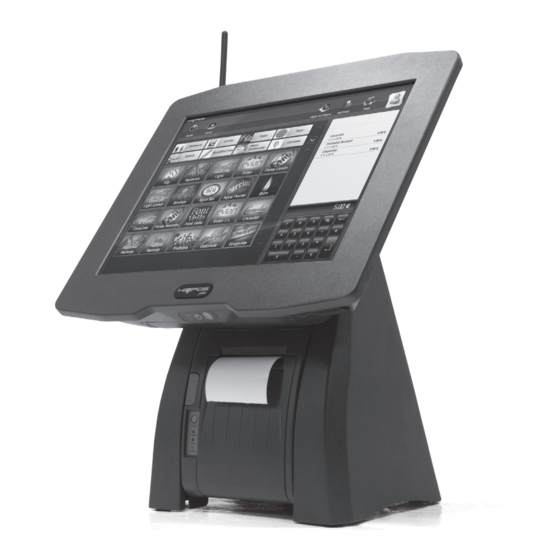
Components identification Front view 1. Wifi Antenna 2. 15” LCD TFT. Resistive Touch Screen 3. Blue illuminated logo indicates power on. Red illuminated logo indicates off-line terminal 4. Power Button 5. Button to change printer paper 6. Built-in printer Rear view 1. -
Page 6: I/O Connectors
I/O connectors 1. External USB port 2. LAN port (RJ-45) 3. Printer power 4. PS/2 keyboard port 5. 24V RJ-11 cash drawer port 6. Printer USB port 7. 2 USB ports 8. Power connector 9. Parellel port 10. COM4 port 11. -
Page 7: Tilt Angle Of The Screen
Tilt angle of the screen To adjust the screen angle, press firmly at the panel corners as indicated by the dots until reaching the desired working angle. POS Dimensions POS dimensions vary depending on the screen inclination Page... -
Page 8: Inserting The Thermal Paper Roll
Inserting the thermal paper roll 1. Open the printer cover by pressing the release button. 2. Insert the paper roll as shown in the image on the right. 3. Leave a small part of the paper outside. Caution: A. Be sure to use only paper rolls that meet the printer specifications. -
Page 9: Hiopos Configuration
HioPOS Configuration 1. Database Creation 3. Area selection, date and time settings On this screen you can start a new installation HioPOS is customized for your country. If or restore a previous backup. your country has different taxes by areas, you should select your area. Press “Start new installation” to start from the beginning. - Page 10 HioPOS Configuration 6. Currency Selection 8. Company Data Introduction HioPOS is already customized to work with In this screen you should enter the data from your currency. If you also accept other curren- your establishment. This data appears in the cies, you should select them from the list. printed ticket, as you can see on the right part of the screen.
- Page 11 HioPOS Configuration 12. Items Display You can also configure the time clock control of the employees by assigning a password This screen shows you the families and the to each user. This will log the time they start items as they will appear on the sale screen. and finish the working day.
-
Page 12: Hiopos Use
HioPOS Use 2. SALE SCREEN SALE 2.1. SALE 1. SELLERS SCREEN Select the items that you want to sell by pressing on them in the area . They will be added to the To start working, select a seller by pressing on the sale and you will be able to see them in the area . - Page 13 HioPOS Use If there is a sale: Change price: Allows you to set the unit price for all the selected lines. Leave on hold: To assign a number or a name to the current sale and start a new sale. Change units: HioPOS will request the units To restore a sale on hold, select it from the and will fix them for all the selected sale lines.
- Page 14 HioPOS Use 3. TOTAL SCREEN 3.3. C OLLECTION Select the type of payment that the client is using to You can finish the sales from this screen. You can pay the sale. Then enter the amount tendered from assign a client to the sale, register how the client the client.
-
Page 15: Configutarion
HioPOS Use Returns Reasons: From this section, you can CONFIGURATION create the return reasons that you need. That way, the users, should indicate the reason of In order to access to this section, select the option the return. Configuration in the sale screen. Import items: From here you can import items to HioPOS from a USB pen drive. -
Page 16: Pos Movements
HioPOS Use POS MOVEMENTS PURCHASE To access this menu, press Purchase on the sale 1. CASH-IN screen. This option is only visible if you do not have You can register all the cash-in not related to a sale. any current sales and the user has permission to It is necessary to do the cash count at the end of do purchases. -
Page 17: Consults
HioPOS Use In the right area you can see the purchase detail CONSULTS selected from the list. This purchase can be reprinted by pressing on Print. Access this option by pressing Consult on the sale screen. This option is only available if you do not have any current sales and the user has permis- 3. CASH COUNTS sion to do consults. - Page 18 HioPOS Use 4. AUDIT Hours, shows you the sales distributed by hours and comparing them with the ones of the You can consult the Returns, the Discounts, last 3 same days of the week. To select another Invitations, the Presence and the day, press Filters.
-
Page 19: Accesories
Backup HioPOS Use 7. TOTALS You are responsible of your data so you have the obligation to keep a correct backup policy of your You have a general summary of the sales previous data. HioPOS offers you the tools to do it. to today and today sales. - Page 20 For more information about the different functionalities of HioPOS, you can consult the website:...
Need help?
Do you have a question about the HioPOS Plus and is the answer not in the manual?
Questions and answers