Table of Contents
Advertisement
Available languages
Available languages
Quick Links
Advertisement
Table of Contents

Summary of Contents for PROEL DIMMER 1K PLDM1K
- Page 1 MANUALE UTENTE – USER’S MANUAL DIMMER 1K PLDM1K Rev. 09/2006...
-
Page 2: Table Of Contents
INDICE CARATTERISTICHE GENERALI ..........4 CARATTERISTICHE TECNICHE ..........5 ISTRUZIONI GENERALI ............5 UTILIZZO SICURO ED EFFICIENTE ........5 AVVERTENZE ................ 6 CONTROLLO E FUNZIONI ............. 7 PANNELLO FRONTALE ............7 PANNELLO POSTERIORE ..........8 GUIDA AL FUNZIONAMENTO..........8 MODALITÀ DMX ADDRESS ..........9 MODALITÀ... - Page 3 TABLE OF CONTENTS GENERAL FEATURES ............12 TECHNICAL SPECIFICATIONS..........13 GENERAL INSTRUCTIONS..........13 SAFE AND EFFICIENT USE ..........13 PRODUCT CARE ..............14 CONTROLS AND FUNCTIONS ..........15 FRONT PANEL ..............15 REAR PANEL ..............16 OPERATION GUIDE............. 16 DMX ADDRESS MODE ............. 17 SWITCH PACK MODE............
-
Page 4: Caratteristiche Generali
CARATTERISTICHE GENERALI Grazie per l’acquisto del dimmer PLDM1K. Questo modello è un modulo dimmer ad un canale. Possiede una varietà di funzioni che includono: Porta DMX IN / OUT standard a 3 poli per fornire • informazioni sul dimmer; Modalità SWITCH PACK o DIMMER PACK; •... -
Page 5: Caratteristiche Tecniche
Per la riparazione consultare sempre personale autorizzato. • In caso di problemi di funzionamento (odore di bruciato, ecc…) cessare immediatamente l’utilizzo, disconnettere la presa dell’alimentazione e rivolgersi al proprio rivenditore per un controllo oppure contattare direttamente la PROEL Spa. -
Page 6: Avvertenze
• Per prevenire rischi di incendio o di shock elettrico, non esporre il prodotto alla pioggia o all’umidità. • Evitare di eseguire la riparazione. Eventuali interventi da parte di personale non qualificato ne provocherebbe danni o il funzionamento difettoso. AVVERTENZE •... -
Page 7: Controllo E Funzioni
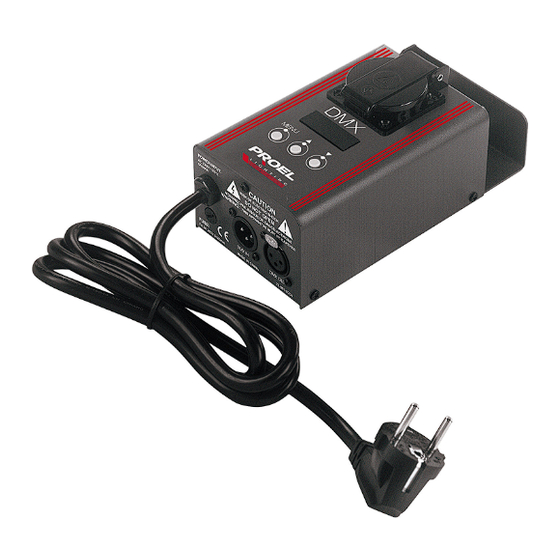
CONTROLLO E FUNZIONI PANNELLO FRONTALE 1. Uscita: 6 A max. 2. Display: Mostra l’attività in corso o lo stato della funzione. 3. Pulsante MENU: Premere entrare livello successivo. 4. Pulsante UP: Ogni pressione aumenterà il valore di una unità. 5. Pulsante DOWN: Ogni pressione diminuirà il valore di un’unità. -
Page 8: Pannello Posteriore
PANNELLO POSTERIORE 1. Cavo di alimentazione: Connettere all’appropriata presa di corrente. 2. Fusibile: F6.3 A 250V 5×20 mm 3. Ingresso DMX: Presa XLR maschio a 3 pin per ricevere dati DMX 4. Uscita DMX: Presa XLR femmina a 3 pin per inviare dati DMX GUIDA AL FUNZIONAMENTO Connettere all’appropriata presa di corrente. -
Page 9: Modalità Dmx Address
Il prodotto funziona da dimmer pack o switch pack a seconda della modalità operativa selezionata. Assicurarsi che i requisiti di alimentazione corrispondano a quelli specificati su questa unità. MODALITÀ DMX ADDRESS 1. Il Display mostra l’indirizzo DMX dell’ultima 1 2 3 modifica effettuata. -
Page 10: Modalità Dimmer Pack
3. Premere il pulsante MENU per entrare in - o n modalità Switch Pack. La modalità Switch Pack consiste di Switch On (S-on) e Switch Off (S-of). In modalità Switch On, l’output è attivo e l’apparecchio si illuminerà indipendentemente al segnale DMX. I modalità Switch Off, l’output è inattivo e l’apparecchio è... - Page 11 3. Premere il pulsante MENU per entrare in 8 8 8 modalità Dimmer Limit. 4. Premere il pulsante UP o DOWN per 8 8 8 cambiare il valore entro la gamma si 10- 100. Ogni pressione cambierà il valore di una unità.
-
Page 12: General Features
GENERAL FEATURES Thank you for your purchase. This product features include: 3 pin standard DMX IN / OUT ports providing dimmer • information. Serves as a Switch Pack or Dimmer Pack, depending • upon the current operation mode. Allows DMX Addressing, Dimmer Preset and Dimmer •... -
Page 13: Technical Specifications
TECHNICAL SPECIFICATIONS Power Input AC 230V ~ 50Hz Channel Output 6 A max DMX In / Out 3 pin XLR socket Fuse F6.3 A 250V 5×20 mm Dimensions (mm) 182×92×65 Weight (kg) GENERAL INSTRUCTIONS Please read through this operating instructions before installing or using your new product. -
Page 14: Product Care
PRODUCT CARE • This product is intended for indoor use only. • Provide occasional ventilation during use. • Unplug the power plug from the sockets when not using the unit for extended period. • Do not use the unit in places subject to excessive humidity, vibration or bumps. -
Page 15: Controls And Functions
CONTROLS AND FUNCTIONS FRONT PANEL 1. Output: 6 A max 6. Display: Shows current activity or function state. 7. MENU button: Press to enter next level. 8. UP button: Each tapping will increase the value once. Pressing and holding down will increase quickly. -
Page 16: Rear Panel
REAR PANEL 1. Power Cord: Plug in the appropriate power outlet. 2. Fuse: F6.3 A 250V 5×20 mm 3. DMX Input: 3 pin XLR socket used to receive DMX data 4. DMX Output: 3 pin XLR socket used to send DMX data OPERATION GUIDE Plug in the appropriate power outlet , this unit recovers to the function state of last time automatically by reasons of power... -
Page 17: Dmx Address Mode
DMX ADDRESS MODE 1. The display shows the DMX address of last 1 2 3 change when powered this unit. If you’ve selected DMX address 123 for the last time, then the display will show 123. 2. Each tap ph the UP or DOWN button will 1 2 5 change the DMX address once. -
Page 18: Dimmer Pack Mode
In the Switch Off mode, output is turned off and the fixture is controlled by DMX signal. When DMX level is less than 40% the fixture goes out. When DMX level exceeds 40% the fixture lights. - o f 4. Tap the UP or DOWN button to change between Switch On and Switch Off. - Page 19 4. Tap the UP or DOWN button to change 8 8 8 the value within the range of 10-100. Each tap will change the value once, pressing and holding down will change the value quickly. Once the Dimmer Limit is selected, it will be stored automatically. 8 8 8 5.
- Page 20 PROEL S.p.A. (World Headquarters – Factory) Via alla Ruenia 37/43 64027 Sant’Omero (TE) – Italy Tel. +39 0861 81241 Fax. +39 0861 887862 e-mail: info@proelgroup.com www.proelgroup.com...
Need help?
Do you have a question about the DIMMER 1K PLDM1K and is the answer not in the manual?
Questions and answers