
Summary of Contents for Onboard Research Model RA800P
- Page 1 Model User Guide Designed and manufactured by Manual Revision 09800002008 May 2007...
-
Page 2: Quick Start Guide
Beatnik™ Rhythmic Analyzer Model User Guide P Quick Start Guide 1. Remove Beatnik from its packaging and remove the rear battery door cover. 2. Install six AA batteries (provided) using the correct orientation indicated inside the battery compartment. Then replace the battery door cover. You can optionally use an AC adapter. 3. Set the Power Switch, located on the rear panel above “Settings,” to On. Using the Default Settings The default settings set at the factory are: Analyzer=Subdivision; View=Autoswitch; Tempo=60; Note=sixteenth; Skill Level=medium. All are explained in more detail later. To start your session, simply press the Start/Pause button. The builtin metronome sounds sixteenth notes at 60 beats per minute. The th four vertical dotted lines on the display represent the four 16 notes in a quarter note. th To test your skills, play the 16 notes with the metronome. When you strike the drum pad, Beatnik displays a realtime view of your stroke timing and calculates a running score of your performance accuracy. When you stop striking the drum pad, Beatnik automatically switches to its History summary view that represents each stroke as a single dot so that you can see the history of every note you played. To pause your session, press the Start/Pause button again. To reset your score to zero and clear your history, press ... -
Page 3: Copyright
Beatnik™ Rhythmic Analyzer Model User Guide P Copyright Copyright © 2007 OnBoard Research Corporation Any technical documentation made available by OnBoard Research Corporation is the copyrighted work of OnBoard Research Corporation. No portion of this document may be copied without the express written consent of OnBoard Research Corporation. OnBoard Research Corporation 1321 Valwood Parkway, Suite 440 Carrollton, Texas 75006 U.S.A. Online: http://www.tuners.com Email: hello@tuners.com Telephone: 12142394005 Fax: 12142394006 Trademarks OnBoard is a registered trademark of OnBoard Research Corporation. Beatnik, RA800P and Beatnik Rhythmic Analyzer are registered trademarks of OnBoard Research Corporation. All other trademarks are the property of their respective owners. Special Thanks Special appreciation and thanks is given to Mark James, Brian Hartig, Mike Drake, Ron Fink, Ed Soph, Christopher Deane, Dan Robbins, J.J. Pepitone, Jim Moen, Henry Okstel and Chris Seiter for their unique contributions in the development of Beatnik Rhythmic Analyzers. The Beatnik Design Team Mark Wilson, Niru Nirumandrad, Rusty Membreno, Jim Dulaney, Bob Snyder Recommended Practice Stands We recommend the Beatnik Stand (see Optional Accessories, pg.26) for its ease of use and durability. This product can also be attached to any percussion practice pad, bell stand or cymbal stand equipped with a standard 8millimeter screw. Warranty ... -
Page 4: Table Of Contents
Beatnik™ Rhythmic Analyzer Model User Guide P Table of Contents Quick Start Guide................ii Using the Default Settings..............ii Changing Default Settings..............ii Copyright................... iii Introduction..................6 Layout ....................6 Current Settings Display ..............8 Data Display..................8 Settings Panel ...................8 Metronome Panel................9 Selector.....................9 Power On/Off Switch..............10 Headphones (or external speaker) Jack ..........10 AC Jack..................10 Drum Pad ..................10 Powering Beatnik................11 Attaching the AC Adapter ...............11 Inserting Batteries ................11 Turning Beatnik On and Off............12 Overview of Setting up a Practice Session.........12 Setting the Tempo................13 Set Tempo ..................13 Measured Tempo ................13 Selecting a Note..................14 ... - Page 5 Beatnik™ Rhythmic Analyzer Model User Guide P Product Specifications ...............26 Optional Accessories................26 v ...
-
Page 6: Introduction
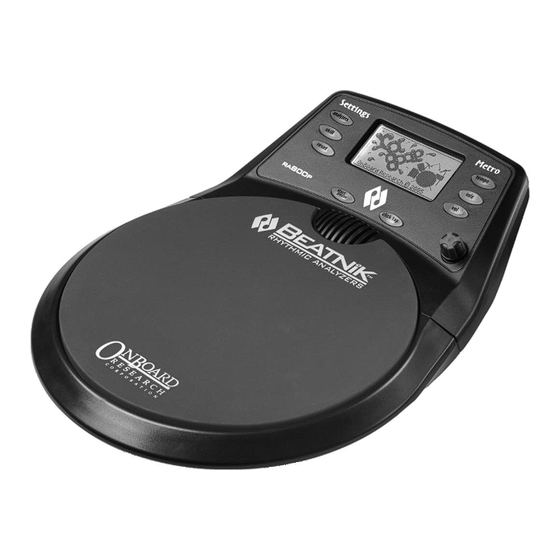
Beatnik™ Rhythmic Analyzer Model User Guide P Introduction The Beatnik™ RA800P Rhythmic Analyzer for Percussion from OnBoard Research helps you improve your rhythmic accuracy in ways never before imagined or possible. Whether you’re an experienced player who wants some finetuning or a promising new talent interested in developing solid rhythmic fundamentals, Beatnik answers the call. Beatnik is more than a fancy metronome. With its two interactive, practical and intuitive builtin analyzers, Beatnik provides instant visual and audio feedback on your timing and rhythmic accuracy. This lets you immediately analyze your technical precision and assess your strengths and weaknesses to help you speed up your progress toward rhythmic perfection. After you set the desired rhythm, simply start the rhythm playback and strike the touchsensitive practice pad. Beatnik’s large display shows a visual representation of each stroke in real time and records every stroke for a history view, which lets you see exactly where your strokes occurred in relation to the actual beat with accuracy to the nearest 512th note! Never before has there been anything like Beatnik. If you have ever wished you knew how your rhythmic and timing skills stack up, Beatnik has all the answers. Layout ¾ Current Settings Display ¾ Realtime and History Data Display ¾ Settings Panel ¾ Metronome Panel ¾ Selector ¾ Speaker ¾... - Page 7 Beatnik™ Rhythmic Analyzer Model User Guide P Figure 1. Top View Figure 2. Rear View 7 ...
-
Page 8: Current Settings Display
Beatnik™ Rhythmic Analyzer Model User Guide P Current Settings Display The current settings display shows a combination of current settings, including the selected accuracy analyzer, view, skill level, volume and tempo settings, and measured tempo and performance score that adjust as you play. Figure 3. Current Settings Display Data Display The data display is 48 x 128 pixels. Each time you strike the drum pad, Beatnik records the timing of the stroke and represents it as one or more pixels in the data display. You can change the view to show your timing and rhythmic accuracy in a variety of ways to help you better understand your performance strengths and weaknesses. Settings Panel The Settings panel includes the following controls: ¾ Accuracy Analyzers – Lets you select from two accuracy analyzers: Groove, Subdivision. See “Accuracy Analyzers.” ¾... -
Page 9: Metronome Panel
Beatnik™ Rhythmic Analyzer Model User Guide P Metronome Panel The Metronome panel includes the following controls: ¾ Tempo – Lets you change the metronome’s tempo (quarter note beat). th th ¾ Note – Lets you set the note (for example, 8 or 16 ) you intend to play. ¾ Volume – The Volume control lets you adjust the volume of the metronome click. ¾ Click/Tap – The Click control adjusts the “depth” or frequency of the subdivided metronome clicks. The Tap Set control lets you set the metronome tempo simply by striking the drum pad. The Tap Start control lets you tap a count off and automatically start a practice session on the fly at the detected tempo. See “Click/Tap.” Selector The selector lets you select settings for the currently active function. When you press a button, the button illuminates, indicating that the selector controls that function. Note: All buttons work this way except the Reset, Start/Pause and Click/Tap buttons. To scroll between options or values, turn the selector clockwise or counterclockwise. The changes to options or values appear in the current settings. ... -
Page 10: Power On/Off Switch
Beatnik™ Rhythmic Analyzer Model User Guide P to cover a wider range in less time. For smaller ranges, turn the selector more slowly. Power On/Off Switch Beatnik provides a simple twoposition on/off switch. The left position is Off and the right position is On. Headphones (or external speaker) Jack The headphones jack lets you listen to Beatnik clicks in headphones when you connect standard headphones equipped with a 3.5mm plug. The output speaker is disconnected when a headphone plug is inserted in the Beatnik’s headphone jack. External speakers such as computer speakers can also be used if equipped with a 3.5mm plug. AC Jack The AC jack lets you power Beatnik from a standard AC outlet using the optional Beatnik AC adapter, or other adapter that confirms to the required specification. Drum Pad The drum pad resembles a standard drum practice pad. This special pad is made of a patented resilient polymer that stands up to the most rigorous practice demands. 10 ... -
Page 11: Powering Beatnik
Beatnik™ Rhythmic Analyzer Model User Guide P Powering Beatnik You can power Beatnik using six AA batteries or an optional AC adapter. The AC Adapter output specifications are as follows: 9V, DC300mA with the Tip plug connector in the Positive position. We recommend the Beatnik AC adapter optional accessory. (see pg.26) Attaching the AC Adapter To save battery power, you can power Beatnik using the optional Beatnik adapter. To attach the AC adapter: 1. Plug the adapter’s barrel plug into the AC jack on the back of Beatnik. 2. Plug the other end of the adapter into a standard AC outlet. Inserting Batteries If AC power is not available, you can power Beatnik using six AA batteries. To insert batteries: 1. Remove the battery compartment cover by pressing the two flexible tabs and lifting off the cover. 2. Insert six AA batteries so that their positive ( + ) and negative ( ) ends are correctly positioned, as shown below. ... -
Page 12: Turning Beatnik On And Off
Beatnik™ Rhythmic Analyzer Model User Guide P 3. Replace the battery compartment cover by inserting the cover’s two fixed tabs in the tab slots. When changing batteries, it is strongly recommended to change all six batteries at once with new fresh batteries of the same brand. Please refer to your battery manufacturer's instructions for using batteries and disposing of old batteries. Turning Beatnik On and Off To turn on Beatnik: Set the Power Switch on the rear panel to On. The liquid crystal display shows an introductory startup screen for two seconds, then sets up according to saved references. To turn off Beatnik: Set the Power Switch to Off. Overview of Setting up a Practice Session Setting up a typical practice can be as simple as 3 steps: 1. Turn on Beatnik using the Power Switch. 2. Press the Start button to begin a practice session. 3. Practice. Additional steps or settings changes can include: 4. ... -
Page 13: Setting The Tempo
Beatnik™ Rhythmic Analyzer Model User Guide P Setting the Tempo Set Tempo The set tempo is the metronome marking that you set for the quarter note beat. For example, if the current settings display shows a set tempo of “120,” Beatnik is set to play 120 quarter note beats per minute. To set the tempo using the selector: 1. Press the Tempo button. The button illuminates, indicating the selector is controlling the tempo. 2. Turn the selector to display the desired tempo. 3. Press the Start button to start a practice session. To set the tempo using the Tap Tempo function: 1. With Beatnik paused, press the Click/Tap button once. 2. ... -
Page 14: Selecting A Note
Beatnik™ Rhythmic Analyzer Model User Guide P Selecting a Note Beatnik uses a quarter note as its fundamental beat. The note selection function lets you select a subdivided note for the quarter note. For th th th example, you can select a quarter note, 8 note, 8 note triplet, 16 th nd note, 5 over 1, 16 note triplet, 7 over 1, and 32 note. When you start a session, Beatnik plays the subdivided note. To select a note value: 1. Press the Note button once. The button illuminates to indicate the selector is controlling the note or beat. 2. Turn the selector until you see the desired note value in the current settings display. Setting the Volume ... -
Page 15: Using The Tap Start Control
Beatnik™ Rhythmic Analyzer Model User Guide P To pause a practice session, press the Start/Pause button during playback. Note: If the View is set to Auto Switch and you stop playing while the metronome continues to sound, Beatnik automatically switches to the History view . This lets you immediately view practice results without pausing the session or manually changing views. As soon as you resume playing, Beatnik automatically switches to Realtime view and continues to record your playing history. See “View Options” for more information. Using the Tap Start Control You can also use the Tap Start function to start a practice session. See “Click/Tap” below. The Accuracy Analyzers Beatnik features two accuracy analyzers, each of which lets you analyze your performance skills in a unique way. ... -
Page 16: Subdivision Analyzer
Beatnik™ Rhythmic Analyzer Model User Guide P Figure 6. Groove Analyzer Subdivision Analyzer Subdivision Analyzer is intended to help you improve the timing of each subdivision within the fundamental quarter note beat. The Subdivision Analyzer shows a separate vertical click marker for each subdivision of the beat. The data display’s total width represents one complete quarter note beat, and each of the 128pixel columns th represents one 512 note. The score is based on the timing precision of each note in relation to the metronome, as well as the selected skill level. View Options in Subdivision Analyzer Beatnik features three different ways to view the results of your practice session in Subdivision Analyzer. You can use the Analyzer button and the Selector to set up the view you want. Realtime – This view displays a single, touchsensitive, vertical stroke indicator each time you strike the drum pad. In Realtime view, Beatnik records the history but displays only the stroke indicator for the most recent stroke, allowing you to concentrate on each stroke as you make 16 ... - Page 17 Beatnik™ Rhythmic Analyzer Model User Guide P Figure 7. Subdivision Analyzer with a Realtime View Each time you strike the drum pad, the stroke indicator appears before, after, or directly on the click marker, showing where your stroke occurred in relation to the metronome click. History – This view depicts each stroke as a single pixel within the data display. Over the course of the entire practice session, the pixels accumulate from the bottom up to provide, at a glance, a clear picture of your timing tendencies. For example, a History view that shows the majority of the strokes (pixels) near a click marker means that you were very accurate. On the other hand, if the history view shows several pixels that are before and after the click marker, as well as some on the click marker, your timing needs work. Figure 8. Subdivision Analyzer with a History View 17 ...
-
Page 18: Skill Levels And Scoring
Beatnik™ Rhythmic Analyzer Model User Guide P Auto Switch – This view automatically switches between Realtime view and History view, depending on whether you are striking the drum pad. In Auto Switch view, Beatnik automatically displays History view after it detects no drum pad activity for one complete beat. Beatnik automatically switches to Realtime view when you resume striking the drum pad. This provides added convenience by showing practice results as soon as possible without having to manually change views. Skill Levels and Scoring Skill Levels Beatnik lets you adjust the skill level to allow a wider margin of tolerance for timing accuracy. You can select from the following levels: ¾ Low ¾ Medium ¾... -
Page 19: Scoring
Beatnik™ Rhythmic Analyzer Model User Guide P Conversely, the Expert level allows a very narrow margin for error, which can result in much lower scores. You can change the skill level when Beatnik is paused and instantly see the change in score. The current settings display indicates the skill level as shown below. Figure 9. Skill Level Indicator To set the skill level using the selector: 4. Press the Skill button. The button illuminates, indicating the selector is controlling the skill level. 5. Turn the selector to display the desired skill level. Scoring The score reflects the accuracy of all notes in the rhythmic pattern based on the selected skill level. The score area on the current settings display represents the score as a percentage, with a lower percentage indicating less accuracy and a higher percentage indicating more ... -
Page 20: Click Depth Control
Beatnik™ Rhythmic Analyzer Model User Guide P practice session is paused, the button functions as the Tap Tempo or Tap Start control. Click Depth Control During a practice session, the Click Depth control adjusts the “depth,” or frequency, of the subdivided metronome clicks. For example, if the nd subdivision is 32 notes at a quick tempo, you might want to reduce th th the clicks to a lower subdivision such as 16 notes, 8 notes, or quarter notes. At faster tempos, this can make it easier to distinguish your strokes from the audible metronome clicks. Each time you press the Click/Tap button, you reduce the click depth by half until only the quarter note beat sounds. Even if you reduce the click depth, Beatnik still records and scores all strokes for the selected note subdivision. ... - Page 21 Beatnik™ Rhythmic Analyzer Model User Guide P Figure 10. Tap Tempo To use the Tap Start function: 1. With Beatnik paused, press the Click/Tab button twice. 2. Turn the selector to set the desired number of countoff beats. 3. Strike the set number of countoff beats on the drum pad at the desired tempo. Beatnik assumes your taps are quarter notes. Beatnik starts automatically at the tempo of the countoff beats. 4. To stop a practice session started with Tap Start, press the Start/Pause button. Figure 11. Tap Start 21 ...
-
Page 22: Glossary
Beatnik™ Rhythmic Analyzer Model User Guide P Glossary Auto Switch — a view option that switches automatically between Realtime view and a History view. Beat — the fundamental quarter note beat that Beatnik uses as a basis for determining note subdivisions, phrases, and tempo settings. Click — the audible metronomic click that indicates the playing tempo, as well as rhythmic subdivisions. Beatnik provides clicks in different tones (high and low) to distinguish between the main beat and subdivisions of the beat. Click Marker —vertical dotted line(s) in the data display that denotes the location of the metronome’s clicks. Data Display — the bottom portion of the LCD that shows when you strike the drum pad, how hard you strike the pad, and a cumulative representation of all strikes during a practice session in the form of individual pixels. Groove Analyzer— an accuracy analyzer that tests your ability to play with consistent tempo, regardless whether it is ahead of or behind ... - Page 23 Beatnik™ Rhythmic Analyzer Model User Guide P Subdivision Analyzer— an accuracy analyzer that shows a separate vertical click marker for each subdivision of the beat, based on the th selected note. For example, if the selected note is an 8 note, two vertical click markers appear on the data display. Subdivision — a rhythmic fraction of the main quarter note beat (for th th example, 8 notes and 16 notes). Tap Tempo — sets the tempo based on strokes on the drum pad, allowing you to manually start a practice session later. Tap Start — sets the tempo and automatically starts a practice session based on a number of countoff beats, allowing you to start a practice session “on the fly.” 23 ...
-
Page 24: Index
Beatnik™ Rhythmic Analyzer Model User Guide P Index H AC adapter ∙ 10 headphones ∙ 9 AC jack ∙ 5, 9 headphones jack ∙ 5 accuracy analyzers ∙ 7, 11, 12, 23 high skill level ∙ 15 auto switch ∙ 15, 18, 22 history view ∙ 5, 14, 18, 22 I batteries ∙ 10 introduction ∙ 5 beat ∙ 22 L layout ∙ 5 click depth ∙ 19 low skill level ∙ 15 click marker ∙ 22 click/tap button ∙ 8, 19 current settings display ∙ 5, 7, 22 M measured tempo ∙ 7, 12, 17, 22 medium skill level ∙ 15 metronome panel ∙ 5, 8 data display ∙ 5, 7, 13, 22 depth click ∙ 8, 19 display current settings ∙ 7 note, selecting ∙ 18 drum pad ∙ 5, 7, 9 P pause ∙ 7, 18 expert skill level ∙ 15 pixel ∙ 7, 13, 14, 22 power switch ∙ 5, 9 powering ∙ 10, 11 ... - Page 25 Beatnik™ Rhythmic Analyzer Model User Guide P subdivision analyzer ∙ 13, 23 realtime view ∙ 13, 15, 22 T reset ∙ 7, 8 tap set ∙ 8 tap start ∙ 8, 17, 18, 19, 20, 23 S tap tempo ∙ 17, 19, 23 tempo score ∙ 7, 13, 15, 16 measured ∙ 7, 12, 17, 22 scoring ∙ 15, 16 setting ∙ 8, 17 selector ∙ 5, 8, 16, 17, 22 set tempo ∙ 17, 22 settings panel ∙ 5, 7 skill level ∙ 7, 15, 16 speaker ∙ 5 view options ∙ 13 speaker jack ∙ 5 voume button ∙ 7, 8, 21 start/pause button ∙ 7, 18, 20 25 ...
- Page 26 Beatnik™ Rhythmic Analyzer Model User Guide P Product Specifications th Timing Precision: Accurate to the nearest 512 note Metronome Range: 25 – 250 beats per minute Battery Type: AA Size, 6 required, included Power Supply: 9 Volts, 300mA Headphone Jack: 3.5mm, headphones included Weight: 2.5 pounds (1.33kg) Dimensions: 9.75” (76mm) x 13”(330mm) x 2.75” (69mm) Stand Screw Thread Size: 8mm screw, stand not included Optional Accessories 1. Beatnik Practice Stand 2. Beatnik AC Adapter 3. Beatnik Carrying Case Call the OnBoard Research TollFree at 18003408890 for pricing and availability, or go to www.tuners.com for online ordering. 26 ...
- Page 27 Beatnik™ Rhythmic Analyzer Model User Guide P Notes 27 ...
Need help?
Do you have a question about the Model RA800P and is the answer not in the manual?
Questions and answers