Table of Contents
Advertisement
Quick Links
Advertisement
Table of Contents

Related Manuals for a2b ETX-200

Summary of Contents for a2b ETX-200
- Page 1 INSTALLATION GUIDE ETX-200 DVB-T Terrestrial Processor design for TV...
-
Page 2: Table Of Contents
Contents 1. Introduction 2. Unpacking the unit 3. Connections and indications 4. Settings 5. About remultiplexing 6. Installation 7. SW options 8. SNMP 9. Technical specification 10.Declaration of conformity 11.Glossary English... -
Page 3: Introduction
1 Introduction Thank you for purchasing an A2B Electronics product. The ETX-200 is a revolutionary solution for reception and modification of terrestrially transmitted TV-content into various transmission formats for cable-TV and SMATV. The ETX-200 is delivered with hardware and software that supports DVB-T reception, MPEG2/MPEG4 H.264 AVC, ASI output, VSB RF modulation with... -
Page 4: Unpacking The Unit
(see page 3 for contact info). Important information about power supply to ETX-200 To avoid problems with ETX-200 and/or EPP-100 it is very important that both DC plugs on the EXM power cord are inserted into the EPP-100, i.e. each EXM unit needs to be fed from two DC outputs at the rear end of EPP-100. -
Page 5: Connections And Indications
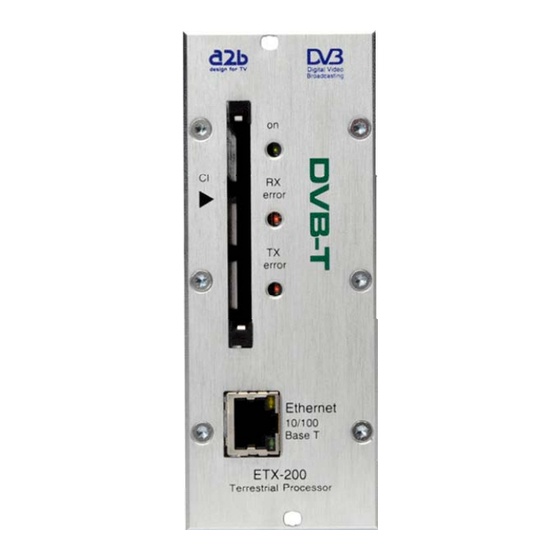
Ethernet port (RJ 45) for RF out control, settings IPTV out and SNMP Rear panel view of Front panel view of ETX-200 ETX-200 Common Interface Insert your Common Interface Conditional Access module into this slot Power on indicator Green light indicates that power is on. -
Page 6: Settings
*) Optional function i.e. SW option is needed NOTE! We recommend to use only A2B original power supply for correct functionality and life cycle. Warranty will be void in case of damages caused by power supplies not supplied by A2B. 4 Settings ETX-200 has an embedded web... - Page 7 Connect the ETX-200 to a DC power supply (EPP-100). See section 6 for installation. Next connect your PC to the ETX-200 with a network cable. Start your web browser (IE, Firefox, Opera etc.) and write the IP address 192.168.0.20 in the address field in your browser.
- Page 8 4.3.2 IP address settings The ETX-200 is set to an default IP address from factory (192.168.0.20 ). However, it is possible to change the IP address and/or the Netmask and/or the Gateway. This is an important function when you install two or more EXM units in a Head End and want to connect all units together through a switch or a router.
- Page 9 CCIR or enter the correct frequency (in MHz). Be sure to press [Set] to enter the frequency to the ETX-200. A list of the available services from the multiplex you tuned to, will be shown on the right hand side.
- Page 10 4 Settings (continued) We suggest that you consult your local terrestrial operator for correct parameters for each multiplex you want to receive. Click [Output] to continue with the output settings. 4.3.4 Output settings ASI mode The output selection ASI disables all RF modulation on the outputs and all selected services will be transmitted only through the ASI...
- Page 11 4 Settings (continued) 4.3.5 Analogue mode (cont.) It is possible to select scaling of the picture format to fit with connected TV- sets. This is handled in the [Aspect ratio] drop down list where it’s possible to choose between the different types. [WSS] (Wide Screen Signalling) is available in the video for signalling the aspect ratio to be displayed by the TV...
- Page 12 4 Settings (continued) COFDM mode (SW option) For [COFDM] (DVB-T) output you can select Output channel (E2 to E69) or Frequency and Output signal attenuation (0 to -31dB). You can also select bandwidth (6,7 or 8 MHz). For max recommended output bitrate see page 16.
- Page 13 DVB-T: 8193 to 13568 (Boxer in Sweden use 8945) DVB-C: 40961 to 65281 (ComHem in Sweden 41001 and up) The ETX-200 is designed to perform remultiplexing fully automatically of both audio and video streams as well as full remultiplexing and regeneration of PSI/SI data.
- Page 14 Select [Browse] and search for the correct file on your computer. When the file is selected press [Upload] and the file is uploaded into the ETX-200. When upload is ready you should get a message “Upload completed”. Always do a power reset after...
- Page 15 55Mb/s. Click [Set bitrate] to save settings. Click on [Start] to get the IPTV stream on the output (RJ 45 connector). To check the IPTV out signal you can use a player like VLC Player. We recommend that you visit our website www.a2b.se for updated info about this function.
-
Page 16: About Remultiplexing
To be sure that you don’t exceed maximum bit rate for an output MUX, please control that you don’t select to many services. The table below gives max bit rates for COFDM and QAM out from ETX-200. Due to bit rate fluctuations from statistical multiplexing, we recommend that you... -
Page 17: Installation
6 Installation The ETX-200 can be installed either as a stand alone unit (Wall mount plate) or in base unit (EBU-100). Before connecting power to the ETX-200, make sure that all other connections have been made. A coaxial cable of good quality with a F-connector should be connected from the aerial to the Antenna input and another one from the RF output to the cable TV network. - Page 18 6.1 Installation examples 6.1.1 Installation of 3 pcs of ETX-200 and one COFDM mux out. ETX-200 #1 ETX-200 #2 ETX-200 #3 VSB RF VSB RF COFDM NOTE! Unit #2 and unit #3 has SW option for enhanced functionality with ASI in and COFDM out.
- Page 19 6.1.3 Installation of ETX-200 units through a switch with DHCP with possibility for remote management over VPN connection between office and Head end. ETX-200 connected through a switch with DHCP VPN connection NOTE! If you have questions about how to set up the VPN connection ask your network administrator for detailed information.
-
Page 20: Sw Options
For price list, contact your distributor, see www.a2b.se , Partners. In the System menu you can see what SW options there are in the ETX-200. 7.1 EXM-Basic, Basic Functionality If you have purchased a ETX-200 without any SW options you have this basic entitlement which include DVB-T input and analogue output. - Page 21 7 SW options (continued) 7.8 EXM-CL, CryptoLITE This SW option allows you to encrypt channels out in Cryptoguard in a mux without any need for an encryption server. For more information please contact Cryptoguard, phone +46-(0)971-10735 English...
- Page 22 7 SW options (continued) 7.9 EXM-SC, Simulcrypt This SW option allows you to encrypt a Mux in an EXM unit. When this SW option is uploaded to the unit a new menu will appear (see below). NOTE! Does not include the encryption equipment such as encryption server, SMS etc.
- Page 23 7 SW options (continued) 7.9 EXM-SC, Simulcrypt (cont.) The setup of encryption of services with Simulcrypt is described below: 1. Make the necessary connection between the EXM unit and the encryption server. For more information about [Server configuration], please refer to your provider of the CA system.
-
Page 24: Snmp
8 SNMP With the FW 1.2 in the ETX-200 you are able to use the SNMP Interface for monitoring the ETX-200. To get the SNMP menu on the unit you write for example: 192.168.0.20/snmp.html in the web browser. In the [SNMP agent] part of the menu you can start the SNMP agent, select Listen port, Read community, Write community. -
Page 25: Technical Specification
9 Technical specification ETX-200 DVB-T Terrestrial processor Connectors and Interfaces QAM modulation (Option) Control and IP out connector RJ-45, 10/100 BaseT QAM modes 16, 32, 64, 128 and 256 QAM RF input connector F female, 75 Ω Symbol rate 4 – 7.2 Mbaud/s RF output connector F female, 75 Ω... - Page 26 Standard web browsers (Internet Explorer, Mozilla Firefox etc.) are supported. Supported formats MPEG2 MP@ML, MPEG4 h.264 AVC With FW 1.2 in your ETX-200 you also can use a third Output standards PAL, SECAM or NTSC part program for surveillance via the SNMP interface.
-
Page 27: Declaration Of Conformity
10 Declaration of Conformity The document for Declaration of Conformity you will find at www.a2b.se. Further information at www.a2b.se. English... -
Page 28: Glossary
11 Glossary Digital Video Broadcasting (Standardization body) MPEG-2 Compression format for digital TV MPEG-4 Compression format for digital-TV (SD and HD) H.264 AVC Format for compression of the video in HDTV Vestigal Side Band (adjacent channel RF-modulation) Asynchronous Serial Interface (High Speed Interface) NICAM Digital sound format for analogue TV-transmission Internet Protocol (defines how data is packetized for Internet broadcast) - Page 29 Notes _________________________________________ _________________________________________ _________________________________________ _________________________________________ _________________________________________ _________________________________________ _________________________________________ _________________________________________ _________________________________________ _________________________________________ _________________________________________ _________________________________________ _________________________________________ _________________________________________ _________________________________________ _________________________________________ _________________________________________ _________________________________________ _________________________________________ _________________________________________ English...
- Page 30 Notes _________________________________________ _________________________________________ _________________________________________ _________________________________________ _________________________________________ _________________________________________ _________________________________________ _________________________________________ _________________________________________ _________________________________________ _________________________________________ _________________________________________ _________________________________________ _________________________________________ _________________________________________ _________________________________________ _________________________________________ _________________________________________ _________________________________________ _________________________________________ English...
- Page 31 Notes _________________________________________ _________________________________________ _________________________________________ _________________________________________ _________________________________________ _________________________________________ _________________________________________ _________________________________________ _________________________________________ _________________________________________ _________________________________________ _________________________________________ _________________________________________ _________________________________________ _________________________________________ _________________________________________ _________________________________________ _________________________________________ _________________________________________ _________________________________________ English...
- Page 32 A2B Electronics AB Södra Allén 23-25, 591 37 Motala P.O. Box 14, 591 21 Motala SWEDEN Phone +46 141 229100 Fax +46 141 229101 E-mail market@a2b.se 655200.01 rev_D_1.2 To view our full line of Professional E-series Products, visit our Web site...
Need help?
Do you have a question about the ETX-200 and is the answer not in the manual?
Questions and answers