
Subscribe to Our Youtube Channel
Related Manuals for Iconix HD-RH1

Summary of Contents for Iconix HD-RH1
- Page 1 HD-RH1 User Manual Table of Contents Table of Contents HD-RH1 OPERATION MANUAL ®...
-
Page 2: Table Of Contents
HD-RH1 User Manual Table of Contents Table of Contents Warnings ............................. 3 Product Description ........................5 Quick Start: Hardware Setup ....................9 System Requirements ..................... 9 Standard Hardware Connection ................9 Standard Hardware Connection Tips ..............10 Remote Connection ....................10 Safety Precautions .................... - Page 3 Menu Screen (showing factory defaults) ............43 Specifications ......................45 List of Figures Figure 1. HD-RH1 Camera head components ................5 Figure 2. CCU – front panel ....................... 6 Figure 3. CCU connectors – rear panel ..................8 Figure 4. Standard Hardware Connection .................. 9 List of Tables Figure 1.
-
Page 4: Warnings
HD-RH1 User Manual Warnings Warnings OPERATION PRECAUTION Operation near any appliance which generates strong magnetic fields may give rise to noise in the video signals. CAUTION Do not place unit into a confined space. Make sure adequate ventilation is available at all times during use. - Page 5 HD-RH1 User Manual Warnings Warnings USA: WARNING: This equipment has been tested and found to comply with the limits for Class A digital device pursuant to Part 15 of the FCC Rules. These limits are designed to provide reasonable protection against harmful interference when the equipment is operated in a commercial environment.
-
Page 6: Product Description
HD-RH1 User Manual Product Description Product Description The HD-RH1 is a professional 3CCD remote head camera system that offers the versatility of 720p, 1080i, 1080p, 480i (NTSC), and 576i (PAL) at all standard frame rates. HD-RH1 Camera Head Cable Lens... -
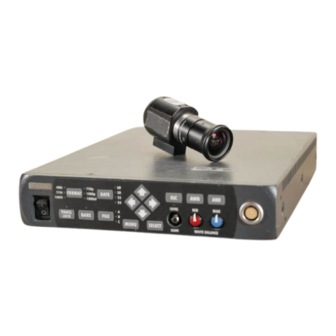
Page 7: Figure 2. Ccu - Front Panel
HD-RH1 User Manual Product Description HD-RH1 Camera Controller Unit (CCU)- Front Figure 2. CCU – front panel Table 2. CCU buttons and functions – front panel Button Function On/Off switch Powers camera on and off. Press and hold to cycle through format options: Format ·... - Page 8 HD-RH1 User Manual Product Description HD-RH1 CCU (Cont’d) Button Function Used to active ELC mode, or variable adjustment of the electronic (+Level LED) shutter. Press and hold to perform an Automatic White Balance. · Mode must be set to AWB in the White Balance Menu.
-
Page 9: Figure 3. Ccu Connectors - Rear Panel
HD-RH1 User Manual Product Description HD-RH1 CCU – Back Panel Figure 3. CCU connectors – rear panel Table 3. CCU connectors and functions – rear panel Part Function Single-link or Dual-Link HD-SDI (SMPTE-292) SD/HD-SDI LINK A Single-Link SD-SDI (SMPTE-259) LINK B Remote control interface. -
Page 10: Quick Start: Hardware Setup
HD-RH1 User Manual Quick Start: Hardware Setup Quick Start: Hardware Setup Once the hardware is connected, the camera is ready to use. The default format and rate is 720p59.94. To change the format and rate, see the Operations – Video Output Setup section. -
Page 11: Standard Hardware Connection Tips
8. Flip the controller power switch to the ON position. 9. Press the BARS button and verify that color bars are displayed. Remote Control / RCP The HD-RH1 may be remotely controlled through the RS-232 remote control interface. For more information, please contact an Iconix representative. Safety Precautions Please read and follow the safety guidelines before using the HD-RH1. -
Page 12: Operation
HD-RH1 User Manual Operation Operation Video Formats & Rates The HD-RH1 is capable of generating images any of 31 format/frame rate combinations. The following chart lists the available combinations: 720p Frame Rates 59.94 25n50 24n60 30n60 23.98 29.97 23.98n59.94 29.97n59.94 1080i Frame Rates 59.94... - Page 13 4:3 aspects. 1080sF/1080PsF For purposes of brevity and clarity, the 1080sF nomenclature is used in this manual and in the HD-RH1 operation to stand for what is also known as 1080PsF (Progressive Segmented Frame). Doubled 720p Frames To accommodate certain recording decks available, the slower frame rates for 720p (23.98-30Hz) have the option to be “pulled-up”...
-
Page 14: Selecting A Format And Rate: Front Panel
HD-RH1 User Manual Operation Selecting a Format and Rate: Front Panel Press and Hold buttons to cycle through options 1. Press and hold the FORMAT key on the front panel to cycle through the format options. 2. When the desired Format LED is lit, release the button. The Format is not selected until the button is released. -
Page 15: Selecting A Format And Rate: Menus
HD-RH1 User Manual Operation Selecting a Format and Rate: Menus 1. Access the Video Output Menu. (See Using Menus.) 2. Select the Format as follows: V I D E O O U T >VIDEO FORMAT: 720P Use up and down arrows to RATE: 59.94... -
Page 16: Select A Scene File
HD-RH1 User Manual Operation Select a Scene File There are three scene file locations – A, B, & C – for storing settings. Parameters are stored in the currently selected/active scene file. The front panel FILE button can switch among the scene files as needed. -
Page 17: White Balance
HD-RH1 User Manual Operation White Balance White Balance adjusts the camera for accurate white and color. There are two modes, selected from the “White Balance” menu (see Using Menus and White Balance Menu.): • AWB (Automatic White Balance) • MANUAL... -
Page 18: How To White Balance: Manual
HD-RH1 User Manual Operation How to White Balance: Manual 1. Access the White Balance Menu and select MANUAL mode. WHITE BALANCE Use up and down arrows to MODE: select MODE AWB R PAINT: AWB B PAINT: Press SELECT BUTTON. AWB AREA:... -
Page 19: Automatic Black Balance
HD-RH1 User Manual Operation Automatic Black Balance Black balance adjustment is provided for accurate black coloration. Black balance is available only on the front panel. Automatic Black Balance button 1. Close the iris or cap the lens to eliminate all light into the camera. -
Page 20: Panel Lock
HD-RH1 User Manual Operation 4. During the process, the following messages display: Message Meaning SHD IN PROGRESS Shading Correction is in progress SHD OK Shading Correction has completed successfully Cannot achieve correction SHD FAIL SHD FAIL INVALID TARGET Target unsuitable for automatic correction 5. -
Page 21: Genlock
HD-RH1 User Manual Operation Genlock The Genlock function from the Sync Menu allows multiple devices to be genlocked to an input reference. In the chart below, a shaded box indicates that the selected output format can be genlocked to the input reference. -
Page 22: Using The Menus
HD-RH1 User Manual Using the Menus Using the Menus The menus provide access to the camera settings. Some settings may be changed using either the front panel or menu; others may be changed only through a menu. Changes to settings are automatically stored in the currently selected scene file. To maintain the current file contents, select a different scene file before any changes are made. -
Page 23: Selecting A Menu Option And Parameter
HD-RH1 User Manual Using the Menus Selecting a Menu Option and Parameter To select an option and parameter on a menu, proceed as follows: 1. Press MENU on the front panel to display the Main Menu. 6. Use the up and down arrow keys to scroll to the desired sub-menu. The “>” symbol appears next to the selection. -
Page 24: User Area On-Screen Entry
HD-RH1 User Manual Using the Menus User Area On-Screen Entry 1. In either White Balance menu (for AWB), or Shutter menu (for AUTO shutter), scroll the cursor to USER AREA EDIT by using the arrow keys, and pressing SELECT. 2. A 7x7 grid is displayed on the screen with a blinking cursor in one of the boxes. -
Page 25: Video Output Menu
HD-RH1 User Manual Video Output Menu Video Output Menu VIDEO OUT VIDEO FORMAT: 720P RATE: 59.94 F/P RATE MODE: 1.001 F/P 720P CARR: NORMAL SDI OUTPUT: SL 422 ANALOG MODE: YPBPR Table 5. Video Output Menu fields Function Options Description 480i Video format options. - Page 26 (e.g. the “60” LED represents a true 60Hz rate) F/P 720P CARR The HD-RH1 has the option for lower 720p frame rates to frame-double the content onto a higher frame-rate carrier. This is indicated by an ‘n’ or ‘N’ in the format/rate call-out. For example, when 24Hz native content is placed on a 60Hz carrier, it is written 720p24n60.
- Page 27 1080i links, per SMPTE-372. Either link used independently will appear as a 1080i signal. The Video Payload ID can be used to differentiate between these signals. • The HD-RH1 automatically switches to SD-SDI (SMPTE-259) when in 480i and 576i. The only mode available for SD-SDI is SL 422. ANALOG MODE...
-
Page 28: Gain Menu
HD-RH1 User Manual Gain Menu Gain Menu GAIN MODE: FIXED GAIN: Table 6. Gain Menu fields Function Options Description MODE OFF (default) Disables gain adjustment. Sets Gain level to 0dB. FIXED Enables ability to set the gain value using the FIXED GAIN function on the menu. -
Page 29: Shutter Menu
HD-RH1 User Manual White Balance Menu Shutter Menu SHUTTER MODE: EXPOSURE: OPEN C-SCAN: AUTO LEVEL: AUTO AREA: USER AREA EDIT Table 7. Shutter Menu fields Function Options Description MODE Off (default) Disables individual shutter adjustment. Shutter position is OPEN (0%). -
Page 30: Table 8. Fixed Shutter Exposures Available By Frame Rate
HD-RH1 User Manual White Balance Menu Shutter Menu (Cont’d) Shutter is controlled from OPEN to 1/10,000 via the front panel LEVEL knob. NOTE: Turning ELC on will automatically turn off VAR GAIN, and vice versa. EXPOSURE When in MODE is FIXED, this value sets the exposure time. Values are in units of seconds (e.g. - Page 31 HD-RH1 User Manual White Balance Menu Auto Shutter Area Presets: The AREA presets for AUTO are as follows: Area A: Area B: Area C: Area D: Area E: Area F:...
-
Page 32: White Balance Menu
HD-RH1 User Manual White Balance Menu White Balance Menu WHITE BALANCE MODE: AWB R PAINT: AWB B PAINT: AWB AREA: USER AREA EDIT SHD MODE: AUTO SHD AUTO: EXEC SHD MANUAL R: SHD MANUAL G: SHD MANUAL B: Table 9. White Balance Menu fields... - Page 33 HD-RH1 User Manual White Balance Menu AWB Area Presets The area presets for AWB are as follows: AWB A: AWB B: AWB C: AWB D: AWB E: AWB F:...
-
Page 34: Detail Menu
HD-RH1 User Manual Detail Menu Detail Menu DETAIL FOCUS ASST: DETAIL MODE: DETAIL LEVEL: Table 10. Detail Menu fields Function Options Description FOCUS ASST Enables Focus Assist mode. OFF (default) Normal operation. ON (default) Enables Detail Enhancer. DETAIL No added enhancement processing. -
Page 35: Level/Knee Menu
HD-RH1 User Manual Level Knee Menu Level/Knee Menu LEVEL/KNEE MASTER PED: RED PED: GREEN PED: BLUE PED: KNEE MODE: KNEE POINT: KNEE SLOPE: WHITE CLIP: WHT CLP LVL: NTSC SETUP: Table 11. Level / Knee Menu fields Function Options Description MASTER PED Range: -7 ~ 0 ~ +10 IRE offset for Master Pedestal. -
Page 36: Gamma Menu
HD-RH1 User Manual Gamma Menu Gamma Menu GAMMA ON/OFF: TABLE: ITU709 USER POWER: 0.45 BLK GAMMA: BG RANGE: BG LVL: TEST RAMP: Table 12. Gamma Menu fields Function Options Description MODE Disables gamma correction and outputs a linear response. ON (default) Enables the table setting. - Page 37 HD-RH1 User Manual Gamma Menu Gamma Menu (Cont’d) BLACK GAMMA Black gamma adjustment is a stretch or crush applied to the selected table. BG RANGE sets the intercept point of the stretch/crush curve with the power function. BG LVL sets the relative amount of stretch or crush.
-
Page 38: Matrix Menu
Matrix. Otherwise, use the setting appropriate for the lighting in use. It is recommended that the COLOR TEMP feature be used instead of conversion filters, as the Iconix colorimetry system will represent truer color across the spectrum, with the added benefit of no light attenuation. - Page 39 HD-RH1 User Manual Matrix Menu Matrix Menu (Cont’d) MATRIX Sets the camera to the color system of choice. The options are OFF, ITU-709, NTSC, and EBU. ITU-709 should be used for most HDTV applications. The NTSC option adheres to SMPTE RP 219 (SMPTE 240M), and is the default for 480i. The EBU option adheres to EBU Tech 3213, and is the default for 576i (PAL).
-
Page 40: Feature Menu
HD-RH1 User Manual Feature Menu Feature Menu FEATURE DIGITAL NR: 4:3 ASPECT: HORIZ FLIP: NEG. IMAGE: RCP ADDRESS: LOAD DEFAULT: EXEC Table 14. Option Menu fields Function Options Description DIGITAL NR OFF (default) Reduces visiblilty of some noise. 4:3 ASPECT... -
Page 41: Lens Menu
HD-RH1 User Manual Part Locations Lens Menu The Lens Menu provides a mechanism for the remote control of lenses, and other motorized devices. The lens control interface provides 3 channels of motorized control, and 2 channels of low voltage outputs. -
Page 42: Sync Menu
HD-RH1 User Manual Sync Menu Sync Menu SYNC GENLOCK: GENLOCK ADJ: ANALOG SYC: DVI SYNC: PAYLOAD ID: Table 16. Sync Menu fields Function Options Description GENLOCK OFF (default) Camera will ignore external source. Camera will attempt to sync to an external signal. - Page 43 HD-RH1 User Manual Sync Menu Sync Menu (Cont’d) DVI SYNC Sets the sync level polarity such that various monitors may be used in either SMPTE-style or VESA-style timing. PAYLOAD ID Available on HD-SDI outputs per SMPTE-352M...
-
Page 44: Quick Reference
HD-RH1 User Manual Quick Reference Quick Reference This section includes: • Menu Options and Factory Defaults • Specifications Menu Screens (showing factory defaults) MAIN MENU DETAIL GAIN FOCUS ASST: SHUTTER DETAIL MODE: DETAIL DETAIL LVL: FEATURE WHITE BALANCE MATRIX GAMMA... - Page 45 HD-RH1 User Manual Quick Reference Menu Screens (Cont’d) MATRIX VIDEO OUT COLOR TEMP: D5600 VIDEO FORMAT: 720P MATRIX: ITU-709 RATE: 59.94 USER MATRIX: F/P RATE MODE: 1.001 F/P 720P CARR: NORMAL USER MATRIX SDI OUTPUT: SL 422 [R] [G] [B]...
-
Page 46: Specifications
HD-RH1 User Manual Quick Reference Specifications Image sensor 1/3-inch Progressive CCD Optical System 1/3-inch 3-CCD Prism System Limiting Resolution 700 TVL/PH (720p) 900 TVL/PH (1080i/p/sF) Lens Mount C-Mount Scanning System 720p: 23.98, 24, 25, 29.97, 30, 50, 59.94, 60 23.98n59.94, 24n60, 25n50, 29.97n59.94, 30n60... - Page 47 HD-RH1 User Manual Quick Reference ICONIX VIDEO INC. 7402 Hollister Ave. Goleta, CA 93117 Part Number: (800) 783-1080 900001 Revision C http://www.iconixvideo.com Printed in USA ©2007...
Need help?
Do you have a question about the HD-RH1 and is the answer not in the manual?
Questions and answers