Table of Contents
Advertisement
Quick Links
Advertisement
Table of Contents

Related Manuals for Salton elite SCM015

Summary of Contents for Salton elite SCM015
- Page 1 INSTRUCTIONS AND WARRANTY MODEL NO. SCM015 SALTON ELITE CUPCAKE MAKER...
-
Page 2: Important Safeguards
Congratulations on purchasing our Salton Elite Cupcake Maker. Each unit is manufactured to ensure safety and reliability. Before using this appliance for the first time, please read the instruction manual carefully and keep it for future reference. FEATURES OF THE SALTON ELITE CUPCAKE MAKER... - Page 3 12. Remove the plug from the socket by gripping the plug. Do not pull on the cord to disconnect the appliance from the mains. Always unplug the unit when not in use, before cleaning or when adding or removing parts. 13.
-
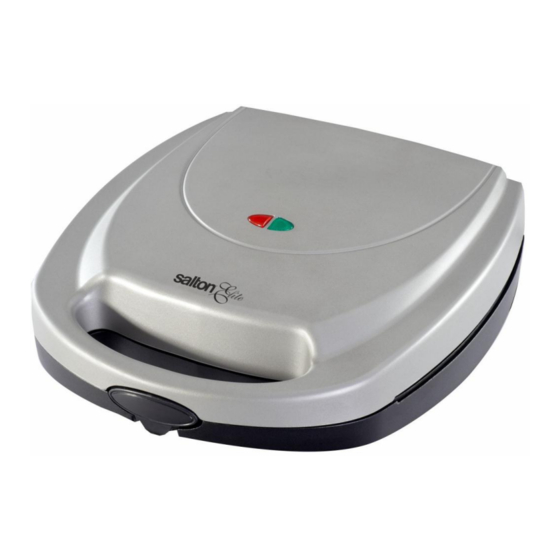
Page 4: Parts Diagram
PARTS DIAGRAM 1. Red Power Light Illuminates when your Cupcake Baker is plugged into the main supply. 2. Green ready-to-cook light Illuminates while your Cupcake Baker is heating up. The light will switch off once the desired temperature is reached and it’s ready to use. - Page 5 OPERATING INSTRUCTIONS Before the first use Remove any promotional labels and/or stickers from your Cupcake Maker before use Wipe the cooking plates as well as the outside of the Cupcake Maker with a damp cloth, do not immerse the main body or power cord in water or any other liquid.
- Page 6 RECIPES Vanilla Cupcakes Ingredients: 225g of good quality butter 225g of castor sugar 4 medium eggs 225g of self raising flour ½ Tbsp of natural vanilla extract Method: 1. Separate the cake cases on to your work top. 2. Put the castor sugar, chopped up butter and vanilla into a food processor. Then add the sieved flour.
- Page 7 100g soft unsalted butter 600g sieved icing sugar Method: 1. It’s important to sieve the icing sugar first in order to produce a smooth frosting. 2. Add all the ingredients into a food processor and mix for about 1minute until creamy and smooth.
- Page 8 Flat plain swirls: Use a plain wide nozzle and slowly swirl icing from the middle into increasing sized circles to the edge. Pointy plain swirls: As above but start at the edge, circling towards the centre. Slightly overlap the previous outward swirl and work the middle blob into a point. Wide star swirl: Use a wide star nozzle and either pipe from the middle or the edge as above.
- Page 9 4. Wash the piping bag thoroughly and dry. Then fill with coffee frosting and pipe a smaller swirl in the centre of each cake. 5. Gently push in a few of the chocolate coated coffee beans into each cake. 6. Finish with a light dusting of cocoa powder. Neapolitan Cupcakes Ingredients: 1 batch vanilla cupcakes (see above)
- Page 10 2. Pipe a large swirl of chocolate frosting onto each cake; this does not need to be neat. 3. Press the popcorn and marshmallows into the frosting randomly. Add a little more frosting if you want to build it higher. You can also add chopped cherries if you wish.
-
Page 11: Cleaning And Maintenance
the unit is heating up. Wait until the Ready Light goes on, then slowly open the Cover to check the degree of baking until all pies become “Golden Brown”. Loosen the baked pies at the sides, and remove them using a wooden spatula. -
Page 12: Servicing The Appliance
Never store the appliance while it is still wet or dirty. Never wrap the power cord around the appliance. SERVICING THE APPLIANCE There are no user serviceable parts in this appliance. If the unit is not operating correctly, please check the following: ... - Page 13 PLEASE AFFIX YOUR PROOF OF PURCHASE/RECEIPT HERE IN THE EVENT OF A CLAIM UNDER WARRANTY THIS RECEIPT MUST BE PRODUCED. W A R R A N T Y Tedelex Trading (Pty) Limited (“Tedelex”) warrants to the original purchaser of this product (“the customer”) that this product will be free of defects in quality and workmanship which under normal personal, family or household use and purpose may manifest within a period of 1 (one) year from the date of purchase (“warranty period”).
Need help?
Do you have a question about the SCM015 and is the answer not in the manual?
Questions and answers