Advertisement
Table of Contents
Disclaimer
The information contained in this Adobe PDF file is for general information purposes only.
Due to the age of the information and the difficulty in converting it to computer formats it
may not be up to date or correct, we make no representations or warranties of any kind,
express or implied, about the completeness, accuracy, reliability, suitability or availability
with respect to the Adobe PDF or the information, products, services, or related graphics
contained in the Adobe PDF document for any purpose. Any reliance you place on such
information is therefore strictly at your own risk.
In no event will we be liable for any loss or damage including without limitation, indirect or
consequential loss or damage, or any loss or damage whatsoever arising from loss of data
or profits arising out of, or in connection with, the use of this Adobe PDF.
This document is available free from cineinformation.org.
Advertisement
Table of Contents

Related Manuals for BOLEX H8


Summary of Contents for BOLEX H8
- Page 1 Disclaimer The information contained in this Adobe PDF file is for general information purposes only. Due to the age of the information and the difficulty in converting it to computer formats it may not be up to date or correct, we make no representations or warranties of any kind, express or implied, about the completeness, accuracy, reliability, suitability or availability with respect to the Adobe PDF or the information, products, services, or related graphics contained in the Adobe PDF document for any purpose.
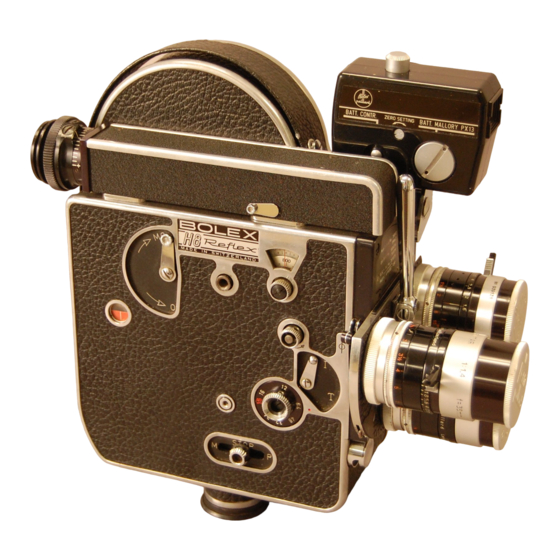
- Page 3 BOLEX H 8 MOVIE CAMERA The only 8 mm movie camera on the market that will take double- run 8 mm film in 25-ft, 50-ft or 100-ft spools. Fig. 1...
- Page 4 Fig. 2. Bolex H 16 Movie Camera...
- Page 5 Fig. 3. Octameter Viewfinder m&Bk 16 mm film double 8 film Fig. 4...
-
Page 6: Table Of Contents
Instructions for Use of PAILLARD-BOLEX Model H Cameras Page Chapter I : Loading the camera Previous to loading — Film check in H 8 cameras — Automatic loading. Chapter II : Film Transport Footage counter— Frame counter— Speeds — Starting the mechanism — Single expo- sure device —... - Page 7 Model Designation : Each model H camera has engraved on the front of the view- finder the size of film for which the camera is intended : H 16 for 16 mm films and H 8 for double run 8 mm films. Equipment : Each model H camera is supplied with at least one lens and the following accessories :...
-
Page 8: Chapter I
CHAPTER I Loading the Camera Previous to loading : The starting button 22 must be placed on " Stop " (Fig. 2). Lever 12 must be clearly set on " M o t o r " . The speed control 19 must be placed on 16 frames per second, i.e. - Page 9 Film check in H 8 cameras : H 8 cameras are provided with a film check which presses against the coils of film on the feed and take-up spools, thus preventing them from unrolling during loading or at the end of a shooting (Fig. 10). Before setting the spools in po- sition in the camera, open fully the two levers 45 and 46, placing...
- Page 10 Automatic loading : Introduce the film into the mechanism through opening 30 (Fig. 8). Press button 21 to set the motor in motion. As soon as the film has passed through the lower sprocket 38, stop the mechanism by releasing pressure on button 21. Push up lever 37 so as to bring it back to the horizontal position (see Fig.
-
Page 11: Film Transport
CHAPTER II Film Transport Footage counter : The counter 15 (in metres or feet) automatically returns to zero as soon as the lid of the camera is removed. It only functions once the lid is in position. The space on the scale between A and 0 corresponds to the passage of a length of approximately 4 ft. - Page 12 Lower dial. — The lower dial totalizes the frames in forward motion and subtracts them in reverse motion : in 50's up to 1000 frames, for the H 16 camera, in 50's up to 2000 frames, for the H 8 camera. Beyond these figures, the cycle starts again and the totals indicated by both dials must be added to the 1000 (or 2000) frames already totalized.
- Page 13 If all this is done with the utmost care, it will be easy to reload the film which must start at the exact point where the exposure has been interrupted. (See paragraph : Unloading the camera, page 10.) Speeds : Button 19 enables the speed to be altered, even while the mechanism is in action, from 8 to 64 pictures per second.
- Page 14 To obtain instantaneous exposures, move lever 17 to position I and then set button 22 on P. The antinuous release is an accessory available on request. It allows the mechanism to be set in motion without jerking or unsteadiness, whether moving pictures or single exposures are being made.
-
Page 15: Unloading The Camera
Chapter I. The white figures I and II on Bolex spools supplied with the apparatus will serve as a reminder as to whether the film has been exposed on one or both sides. -
Page 16: Chapter Iii : Lenses
CHAPTER III Lenses Interchangeability of lenses: The Bolex model H camera is made to take interchangeable lenses, the mounts of which are provided with an international standard thread. Model H 16 takes standard 1 inch thread (25.4 mm, setting 17.52 mm), while model H 8 takes the small standard 5/8-inch (15.8 mm, setting 12.29 mm). - Page 17 (with round hole) must be left inserted in the camera to prevent lightfrom entering the slot and fogging the film. Bolex H 16 cameras with filter slot are supplied complete with the following accesso- ries : 5 filter holders, in case ;...
- Page 18 1 Kodak Wratten Skylight filter » » Daylight filter » » 8 K2 yellow filter » » 15 G yellow-orange filter » » 25 A red filter Instructions for using the gelatine filters Warning ! Handle the sheets of gelatine or the prepared filters carefully by picking them up at the edges only, as fingerprints are indelible.
- Page 19 Filters for black-and-white films Wratten filters 8K2, 15G and 25A are intended to heighten the contrast between different colors, translated on the film as various shades of grey. When these filters are used, the diaphragm aperture must be increased as compared with the normal reading, by the following amounts : 1 stop for Wratten filter...
- Page 20 Lenses with focal length of Correction of focusing : f =25 or 26 mm f= 16 mm The fact of placing the filters o o feet feet behind the lensslightly alters 200- the focusing setting for a given distance. Diagrams opposite show the positions to which the focusing rings - 6 / 4...
- Page 21 Turret handle The handle is permanently mounted on the new-type turret and can be folded back completely. It makes the turret considerably easier to handle and eliminates all risks of accidentally upset- ting the setting of the lenses, since the latter need longer be used as levers as...
- Page 22 In this case it will be advisable to get in touch with the general Bolex agent in your territory through your nearest Bolex distributor, stating the lens power required.
- Page 23 Then turn the catch as far as it will direction shown by the arrow, so that it takes up the position • shown in fig. 13. The viewflnder is now firmly fixed onto the camera lid. Fig. 13 To remove the viewfinder, open catch 7 completely ; lift up back of finder until pin 8 is clear of hole 9 ;...
-
Page 24: Chapter Iv : How To Film
CHAPTER IV How to Film — General Rules Speed : Regulate the speed, remembering that the normal speed for projection is 16 frames per second. Viewfinder-Parallax : Correct the parallax according to the distance between the lens and the subject so as to obtain dead accurate centering. Varying focal length of lenses : Make sure that the viewfinder is regulated for use with the taking lens on the turret. - Page 25 It should be remembered that the plane of the film in Model H 16 is 17.52 mm, and in Model H 8 12.29 mm, from the base of the lens when the latter is screwed home in position. This plane is indicated by a line (1) engraved on the edge of the case, at a height corresponding to the axis of the turret.
- Page 26 The amount of light on the subject. The speed at which the speed regulator has been set. The H and D speed of the film. The special Paillard-Bolex table shows the opening of the diaphragm for most usual subjects. Consult this table often until you have memorised the information given.
- Page 27 Steadiness : Hold the camera very steady. Whenever possible use a stand or some other support. A stand is necessary when filming with a lens of a higher focal length than 50 mm (2"). The base 4 of the camera is provided with a universal screw fitting for a stand.
-
Page 28: How To Film - Various Possibilities
CHAPTER VI How to Film — Various Possibilities Color films : All makes of color film can be used on model H cameras. The steady running speed of the apparatus from the first frame of each scene ensures excellent results even with color emulsions which are particularly sensitive to the slightest difference in time of exposure. - Page 29 Needless to say, the illumination used from one exposure to another must remain the same or else the diaphragm of the lens must be regulated accordingly. Above all, the camera must be held steady. Always keep our little celluloid exposure table handy in case of need.
-
Page 30: Camera Identification Number
The unlimited reverse action of the model H camera permits double exposures to be made over any footage of the film, for the purpose of obtaining super-impositions. When winding the film back on to the top spool for double exposures do not forget to cover the "... -
Page 31: Oiling
If your camera should be in need of repairs, please get in touch with the general Bolex agents in the country where you are staying, as they are the only persons authorized to undertake repair work. -
Page 32: Eye-Level Focus
EYE-LEVEL FOCUS FOR PAILLARD-BOLEX H MOVIE CAMERAS This accessory is intended for use with the ground-glass focussing prism (or Critical Visual Focusser) fitted to H 16 and H 8 cameras. Whereas when used alone this prism provides a horizontal image at the front of the camera, the Eye-... - Page 33 If your camera was supplied with Eye-Level Focus already fitted, only operations E to H need be undertaken. Remove the trifocal viewfinder from the clamps at the top of the camera, and place it in the lateral position (on lid of camera). Unscrew the eyepiece lens of the critical visual focusser, which contains the magnifier, and which is situated in the upper front part of the camera, and replace it by the special magnifier lens supplied with the Eye-Level...
-
Page 34: Trifocal Viewfinder
T R I F O C A L V I E W F I N D E R : Some models of H cameras are supplied with a trifocal view- finder (Fig. 6) permitting, like the Octameter Viewfinder, a strict correction of the parallax. - Page 36 Fig. 8...
- Page 38 Ha 307 Printed in Switzerland...
Need help?
Do you have a question about the H8 and is the answer not in the manual?
Questions and answers