
Related Manuals for Dieci Pegasus

Summary of Contents for Dieci Pegasus
- Page 1 Pegasus Via E. Majorana, 2-4 42027 Montecchio Emilia (RE) ITALY Tel. +39 0522 869611 Fax +39 0522 869744 ATTENTION: ALWAYS KEEP A COPY OF THIS MANUAL www.dieci.com - E-mail: mailbox@dieci.com ON THE MACHINE AT THE OPERATOR’S DISPOSAL...
- Page 3 AND MAINTENANCE MANUAL FOR EACH DEVICE OR ATTACHMENT WITH WHICH THIS MACHINE IS RIGGED-OUT. THE LATTER MANUALS ARE WRITTEN BY THE RESPECTIVE SUPPLIERS OR ARE REPRODU- CED IN FULL AND EXACTLY BY DIECI WITH THE SPECIFIC AUTHORISATION OF THE SUPPLIERS: SAID MANUALS MAY BE FURTHER COMPLETED WITH OTHER SPECIFICATIONS WRITTEN BY DIECI.
- Page 4 Model E.T. PEGASUS PAGE INTENTIONALLY LEFT BLANK FOR EDITING PURPOSES...
-
Page 5: Table Of Contents
CHAPTER “A” INTRODUCTION, WARRANTY, MACHINE IDENTIFICATION INTRODUCTION ..............................A/3 WARRANTY ................................A/4 IDENTIFYING YOUR MACHINE ..........................A/6 IDENTIFYING THE TELEHANDLER ........................A/7 DECLARATION OF CONFORMITY ........................A/9 CHAPTER “B” SAFETY STANDARDS RECOGNISING SAFETY STANDARDS ........................B/2 GENERAL WARNINGS ............................B/3 PROTECTIVE CLOTHING ............................B/4 INSPECTING THE MACHINE ..........................B/4 PREPARING FOR EMERGENCIES ........................B/5 THE DRIVER’S CAB ..............................B/6 DRIVING LICENCES AND AUTHORISATIONS .......................B/7... - Page 6 Model E.T. PEGASUS CHAPTER “C” GETTING TO KNOW AND USING THE MACHINE GENERAL WARNINGS ............................C/3 IDENTIFYING MACHINE PARTS – FOUR MOVEMENT STABILISERS ..............C/4 IDENTIFYING MACHINE PARTS – EIGHT MOVEMENT STABILISERS ............... C/5 CAB ..................................C/7 EXTERNAL COMPONENTS ........................... C/7 INTERNAL COMPONENTS ............................
- Page 7 REAR WINDSHIELD WIPER CONTROL ......................C/43 EMERGENCY LIGHTS SELECTOR ........................C/43 MANUAL ELECTRONIC ACCELERATOR ......................C/43 MANUAL MECHANICAL ACCELERATOR (PEGASUS 38.16) ................C/44 BOOM HEAD SOLENOID VALVE SWITCH (OPTIONAL) ..................C/45 BOOM HEAD WORK SPOTLIGHT SWITCH (OPTIONAL) .................. C/45 INTERNAL CAB VENTILATION ..........................C/46 AIR RECIRCULATION ............................
- Page 8 Model E.T. PEGASUS CHAPTER “D” MAINTENANCE AND ADJUSTMENT MAINTENANCE REGULATIONS ..........................D/3 INTRODUCTION ..............................D/3 RUNNING THE MACHINE IN ..........................D/4 VIBRATION EMISSION STATEMENT ........................D/5 MANUFACTURER’S FIRST TEST STATEMENT ....................D/5 IDENTIFYING MACHINE PARTS - FOUR MOVEMENT STABILISERS..............D/6 IDENTIFYING MACHINE PARTS - EIGHT MOVEMENT STABILISERS.
- Page 9 Dear customer, Congratulations and thank-you for choosing a machine. This handbook has been written so that you can appreciate the qualities of this machine to the full. It is advisable to read this handbook in its entirety before using the machine for the first time. It contains information, advice and important warnings for use, which will help you to exploit the technical advantages of your machine fully.
- Page 10 Model E.T. PEGASUS PAGE INTENTIONALLY LEFT BLANK FOR EDITING PURPOSES...
-
Page 11: Introduction
INTRODUCTION WARRANTY IDENTIFYING YOUR MACHINE... - Page 12 SHE IS ADEQUATELY PREPARED FOR ITS USE. ANY USE OTHER THAN THE USE DESCRIBED IN THIS MANUAL IS STRICTLY FORBIDDEN AND DIECI SHALL NOT BE HELD LIABLE FOR ANY DAMAGE TO PEOPLE, OBJECTS OR ANIMALS. WHILE USING THE MACHINE, STRICTLY OBSERVE THE RESPECTIVE...
- Page 13 INTRODUCTION The aim of this manual is to provide the operator with instructions for efficient and safe use and maintenance of the telehandler. Following these instructions carefully will allow you to obtain full efficiency and a long working life from your machine, and will help to make your work considerably easier.
- Page 14 18 months from the date the machine left rial, manufacture and/or assembly. the manufacturer's factory (in sales to distributors or dealers). - DIECI reserves the right to judge whether to repair or to replace defective parts. - DIECI shall respond to claims using the means and me- thods it deems most appropriate.
- Page 15 - If the fault is not reported in the prescribed way and wi- be sent directly to the DIECI customer service, within 8 thin the established expiry. days of the occurrence of the malfunction.
- Page 16 Model E.T. PEGASUS Introduction - Warranty Identifying your machine IDENTIFYING YOUR MACHINE MACHINE MODELS - The Manufacturer offers a range of similar machines with different technical specifications and performances. - When consulting any table or diagram in this manual or on the machine itself, always refer to the model code number for your machine.
-
Page 17: Identifying The Telehandler
Engine serial number Delivery date................Warranty expiry date .............. NOTE: The telehandlers commercially known as Pegasus are stam- ped with a type-approval code (see the first four numbers stamped on the chassis) Iveco NEF Pegasus 38.16 engine serial N° Axle serial number... - Page 18 Model E.T. PEGASUS Introduction - Warranty Identifying your machine PAGE LEFT INTENTIONALLY BLANK FOR EDITING PURPOSES...
-
Page 19: Declaration Of Conformity
: Via E. Majorana, 2-4- 42027 Montecchio Emilia (RE), Italy Name and address of the person authorised to compile the technical file: Mr. ENNIO MANGHI DIECI SRL- Via E. Majorana, 2-4 - 42027 Montecchio Emilia (RE), Italy Declares that: The HVL155-type Telescopic Lift (PEGASUS **.21) Serial No. HVL155****... - Page 20 Model E.T. PEGASUS Introduction - Warranty Identifying your machine PAGE LEFT INTENTIONALLY BLANK FOR EDITING PURPOSES A/10...
-
Page 21: Chapter "B" Safety Standards
SAFETY STANDARDS... -
Page 22: Recognising Safety Standards
Carefully read the safety standards and comply with the recommended precautions to avoid potential dangers and to safeguard your health and safety. The "warning: possible risk" symbols and the "warning words" have been included to highlight situations that DIECI has wanted to underline. This manual must anyway be read and learned in its entirety. -
Page 23: General Warnings
GENERAL WARNINGS DIECI shall not be held liable for any damage caused by manoeu- This machine has been designed and constructed to be vres carried out instinctively, by reflex, in a state of panic, in case used as a self-propelled machine, with the operator in the of malfunction, accident, fault, etc., while the machine is in use. -
Page 24: Protective Clothing
Model E.T. PEGASUS Safety standards PROTECTIVE CLOTHING INSPECTING THE MACHINE - Always wear garments that are appropriate for the job you have to accomplish. Do not wear loose clothing, ties, chains, belts or other accessories that may become tan- gled in the control levers or other parts of the machine. -
Page 25: Preparing For Emergencies
Check the machine is clean PREPARING FOR EMERGENCIES - You must always be prepared in case of a fire or accident. Clean all windows, lights and rear-view mirrors. Remove any mud or waste. Remove any rubbish or dirt from inside the cab, espe- cially around the pedals and controls. -
Page 26: The Driver's Cab
Model E.T. PEGASUS Safety standards THE DRIVER’S CAB - Use appropriate handles and steps to reach the driver's seat. - CAUTION - Only use the machine if the seat is adjusted properly. - Always face the machine when getting in or out, keeping An incorrect seat adjustment can quickly tire the ope- a tight hold of the machine using the steps and handles. -
Page 27: Starting The Machine
AUTHORISATION TO DRIVE THE MACHINE STARTING THE MACHINE - Regardless of the driver’s experience, before starting - CAUTION - the machine, take time to become familiar with the loca- Comply with the legislation in effect in the country tion and function of every control and instrument. where the machine is used. -
Page 28: Working In Conditions Of Safety
Model E.T. PEGASUS Safety standards WORKING IN CONDITIONS OF SAFETY - DANGER - DO NOT USE THE MACHINE IF YOU ARE UNDER THE EFFECT OF ALCOHOL, DRUGS OR IF YOU HAVE TA- KEN ANY MEDICATION THAT MAY MAKE YOU DROWSY OR ALTER YOUR PROMPT REACTIONS. - Page 29 - Ensure there is no one at risk while reversing the machine When working on slopes there is a danger that the ma- or rotating the turret. chine can lose balance and roll-over while rotating or ac- - Check the space around the machine before carrying out tivating the work attachments.
- Page 30 Remember certain parts protrude beyond the DIECI strongly recommends that the safety regulations dimensions of the cab. employed onsite comply with the local regulations in ef- fect for any type of work carried out near electricity lines.
- Page 31 - When changing an attachment, to avoid damaging the - CAUTION - hydraulic fittings switch off the engine and wait a minute to discharge the pressure from the circuit. Always clean Every time the machine is used, ensure any attachments the fittings before fitting another attachment.
-
Page 32: Handling Loads
There are various options available to improve visibility in lanced and correctly positioned loads to avoid any risk poor light conditions. Please contact your DIECI dealer. of overturning. - IT IS FORBIDDEN to lift or handle loads over the rated ca- - Always insert the forks completely under the load and pacity of the machine or attachment. -
Page 33: Parking The Machine
PARKING THE MACHINE - Always park on flat, solid and level ground, where there is no risk of rock falls, landslides or flooding. - Lower the stabilizers on the ground (if the machine has stabilisers). - Completely retract the boom and lower to ground level. - Engage the parking brake. -
Page 34: Road Use
Model E.T. PEGASUS Safety standards ROAD USE - In some countries, it is compulsory to have and use a wedge for the wheels when the vehicle is at a standstill. - Ensure your machine complies with local legislation as - CAUTION - regards the presence of a number plate when driving on roads during the day and at night. -
Page 35: Transporting The Machine
HOISTING THE MACHINE TRANSPORTING THE MACHINE - Disassemble any attachments from the machine. - Before transporting the machine, ensure that the rules and regulations of every area the machine will travel - Completely retract and lower the boom. through are complied with. - When the machine is in position, engage the parking - Disassemble any attachments from the machine. -
Page 36: Electromagnetic Interference
Model E.T. PEGASUS Safety standards ELECTROMAGNETIC INTERFERENCE CARRYING OUT MAINTENANCE WORK SAFELY - Some machines can be equipped with electronic com- - Do not leave tools or other items lying around the ponents whose function can be influenced by electroma- workplace. - Page 37 - Do not carry out any maintenance while the engine is run- ning. If it is necessary to carry out maintenance work while the engine is running, seek the assistance of at least two workers and proceed as follows: One person must remain seated in the driver’s seat, ready to switch off the engine at any moment.
- Page 38 THIS OPERATION CAN ONLY BE CARRIED OUT BY AU- THORISED PERSONNEL. - CAUTION - - Only use the lubricants indicated by DIECI, never use BEWARE OF BURNS; THE ENGINE OIL OF THE REDUC- used lubricants. TION GEARS AND THE HYDRAULIC SYSTEM, AS WELL AS THE PIPES, ENGINE AND OTHER COMPONENTS BECOME VERY HOT WHEN THE MACHINE IS IN USE.
-
Page 39: Storing The Machine/Prolonged Inactivity
- To repair any small defects on the bodywork, ask your Check the level of the coolant in the radiator. DIECI dealer for tins of touch up paint. Ensure all the Check the various oil levels. stickers are present; replace any stickers that are lost or Assemble a fully charged battery. -
Page 40: Cleaning The Windows
Model E.T. PEGASUS Safety standards CLEANING THE WINDOWS - The cab windows, headlamps and rear-view mirrors must be washed frequently with soapy water. - After you have cleaned these components, dry carefully. Do not leave any stains or halos that may limit or distort the operator's view. -
Page 41: Fire Prevention
- CAUTION - Stop the machine immediately if an alarm lights up in the cab. Contact your DIECI service centre and do not operate the machine until the fault has been repaired. - Before every work cycle, ensure there are no leaks from the machine;... -
Page 42: Batteries
Model E.T. PEGASUS Safety standards BATTERIES - Do not overturn or tilt the battery to avoid acid leakage. - Charge the battery in a well-ventilated place and AL- WAYS disconnect the power supply before disconnec- ting the terminals. - Always use a voltmeter or a densimeter to check the battery charge. -
Page 43: Starting Up With Auxiliary Batteries
STARTING UP WITH AUXILIARY BATTERIES - Do not charge damaged batteries. Danger of explosion. - Do not charge a hot battery. Danger of explosion. - A battery is completely charged if at a constant tempe- - CAUTION - rature, the density of the electrolyte and the measured Two adequately trained and qualified people are requi- voltage at the poles does not increase within 2 hours. -
Page 44: Electrical System Overload Protection
Model E.T. PEGASUS Safety standards Connecting the cables and starting the engine ELECTRICAL SYSTEM OVERLOAD PROTECTION 1. Ensure the ignition key is in position “O”. - CAUTION - 2. Connect the positive poles “+” on the two batteries “A”. Burnt fuses must be replaced with another fuse of the 3. -
Page 45: Tyres
Inflating or working on the tyres can be dangerous. Whenever possible, specialised personnel must be emplo- - Only use original DIECI nuts to tighten the wheels. If you yed to work on or install tyres. In any case, to avoid serious lose even just one nut, contact a DIECI service centre. - Page 46 TED. USE A SAFETY CAGE. Remove the safety support and lower the telehandler - Do not inflate any tyres over the pressure indicated by DIECI. with the jack. If the bead does not settle on the rim when this pressure...
-
Page 47: Storing Dangerous Fluids
STORING DANGEROUS FLUIDS - Handle fuels carefully; they are highly inflammable. If fuel is ignited, there may be an explosion and/or fire. - Beware of the fumes and vapours produced by chemical products. Do not inhale. - Do not inhale combustion fumes. - Ensure these chemical products are not dispersed in the soil, sewers or surface water. -
Page 48: Diesel
If there are any fuel leaks due to breakages, stop the leak the fuel. The formation of paraffin prevents the fuel from as soon as possible and contact a DIECI service centre. passing through the filter. - CAUTION - AVOID INHALING DIESEL VAPOURS;... -
Page 49: Cleaning And Storing Diesel Fuel
CLEANING AND STORING DIESEL FUEL 6. Fuel barrels (see the figure below) must be stored under cover to prevent water seepage. The barrels should also be tilted slightly, to allow any water to drain off the upper It is essential the fuel is kept clean. rim. -
Page 50: Ecological Considerations
Model E.T. PEGASUS Safety standards ECOLOGICAL CONSIDERATIONS WASTE DISPOSAL - CAUTION - A few helpful recommendations are listed below. Find out about the current standards and legislation in effect in your country. Ask suppliers of lubricating oils, fuels, antifreeze pro- ducts, detergents, etc. - Page 51 PAGE INTENTIONALLY LEFT BLANK FOR EDITING PURPOSES B/31...
-
Page 52: Checking The Wind Speed
- CAUTION - DIECI telehandlers can be used in wind speeds up to 45 Km/h equal to 12.5 m/s (no. 6 of the Beaufort scale) measured at ground level. - Page 53 - CAUTION - On request, DIECI can provide enlarged base supports. EXTENSION PRESSURE (KG/CM) 13 mt...
-
Page 54: Safety Devices
Model E.T. PEGASUS Safety standards SAFETY DEVICES The machine is equipped with a number of safety devices (proximity switches, micro-switches, and load monitoring devices) to safeguard against incorrect manoeuvres or carelessness. The location of safety devices inside the cab (fig.7/B) Seat microswitch (fig.7/B) - Page 55 The location of machine safety devices Lowered foot microswitch. Machine with two movement stabilisers. (fig.8/B - Pos.“1”) (fig.8/B) Beam completely extended and foot lowered microswitch. Machine with eight movement stabilisers (fig.9/B - Pos.“1”) (fig.9/B) Turret aligned with chassis proximity switch (fig.10/B - Pos.“1”) (fig.10/B) Turret rotation locking pin enabled proximity switch.
- Page 56 Model E.T. PEGASUS Safety standards Boom descent limit microswitch. (fig.13/B - Pos.“1”) Boom ascent limit microswitch. (fig.13/B - Pos.“2”) (fig.13/B) Cab emergency exit (rear cab window). (fig.14/B) (fig.14/B) Check valve on all hydraulic cylinders. (fig.15/B - Pos.“1”) (fig.15/B) Safety rod for boom support.
-
Page 57: The Driver's Cab
IT IS FORBIDDEN to open the window completely while the machine is being used; there is a shearing hazard between the boom and chassis. - CAUTION - IF THE CAB HAS ANY VISIBLE DAMAGE, CONTACT AN AUTHO- RISED DIECI SERVICE CENTRE OR WORKSHOP TO REPLACE. B/37... -
Page 58: Load Tables
Model E.T. PEGASUS Safety standards LOAD TABLES - CAUTION - CHECK THE LOAD TABLES OF YOUR MACHINE IN CHAPTER "H" - TECHNICAL INFORMATION SHEETS The Safe Working Load -SWL of these machines depends on their extension range and boom angle. -
Page 59: Using The Load Tables And Boom Indicators
USING THE LOAD TABLES AND BOOM INDICATORS - CAUTION - For your own safety and the integrity of the machine, comply with the information provided below. The load tables regarding your machine are in the notebook in the cab. - CAUTION - The limits indicated in the load tables refer to the machine at a halt on wheels or stabilizers and on level ground. - Page 60 Model E.T. PEGASUS Safety standards When you know the weight of the load, consult the load table (see the machine technical information sheets in chapter “H“ ) and find the section indicating the weight immediately above. Example: in the example load table (fig.20/C), the weight of the load is 0.9 tons, thus find the 1.0 ton section (fig.20/C Pos.”A”).
- Page 61 Notebook with essential data (fig.21/B - Pos.“1”) - A : cover page - B : gear change page - C : tyre inflation pressure page - D : main safety standards page - E : road circulation page - F : key to symbols page (front) - G : key to symbols page (back) - H : load capacity diagrams (fig.21/B)
-
Page 62: Handling Loads
Model E.T. PEGASUS Safety standards HANDLING LOADS Lifting a load off the ground 1. Slowly approach the load to lift with the boom completely retracted and the forks in a horizontal position at the height of the lifting point. Keep the forks raised high enough to avoid contact with the ground. - Page 63 Lifting loads from high up 1. Ensure the forks can be easily inserted under the load. 2. Slowly and cautiously drive the machine perpendicularly towards the load with horizontal forks. 3. Always remember to maintain the distance necessary to in- sert the forks under the load between the pile and the ma- chine.
- Page 64 Model E.T. PEGASUS Safety standards Placing loads in high places 1. Place the load in the carrying position in front of the pile. 2. Raise and extend the boom until the load is above the pile. If necessary, advance the machine towards the pile very slowly and with the utmost care.
- Page 65 Picking up a round load - Tilt the forks forwards and extend the telescopic boom. While inserting the forks under the load, turn the fork holder plate backwards to allow the load to slide. If ne- cessary, secure the load with wedges. - CAUTION - Always comply with the centre of gravity of the load, tilt the forks enough to ensure stability and to avoid...
-
Page 66: Safety Stickers
Model E.T. PEGASUS Safety standards SAFETY STICKERS Safety stickers have been applied to the machine in the indicated positions. The aim of the safety stickers is to provide a guide for your and others’ safety. Before using the machine, check the contents and position of the stickers by walking around the ma- chine with this manual in your hands. - Page 67 BAR 8,0 BAR 8,0 BAR 8,0 BAR 8,0 B/47...
- Page 68 Model E.T. PEGASUS Safety standards Safety stickers and where they are located. Located in the cab on the right side window (fig.28/B): - DANGER: Keep all persons at a safe distance from the machine before and during starting loading operations.
- Page 69 Use and maintenance stickers. On the rear window (fig.34/B) Shows the direction in which to remove the locking pin that prevents the window from being opened completely On the rear window (fig.35/B) (fig.34/B) (fig.35/B) Indicates the emergency exit On the left of the dashboard (fig.36/B) AXA 1492 Indicates that the seat belts have to be fastened when using DEXTRON 2...
- Page 70 Model E.T. PEGASUS Safety standards PAGE LEFT INTENTIONALLY BLANK FOR EDITING PURPOSES B/50...
-
Page 71: Getting To Know And Using The Machine
GETTING TO KNOW AND USING THE MACHINE - CAUTION: - Read the SAFETY REGULATIONS (in this manual) carefully for the safety of all personnel and the machine. - Page 72 Model E.T. PEGASUS Getting to know and using the machine ANY MODIFICATION TO THE MACHINE REQUIRES A NEW TEST TO CHECK CONFORMITY WITH THE “ ” MACHINE DIRECTIVE 98/37. THIS ALSO APPLIES IN CASE OF REPAIRS WITH NON-ORIGINAL SPARE PARTS.
-
Page 73: General Warnings
GENERAL WARNINGS - CAUTION: The machine may only be used by skilled and trained per- - CAUTION: sonnel who have read this manual. If the machine is driven on roads, the operator must have a valid driver’s licence The operator must use the machine and all its controls only pursuant to the regulations in effect in the country where the when properly seated in the driver’s seat. -
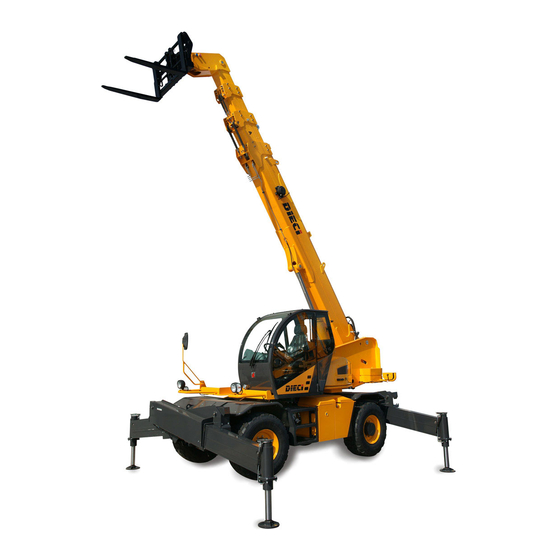
Page 74: Identifying Machine Parts - Four Movement Stabilisers
Model E.T. PEGASUS Getting to know and using the machine IDENTIFYING MACHINE PARTS – Four movement stabilisers (Pegasus 70.11, 60.16, 30.16, 40.17, 38.16) Machine left side 10 11 1. Cab 11. Toolbox 2. Telescopic boom 12. Hydrostatic system oil filter 3. -
Page 75: Identifying Machine Parts - Eight Movement Stabilisers
IDENTIFYING MACHINE PARTS – Eight movement stabilisers (Pegasus 45.19, 45.21, 50.21, 40.25) Machine left side 10 11 1. Cab 11. Toolbox 2. Telescopic boom 12. Hydrostatic system oil filter 3. Attachment holder plate 13. Hydraulic oil tank 4. Front left stabiliser 14. - Page 76 Model E.T. PEGASUS Getting to know and using the machine Machine with four movement stabilisers Machine with eight movement stabilisers (Pegasus 70.11, 60.16, 30.16, 40.17, 38.16) (Pegasus 45.19, 45.21, 50.21, 40.25) Front view Front view 1. Front right stabiliser 1. Front right stabiliser 2.
-
Page 77: Cab
(Pegasus four and eight movement stabilisers) External components Openable roof. Left rear-view mirror Front windscreen wiper Cab door. Door upper window. Door handle. Rear window / Emergency exit Rear windshield wiper Revolving light air inlet Internal components Seat. Door handle. -
Page 78: Getting In And Out Of The Cab
Model E.T. PEGASUS Getting to know and using the machine GETTING IN AND OUT OF THE CAB Before getting in the cab, ensure your hands and shoes are clean and dry to avoid slipping and falling. Only use the grips (fig.1/C Pos.“1”, “2” and “3”) to access the cab. -
Page 79: Opening The Cab Door Window
OPENING THE CAB DOOR WINDOW (fig.3/C Pos.“1”) - To open, lower the grip turning it clockwise (fig.3/C Pos. “2”). - To fasten the window so it stays open, press lightly to secure the window in the catch (fig.3/C Pos.“3”). - Press the button inside the cab (fig.3/C Pos.“4”) to relea- se the window and close it. -
Page 80: Roof
Model E.T. PEGASUS Getting to know and using the machine ROOF (fig.5/C) To open the roof, grip the handles (fig.5/C Pos. “1” and “2”) and push upwards and rotate (fig.5/C Pos.“A”). The completely turned handles will hold the roof in position. -
Page 81: Courtesy Compartment
COURTESY COMPARTMENT (fig.9/C Pos.“1”) - Located behind the seat. (fig.9/C) TECHNICAL DOCUMENT COMPARTMENT (fig.10/C Pos.“1”) All technical documentation must be kept in its compartment inside the cab door (fig.10/C Pos.“1”). The use and maintenance manual and the spare parts cata- logue must always be available inside the machine in case they need to be consulted. -
Page 82: Seat
Getting to know and using the machine SEAT (fig.12/C) DIECI supplies various types of seat model depending on customer requirements. The machine is equipped with a “dead man” safety system, featuring an electric microswitch in the driver’s seat. The microswitch is located inside the cu- shion where the driver is seated (fig.12/C Pos.“A”). -
Page 83: Seat Belts
- To adjust the inclination of the backrest, act on lever “F” (fig.14/C) and force the backrest with your back; it will automatically adapt to your anatomic features. - To adjust the lumbar cushion act on knob “G” (fig.14/C) behind the backrest. - To adjust the inclination of the armrests, turn knob “I”... -
Page 84: Instruments Inside The Cab
Model E.T. PEGASUS Getting to know and using the machine INSTRUMENTS INSIDE THE CAB (fig.16/C) (fig.16/C) Dashboard with air vents Ignition key Adjustable steering column. Machine function selector Right-side dashboard Load monitoring display Steering wheel adjustment lever Left-side dashboard Turret/boom movement joystick Spirit level “INCHING”... -
Page 85: Instrument Cluster Pilot Lights
INSTRUMENT CLUSTER PILOT LIGHTS (fig.17/C) (fig.17/C) High beam headlights pilot light Front axle alignment pilot light (blue) (yellow) Direction indicator pilot light Rear axle alignment pilot light (green) (yellow) Glow plug preheat pilot light Turret and chassis aligned exactly pilot light (yellow) (green) Blocked air filter pilot light... -
Page 86: Instrument Cluster - Using The Instruments
Model E.T. PEGASUS Getting to know and using the machine INSTRUMENT CLUSTER – USING THE INSTRUMENTS (fig.18/C) (fig.18/C) Fuel level indicator Engine water temperature indicator The fuel level pointer indicates the amount of diesel in the In normal use, the temperature pointer moves from the bot- fuel tank. -
Page 87: Right-Side Dashboard - Switches And Function Selectors
RIGHT-SIDE DASHBOARD – SWITCHES AND FUNCTION SELECTORS (fig.19/C) (fig.19/C) Parking brake switch Internal cab fan selector (red) Revolving light switch “I” gear switch (yellow) (red) Front windscreen wiper switch “II” gear switch (green) (red) Rear windshield wiper with washer Emergency lights switch spray switch (red) (green) - Page 88 Model E.T. PEGASUS Getting to know and using the machine RIGHT-SIDE DASHBOARD – SWITCHES AND FUNCTION SELECTORS (fig.20/C) (fig.20/C) - CAUTION: C/18 - Read the SAFETY REGULATIONS (in this manual) carefully for the safety of all personnel and the machine.
-
Page 89: Right-Side Dashboard - Switches - Selectors - Pushbuttons
RIGHT-SIDE DASHBOARD – SWITCHES – SELECTORS - PUSHBUTTONS Stabiliser switch Anti roll-over device - 3B6 REAR right/left Beam/foot selector Machine function selector Only with 8-movement stabilisers (forks/basket/winch) Selector to select machine fun- Rear axle oscillation lock switch ctions controlled from onboard the machine or using radio control Machine levelling switch Steering type selector... -
Page 90: Ignition Switch
If the engine does not start within 5 seconds, retry at regular 15-second intervals to avoid overloading the starter motor. If it is not possible to start the engine, consult the “Maintenan- ce” chapter in this manual or contact a DIECI service centre. - CAUTION: C/20... - Page 91 If this is not the case, consult the “Maintenance” chapter in this manual or contact a DIECI service centre. During the first 10 minutes of use drive at low speed and lift loads slowly to allow the engine and the hydraulic oil to warm up.
-
Page 92: Dashboard Levers
Model E.T. PEGASUS Getting to know and using the machine DASHBOARD LEVERS Forward/reverse gear selection lever This lever “1” (fig.23/C) allows you to change gear and sound the horn. The pilot lights showing in which the direction the ma- chine is travelling light up on the instrument panel (fig.24/C po- sition “F-R”). -
Page 93: Multifunction Lever
MULTIFUNCTION LEVER Direction indicators - Pull the lever towards you to indicate a right turn (fig.25/C Pos.“R”). - Push forwards to indicate a left turn (fig.25/C Pos.“L”). The indicators only function when the ignition switch is in the ‘instruments on’ position (fig.22/C Pos.“1”). A pilot light in the instrument cluster signals that the indica- tors have been enabled. -
Page 94: Pedals
Check that both lights function on a regular basis. - CAUTION: If the pedal is not used very often, check regularly that it fun- ctions properly. If there are any problems, contact a DIECI service centre. “INCHING” pedal (fig.27/C Pos.“3”) This pedal allows the machine to advance with slow and preci- se movements even when the engine is running at high speed. -
Page 95: Parking Brake
9. The test should not last for more than 20 seconds. 10. If the machine moves during the test, the brake must be checked at a DIECI service centre. - CAUTION: If there is a parking brake malfunction, do not use the machine. -
Page 96: Fast/Slow Gear Switch
Model E.T. PEGASUS Getting to know and using the machine FAST/SLOW GEAR SWITCH (fig.30/C Pos.“A” and “B”) The machine features a two-speed mechanical gear (fast/ slow gear) for site or road use. To change gear: - Slow down and bring the machine to a complete stop. -
Page 97: Emergency Button
EMERGENCY BUTTON (fig.32/C Pos.“1”) The emergency button switches off the engine and blocks boom movements. - Press the head of the mushroom shaped button to ena- ble the emergency response. - Turn in the direction of the arrow on the head of the but- ton to disable the emergency response. -
Page 98: Levelling The Front Differential Axle
The rear axle oscillation lock must be enabled when the ma- chine is used without stabilisers. ATTENTION THE LEVELLING OF THE FRONT DIFFERENTIAL AXLE IS NOT PRESENT ON THE PEGASUS 38.16 (fig.34/C) - CAUTION: C/28 - Read the SAFETY REGULATIONS (in this manual) carefully for the safety of all personnel and the machine. -
Page 99: Rear Differential Axle Oscillation Lock
REAR DIFFERENTIAL AXLE OSCILLATION LOCK (fig.35/C Pos.“1”) When the rear axle is locked (fig.35/C Pos.“1”), this prevents the machine from oscillating during the rotation of the ma- COBO 02.246 chine on two wheels function. Oscillations can cause the load to be dropped or the machine to roll-over. - CAUTION: Before engaging the oscillation lock, ensure the machine has been levelled correctly using the spirit level in the cab (fig.37/C... -
Page 100: Turret Rotation Locking Pin
Model E.T. PEGASUS Getting to know and using the machine TURRET ROTATION LOCKING PIN (fig.39/C) The turret rotation locking pin is used to block the turret when it is aligned with the lower chassis. The pin is located on the right side of the machine (fig.39/C Pos “1”). -
Page 101: Stabilisers
STABILISERS The use of stabilisers improves machine stability during lifting operations. When the machine is positioned on the stabilisers, refer to the load diagrams. The load control panel is able to detect automatically whe- ther the machine is operating on tyres or stabilisers. - CAUTION: The machine is type-approved to work on all four completely or partially extended stabilisers. -
Page 102: Positioning The Four Movement Stabilisers
Model E.T. PEGASUS Getting to know and using the machine POSITIONING THE FOUR MOVEMENT STABILISERS (Pegasus 70.11, 60.16, 30.16, 40.17, 38.16) To enable the stabilisers act on the lever/selector (fig.45/C Pos.“1”), the desired stabiliser switch (fig.45/C Pos.“2”, “3”, “4” and “5”) and the stabiliser switch (fig.46/C Pos.“A”). -
Page 103: Positioning Eight Movement Stabilisers
POSITIONING EIGHT MOVEMENT STABILISERS. (Pegasus 45.19, 45.21, 50.21, 40.25) To enable the stabilisers act on the lever/selector (fig.48/C Pos. “1”), the beam or stabiliser selector (fig.48/C Pos. “6”), the desired stabiliser switch (fig.48/C Pos. “2”, “3”, “4” and “5”) and the stabiliser switch (fig.49/C3 Pos.“A”). -
Page 104: Joystick (Standard
Model E.T. PEGASUS Getting to know and using the machine JOYSTICK (STANDARD) Electro hydraulic proportional power control with joystick (fig.51/C Pos.“1”) The telehandler is equipped with an electro hydraulic power control located to the right of the operator (fig.51/C Pos.“1”) The power control activates the following operations: •... -
Page 105: Double Joystick (Optional
DOUBLE JOYSTICK (OPTIONAL) Electro hydraulic proportional power control with two joysticks (optional) The telehandler can be equipped with 2 electro hydraulic power controls, one positioned on the left (fig.53/C Pos.“1”) and one on the right (fig.53/C Pos.“2”) of the operator. In machines equipped with two joysticks the left joystick hol- der armrest is mobile, to ease getting in and out of the cab. -
Page 106: Machine Function Selector
Do not assemble any attachments other than the attach- ments recommended by DIECI. - CAUTION: Only use original DIECI attachments. DIECI shall not be held liable for any damage to the machine, things or people caused by the use of non-original attachments. -
Page 107: Anti Roll-Over Device
ROLL-OVER DEVICE MANUAL WHICH HAS BEEN put them right as soon as possible by contacting an authori- INTEGRATED INTO THIS MANUAL. sed workshop or the DIECI service centre. - CAUTION: C/37 - Read the SAFETY REGULATIONS (in this manual) carefully for the safety of all personnel and the machine. -
Page 108: Limiting Device Exclusion
Danger of rolling over. - CAUTION - DIECI shall not be held liable if the operator knowingly or unknowingly uses button “A” (fig.59/C) incorrectly to exclude the safety devices. -
Page 109: Radio Control (Optional
RADIO CONTROL (optional) (fig.60/C Pos.“1”) If assembled on the machine, the boom can be operated using the radio control. The radio control allows you to remo- te control every boom movement and turret rotation doubling the cab controls. The following movements can be carried out using the radio control: •... -
Page 110: Steering Selector
Model E.T. PEGASUS Getting to know and using the machine STEERING SELECTOR (fig.63/C Pos “1”) Turn the selector (fig.63/C Pos.“1”) to obtain 3 types of steering: Normal steering - (fig.65/C Pos “A”) This type of steering allows front steering only. -
Page 111: Wheels Alignment Selector
WHEELS ALIGNMENT SELECTOR (fig.66/C Pos.”3”) The selector (fig.66/C Pos.”3”) enables the front and rear wheels signal device aligned with the frame. Te optical signal is given via two LEDs on the dashboard. the LED “1” (fig.67/C) signals the alignment of the front axle wheels, the LED “2”... -
Page 112: Revolving Light Switch
Model E.T. PEGASUS Getting to know and using the machine REVOLVING LIGHT SWITCH The revolving light must be positioned above the driver’s cab (fig.69/C Pos.“1”) and must always be switched on du- ring site and road use. COBO 02.246 - Position the revolving light on the driver’s cab (fig.69/C Pos.“1”). -
Page 113: Front Windscreen Wiper Control
FRONT WINDSCREEN WIPER CONTROL (fig.72/C Pos.“1”) - Act on the switch to enable the control (fig.72/C Pos.“1”). - The first click enables the first speed (slow). - The second click enables the second speed (fast). A pilot light will light up on the selector to indicate the device is switched on. -
Page 114: Manual Mechanical Accelerator (Pegasus 38.16
Model E.T. PEGASUS Getting to know and using the machine MANUAL MECHANICAL ACCELERATOR (PEGASUS 38.16) (fig.74/C Pos.”1”) Allows to accelerate the engine revs and keep them con- stant without pressing the accelerator pedal. To activate the accelerator: - Pull the lever towards yourself to increase the engine revs. -
Page 115: Boom Head Solenoid Valve Switch (Optional
BOOM HEAD SOLENOID VALVE SWITCH (OPTIONAL) (fig.75/C Pos.“1”) The switch is only installed if the solenoid valve is present on the boom head (fig.75/C Pos.“2”). With the adoption of the solenoid valve, it is possible to have the hydraulic controls doubled on the boom head. - Press the button (fig.75/C Pos.“1”) to supply current to the solenoid valve, which will divert the flow of oil. -
Page 116: Internal Cab Ventilation
Model E.T. PEGASUS Getting to know and using the machine INTERNAL CAB VENTILATION To enable the fan, turn the selector (fig.78/C Pos.“1”) clockwise. The clicks represent respectively: - Off (fig.78/C Pos.“A”). - First speed (fig.78/C Pos.“B”). - Second speed (fig.78/C Pos.“C”). -
Page 117: Air Recirculation
AIR RECIRCULATION While the fan in the cab is switched on, it is possible to enable the air recirculation function by acting on the relative vent (fig.81/C Pos.“1”). - Turn lever “2” (fig.81/C) towards the right side of the machine to enable air recirculation; part of the air will be drawn from inside the cab, reducing the amount of air taken from outdoors. -
Page 118: Retracting The Boom
Model E.T. PEGASUS Getting to know and using the machine RETRACTING THE BOOM Retracting the boom manually. - CAUTION - These procedures must be carried out by two quali- fied and expert operators with the authorisation of the Safety Manager. -
Page 119: Telescopic Boom Recovery Pegasus 38.16
TELESCOPIC BOOM RECOVERY PEGASUS 38.16 Telescopic boom recovery with manual system - ATTENTION - These operations must be performed by two operators that are qualified, expert and authorised by the Safety Manager. 1. Extract the movements execution lever, insert it into its seat on the distributor (fig.87 Pos.”A”-”B”-”C”). -
Page 120: Towing The Machine
Model E.T. PEGASUS Getting to know and using the machine TOWING THE MACHINE The machine may only be towed in an emergency at low speed (max 4 km/hour) and over short distances (max 500 m). The procedure is as follows: - Place the gear in neutral. - Page 121 Putting the gear in neutral Instructions - Switch off the engine. - Turn the lever (fig.91/C Pos.“1”) on the hydraulic cock to- wards the centre of the machine until it is closed. The cock is under the machine in the centre near the reduction gear. - Use a screwdriver to position the gear selector pin (fig.92/C Pos.“2”) in neutral (at half way).
- Page 122 Model E.T. PEGASUS Getting to know and using the machine Disengage the parking brake with the engine off negative (Pegasus 38.16) 1° Position a screwdriver as in the figure (fig.94/C). 2° Use a rubber mallet to strike the handle of the screwdriver.
-
Page 123: Catalytic Purifier (Optional
300 working hours: drain off the water and clean the inside for a few minutes with a pressuri- sed jet. DIECI also provides the additive TAM which, added to the water at every change, helps to keep the purifier clean. - Page 124 Model E.T. PEGASUS Getting to know and using the machine PAGE INTENTIONALLY LEFT BLANK FOR EDITING PURPOSES - CAUTION: C/54 - Read the SAFETY REGULATIONS (in this manual) carefully for the safety of all personnel and the machine.
-
Page 125: Instrument Cluster
GETTING TO KNOW AND USING THE MACHINE INTEGRATED DEVICES “INSTRUMENT CLUSTER” - CAUTION: C/55 - Read the SAFETY REGULATIONS (in this manual) carefully for the safety of all personnel and the machine. - Page 126 Model E.T. PEGASUS Getting to know and using tha machine Integrated devices ANY MODIFICATION TO THE MACHINE REQUIRES A NEW TEST TO CHECK CONFORMITY WITH THE “ ” MACHINE DIRECTIVE 98/37. THIS ALSO APPLIES IN CASE OF REPAIRS WITH NON-ORIGINAL SPARE PARTS.
- Page 127 INSTRUMENT CLUSTER (fig.100/C) (fig.100/C) Main beam headlights pilot light Front axle alignment pilot light (blue) (yellow) Direction indicator pilot light Rear axle alignment pilot light (green) (yellow) Glow plug preheat pilot light Turret and chassis aligned exactly pilot light (yellow) (green) Blocked air filter pilot light Turret rotation locking pin inserted pilot light...
- Page 128 Model E.T. PEGASUS Getting to know and using tha machine Integrated devices LIQUID CRYSTAL DISPLAY The following functions are displayed: - Hour counter (6 figures including one decimal and an hourglass) (fig.101/C Pos.“C”). - Clock (4 figures) (fig.101/C Pos.“A”). - Tachymeter (3 figures including one decimal, plus km/h, m/h and mph) (fig. 101/C Pos.“C”).
-
Page 129: Push Buttons
(fig.102/C) PUSH BUTTONS There are two integrated push buttons on the panel. During normal use the two push buttons have the same function. - Pushbutton “1” (fig.102/C) to change the information on the display. - Pushbutton “2” (fig.102/C) to change the information on the display. Changing the information on the display Press button “1”... -
Page 130: Instrument Cluster: Initial Check Up Of The Instruments
Model E.T. PEGASUS Getting to know and using tha machine Integrated devices INSTRUMENT CLUSTER: INITIAL CHECK UP OF THE INSTRUMENTS When the instrument cluster is switched on, several pilot lights, the buzzer and every display segment come on for 1.5 seconds. - Page 131 GENERAL ALARM LED The emergency indicator light/general alarm occur: - in the event of engine error (electronic engine only) - if one of the indicator lights indicated in the table below should switch on - in the event of engine overrevving - in the event of the anti-tipping system using By-Pass button.
- Page 132 Model E.T. PEGASUS Getting to know and using tha machine Integrated devices Engine errors (electronic engine only) Engine errors are signalled by the general alarm pilot light accompanied by an acoustic alarm (buzzer) that lasts for 1.5 seconds and an error code is displayed on the LCD (fig.105/C Pos.“3”). The error is displayed until the operator presses but- ton “1”...
- Page 133 Below is an example of scrolling error messages on the display. Vkmip/h (fig.106/C) Vkmip/h Vkmip/h (fig.107/C) If there are any display errors, the last display appears with the word “ESC”. - CAUTION: C/63 - Read the SAFETY REGULATIONS (in this manual) carefully for the safety of all personnel and the machine.
-
Page 134: Service
Model E.T. PEGASUS Getting to know and using tha machine Integrated devices SERVICE When the machine needs to be serviced, the letter “S” is displayed on the LCD (fig.108/C Pos.“2”) with the corresponding servi- ce hours (fig.108/C Pos.“1”). This will only be displayed for 10 seconds when the dashboard is switched on. The letter “S” will flash. -
Page 135: Error List
ERROR LIST (electronic engine only) Display Type Component Description CODE Diagnostic Throttle Position Sensor data erratic intermittent or incorrect Diagnostic Throttle Position Sensor Voltage above normal or shorted high Voltage above normal or shorted high Diagnostic Secondary throttle position sensor Diagnostic Throttle Position Sensor Voltage below normal or shorted low... - Page 136 Model E.T. PEGASUS Getting to know and using tha machine Integrated devices data incorrect Diagnostic Engine software Diagnostic SAE J1939 data link Abnormal update Solenoid Current Low Diagnostic Turbo Wastegate Diagnostic Turbo Wastegate Solenoid Current High Turbo Wastegate not responding...
- Page 137 High Temperature Event Exhaust Event Fuel Rail pressure sensor Low Fuel Rail Pressure High Fuel Rail Pressure Event Fuel Rail pressure sensor Event Intake Manifold pressure sensor Low Intake Manifold Pressure High Intake Manifold Pressure Event Intake Manifold pressure sensor Diagnostic Intake Manifold pressure sensor Pressure Abnormal Rate of Change...
- Page 138 Model E.T. PEGASUS Getting to know and using tha machine Integrated devices PAGE INTENTIONALLY LEFT BLANK FOR EDITING PURPOSES - CAUTION: C/68 - Read the SAFETY REGULATIONS (in this manual) carefully for the safety of all personnel and the machine.
-
Page 139: 3B6 - Load Limiting Device
“3B6 – LOAD LIMITING DEVICE” - CAUTION: C/69 - Read the SAFETY REGULATIONS (in this manual) carefully for the safety of all personnel and the machine. - Page 140 Model E.T. PEGASUS Getting to know and using tha machine Integrated devices PAGE INTENTIONALLY LEFT BLANK FOR EDITING PURPOSES - CAUTION: C/70 - Read the SAFETY REGULATIONS (in this manual) carefully for the safety of all personnel and the machine.
-
Page 141: General Information
GENERAL INFORMATION The MidMac-ST02 system is a load limiting device for telehandlers in the Pegasus series. Its main specifications are: • Limiting device manager pursuant to standards ISO13000 and EN280 • Black Box and alarm management with 500 storable events LAYOUT Ref. -
Page 142: Display
Model E.T. PEGASUS Getting to know and using tha machine Integrated devices DISPLAY Operator panel Load condition % and alarms 1. The LCD bar on the alphanumeric display indicates the percentage of the load that is being lifted compared to the maximum load allowed in the working conditions. -
Page 143: Main Work Data
MAIN WORK DATA 8. WEIGHT OF THE RAISED LOAD Graphic symbol below: (ACT) Reading in “Tons” with one decimal 9. MAXIMUM LOAD ALLOWED in the present machine configuration. Graphic symbol below: (MAX) Reading in “Tons” with one decimal 10. WORK RADIUS (measurement of the distance from the centre of the swing gear to the projection of the load application point). Graphic symbol below: (R) Reading in “Metres”... -
Page 144: Complementary Work Data Readings
Model E.T. PEGASUS Getting to know and using tha machine Integrated devices COMPLEMENTARY WORK DATA READINGS 48.5 Press “ENTER” once for a few seconds to display the values regarding complementary readings. After this the display returns to the main ACT, MAX, and R readings. -
Page 145: Attachment And Operating Mode Display
ATTACHMENT AND OPERATING MODE DISPLAY The operating mode setting (OM) is automatic because selected by external microswitches. On the normally displayed main page, the Selected Attachment Table (T) and the Operating Mode (OM) of the machine are displayed in the highlighted area in the form of numbers. -
Page 146: Attachment And Operating Mode Selection
Model E.T. PEGASUS Getting to know and using tha machine Integrated devices UNENCODED DISPLAY OF ATTACHMENTS AND OPERATING MODES To better understand work conditions, or the operating mode (OM) and the attachment (Tool) (t), they can be displayed in text form: press INDEX. -
Page 147: Self-Diagnostics And Alarm Messages
SELF-DIAGNOSTICS AND ALARM MESSAGES The limiting device is provided with a self-diagnosis system that detects transducer malfunctions, cable breakages and internal electronic malfunctions. When a fault is detected, the limiting device goes into safety mode blocking any dangerous manoeuvres and at the same time the display panel shows the LCD bar at the bottom of the scale. -
Page 148: Diagnostics Displays
Model E.T. PEGASUS Getting to know and using tha machine Integrated devices DIAGNOSTICS DISPLAYS The diagnostics functions are always accessible without the need for a password. From the main screen, press ENTER to enter diagnostics mode. Then scroll forwards or backwards to select the desired page. -
Page 149: Midac Alarms
MIDAC ALARMS Alarm code Description Non-congruent memory data Angle transducer 1 reading less than the minimum value Angle transducer 1 reading more than the maximum value Extension transducer 1 reading less than the minimum value Extension transducer 1 reading more than the maximum value Extension 1 reading in metres less than the minimum value Extension 1 reading in metres more than the maximum value Pressure transducer reading in the main cylinder... - Page 150 Model E.T. PEGASUS Getting to know and using tha machine Integrated devices Alarm code Description Pressure transducer reading in the compensator cylinder (rod side) less than the minimum value. Pressure transducer reading in the compensator cylinder (rod side) more than the maximum value.
-
Page 151: Appendix: Wiring Diagrams
APPENDIX: WIRING DIAGRAMS IDR1 DIAGNOSTICS CAN-BUS LINE LIMITER DIAGNOSTICA LINEA CAN-BUS LIMITATORE CONNECTOR CONNETTORE 9C. VASCHETTA FEMMINA Ref. Quantity Title / Name Main Unit Midac Display indicator Cable Reel Pressure Transducer Pressure Ansducer Connector - CAUTION: C/81 - Read the SAFETY REGULATIONS (in this manual) carefully for the safety of all personnel and the machine. -
Page 152: Alarms
Model E.T. PEGASUS Getting to know and using tha machine Integrated devices ALARMS E2prom alarms These alarms indicate that the system has detected that one or more data stored in the E2PROM parameter area is/are corrupt. Possible causes: • The system has not been programmed yet •... -
Page 153: Angle And Extension Transducer Alarm
ANGLE AND EXTENSION TRANSDUCER ALARM The typically potentiometric extension or angle transducers provide a useful signal in their function range between 0.25 and 4.75 V. The program converts the incoming voltage and makes the size measured typically in: • Centimetres for distances •... - Page 154 Model E.T. PEGASUS Getting to know and using tha machine Integrated devices PAGE INTENTIONALLY LEFT BLANK FOR EDITING PURPOSES - CAUTION: C/84 - Read the SAFETY REGULATIONS (in this manual) carefully for the safety of all personnel and the machine.
-
Page 155: Maintenance And Adjustment
MAINTENANCE ADJUSTMENT - CAUTION: - Read the SAFETY REGULATIONS (in this manual) carefully for the safety of all personnel and the machine. - Page 156 Mod. E.T. PEGASUS Maintenance and adjustment ANY MODIFICATION TO THE MACHINE REQUIRES A NEW TEST TO CHECK C ON F O R MIT Y WIT H T HE “ ” M AC HI NE DI R EC TI VE 9 8/ 3 7.
-
Page 157: Maintenance Regulations
Manual at a DIECI dealer and at the fixed terms. To ensure you receive good customer service from your dealer, please: Maintenance 1 - Specify your name, address and telephone number. -
Page 158: Running The Machine In
Mod. E.T. PEGASUS Maintenance and adjustment RUNNING THE MACHINE IN Maintenance is best carried out indoors and at the end of the working day so that all oils are hot and can be easily drained off. The operations described below must be carried out once... -
Page 159: Vibration Emission Statement
Values determined in compliance with standard EN 13059 MANUFACTURER’S FIRST TEST STATEMENT DIECI S.r.l. hereby states that before being issued on the mar- ket, every vehicle manufactured in its factory undergoes static and dynamic tests that have the aim of verifying the vehicle functions properly and complies with the EC directives it is subject to. -
Page 160: Identifying Machine Parts - Four Movement Stabilisers
Mod. E.T. PEGASUS Maintenance and adjustment IDENTIFYING MACHINE PARTS - Four movement stabilisers. (Pegasus 70.11, 60.16, 30.16, 40.17, 38.16) Machine left side 10 11 1. Cab 11. Battery cut-off switch 2. Telescopic boom 12. Hydrostatic system oil filter 3. Attachment holder plate 13. -
Page 161: Identifying Machine Parts - Eight Movement Stabilisers
IDENTIFYING MACHINE PARTS - Eight movement stabilisers. (Pegasus 45.19, 45.21, 50.21, 40.25) Machine left side 10 11 1. Cab 11. Toolbox 2. Telescopic boom 12. Hydrostatic system oil filter 3. Attachment holder plate 13. Hydraulic oil tank 4. Front left stabiliser 14. -
Page 162: Identifying Machine Parts
Mod. E.T. PEGASUS Maintenance and adjustment IDENTIFYING MACHINE PARTS Machine engine 1. Air filter 4. Fuse control unit 2. Engine 5. Radiator 3. Hydraulic pump Machine base 1. Front axle 3. Drive shaft 2. Rear axle 4. Gear reduction unit - CAUTION: - Read the SAFETY REGULATIONS (in this manual) carefully for the safety of all personnel and the machine. - Page 163 Pegasus 38.16 mechanical engine 1. Air filter 4. Fuses control unit 2. Engine 5. Radiator 3. Hydraulic pump - CAUTION: - Read the SAFETY REGULATIONS (in this manual) carefully for the safety of all personnel and the machine.
-
Page 164: Maintenance And Adjustment Schedule
Mod. E.T. PEGASUS Maintenance and adjustment MAINTENANCE AND ADJUSTMENT SCHEDULE On the left is a list of the maintenance procedures to carry out. The diagrams on the right indicate how often the maintenance has to be carried out and provide an idea of where the parts are located. The asterisk (*) indicates maintenance in case the ma- chine is used in particular environments. - Page 165 MAINTENANCE AND ADJUSTMENT SCHEDULE On the left is a list of the maintenance procedures to carry out. The diagrams on the right indicate how often the maintenance has to be carried out and provide an idea of where the parts are located. The asterisk (*) indicates maintenance in case the ma- chine is used in particular environments.
- Page 166 Mod. E.T. PEGASUS Maintenance and adjustment MAINTENANCE AND ADJUSTMENT SCHEDULE On the left is a list of the maintenance procedures to carry out. The diagrams on the right indicate how often the maintenance has to be carried out and provide a rough idea of where the parts are located. The asterisk (*) indicates maintenance in case the machine is used in particular environments.
-
Page 167: Capacity Of The Parts To Lubricate
CAPACITY OF THE PARTS TO LUBRICATE ASSEMBLY DESCRIPTION CAPACITY CAPACITY 38.16 ENGINE OIL 9,00 lt 9,00 lt FRONT WHEEL REDUCTION GEAR OIL 1,25 lt 1,25 lt REAR WHEEL REDUCTION GEAR OIL 1,25 lt 1,25 lt FRONT DIFFERENTIAL AXLE OIL 7,50 lt 7,50 lt REAR DIFFERENTIAL AXLE OIL 7,75 lt... -
Page 168: Opening The Engine Bonnet
Mod. E.T. PEGASUS Maintenance and adjustment OPENING THE ENGINE BONNET (Fig.1/D) The engine bonnet is equipped with an external handle with lock (fig. 1/D Pos. “1”). To open: - Insert the key in the lock (fig. 1/D Pos.“2”) and turn clockwise/anticlockwise to lock/unlock. -
Page 169: Pedals
Periodically check the condition of all hoses and/or piping. of the brakes. If the level is drastically reduced there is a leak in the system. Contact the DIECI dealer for the replace- ment of any damaged, corroded or ruined piping. -
Page 170: Brakes
Periodically check the condition of all hoses and/or piping. of the brakes. If the level is drastically reduced there is a leak in the system. Contact the DIECI dealer for the replacement of any damaged, corroded or ruined piping. - ATTENTION: Always use the recommended type of oil, as indicated in the lubricants table (See page D/12 oils table). - Page 171 The pedal does not need adjusting, because it is connected directly to the inching valve, which hydraulically controls the hydrostatic pump functions.ne maintenance. (fig.12/D) (fig.13/D) (Pegasus 38.16) - CAUTION: D/17 - Read the SAFETY REGULATIONS (in this manual) carefully for the safety of all personnel and the machine.
-
Page 172: Parking Brake
The electrically controlled parking brake does not need any routine maintenance. - CAUTION: If the brake is not effective, contact your DIECI dealer to have the fault corrected. When pilot light “A” (fig. 15/D) light ups, this indicates that the power brake pressure is low. -
Page 173: Hydraulic Oil Level
(fig.16/D Pos. “2”). If there is insufficient oil, remove the filler cap (fig.17/D Pos.“1”) (fig.16/D) and top up with oil of the type recommended by DIECI. Add the amount necessary to ensure the correct oil level is restored. Routine maintenance must be carried out at the prescribed intervals (pages D/9-10-11). -
Page 174: Changing The Hydraulic Oil And Filters
Mod. E.T. PEGASUS Maintenance and adjustment Changing the hydraulic oil and filters Consult the summary Table at the start of this chapter to find out how often this must be done (pages D/9-10-11) There are three mesh filters inside the tank (fig.18/D Pos.“1”) which avoid the issue of any dangerous particles in the hydraulic system. -
Page 175: Hydrostatic System Filter
7. Take the new filter and fill it with one of the hydraulic oils ap- (fig.19/D) proved by DIECI. Lubricate the new O-ring with the same oil. 8. Screw up the filter using your hands. Ensure the O-ring lubricated previously is positioned correctly. -
Page 176: Fuel Tank
Mod. E.T. PEGASUS Maintenance and adjustment FUEL TANK (Fig.21/D Pos.“1”) Cleaning To clean correctly: 1. Place the machine on a flat and level surface. 2. Switch off the engine and remove the ignition key. Place a “maintenance work in progress” sign in the cab. -
Page 177: Engine Radiator
If it is necessary to top up the radiator frequently in normal working conditions, ensure there are no leaks in the cooling sy- stem. If there are any problems, contact a DIECI service centre. - CAUTION: Use demineralised water to top up the cooling system. -
Page 178: Replacing The Coolant
Mod. E.T. PEGASUS Maintenance and adjustment Replacing the coolant To replace the coolant correctly: 1. Place the machine on a flat surface. 2. Switch off the engine and remove the ignition key. Place a “maintenance work in progress” sign in the cab. -
Page 179: Air Filter
- ATTENTION: (fig.28/D) (Pegasus 38.16 air filter) If the filtering elements come into contact with liquids of of any type, they must be replaced. - Page 180 Mod. E.T. PEGASUS Maintenance and adjustment Cleaning/Replacing the cartridges engine air filter elec- tronic 1. Place the machine on a flat and level surface. 2. Switch off the engine and remove the ignition key. Place a “maintenance work in progress” sign in the cab.
- Page 181 When changing the filter cartridges, as well as cleaning the filter housing, it is necessary to clean the primary intake duct. To do this, proceed as follows: 1. Loosen the clamp on the engine intake pipe from the air filter side (fig. 40/D Pos. “1”). 2.
- Page 182 Mod. E.T. PEGASUS Maintenance and adjustment Cleaning/replacement of the mechanical engine air filter cartridge (Pegasus 38.16) 1. Loose the knob “1” (Fig.46/D) anti-clockwise 1. and re- move the lid “2” (Fig.46/D). (fig.46D) 2. Remove the knob “3” (Fig.47/D) by screwing it anti- clockwise in order to extract the pre-filter ”4”...
- Page 183 5. Extract the filter “7” (Fig.50/D). 6. Clean and replace the filters and re-mount everything (fig.50/D) carrying out the same operations in the reverse order ta- king care not to tighten the bolts and knobs excessively. A sealing ring is present in the lid in order to prevent “1” (Fig.51/D) draughts of air.
-
Page 184: Rotation Reduction Gear With Oil Level Rod
Mod. E.T. PEGASUS Maintenance and adjustment ROTATION REDUCTION GEAR WITH OIL LEVEL ROD Checking the oil level. While the machine is being used, the rotation reduction gear oil heats up and increases its volume. Therefore, check the le- vel when the temperature is close to the ambient temperature. -
Page 185: Rotation Reduction Gear Without An Oil Level Rod
ROTATION REDUCTION GEAR WITHOUT AN OIL LEVEL ROD Checking the oil level. While the machine is being used, the rotation reduction gear oil heats up and increases its volume. While the machine is being used, the rotation reduction gear oil heats up and increases its volume. -
Page 186: Cylinder Check Valves
If the boom keeps on moving after the engine has stopped running, the cylinder check valves are faulty. Repair the fault as soon as possible. Contact a DIECI service centre. B) Boom extension cylinder: (fig.62-63/D) 1. Start the engine. Ensure that the parking brake is enga- ged and the gear selector is in neutral. - Page 187 If the forks keep on lowering or moving after the engine has stopped, the check valve is faulty. Repair the fault as soon as possible. Contact a DIECI service centre. D) Rear axle oscillation lock levelling cylinders: (fig. 65-66/D) 1. Start the engine. Ensure that the parking brake is enga- (Fig.
-
Page 188: Reduction Gear And Differential Axles
Mod. E.T. PEGASUS Maintenance and adjustment REDUCTION GEAR AND DIFFERENTIAL AXLES The figures are indicative and may not be the same as the parts assembled on your machine. The references to maintenance holes refer to the following pages, which illustrate two standard axles with reduction gear for more exact identification. - Page 189 Epicyclic reduction gear Changing the oil (fig.73/D - fig.74/D - fig.75/D) 1. Place the machine on a flat and level surface while the differential oil is still hot. 2. Switch off the engine and remove the ignition key. Place a “maintenance work in progress” sign in the cab. 3.
- Page 190 Mod. E.T. PEGASUS Maintenance and adjustment Oil level cap REDUCTION GEAR Oil filler and level cap Drain plug Air vent Oil cap (fig.78/D) - CAUTION: D/36 - Read the SAFETY REGULATIONS (in this manual) carefully for the safety of all personnel and the machine.
- Page 191 Oil level cap DIFFERENTIAL AXLE Oil filler and level cap Drain plug Air vent Oil cap (fig.78/D) - CAUTION: D/37 - Read the SAFETY REGULATIONS (in this manual) carefully for the safety of all personnel and the machine.
- Page 192 Mod. E.T. PEGASUS Maintenance and adjustment PAGE INTENTIONALLY LEFT BLANK FOR EDITING PURPOSES - CAUTION: D/38 - Read the SAFETY REGULATIONS (in this manual) carefully for the safety of all personnel and the machine.
-
Page 193: Boom Sliding Blocks
- CAUTION: - While the boom is completely extended horizontally, remo- Only use the lubricants indicated in the DIECI tables. Different ve the layer of lubricant from the extensions with a cloth. lubricants can cause serious damage to the sliding surfaces. -
Page 194: External Boom Chains
Consult the table on the right for the correct viscosity (fig.82/D). - CAUTION: In the case of special applications or use in adverse condi- Temperature (C°) Recommended viscosity tions, consult a DIECI service centre. ISO VG (Cst) Between 15 and 32 - 15 < T< 0 - PROHIBITION - IT IS STRICTLY FORBIDDEN to lubricate 0 <... -
Page 195: How To Determine Wear Caused By Elongation
- Activate the boom several times to distribute the lubri- cant evenly. - CAUTION: If the chains need to be replaced, contact a DIECI service centre. - CAUTION - The chains can be weakened by hydrogen. IT IS STRICTLY FORBIDDEN to work in acid areas. -
Page 196: Lubricators
Mod. E.T. PEGASUS Maintenance and adjustment LUBRICATORS Machine with four movement stabilisers (PEGASUS 70.11, 60.16, 30.16, 40.17, 38.16) Machine left side (fig.90/D) Machine right side (fig.91/D) - CAUTION: D/42 - Read the SAFETY REGULATIONS (in this manual) carefully for the safety of all personnel and the machine. - Page 197 LUBRICATORS Machine with eight movement stabilisers (PEGASUS 45.19, 45.21, 50.21, 40.25) Machine left side (fig.92/D) Machine right side (fig.93/D) - CAUTION: D/43 - Read the SAFETY REGULATIONS (in this manual) carefully for the safety of all personnel and the machine.
- Page 198 Mod. E.T. PEGASUS Maintenance and adjustment LUBRICATORS One/two/three extension booms The references for the lubricators on two extension booms are the same as for three extension booms. (fig.94/D) (fig.95/D) - CAUTION: D/44 - Read the SAFETY REGULATIONS (in this manual) carefully for the safety of all personnel and the machine.
- Page 199 LUBRICATORS Drive shafts and differential axles Front drive shaft Rear drive shaft Differential axle Epicyclic reduction gear (fig.96/D) - CAUTION: D/45 - Read the SAFETY REGULATIONS (in this manual) carefully for the safety of all personnel and the machine.
-
Page 200: Battery Cut-Off Switch
Mod. E.T. PEGASUS Maintenance and adjustment BATTERY CUT-OFF SWITCH (fig.97/D Pos.“1”) The battery cut-off switch is below the cab next to the battery. The battery cut-off switch disconnects the power supply to the electrical system by opening the circuit on the negative pole. -
Page 201: Fuses
FUSES (fig. 99/D Pos. “1”) General control unit The general electrical circuit is protected by fuses located in the general control board (fig.99/D Pos.“1”). To access the electronic board, remove the left plastic cover below the dashboard by unscrewing the screws. If there are any electrical malfunctions, first check the condi- tion of the fuses when looking for the source of the problem. -
Page 202: Lights
Mod. E.T. PEGASUS Maintenance and adjustment LIGHTS The lights on the machine must always be efficient and function perfectly. Check the lights are functioning properly every day. If any lights are damaged, they must be replaced immediately. Immediately replace any burnt out light bulbs. -
Page 203: Rear Light
REAR LIGHT (fig. 105/D) The rear light consists in an indicator light, rear red light, stop light and reversing light. To access the light bulbs: - Stop the machine and act on the battery cut-off switch to disconnect the power supply. - Remove the head light power connector on the rear. -
Page 204: Preload And Tightening Torque Table For Class 1 Nuts And Bolts
Mod. E.T. PEGASUS Maintenance and adjustment PRELOAD AND TIGHTENING TORQUE TABLE FOR CLASS 1 NUTS AND BOLTS fine pitch nut and bolt classes 10.9 12.9 preload tightening preload tightening preload tightening preload tightening preload tightening preload tightening torque torque torque... -
Page 205: Preload And Tightening Torque Table For Class 2 Nuts And Bolts
PRELOAD AND TIGHTENING TORQUE TABLE FOR CLASS 2 NUTS AND BOLTS large pitch nut and bolt classes 10.9 12.9 preload tightening preload tightening preload tightening preload tightening preload tightening preload tightening torque torque torque torque torque torque 0.10 4874.7 4.24 6093.4 5.30 7312.1... -
Page 206: Torque Table For Hydraulic Fittings
Mod. E.T. PEGASUS Maintenance and adjustment TORQUE TABLE FOR HYDRAULIC FITTINGS 60° oval insert - BSP thread THREAD 1/18-28 1/4-19 3/8-19 1/2-14 5/8-14 3/4-14 1”-11 1”1/4-11 1”1/2-11 12-14 14-16 25-28 45-60 55-70 90-110 120-140 170-190 200-245 60° oval insert - METRIC thread... -
Page 207: Trouble Shooting
Ensure you have read and understood the “User Instructions” and “Safety Regulations” before carrying out any repairs on the machine. This symbol: means that the problem CANNOT be fixed without the assistance of an authorised DIECI Service workshop. Troubleshooting with the load monitoring display and the LCD on the instrument cluster is described in chapter “G”... - Page 208 Mod. E.T. PEGASUS Maintenance and adjustment TROUBLE SHOOTING ASSEMBLY PROBLEM PROBABLE CAUSE REMEDY Insufficient hydraulic oil level Check the hydraulic oil level The machine does not move in any direction The parking brake is engaged Disengage the brake HYDRAULIC - CAUTION: CIRCUIT AND Remain seated in the driver’s...
- Page 209 TROUBLE SHOOTING ASSEMBLY PROBLEM PROBABLE CAUSE REMEDY The rotation locking pin is in- Remove the pin serted See the chapter The safety devices have been ena- “Getting to know your machine” bled (pilot light and acoustic alarm on) Hydraulic pump malfunction Install a gauge and check the (turret rotation pump) pressure...
-
Page 210: How To Complete The Service Register
Inspections and scheduled tests, together with maintenance work must be carried out by especially employed experts, or by a workshop authorised by the manufacturer, DIECI S.r.l. The employer/user of the machine must record the results of the tests and inspections in the Service Register, or ask specifi- cally trained personnel to record them. -
Page 211: Machine Details
MACHINE DETAILS Manufacturer: Dieci S.r.l. Model: ..................serial number ..........Year ......Attachment..............serial number ..........Year ........Max. capacity [kg]: .................................... Attachment ..............serial number ..........Year ........Max. capacity [kg]: ....................................Attachment..............serial number ..........Year ........Max. capacity [kg]: .................................... - Page 212 Mod. E.T. PEGASUS Maintenance and adjustment PAGE INTENTIONALLY LEFT BLANK FOR EDITING PURPOSES - CAUTION: D/58 - Read the SAFETY REGULATIONS (in this manual) carefully for the safety of all personnel and the machine.
-
Page 213: Record Of Scheduled Inspections And Maintenance Work
- CAUTION - - CAUTION - The maintenance work in bold type is considered Maintenance must be carried out by qualified personnel fundamental by DIECI for people’s safety. who must sign the scheduled maintenance report. - CAUTION: D/59 - Read the SAFETY REGULATIONS (in this manual) carefully for the safety of all personnel and the machine. - Page 214 Mod. E.T. PEGASUS Maintenance and adjustment PAGE INTENTIONALLY LEFT BLANK FOR EDITING PURPOSES - CAUTION: D/60 - Read the SAFETY REGULATIONS (in this manual) carefully for the safety of all personnel and the machine.
- Page 215 - CAUTION - - CAUTION - The maintenance work in bold type is considered Maintenance must be carried out by qualified personnel fundamental by DIECI for people’s safety. who must sign the scheduled maintenance report. - CAUTION: D/61 - Read the SAFETY REGULATIONS (in this manual) carefully for the safety of all personnel and the machine.
- Page 216 Mod. E.T. PEGASUS Maintenance and adjustment PAGE INTENTIONALLY LEFT BLANK FOR EDITING PURPOSES - CAUTION: D/62 - Read the SAFETY REGULATIONS (in this manual) carefully for the safety of all personnel and the machine.
- Page 217 - CAUTION - - CAUTION - The maintenance work in bold type is considered Maintenance must be carried out by qualified personnel fundamental by DIECI for people’s safety. who must sign the scheduled maintenance report. - CAUTION: D/63 - Read the SAFETY REGULATIONS (in this manual) carefully for the safety of all personnel and the machine.
- Page 218 Mod. E.T. PEGASUS Maintenance and adjustment PAGE INTENTIONALLY LEFT BLANK FOR EDITING PURPOSES - CAUTION: D/64 - Read the SAFETY REGULATIONS (in this manual) carefully for the safety of all personnel and the machine.
- Page 219 REGULAR MAINTENANCE SPECIAL MAINTENANCE Machine Job description Job accomplished working hours Date Signature Date Signature REGULAR MAINTENANCE SPECIAL MAINTENANCE Machine Job description Job accomplished working hours Date Signature Date Signature - CAUTION - - CAUTION - The tables must be completed clearly using Maintenance must be carried out by qualified personnel the spaces provided.
- Page 220 Mod. E.T. PEGASUS Maintenance and adjustment PAGE INTENTIONALLY LEFT BLANK FOR EDITING PURPOSES - CAUTION: D/66 - Read the SAFETY REGULATIONS (in this manual) carefully for the safety of all personnel and the machine.
- Page 221 REGULAR MAINTENANCE SPECIAL MAINTENANCE Machine Job description Job accomplished working hours Date Signature Date Signature REGULAR MAINTENANCE SPECIAL MAINTENANCE Machine Job description Job accomplished working hours Date Signature Date Signature - CAUTION - - CAUTION - The tables must be completed clearly using Maintenance must be carried out by qualified personnel the spaces provided.
- Page 222 Mod. E.T. PEGASUS Maintenance and adjustment PAGE INTENTIONALLY LEFT BLANK FOR EDITING PURPOSES - CAUTION: D/68 - Read the SAFETY REGULATIONS (in this manual) carefully for the safety of all personnel and the machine.
- Page 223 REGULAR MAINTENANCE SPECIAL MAINTENANCE Machine Job description Job accomplished working hours Date Signature Date Signature REGULAR MAINTENANCE SPECIAL MAINTENANCE Machine Job description Job accomplished working hours Date Signature Date Signature - CAUTION - - CAUTION - The tables must be completed clearly using Maintenance must be carried out by qualified personnel the spaces provided.
- Page 224 Mod. E.T. PEGASUS Maintenance and adjustment PAGE INTENTIONALLY LEFT BLANK FOR EDITING PURPOSES - CAUTION: D/70 - Read the SAFETY REGULATIONS (in this manual) carefully for the safety of all personnel and the machine.
-
Page 225: Electrical Diagrams And Circuits Electronic Engine
ELECTRICAL DIAGRAMS AND CIRCUITS Electronic engine... - Page 226 Mod. E.T. PEGASUS Electric wiring and system diagrams FUSE BOX KEY – DIA. N° 01171037 DESCRIPTION Q.TY DELAYED TIMER 3” 12V BASKET START ANTI-REP. CONTROL UNIT PRINTED CIRCUIT DIODES 1N 4007 BLACK DIODE P 600 M INTERMITTENCE 12 V BUZZER...
- Page 228 Mod. E.T. PEGASUS Electric wiring and system diagrams THIS PAGE HAS BEEN INTENTIONALLY LEFT BLANK FOR PRINTING PURPOSES...
- Page 229 FUSE BOX KEY – DIA. N° E25800-036 DESCRIPTION Q.TY Perkins Control unit CAR RADIO A110 RADIO REAR OUTRIGGER MICRO SWITCH FRONT OUTRIGGER MICRO SWITCH SPEED SENSOR B10 Air filter pressure sensor clogged FUEL LEVEL SENSOR B13 Hydraulic oil pressure sensor SEAT MICRO SWITCH BRAKE PRESSURE SWITCH ACCUMULATOR PRESSURE SWITCH MECHANICAL GEAR ENGAGED MICRO SWITCH B35 2nd MECHANICAL GEAR PRESSURE SWITCH ENGAGED...
- Page 230 Mod. E.T. PEGASUS Electric wiring and system diagrams FUSE BOX KEY – DIA. N° E25800-036 DESCRIPTION Q.TY PARKING BRAKE + START GEAR FUSE 7.5A ENGINE STOP + SEAT MICRO SWITCH FUSE 7.5A WARNING FUSE 7.5A REVOLVING LIGHT FUSE 7.5A RADIO FUSE 5A OPTIONAL FUSE CURRENT SOCKET FUSE 7.5A...
- Page 231 RIGHT REAR OUTRIGGER/ RIGHT REAR OUTRIGGER CROSS MEMBER POSTERIORE DX RIGHT REAR OUTRIGGER/ RIGHT REAR OUTRIGGER FEET DESCENT SOLENOID VALVE LEFT REAR OUTRIGGER/LEFT REAR OUTRIGGER FEET ASCENT SOLENOID VALVE LEFT REAR OUTRIGGER/ LEFT REAR OUTRIGGER FEET DESCENT SOLENOID VALVE OUTRIGGERS GENERAL SOLENOID VALVE/OUTRIGGERS DESCENT SELECTION PEGASUS 18/21 mt...
- Page 232 LOW. CAB LINE INTERFACE CON. WITH CONTROL UNIT LINE LEFT DASHBOARD LINE INTERFACE CONN. WITH LOW. CAB LINE. CURRENT SOCKET LOW. CAB LINE INTERFACE CONN. WITH PEGASUS TOWER LINE LOW. CAB LINE INTERFACE CONN. WITH ENGINE LINE LOW. CAB LINE INTERFACE CONN. WITH CONTROL UNIT LINE LOW.
- Page 233 WIRE COLOURS SKY BLUE WHITE ORANGE YELLOW GREY DARK BLUE BROWN BLACK PINK GREEN PURPLE NOTE: WIRES WITH TWO COLOURS ARE INDICATED BY COMBINING THE SYMBOLS ABOVE, FOR EXAMPLE: G/V - YELLOW/GREEN (HORIZONTAL STRIPES) Y-G- YELLOW-GREEN (VERTICAL STRIPES)
- Page 234 Mod. E.T. PEGASUS Electric wiring and system diagrams Valid certi ed copy only E/10...
- Page 235 Valid certi ed copy only E/11...
- Page 236 Mod. E.T. PEGASUS Electric wiring and system diagrams Valid certi ed copy only E/12...
- Page 237 Valid certi ed copy only E/13...
- Page 238 Mod. E.T. PEGASUS Electric wiring and system diagrams Valid certi ed copy only E/14...
- Page 239 Valid certi ed copy only E/15...
- Page 240 Mod. E.T. PEGASUS Electric wiring and system diagrams Valid certi ed copy only E/16...
- Page 241 Valid certi ed copy only E/17...
- Page 242 Mod. E.T. PEGASUS Electric wiring and system diagrams Valid certi ed copy only E/18...
- Page 243 Valid certi ed copy only E/19...
- Page 244 Mod. E.T. PEGASUS Electric wiring and system diagrams CONTROL BOX RELAY DISTRIBUTOR EXTENSION SIGNAL 1 OUTRIGGERS 1 LOWERED OUTRIGGERS MOVEMENT LIFTING SIGNAL 2 ANTI-TIPPING EXCLUSION SERVICES SIGNAL 3 ROTATION SIGNAL 4 SWIVEL SIGNAL 5 12V DISTRIBUTOR (+GEN SOL. VALVE) OARD 12 V POWER SUPPLY...
- Page 245 CONTROL BOX RELAY E/21...
- Page 246 Mod. E.T. PEGASUS Electric wiring and system diagrams Cabin Circuit board Valid certi ed copy only E/22...
- Page 247 Radio control Upper Arm lamp Arm Low Circuit board Midac Valid certi ed copy only E/23...
- Page 248 Mod. E.T. PEGASUS Electric wiring and system diagrams By pass Plug Arm's Head Circuit Board Joystick Valid certi ed copy only E/24...
- Page 249 Distributor valve Main valve Lifting Rotation Boom Forks Radio control Circuit Board Valid certi ed copy only E/25...
- Page 250 Mod. E.T. PEGASUS Electric wiring and system diagrams E/26...
- Page 251 THIS PAGE HAS BEEN INTENTIONALLY LEFT BLANK FOR PRINTING PURPOSES E/27...
- Page 252 Mod. E.T. PEGASUS Electric wiring and system diagrams Valid certified copy only E/28...
- Page 253 Valid certified copy only E/29...
- Page 254 Mod. E.T. PEGASUS Electric wiring and system diagrams THIS PAGE HAS BEEN INTENTIONALLY LEFT BLANK FOR PRINTING PURPOSES E/30...
- Page 255 ELECTRICAL DIAGRAMS AND CIRCUITS Mechanical Engine 38.16_400° E/31...
- Page 256 Mod. E.T. PEGASUS Electric wiring and system diagrams FUSE BOX KEY – DIA.N° 01171037 DESCRIPTION DELAYED TIMER 3” 12V BASKET START ANTI-REP. CONTROL UNIT PRINTED CIRCUIT DIODES 1N 4007 BLACK DIODE P 600 M INTERMITTENCE 12 V BUZZER POWER TERMINAL M6...
- Page 257 E/33...
- Page 258 Mod. E.T. PEGASUS Electric wiring and system diagrams THIS PAGE HAS BEEN INTENTIONALLY LEFT BLANK FOR PRINTING PURPOSES E/34...
- Page 259 BASE SYSTEM KEY - DIA. N° E25800-038F_38.16_400° (mechanical motor) NAME DESCRIPTION SHEET PRE-HEATING CONTROL UNIT ELECTRONIC ACCELERATOR B23a MOTOR WATER THERMAL CONTACT B23b IGNITION PLUG THERMISTOR FUEL LEVEL INDICATOR SENSOR B23as WATER TEMPERATURE INSTRUMENT THERMOSTAT MOTOR OIL PRESSRE SWITCH SEAT MICRO SWITCH BRAKE PRESSURE SWITCH ACCUMULATOR PRESSURE SWITCH REAR OUTRIGGER MICRO SWITCH...
- Page 260 Mod. E.T. PEGASUS Electric wiring and system diagrams BASE SYSTEM KEY - DIA. N° E25800-038F_38.16_400° (mechanical motor) NAME DESCRIPTION SHEET HEATING FAN FUSE 15A PARKING BRAKE + START GEAR FUSE 7.5A ENGINE STOP + SEAT MICRO SWITCH FUSE 7.5A WARNING FUSE 7.5°...
- Page 261 BASE SYSTEM KEY - DIA. N° E25800-038F_38.16_400° (mechanical motor) NAME DESCRIPTION SHEET RUNNING MOTOR FREQUENCY RELAY JOYSTICK SWITCH RELAY K401 OPTIONAL REVS VARIATION CONTROL UNIT Fan 3rd speed relay STARTER MOTOR REAR WINDSCREEN WIPER MOTOR FRONT WINDSCREEN WIPER MOTOR REAE WINDSCREEN WASHER PUMP FRONT WINDSCREEN WASHER FAN MOTOR Air conditioner motor...
- Page 262 LEFT FRONT OUTRIGGER/LEFT FRONT OUTRIGGER FEET DESCENT SOLENOID VALVE RIGHT REAR OUTRIGGER/RIGHT REAR OUTRIGGER FEET ASCENT SOLENOID VALVE LEFT FRONT OUTRIGGER/LEFT REAR OUTRIGGER FEET ASCENT SOLENOID VALVE OUTRIGGERS GENERAL SOLENOID VALVE/OUTRIGGERS DESCENT SELECTION PEGASUS 18/21mt RIGHT REAR AXLE LOCK SOLENOID VALVE LEFT REAR AXLE LOCK SOLENOID VALVE.
- Page 263 BASE SYSTEM KEY - DIA. N° E25800-038F_38.16_400° (mechanical motor) NAME DESCRIPTION SHEET INTERFACE CONNECTOR L. DRIVER POSITION - L. LEFT DASHBOARD INTERFACE CONNECTOR L. DRIVER POSITION - L. LEFT DASHBOARD LOW BOOM BY PASS CONNECTOR BASKET LINE CONNECTOR INTERFACE CONNECTOR L DRIVER POSITION - JOINT INTERFACE CONNECTOR L DRIVER POSITION - JOINT CONNECTOR L.
- Page 264 Mod. E.T. PEGASUS Electric wiring and system diagrams Valid certified copy only E/40...
- Page 265 Valid certified copy only E/41...
- Page 266 Mod. E.T. PEGASUS Electric wiring and system diagrams Valid certified copy only E/42...
- Page 267 Valid certified copy only E/43...
- Page 268 Mod. E.T. PEGASUS Electric wiring and system diagrams Valid certified copy only E/44...
- Page 269 Valid certified copy only E/45...
- Page 270 Mod. E.T. PEGASUS Electric wiring and system diagrams Valid certified copy only E/46...
- Page 271 Valid certified copy only E/47...
- Page 272 Mod. E.T. PEGASUS Electric wiring and system diagrams Valid certified copy only E/48...
- Page 273 Valid certified copy only E/49...
- Page 274 Mod. E.T. PEGASUS Electric wiring and system diagrams Circuit board Cabin Valid certified copy only E/50...
- Page 275 Radio control Upper Arm lamp Arm Low Circuit board Midac Valid certified copy only E/51...
- Page 276 Mod. E.T. PEGASUS Electric wiring and system diagrams By pass Plug Arm's Head Circuit Board Joystick Valid certified copy only E/52...
- Page 277 Distributor valve Main valve Lifting Rotation Boom Forks Speed Rotation Regulator Radio control Circuit Board Valid certified copy only E/53...
- Page 278 Mod. E.T. PEGASUS Electric wiring and system diagrams THIS PAGE HAS BEEN INTENTIONALLY LEFT BLANK FOR PRINTING PURPOSES E/54...
- Page 279 E/55...
- Page 280 Mod. E.T. PEGASUS Electric wiring and system diagrams Valid certified copy only E/56...
- Page 281 Valid certified copy only E/57...
- Page 282 Mod. E.T. PEGASUS Electric wiring and system diagrams Valid certified copy only E/58...
- Page 283 Hydraulic circuit - CAUTION: - Read the SAFETY REGULATIONS (in this manual) carefully for the safety of all personnel and the machine.
- Page 284 Mod. E.T. PEGASUS Hydraulic system THIS PAGE HAS BEEN INTENTIONALLY LEFT BLANK FOR PRINTING PURPOSES - CAUTION: - Read the SAFETY REGULATIONS (in this manual) carefully for the safety of all personnel and the machine.
- Page 285 Has not been read and understood. any arbitrary modiFication made to tHe veHicle will absolve dieci From all liability For damage or injury resulting From sucH modiFication. to guarantee your saFety and tHat oF otHers, do not modiFy tHe...
- Page 286 Mod. E.T. PEGASUS Hydraulic system - CAUTION: - Read the SAFETY REGULATIONS (in this manual) carefully for the safety of all personnel and the machine.
- Page 287 - CAUTION: - Read the SAFETY REGULATIONS (in this manual) carefully for the safety of all personnel and the machine.
- Page 288 Mod. E.T. PEGASUS Hydraulic system - CAUTION: - Read the SAFETY REGULATIONS (in this manual) carefully for the safety of all personnel and the machine.
- Page 289 - CAUTION: - Read the SAFETY REGULATIONS (in this manual) carefully for the safety of all personnel and the machine.
- Page 290 Mod. E.T. PEGASUS Hydraulic system - CAUTION: - Read the SAFETY REGULATIONS (in this manual) carefully for the safety of all personnel and the machine.
- Page 291 - CAUTION: - Read the SAFETY REGULATIONS (in this manual) carefully for the safety of all personnel and the machine.
- Page 292 Mod. E.T. PEGASUS Hydraulic system THIS PAGE HAS BEEN INTENTIONALLY LEFT BLANK FOR PRINTING PURPOSES - CAUTION: F/10 - Read the SAFETY REGULATIONS (in this manual) carefully for the safety of all personnel and the machine.
- Page 293 TECHNICAL DATA TECHNICAL SPECIFICATIONS...
- Page 294 Mod. E.T. PEGASUS Technical data PAGE INTENTIONALLY LEFT BLANK FOR EDITING PURPOSES...
- Page 295 CAUTION An operator on the ground must be present while the basket is being used. CAUTION To use attachments, consult the capacity diagrams. CAUTION To use attachments with radio control, read the instructions in the enclosed manual. CAUTION To use attachments with the load limiting device (with display) (optional), read the instructions in the enclosed manual.
- Page 296 The information contained in the present publication is only intended as an indication; the models described may be modified, without notice, by the manufacturer, drawings and photographs may refer to optional equipment or to particular specifications for other countries. For any further information, please contact DIECI headquarters at the address given below.
- Page 297 Pegasus 38.16 MAX 2,3 ton MAX 3,8 ton MAX 3,2 ton 15,70 70° 15,50 70° 60° 60° 13,80 70° 50° 60° 50° 40° 40° 50° 30° 30° 40° 20° 20° 30° 10° 20° 10° 10° 0° 0° 0° 13,4 13,4...
- Page 298 Mod. E.T. PEGASUS Technical data...
- Page 300 Mod. E.T. PEGASUS Technical data...
- Page 302 Mod. E.T. PEGASUS Technical data G/10...
- Page 303 G/11...
- Page 304 Mod. E.T. PEGASUS Technical data G/12...
- Page 305 G/13...
- Page 306 Mod. E.T. PEGASUS Technical data G/14...
- Page 307 G/15...
- Page 308 Mod. E.T. PEGASUS Technical data G/16...
- Page 309 G/17...
- Page 310 Mod. E.T. PEGASUS Technical data G/18...
- Page 311 G/19...
- Page 312 Mod. E.T. PEGASUS Technical data G/20...
- Page 313 G/21...
- Page 314 Mod. E.T. PEGASUS Technical data G/22...
- Page 315 ALFABETICAL INDEX "A" Air filter ................................D/25 Air reCirCUlAtiON ............................C/47 AlArMS .................................C/82 AligNMeNt (StANDArD) ............................C/40 ANgle AND eXteNSiON trANSDUCer AlArM ....................C/83 ANti rOll-OVer DeViCe ...........................C/37 APPeNDiX: WiriNg DiAgrAMS ..........................C/81 ASHtrAY................................C/10 AttACHMeNt AND OPerAtiNg MODe DiSPlAY ....................C/75 AttACHMeNt AND OPerAtiNg MODe SeleCtiON ..................C/76 "B"...
- Page 316 Mod. E.T. PEGASUS Alfabetical index eMergeNCY BUttON ............................C/27 eMergeNCY eXit ..............................C/9 eMergeNCY ligHtS SeleCtOr ........................C/43 eNgiNe ..................................D/14 eNgiNe rADiAtOr ..............................D/23 errOr liSt ................................C/65 eVAlUAtiNg tHe CONSiSteNCY Of tHe SUBSOil ..................B/33 eXterNAl BOOM CHAiNS ..........................D/40 eXterNAl COMPONeNtS ............................C/7 "F" fASt/SlOW geAr SWitCH ..........................C/26 fire PreVeNtiON ...............................B/21...
- Page 317 MAiN WOrK DAtA ..............................C/73 MAiNteNANCe ..............................C/53 MAiNteNANCe ..............................C/53 MAiNteNANCe AND ADJUStMeNt SCHeDUle ....................D/10 MAiNteNANCe regUlAtiONS ..........................D/3 MANUAl eleCtrONiC ACCelerAtOr ......................C/43 MANUAl MeCHANiCAl ACCelerAtOr (PegASUS 38.16) ................C/44 MANUfACtUrer’S firSt teSt StAteMeNt .....................D/5 MAX 180W POWer OUtlet ..........................C/10 MiDAC AlArMS ..............................C/79 MUltifUNCtiON leVer ............................C/23 "N"...
- Page 318 StOriNg DANgerOUS flUiDS ........................B/27 StOriNg tHe MACHiNe/PrOlONgeD iNACtiVitY ..................B/19 "T" teCHNiCAl DOCUMeNt COMPArtMeNt ......................C/11 teleSCOPiC BOOM reCOVerY PegASUS 38.16 ..................C/49 tHe DriVer’S CAB ...............................B / 6 tHe DriVer’S CAB .............................B/37 tigHteNiNg tHe WHeel NUtS ........................B/25 tOrQUe tABle fOr HYDrAUliC fittiNgS ....................D/52 tOWiNg tHe MACHiNe ............................C/50...
- Page 320 - Via E. Majorana, 2-4 - 42027 Montecchio Emilia (RE) ITALY Tel. +39 0522 869611 - Fax . S A T +39 0522 869744 www.dieci.com - E-mail: service@dieci.com...
Need help?
Do you have a question about the Pegasus and is the answer not in the manual?
Questions and answers
Перечень работ при выполнении частичного технического обслуживания и полного технического обслуживания
The maintenance tasks for Dieci Pegasus include:
Partial Technical Service:
- Clean diesel injection pump filter
- Replace hydraulic system oil
- Replace oil tank pre-filter
- Replace external hydraulic oil filter
- Check oil level in differential sump
- Check oil level in epicyclic reduction gears
- Check gear oil level
- Check turret rotation reduction gear oil level
- Tighten boom sliding blocks
- Check chain tension
Full Technical Service (Special Maintenance):
- Replace the coolant
- Replace oil in differential sump
- Replace oil in epicyclic reduction gears
- Replace gear oil
Maintenance must be performed by qualified personnel and comply with DIECI’s service schedule to ensure machine safety and performance.
This answer is automatically generated
КАК ПРОДЛИТЬ СРОК ЭКСПЛУАТАЦИИ?
To extend the lifespan of a Dieci Pegasus, follow these maintenance steps:
1. Regular Water Purifier Maintenance: Change the water every 8 working hours and clean the purifier every 300 working hours. Use the TAM additive to keep it clean and improve performance.
2. Engine Maintenance: Check and maintain the FPT (Fiat Powertrain Technology) engine, which includes monitoring the oil dipstick, fuel filter, and oil filter.
3. Cooling System Care: Ensure the radiator at the back is clean and functioning properly.
4. Transmission and Axles: Maintain the hydrostatic transmission (0-40 km/h) and Dyna Spicer axles, which include oil bath braking systems.
5. Follow Safety Regulations: Adhere to all safety guidelines in the manual to prevent damage and ensure safe operation.
By performing these regular maintenance tasks, the machine's lifespan and efficiency can be maximized.
This answer is automatically generated
Добрый день! Хочу поинтересоваться, можно ли заказать у вас Руководство по эксплуатации DIECI PEGASUS 40.25 ?