
Summary of Contents for Tieline i-Mix G3 TLM 600
- Page 1 TLM 600 Integrated Mixer-CODEC Main Operation Manual i-Mix G3 Reference Manual Version 11.0 Software Version: Tieline Toolbox V.4.13.20 RPTP version 99 Firmware Version: 1.6.00; RPTP version 99 October, 2007...
-
Page 2: Table Of Contents
2.3......................14 2.4....................14 AVIGATION 2.5..................14 OFTWARE 2.6.......................14 YPERLINKS SECTION 3. WELCOME TO OUR REVOLUTION ..........16 SECTION 4. INTRODUCTION TO TIELINE CODECS ......... 18 4.1. 1.4.............19 EATURES IN ELEASE ERSION 4.2. 1.6.............20 EATURES IN ELEASE ERSION 4.3. -
Page 3: Page
15.11. LCD D ......100 NITIAL ONNECTION TATE OF ODEC ISPLAYS 15.12......102 NITIATING ANUAL ONNECTIONS IALING A UMBER 15.13. ISDN C ..............107 ANUAL ONNECTIONS Tieline Page 3 T E C H N O L O G Y... - Page 4 ELATIONSHIP BETWEEN ONFIGURATION ILES ROFILES AND ....................... 169 ATRICES 19.2. D ........... 170 IFFERENT ODEC ONFIGURATION ILES 19.3. S ..... 171 AVE AND UNCTIONS OF ONFIGURATION ILES Tieline Page 4 T E C H N O L O G Y...
-
Page 5: Page
....................214 AMPLERATE 22.12............214 LGORITHM ONNECTION ATRIX 22.13.......... 217 ORTS AND ODEC CHANNELS VERVIEW 22.14................219 HONEBOOK UMBERS 22.15..................220 UTOMATIC EDIAL Tieline Page 5 T E C H N O L O G Y... -
Page 6: Page
25.7. DN1, DN2 MSN N ..............244 UMBERS 25.8. A ....................245 UTO ANSWER 25.9. P ................245 HANTOM OWER ETECT 25.10..............245 ANUAL EFAULT LGORITHM Tieline Page 6 T E C H N O L O G Y... - Page 7 UNCTION 31.2. A ..................273 CTIVATION 31.3. S .............. 283 CTIVATION XAMPLES 31.4. T ...................... 284 31.5. P ................298 RESET UNCTIONS 31.6. E ....................303 UNCTION Tieline Page 7 T E C H N O L O G Y...
-
Page 8: Page
................326 TORING THE HONEBOOK SECTION 37. TROUBLESHOOTING TIPS ............328 37.1. POTS T ................328 ROUBLESHOOTING 37.2. ISDN T ................329 ROUBLESHOOTING 37.3. GSM T ................330 ROUBLESHOOTING Tieline Page 8 T E C H N O L O G Y... - Page 9 68 ..................348 PPENDIX 4.3. IC ....................... 349 PPENDIX 4.4. CE & CE T ................... 349 PPENDIX APPENDIX 5. CODEC SPECIFICATIONS............350 APPENDIX 6. CREDIT NOTICES .................351 INDEX...........................352 Tieline Page 9 T E C H N O L O G Y...
- Page 10 IGURE ET FACTORY DEFAULTS DROP DOWN MENU 49: T B (M .........185 IGURE ANUAL EFAULT ROGRAM ATRIX 50: T ‘M ’ ........186 IGURE ROFILE ANUAL EFAULT RESETS Tieline Page 10 T E C H N O L O G Y...
- Page 11 HANGE ONFIRMATION ESSAGE 95: P .................325 IGURE HONEBOOK DITOR IN 96: F D15 I ..............341 IGURE EMALE NTERFACE ONNECTOR 97: M D15 I ...............341 IGURE NTERFACE ONNECTOR Tieline Page 11 T E C H N O L O G Y...
- Page 12 ............340 ABLE ATA AND NTERFACE ONNECTOR 23: X.21 P D-15 C ............340 ABLE OUTS FOR ONNECTORS 24: XLR 4 P ..............343 ABLE OWER ONNECTOR Tieline Page 12 T E C H N O L O G Y...
-
Page 13: Section 1. Safety Notices And Warnings
ANY DAMAGE TO A TIELINE PRODUCT CAUSED BY LIGHTNING or an ELECTRICAL STORM WILL VOID THE WARRANTY. WARNING: DIGITAL PHONE SYSTEMS DO NOT CONNECT YOUR CODEC TO A DIGITAL PHONE SYSTEM. -
Page 14: Section 2. Manual Conventions
If you are reading this document on a PC, within it there are many hyperlinks to websites or to other related bookmarked elements within the manual. These are characterized by being underlined as in the following example: Connection Setup Tieline Page 14 T E C H N O L O G Y... - Page 15 Ctrl key on your keyboard and click the left mouse button. This will take you to the hyperlink destination. Tieline Page 15 T E C H N O L O G Y...
-
Page 16: Section 3. Welcome To Our Revolution
A PC GUI (Graphical User Interface) can be connected to the 1RU codec, providing flexibility in controlling the codec and saving rack space in the studio. codec family specifications can be found at http://www.tieline.com ieline is an integrated 5 channel mixer and award winning studio ieline quality POTS, ISDN, GSM, 3G/IP, IP and X.21 codec. - Page 17 The is the perfect ieline solution for remote broadcasters. In the audio broadcast revolution - hearing is believing… welcome to our revolution! Tieline Page 17 T E C H N O L O G Y...
-
Page 18: Section 4. Introduction To Tieline Codecs
Help us to help you: We value feedback from our customers and encourage you to help us make your job easier by emailing any suggestions on how we can improve this reference manual to support@tieline.com Tieline Page 18... -
Page 19: Features In Release Version 1.4. Xx
The phone input can be routed to the codec analog outputs via the Audio menu by pressing only); Softkey 1 AES/EBU functionality is fully integrated ( rack unit COMMANDER only); and X.21/V.35 functionality is fully integrated. Tieline Page 19 T E C H N O L O G Y... -
Page 20: Features In Release Version 1.6. Xx
How to order the right 3G data plan; 3G Antennae: how and what to select for the module purchased, i.e. EV- DO versus UMTS/HSDPA USB module use: Tieline Page 20 T E C H N O L O G Y... - Page 21 A Toolbar provides the ability to restore minimised windows. Caveats: - Supports multiple TCP connections but with only 1 UDP, 1 Serial or 1 USB connection at the same time. Tieline Page 21 T E C H N O L O G Y...
-
Page 22: 4.3. Features Of The I-Mix G3
Interface Connector for PC connection. RS232 PC interface connector. 10/100 interface with individual MAC address. Fast and easy configuration using the Box software running ieline Tool Windows ® 98/2000/XP. Tieline Page 22 T E C H N O L O G Y... -
Page 23: Data Options Available
This can be solved by turning off the ‘session data’ stream sent by the Tieline codec. To do this select [Menu] > [Configuration] > [System Settings] > [Session Data] > [Disable]. Please note that this is a global setting and will also affect all POTS, and IP connections on the codec. -
Page 24: Compatibility Across The G3 Range Of Codecs
Box and Your Codec to Work Together.) Tool Backward Compatibility Tip: If you want to connect your to a or to an COMMANDER COMMANDER -Mix Music you will need to use the algorithm. Tieline Page 24 T E C H N O L O G Y... -
Page 25: Section 5. Codec Controls And Connections
Go to Table of Contents Section 5: Controls and Connections for the I-Mix G3 Section 5. Codec Controls and Connections ISDN/POTS/ GSM/X.21/3G Expansion slot for interchangeable modules. ieline Tieline Page 25 T E C H N O L O G Y... -
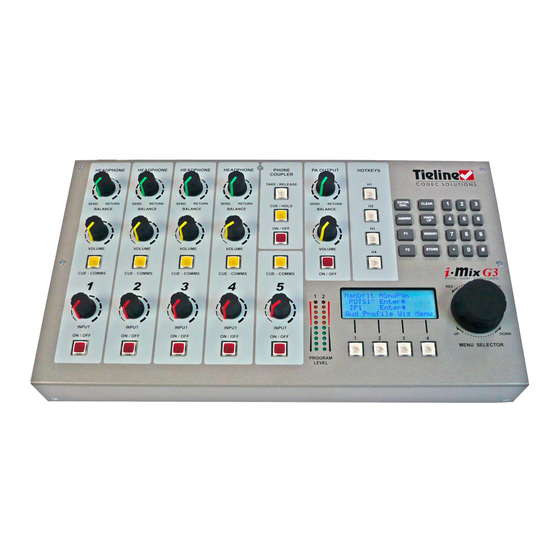
Page 26: Figure 1: I -Mix G3 Frontp
In this case DIAL Illuminated red when channel is Programmable buttons for one press an auxiliary input. MEMORY [MENU] active. initialization of User Functions. Tieline Page 26 T E C H N O L O G Y... -
Page 27: Figure 2: Rear Paneld
Go to Table of Contents Section 5: Controls and Connections for the I-Mix G3 Figure 2: Rear Panel Detail of the i-Mix G3Rear Panel Detail of the Tieline I-Mix G3 POTS HEADPHONE OUTPUTS. INPUT CONNECTORS The codec has 5 inputs that will RJ 11 Plain Old Industry Standard RTS connectors. -
Page 28: Section 6. New Codec Menu Wizards
If the flashing brackets are navigated over the current MENU SELECTOR (MS) selection (displaying arrows) then the brackets and arrows will flash intermittently between one and then the other. Tieline Page 28 T E C H N O L O G Y... -
Page 29: Module Indicator Arrows
POTS connections are displayed on an -Mix screen. Onboard POTS connection via rear codec RJ11 POTS module in right side of the codec. Figure 5: i-Mix G3 Menu Screen Module Indicator Arrows Tieline Page 29 T E C H N O L O G Y... -
Page 30: Codec Module Options
The next section of this manual explains how to get connected quickly using the manual default profiles supplied with your codec, depending on what modules you have installed into your codec. Tieline Page 30 T E C H N O L O G Y... -
Page 31: Section 7. Quick Start: Connecting Quickly Using Manual Default Profiles
If you are using your codec in places where MSN numbers (Multiple Subscriber Numbers) are used, enter the MSN number in the DN1 and DN2 menu in the codec. Tieline Page 31 T E C H N O L O G Y... -
Page 32: 7.1. Step 1: Set Audio Configuration Settings
(etc) are functioning correctly. Tieline Page 32 T E C H N O L O G Y... -
Page 33: Figure 6: Codec Audio Menu
Go to Table of Contents Section 7: Quick Start 7.1.1. Codec Audio Menu Figure 6: Codec Audio Menu Structure Tieline Page 33 T E C H N O L O G Y... -
Page 34: 7.2. Step 2: Select A Profile
The bandwidth of one 64kb ISDN B channel and one satellite ISDN connection can be Connection 2 Manual Default Stereo split to deliver two 15kHz signals. (See of the profile in Connection Setup Profile Editor section of the in Tool Tieline Page 34 T E C H N O L O G Y... - Page 35 In addition, it is very important to note that remote control of a codec is not Music, Music Plus Voice G3 possible unless you are using either the algorithms. Tieline Page 35 T E C H N O L O G Y...
-
Page 36: 7.3. Step 3: Change Connection Settings
We then complete this section of the manual with quick start connection procedures for each manual default profile and connection type. Tieline Page 36 T E C H N O L O G Y... -
Page 37: Figure 8: Pots Menuc
Go to Table of Contents Section 7: Quick Start 7.3.1. New POTS Wizard Figure 8: POTS Menu Configuration Wizards Tieline Page 37 T E C H N O L O G Y... -
Page 38: Figure 9: Isdn Menuc
Go to Table of Contents Section 7: Quick Start 7.3.2. New ISDN Wizard Figure 9: ISDN Menu Configuration Wizard Tieline Page 38 T E C H N O L O G Y... -
Page 39: Figure 10: Gsm Menuc
Go to Table of Contents Section 7: Quick Start 7.3.3. New GSM Wizard Figure 10: GSM Menu Configuration Wizard Tieline Page 39 T E C H N O L O G Y... -
Page 40: Figure 11: Ip Menuc
Go to Table of Contents Section 7: Quick Start 7.3.4. New IP Wizard Figure 11: IP Menu Configuration Wizard Tieline Page 40 T E C H N O L O G Y... -
Page 41: Figure 12: 3G Wizard
Go to Table of Contents Section 7: Quick Start 7.3.5. 3G Wizard Figure 12: 3G Wizard Tieline Page 41 T E C H N O L O G Y... -
Page 42: Figure 13: X.21 Menu Wizard
Go to Table of Contents Section 7: Quick Start 7.3.6. New X.21 Wizard Figure 13: X.21 Menu Wizard Tieline Page 42 T E C H N O L O G Y... - Page 43 The codec audio connection bit rate setting; Forward Error Correction settings; Jitter-buffer millisecond settings; and The profile you wish to select (i.e. Mono, Stereo, Dual Mono or Mono IFB.) Tieline Page 43 T E C H N O L O G Y...
-
Page 44: In Module
Dual mono MP2 is not possible over IP or 3G/IP. There is only one plug- i-Mix in module slot in an so dual mono MP2 audio cannot be sent using an X.21 interface with this codec. Tieline Page 44 T E C H N O L O G Y... - Page 45 [ISDN/IP/X.21], all connection bit rates are displayed for selection. Whereas in the connection wizard only relevant algorithm and sample rate settings are available in order to optimize the quality of connections. Tieline Page 45 T E C H N O L O G Y...
-
Page 46: Table 2: Isdn Mpeg 2 L
16kHz 24kHz 32kHz 48kHz MP2-Dual 128K 192k 256K 384K 768K 1.5M 16kHz 24kHz 32kHz 48kHz MP2- JStereo 128K 192k 256K 384K 768K 1.5M 16kHz 24kHz 32kHz 48kHz Tieline Page 46 T E C H N O L O G Y... -
Page 47: Figure 14: X.21 Mpeg 2 L
Please note: FEC is not currently offered for use with MPEG algorithms. It is scheduled to be incorporated in future software releases. Please check at support@tieline.com for details of the implementation date of this feature. In addition, the default connection bit rate for MP2 algorithms is 64kbps over IP. -
Page 48: Table 3: Algorithmc
Using Voice G3, there is no need to negotiate higher than 14.4 or 16.8kbps to maximize audio quality. Staying at lower bit-rates improves link stability over TCP. Only available over a point-to-point crossover cable (i.e. CAT 5) and using high quality LAN switching. Tieline Page 48... - Page 49 It is very important to note that remote control function of a codec is not possible unless you are using the Music, MusicPlus Voice G3 algorithms. Tieline Page 49 T E C H N O L O G Y...
- Page 50 Go to Table of Contents Section 7: Quick Start Tieline G3 Codec - Profile / Algorithm Matrix Voice MP2 J- Music Music Other G.711 G.722 Mono Dual Stereo Stereo Audio Plus POTS ManDflt MonoPgm ManDflt Mono/IFB ManDflt Stereo ManDflt DualPgm...
-
Page 51: Table 4: Profile , A
ManDflt MonoPgm ManDflt Mono/IFB ManDflt Stereo ManDflt DualPgm = Not recommended for use on TLF300 and TLR300 using new POTS G3 Module Tieline G3 Codec - Sample Rate / Algorithm Matrix Voice MP2 J- Music Music Other G.711 G.722 Mono... -
Page 52: Table 5: Dual Monop
Go to Table of Contents Section 7: Quick Start 7.3.10. Dual Mono Program: Valid Algorithm Combinations Table 5: Dual Mono Program Algorithm Matrix Tieline Page 52 T E C H N O L O G Y... -
Page 53: 7.4. Getting Connected
It will also automatically upgrade all USB modules to version 1.0.9, which supports UMTS, HSDPA & EV-DO 3G connections. Tieline Page 53 T E C H N O L O G Y... -
Page 54: 7.5. 10 Simple Steps To Connect Tieline Codecs
Go to Table of Contents Section 7: Quick Start 7.5. 10 Simple Steps to Connect Tieline Codecs Use the black rotary to scroll through menus and press it to MENU SELECTOR (MS) select menu items. If more detailed connection information is required, please see the ‘Quick Start’... - Page 55 If you connect with IP, 3GIP or SIP, please download the “IP and 3GIP Streaming Reference Manual” from the website at www.tieline.com . ieline If you continue to have difficulty connecting, contact at support@tieline.com for...
- Page 56 100 volts. Connection of a POTS codec to a voltage greater than the ieline normal 50 volts will cause damage to a POTS codec and void the warranty. Tieline Page 56 T E C H N O L O G Y...
-
Page 57: 7.6. 3G/Umts Ip Connections
7. Try to maintain a link quality (LQ) reading for your connection of between 70% and 100%.To negotiate higher bit-rates press “F2” then “3”; for lower bit-rates press Tieline Page 57 T E C H N O L O G Y... - Page 58 Alternatively, check the 3G section on our website at www.tieline.com for a list of compatible devices. Tieline Page 58 T E C H N O L O G Y...
-
Page 59: 7.7. Remote Control Of Input Controls
Box software installed on it, you can Tool configure remote control settings for all codec inputs using this software. See the Box section of this manual titled Remote Control for more details. Tool Tieline Page 59 T E C H N O L O G Y... -
Page 60: Configuring Remote Control
[Setup Remote Ctrl] > [Gang Inputs] > [Gang Input 2 To] > [Knob 1]. How easy was that! Now when input 1 on the master codec adjusts the gain setting on input 1 Tieline Page 60 T E C H N O L O G Y... -
Page 61: Adjusting Local (Master Codec) And Remote (Slave Codec) Input Levels When In Remote Control Channel Mode
SOFTKEY 4 Menu scroll to and select [Remote Controls] > [Reset Remote Control] > [Yes]. Following is a complete menu structure for the Remote Controls menu in ieline codecs. Tieline Page 61 T E C H N O L O G Y... -
Page 62: Codec Remote Control Menu Structure
Go to Table of Contents Section 7: Quick Start 7.12. Codec Remote Control Menu Structure Figure 17: Remote Control Codec Menus Tieline Page 62 T E C H N O L O G Y... -
Page 63: Section 8. Pots Operation And Usage Tips: How It Works
Go to Table of Contents Section 8: POTS Operation and Usage Tips Section 8. POTS Operation and Usage Tips: How it works All analogue audio inputs are digitized by a high quality stereo 24-bit analogue-to- digital (A to D) converter. This serial data stream is then fed to an extremely fast 32- bit Digital Signal Processor (DSP) that encodes the audio data using the ieline proprietary digital audio compression algorithm. -
Page 64: 8.2. Modem Negotiation And Line Quality For Pots Mode
Go to Table of Contents Section 8: POTS Operation and Usage Tips 8.2. Modem Negotiation and Line Quality for POTS Mode sends and receives high-speed digital information over a standard telephone line via an internal modem or a POTS module. A COMMANDER uses POTS modules only. -
Page 65: Private Branch Exchanges (Pbx), Private Automatic Branch Exchanges (Pabx), Business Systems
Go to Table of Contents Section 8: POTS Operation and Usage Tips 8.5. Private Branch Exchanges (PBX), Private Automatic Branch Exchanges (PABX), Business Systems Avoid connecting a codec to a PBX, PABX, Key station, business system ieline or any other local switchboard. Easily said, the tricky bit is working out if you are on one of these systems. -
Page 66: 8.7. Earth Leakage Problems On The Line
Go to Table of Contents Section 8: POTS Operation and Usage Tips As an example, a POTS service has been provided to a customer a long way from the CO, this customer has since moved on. The phone company needs to provide a phone service in the same area, but closer to the CO. -
Page 67: 8.9. Tips For Successful Operation
Go to Table of Contents Section 8: POTS Operation and Usage Tips Warning on Digital Phone Systems: Digital phone systems typically run off voltages greater than the 50 volts used by the PSTN. Some older ISDN systems run on approx 100 volts. Connection of a POTS codec to a voltage ieline greater than the normal 50 volts will cause damage to a POTS codec and void... -
Page 68: Pots Versus New Pots G3 Modules
Go to Table of Contents Section 8: POTS Operation and Usage Tips 8.10. POTS versus new POTS G3 Modules has a new POTS module called a POTS G3 module. The new module is ieline distinguishable from the old one because the original DAA module has been removed –... -
Page 69: Stability Of Tieline Pots Modules
POTS module, not a POTS G3 module. Dial this connection second for bonded connections). 8.11. Stability of Tieline POTS Modules Both POTS modules create stable connections because they measure the ieline amount of fluctuation in line quality before working out the optimal bit-rate setting to connect at. -
Page 70: Figure 20: New Pots G3 M
Go to Table of Contents Section 8: POTS Operation and Usage Tips Recommendation When possible we recommend that you use the same pair of modules when connecting between two codecs. This is not always possible, so please note the following differences in dialing with different module combinations. 8.11.2. -
Page 71: Summary
Go to Table of Contents Section 8: POTS Operation and Usage Tips maximum of 28,800bps (depending on modem handshaking). The codec will then renegotiate the link downwards to the highest possible bit rate where line quality is greater than 70%. 8.11.4. - Page 72 USA POTS test number 317 913 6911, and the ieline codec’s Line Quality Display is there to help you test your codec. If you need any assistance in setting up your codec, you can contact us at support@tieline.com Page 72 ieline...
-
Page 73: Section 9. Isdn
Go to Table of Contents Section 9: ISDN Section 9. ISDN The acronym ISDN stands for Integrated Services Digital Network. The Basic Rate Interface (BRI) of ISDN consists of 2 bearer (B) channels at 64 Kbps each and 1 data (D) channel at 16 Kbps, i.e. -
Page 74: 9.3. How Do I Install The Isdn Module
U ISDN module will be required. You can ring your telecommunications ieline provider to ask if you’re not sure. In Japan, you will need the S/T ISDN module. ieline North America 'U' interface European 'S' interface Tieline Part Tieline Part Model Model Number Number Commander Commander... -
Page 75: 9.4. Connecting Over Isdn
Go to Table of Contents Section 9: ISDN 9.4. Connecting over ISDN The following information is intended to provide users with the necessary tools to make successful ISDN calls on codecs under a variety of ISDN line ieline conditions 9.4.1. Important Settings First, it is important to know what Wizard settings are available to configure ISDN. - Page 76 Go to Table of Contents Section 9: ISDN The full and expanded codec ISDN menu settings are located at [Menu] > [Configuration] > [ISDN< Left Setup] (or ISDN> Right Setup, depending on the slot a module has been inserted into). 9.4.2.
- Page 77 Go to Table of Contents Section 9: ISDN 9.4.5. Configuration Profile ‘ManDflt MonoPgm’ (default) should displayed at the top of the main menu screen on the LCD display. If not press SOFTKEY 2 Profile and using the scroll through MENU SELECTOR the available options until ManDflt MonoPgm surrounded...
- Page 78 Go to Table of Contents Section 9: ISDN 9.4.8. Testing the ISDN Line Type With an ISDN line connected to the codec ISDN should be displayed. This appears Sync regardless of whether you have the ‘ISDN Line Type’ set correctly. To test whether you have the correct ‘ISDN Line Type’...
- Page 79 Go to Table of Contents Section 9: ISDN 9.4.10. Connecting Tieline to Tieline 1. Rotate the until ‘ISDN1’ MENU SELECTOR is surrounded by square braces 2. Enter the number to be dialed using the numeric keypad 3. Press the button to dial the...
- Page 80 Go to Table of Contents Section 9: ISDN 9.4.11. Connecting Tieline to AEQ/Telos To dial from a codec to a non- codec it is necessary to disable ieline ieline ‘Session Data’ and use either G.722 or MP Layer 2 algorithms for compatibility.
-
Page 81: Section 10. Gsm
190 countries. Figure 22: Tieline GSM Module and Antenna Cell phone networks provide a voice channel and a data channel. The ieline data facility connects over the data channel and is therefore relying on the Telco’s commitment to wireless data integrity, bit rate allocation and link reliability. -
Page 82: What Do Ineed For Gsm
Go to Table of Contents Section 10: GSM 10.3. What do I need for GSM? To use a codec in GSM mode it requires a GSM plug-in module with an ieline antenna connector, which is available from as an additional module ieline option. -
Page 83: Configuring Gsm Connections Using Agsm Module
Go to Table of Contents Section 10: GSM 10.5. Configuring GSM Connections Using a GSM Module If you are dialing out from a codec via a GSM module, then you will need to configure the GSM codec connection. The easiest way to do this is to use the codec GSM menu wizard. - Page 84 Go to Table of Contents Section 10: GSM on the rear of the codec. Then press , scroll to SOFTKEY 4 Menu [Configuration] > [Advanced Menu] > [Serial Port Mode] > [GSM]. This configures the serial port and the GSM connection should appear on the main menu screen as a connection option.
-
Page 85: Configuring Apots Landline Codec For Gsm Connections
Go to Table of Contents Section 10: GSM If your codec is captioning enabled, you will also see Transcriptor TX as options in the algorithm menu. Transcriptor RX GSM LL/GSM/USB-3G For more information on these settings see the section in this manual or the Quick Start connection procedure for GSM connections. -
Page 86: Making Gsm Voice Calls
Go to Table of Contents Section 10: GSM 10.7.2. GSM Transparent and Non-transparent Data Modes If you are using a GSM connection, we recommend you ensure that your SIM card has been set to send data in non-transparent mode. Check this with your telco when you order your data service. -
Page 87: Selecting Gsm Voice Mode
Go to Table of Contents Section 10: GSM this becomes difficult to work with. Switching to GSM voice will eliminate the codec latency problem. A GSM voice call is similar in quality to standard POTS/PSTN voice calls - in other words a 3 kHz connection. It can dial into a studio hybrid or another codec which is set to POTS Voice Mode. -
Page 88: Figure 23: Phone Audior
Go to Table of Contents Section 10: GSM 10.10.1. Default Settings for GSM Voice Calls When using GSM voice mode it operates using the same Phone Coupler circuitry that is used by POTS on the rear panel of the Line 2 COUPLER codec. -
Page 89: A Final Note On Gsm Configuration
2.5 hours of broadcasting. For more information please see the Portable Powering Solutions section within this manual. Figure 24: The Tieline Portable Solutions Range Page 89 ieline T E C H N O L O G Y... -
Page 90: Section 11. 3Gip
Streaming Reference Manual”, which is a separate document. This manual contains all the relevant information for streaming audio over IP – including SIP connectivity. Contact support at support@tieline.com or visit our website at ieline http://www.tieline.com/support/manuals.html to download the latest manual. -
Page 91: Section 12. Satellite
Do not force a module into the codec. Modules should be installed slowly and gently. Page 91 Tieline T E C H N O L O G Y... -
Page 92: Section 13. X.21
A diagram follows with an example of how this might look. Page 92 Tieline T E C H N O L O G Y... -
Page 93: Connecting Via X.21
For more information on how to connect via X.21 using codecs, ieline please see the X.21 or Quick Start section of this reference manual or contact customer support at support@tieline.com for more info. Page 93 Tieline T E C H N O L O G Y... -
Page 94: Section 14. Ip Streaming Configurations
Streaming Reference Manual”, which is a separate document. This manual contains all the relevant information for streaming audio over IP – including SIP connectivity. Contact support at support@tieline.com or visit our website at ieline http://www.tieline.com/support/manuals.html to download the latest manual. -
Page 95: Section 15. Operation Of Your Codec: Codec Lcd Displays And Dialing Connections
For simplicity, in this manual the will only be described for navigation as it is able to navigate through every codec menu item and select it. Tieline Page 95 T E C H N O L O G Y... -
Page 96: Clear
This provides the Control opportunity to adjust the input level remotely with the menu in Tool software. (Related topics: Control Tab, i-Mix Phone Coupler). Tieline Page 96 T E C H N O L O G Y... -
Page 97: Pre-Flight Connection Checks
They are fully documented in the section in this manual titled Box. Most of the elements within these profile menus can be amended into Tool Tieline Page 97 T E C H N O L O G Y... -
Page 98: Getting Started
Depending on the communications module options that you have purchased from and installed in your codec, the connections available to you will be ieline, displayed on the Depending on what module you may have installed. Tieline Page 98 T E C H N O L O G Y... -
Page 99: Loading Profiles
– either adjust the profile settings or install the correct module if this occurs. Tieline Page 99 T E C H N O L O G Y... -
Page 100: Initial Connection State Of Codec Lcd Displays
These networks will not send you ISDN sync information until an ISDN connection is detected. If you try to dial an ISDN connection and the line is not connected, the codec will display No signaling data. Check wiring Tieline Page 100 T E C H N O L O G Y... - Page 101 IP addresses automatically. In this case, you may need to enter a static address using the IP configuration wizard. Please see your IT system administrator for more information. Tieline Page 101 T E C H N O L O G Y...
-
Page 102: Initiating Manual Connections: Dialing A Number
– POTS, ISDN, GSM, IP, 3G/IP and X.21. For ieline more detailed information in relation to connections over each type of connection, and using the various default profiles that are programmed into your Tieline Page 102 T E C H N O L O G Y... - Page 103 - [POTS1^ Enter# the bit rate of connection and the [POTS2> 28.8 L91R89 Line Quality of both codecs will be Menu displayed. Tieline Page 103 T E C H N O L O G Y...
-
Page 104: Figure 28: Standard Pots C
Once this process is completed the standard connection screen is displayed. ManDflt MonoPgm POTS1^ Enter# [POTS2> 28.8 L91R89] Menu Figure 28: Standard POTS Connection Screen Tieline Page 104 T E C H N O L O G Y... - Page 105 POTS modules initially attempt to establish a link at 19,200 bps. They ieline will then renegotiate the link to the highest possible bit rate, either up or down. Tieline Page 105 T E C H N O L O G Y...
- Page 106 No Dial Tone displayed and you will have to attempt to reconnect again. A Cautionary Note: The maximum number of digits and pauses in the dial string is 27. Tieline Page 106 T E C H N O L O G Y...
-
Page 107: Manual Isdn Connections
If you attempt to connect and your RJ45 ISDN line connection is not attached correctly to the codec, the following error message will be displayed on the codec LCD – No signaling data. Check wiring Tieline Page 107 T E C H N O L O G Y... -
Page 108: Manual Gsm Connections
4. Once the connections have been ManDflt MonoPgm established they will be displayed [GSMCS1> 9.6 VoiceG3 as shown in the right-hand GSMCS2^ 9.6 VoiceG3 image. Aud Profile Wiz Menu Tieline Page 108 T E C H N O L O G Y... -
Page 109: Manual 3G Connections
To connect to the other codec, scroll to IP1 on the LCD screen and connect as you would for any Ethernet-connected IP connection, as explained in the following section. Tieline Page 109 T E C H N O L O G Y... -
Page 110: Manual Ip Connections
4. Once you have connected to the ManDflt MonoPgm codec have dialed, [IP1 27.2 L95R93] connection should display in a IP2> Enter# similar manner to the right-hand Menu screen image. Tieline Page 110 T E C H N O L O G Y... -
Page 111: Manual X.21 Connections
Menu . Only one X.21 Music module is connected in this screen. Powerup Profile c. (Related topic: Manual Default Profiles, and X.21 Connections) Tieline Page 111 T E C H N O L O G Y... -
Page 112: The Connections Manager (Cxns)
If you are not sure how to create profiles or how to Box, please consult the sections in this manual titled Tool Tool Box, Configuration File System and Profile Editor. Tieline Page 112 T E C H N O L O G Y... - Page 113 Connection Status CXNS Bball Venue<<>> Connected Actv E1:D1 203.36.205.163 Cxns << >> Menu IP address (or POTS/ISDN Encoders & number) of the Decoders being current connection. used. Tieline Page 113 T E C H N O L O G Y...
-
Page 114: Summary
Although complete codec menu structures and descriptions of their elements follow, more in-depth details of many codec functions are contained in the Box software section of this manual. Tool Tieline Page 114 T E C H N O L O G Y... -
Page 115: Menu Settings
If you would like to see menu diagrams for the Audio and Wizard menus in the codec, please see the Quick Start section of this reference manual. Page 115 Tieline T E C H N O L O G Y... -
Page 116: Figure 29: Menu Submenus
Go to Table of Contents Section 15: Operation of your Codec Figure 29: Menu Submenus Page 116 Tieline T E C H N O L O G Y... -
Page 117: Menu: Submenu Details
Sets the clock in the codec. Advanced Menu Sets Box, CAN, and Tool LAN connection settings as well as system defaults and system reset functions. Exit Menu Exits to the submenu. Menu Page 117 Tieline T E C H N O L O G Y... - Page 118 Configuration Menu For more detail of these secondary submenu items, check the tables that follow which outline each individual selection available within these menus. Page 118 Tieline T E C H N O L O G Y...
-
Page 119: Figure 30: Configurations
Go to Table of Contents Section 15: Operation of your Codec Figure 30: Configuration Submenu Items Page 119 Tieline T E C H N O L O G Y... - Page 120 Remote Switches the remote codec channel Controls control function on at the local codec. Switches the remote codec channel control function off at the local codec. Page 120 Tieline T E C H N O L O G Y...
- Page 121 Audible Alarm Enable Enables a piezo alarm within the codec that sounds if there is a loss of AES/EBU sync in the codec. Disable Disables this function. (Default) Page 121 Tieline T E C H N O L O G Y...
-
Page 122: Setting 1
Decoder 1 Displays the level leaving the encoder. Decoder 2 Displays the level leaving the encoder. Audio Ref Level Solves audio level incompatibility Tieline The default setting for codecs. ieline Codecs between a codec and another ieline brand of codec. (Related topic:... - Page 123 If switch type is National ISDN-1 and 2 US-DMS If switch type is Northern Telecom DMS100 US-AT&T If switch Type is AT&T Custom Table continued on the next page… Page 123 Tieline T E C H N O L O G Y...
- Page 124 Music Plus Algorithm G.711 setting in the MPEG algorithms allow you to select the G.722 codec for ISDN) sample rate from the four available options. Page 124 Tieline T E C H N O L O G Y...
- Page 125 S/T or U type line interfaces. Firmware Provides firmware details. Exit Menu Exits this submenu and goes to the submenu. Configuration Table continued on the next page… Page 125 Tieline T E C H N O L O G Y...
- Page 126 Max Bitrate Sets the maximum bit rate at which the 9600bps – Use the to scroll and set the codec will attempt a connection. 33600bps maximum bit rate. Page 126 Tieline T E C H N O L O G Y...
- Page 127 A higher bit rate is renegotiated if line quality at both ends is above 80%. Table continued on the next page… Page 127 Tieline T E C H N O L O G Y...
- Page 128 Retrains to the bit rate selected from 33600bps the menu. Reset Modem Resets the modem. Exit Menu Exits this menu and goes to the submenu. Configuration Table continued on the next page… Page 128 Tieline T E C H N O L O G Y...
- Page 129 GSM LL/GSM/USB-3G please see the section, or the GSM Operation and Quick Disable Disables this function Start sections within this manual. Table continued on the next page… Page 129 Tieline T E C H N O L O G Y...
- Page 130 Selects the UDP IP protocol (Default) Setup the codecs over IP. TCPIP Selects the TCP IP protocol Session Type Programs Tieline session data, SIP or no Tieline Tieline Session Data used to connect session data for IP connections. Codecs devices.
- Page 131 MP2 Stereo 16,000; 24,000; 32,000; 48,000. algorithm. MP2 J-Stereo 16,000; 24,000; 32,000; 48,000. Other Selects this algorithm. Voice G3 Selects this algorithm. Raw Audio Selects this algorithm. Page 131 Tieline T E C H N O L O G Y...
-
Page 132: Correction
Port number. Audio Port Reprograms the codec Audio Port number. Exit Menu Exits this submenu and goes to the Configuration submenu. Table continued on the next page… Page 132 Tieline T E C H N O L O G Y... - Page 133 X.21 - ISDN Select this options ieline only support connections via an ISDN X.21 – X.21 Check at support@tieline.com for the Terminal Adapter (TA). Ensure that you select implementation date of this feature. X21 < - > ISDN in this menu.
- Page 134 This is necessary if a NAT Traversal mode is switched off. device has a private IP address behind a public IP address and a firewall. Exit Mode Page 134 Tieline T E C H N O L O G Y...
- Page 135 Automatic selection. See ‘ISDN 3B only capable bonding and 4B Bonding’ for details. connections together. codecs can Tieline Selects Tieline Bonding ieline bond up to four channels using Selects CCS Bonding ieline’s bonding. Cough Buttons Switches the button on the...
- Page 136 Even if a commentator turns down number the headphone digipot completely on the between 0 & codec, talkback will still be heard in the 255) headphones. Table continued on the next page… Page 136 Tieline T E C H N O L O G Y...
- Page 137 (Default) Selects Current Runtime as Runtime the active profile. ManDflt Selects this profile on powerup. MonoPgm ManDflt Selects this profile on powerup. Mono/IFB Table continued on next page… Page 137 Tieline T E C H N O L O G Y...
- Page 138 12 digit unlocking-key. number. After entering the key, it will enable or Disable Disables this function. disable the failover function in the codec. Table continued on the next page… Page 138 Tieline T E C H N O L O G Y...
- Page 139 ‘Enable’ within number. this menu. Disable Disables this function. Stream Allows users of Tieline codecs to enable a Enable Enables the IP Stream demo. Demo 2 45 day trial of IP streaming. After 45 days Disable Disables the IP Stream demo.
- Page 140 IP Address Displays the IP address for LAN connections. Subnet Mask Displays the Subnet Mask for LAN connections. Table continued on the next page… Page 140 Tieline T E C H N O L O G Y...
- Page 141 Features Lists the features Enabled enabled codec. Exit Menu Returns you to the connection screen of the profile you have loaded into the codec. Page 141 Tieline T E C H N O L O G Y...
-
Page 142: Rd Party Devices
(in this case cell-phones) to send data exclusively between these two devices. Packet switching, as used in computer networks and increasingly in telecommunications devices (i.e. 3G cell-phones), is where data packets can be Page 142 Tieline T E C H N O L O G Y... -
Page 143: The Osi Model Explained
It is appropriate to now explain the Session Layer in some more detail, as well as the attributes of session data and how it is sent between two codecs. Page 143 Tieline T E C H N O L O G Y... -
Page 144: The Session Layer
– in our case two codecs. 16.7. How Tieline Codec Session Data Works Session data operates over the full bandwidth of a codec connection. This is a minimum of 9,600 bps and is dependent on the connection type being used. As with audio data, session data is sent bidirectionally from both the remote and local codecs. -
Page 145: Figure 31: Session Datac
Go to Table of Contents Section 16: Data Transfer & Using 3 Party Devices 16.7.2. Session Data and Non-Tieline Codecs Session data is a great tool for programming codecs to operate according to a series of preset instructions. It makes the operation of... -
Page 146: Figure 32: Session Datas
Error: This will appear when a software error has occurred. If you see this message attempt to connect again. If repeated attempts to connect fail, please contact support@tieline.com in order to troubleshoot the problem. 16.7.5. Limitations of Session Data Configuration In most situations session data can be sent successfully over different connections. -
Page 147: Configuring The Serial Port To Send Data
. Then Menu SOFTKEY 4 scroll to [Configuration] > [Advanced] > [Serial Flow Control]. Select Enable enable flow control. Remember, this needs to be configured on both codecs. Page 147 Tieline T E C H N O L O G Y... - Page 148 Serial Port Mode and Serial Port Rate. Check the Serial Port Flow Control box to enable flow control. Default settings are shown. 16.9.2. The Serial Port (RS232) Auxiliary Data Channel for MP2 and Tieline Music Connections connection on codecs is capable of sending in-band data...
-
Page 149: Gsm Transparent And Non-Transparent Data Modes
[Voice Analog]. Plug the other end of the POTS connection into the device you wish to control. ----DTMF Control---- Enter DTMF Digits Figure 33: DTMF Control LCD Screen Page 149 Tieline T E C H N O L O G Y... - Page 150 G.711 algorithm and the codec will make an outgoing analog call. This is automatically selected if an analog call is received by the codec. Page 150 Tieline T E C H N O L O G Y...
-
Page 151: Relay And Control Port Operation
50 bps is the minimum data capability. ISDN, X.21 and IP connections may provide greater data bandwidth. Please check with us at support@tieline.com for updates on the implementation of this feature. Currently only one relay box can be connected. Page 151... -
Page 152: Cabling And Operation Distances
63m. A CAN cable wiring diagram is available in Appendix 1 of this reference manual. This section is titled CAN Cable Wiring Configuration. Page 152 Tieline T E C H N O L O G Y... -
Page 153: Can Bus Cable Terminations
Slide the PCB card out and make changes as needed. Ensure the grounding screw is secure when reassembling. Page 153 Tieline T E C H N O L O G Y... -
Page 154: Dip Settings
An internal piezo alarm is fitted to act as an audible indicator when either an input or an output function occurs. The default for this is off. It can be activated by changing DIP switch 4 settings per the table provided. Page 154 Tieline T E C H N O L O G Y... -
Page 155: Section 18. Toolbox Operation
Free updates of Box software can be downloaded from the Tool ieline web site at http://www.tieline.com/support/software.html. To determine the version of Box software you require for your codec, go to our website at Tool http://www.tieline.com/support/software.html and check for the most suitable version to upgrade your codec. -
Page 156: Preparing To Use Toolbox Software With Your Codec
For the procedure to upgrade you codec’s software, see the Updating Firmware section in this reference manual. Figure 36: Main Menu Screen of the ToolBox Program Page 156 Tieline T E C H N O L O G Y... -
Page 157: Connecting Your Codec To Apc
COM port that you are connected to (if you are unsure Autodetect click on and your Box software will detect this Tool automatically for you). Page 157 Tieline T E C H N O L O G Y... -
Page 158: Connecting Toolbox Via Usb
USB software drivers to connect successfully. (If you don’t have the appropriate USB drivers please contact us at support@tieline.com ). Please follow these steps to successfully install the drivers: Before you begin, ensure that you have the appropriate USB drivers saved in a file on your PC. - Page 159 Codec entry. This indicates that the driver is installed correctly and it should appear in the list. If don't find a "Tieline Codec" and you see a yellow exclamation mark in "USB" or "Other Devices" then you should re-install the driver. To do this you have to right click on yellow exclamation device, select Update Driver and select driver, etc.
-
Page 160: Lan Connection: Static, Dhcp And Bootp Ip Addresses
DHCP server. We suggest using the following number as shown above for your codec 192.168.0.1); Page 160 Tieline T E C H N O L O G Y... - Page 161 255.255.255.0; Then click on to save the changes and now both your PC and your codec should be configured to communicate with each other. Page 161 Tieline T E C H N O L O G Y...
-
Page 162: Serial Port Connections: Configuration At The Codec Itself
Serial, LAN or USB. It could also be a good idea to check that the cables are connected and seated properly. If you are still having problems connecting, it could be a good idea to reboot the codec and try again. Page 162 Tieline T E C H N O L O G Y... -
Page 163: Connecting Your Codec To Toolbox Software
For more information on software compatibility, please see the Updating Firmware section within this reference manual or visit the software support page on our website at http://www.tieline.com/support/software.html . Once you have the correct software installed on your PC and in your codec, you can initiate connection between your codec and your computer by following these steps. -
Page 164: Figure 37: Tool Box Rptp E
Box without an RPTP version is Tool installed on the PC. You will need to check the software support page on our website at http://www.tieline.com/support/software.html to determine what version of codec firmware will work with your version of Tool Box. -
Page 165: Updating Firmware
Box, please visit the software support page on our website Tool at http://www.tieline.com/support/software.html If you require new codec firmware, click on the “I need an upgrade” link on the software support page and complete the Software Upgrade Request Form. -
Page 166: Figure 39: Tool Box Software
5. Once the update has been successfully completed a new message will advise you of this. Click and proceed with using the codec. The codec will automatically reboot itself after upgrading. Page 166 Tieline T E C H N O L O G Y... -
Page 167: Figure 40: Rptp Errorm
If the *.bin file that you select to load into the codec is an old firmware version without an RPTP version number, the following error message will appear: Figure 41: ToolBox Upgrade Warning Page 167 Tieline T E C H N O L O G Y... - Page 168 Box by visiting our website’s Tool software support page at http://www.tieline.com/support/software.html. Firmware Upgrade Troubleshooting Tip: If you are having trouble performing the upgrade, try powering the codec down and then up again. If you are upgrading via a USB connection, check to see that the USB cable is seated well in the codec.
-
Page 169: Section 19. Configuration File System
There is a set of default matrices in each codec and users can adjust these and create new custom matrices to suit individual broadcast requirements. The following image displays how this system works. Page 169 Tieline T E C H N O L O G Y... -
Page 170: Different Codec Configuration Files
Check that the talkback matrices of both the local and remote codecs are configured correctly. (Related Topics: Manual Default Matrix Editor Profile Editor Profiles, , The LCD Screen on Initial Powerup) Page 170 Tieline T E C H N O L O G Y... -
Page 171: Set, Get, Save And Open Functions Of Configuration Files
Table 8: Configuration File Menu Options Matrix A discussion of how to adjust all of a profile’s individual settings with the Editor Profile Editor and the follows. Page 171 Tieline T E C H N O L O G Y... -
Page 172: Section 20. Matrix Editor
For more information on matrices, please consult the COMMANDER COMMANDER Matrix Map View Matrix reference manuals. (Related Topics: , Preparing to Box Software with your Codec.) Tool Page 172 Tieline T E C H N O L O G Y... -
Page 173: Routing Matrices Explained
[Features Enabled]. If is not listed then you will need to enable this Matrix within your codec. This process is explained in the following section. Page 173 Tieline T E C H N O L O G Y... -
Page 174: Activating The Matrix Editor
Your codec will now be enabled for matrix functionality. The Editor is displayed in the following image. Figure 44: Matrix Editor Main Menu Page Matrix Editor purchase capability please contact ieline support@tieline.com. Page 174 Tieline T E C H N O L O G Y... -
Page 175: Matrices -Where Do I Start
Check that the talkback matrices of both the local and remote codecs are configured correctly. (Related topics: Manual Default Profiles and The Default Matrices) Page 175 Tieline T E C H N O L O G Y... -
Page 176: Defining The Matrix Editor
Input 1, Input 2 etc, are inputs and sources from where signal flows from. list across Encoder 1, CH 1 Out etc, are destinations or outputs where signals flow to. Page 176 Tieline T E C H N O L O G Y... -
Page 177: Checking Of Cross Points
In this example, has now been checked. Input The signal appearing on can now be heard in the headphones previous example) and also will display on the PPM2 LEDs Page 177 Tieline T E C H N O L O G Y... -
Page 178: The Default Matrices: How To Use Them
Manual Default Cue 4; Manual Default Stereo Cue 5 Manual Default Program B Manual Default Stereo Program B Manual Default Dual Program B ; and Manual Default Program TLM400 Page 178 Tieline T E C H N O L O G Y... -
Page 179: Figure 46: Tlm400 Pa Feed
PA Controls section on the codec to control what is sent via analog . For more information on using these codec functions see the Output Ch 2 PA Controls section in this reference manual. Page 179 Tieline T E C H N O L O G Y... -
Page 180: Creating, Saving And Amending Matrices
. The cross point connections from the Program B Swimming Venue Program matrix will be copied to the matrix. They can be amended as required. Page 180 Tieline T E C H N O L O G Y... -
Page 181: Additional Edit Matrix Functions
Box software. Tool Set factory defaults Select Matrix returns all of the factory default matrices in the to edit drop-down menu to their original factory default settings. Page 181 Tieline T E C H N O L O G Y... -
Page 182: Profile Editor
Please note that if you want to change profiles you need to hang up the codec before making the change. Then load the new profile that you require and redial to make a connection. Page 182 Tieline T E C H N O L O G Y... -
Page 183: Set Factory Defaults
By purchasing the ‘Profile and Router’ ( Editor ) option from , you can also adapt and save the default matrices as ieline new profiles in your codec. Page 183 Tieline T E C H N O L O G Y... - Page 184 Manual Default Presets Current previous settings are loaded back into Runtime (i.e. current codec settings). Powerup Profile Connection Setup (Related topics: The Default Matrices, and Selecting Manual Default Profiles) Page 184 Tieline T E C H N O L O G Y...
-
Page 185: Selecting Manual Default Profiles
Figure 49: The Manual Default Program B (Mono) Matrix Page 185 Tieline T E C H N O L O G Y... -
Page 186: Current Runtime: Overview
If a factory reset is performed on the codec these settings will be discarded and will need to be sent to the codec again and reloaded. Figure 50: The Profile ‘Mask’ for Manual Default Presets Page 186 Tieline T E C H N O L O G Y... -
Page 187: Manual Default Mono Program
Ch 1 and 2 Out HP 1-4 Left Right using Decoder 1 is being sent to & ManDflt Mono/IFB . This program matrix is also used for the profile Page 187 Tieline T E C H N O L O G Y... -
Page 188: Manual Default Mono/Ifb
, the incoming IFB feed is being monitored in the left side of each CH 2 Out output and is also being sent to . All audio inputs are being PPM 2 monitored via Page 188 Tieline T E C H N O L O G Y... - Page 189 Input 1 Encoder 2 is being sent on and monitored via the four right-hand PPM 2 headphone outputs and Page 189 Tieline T E C H N O L O G Y...
-
Page 190: Manual Default Stereo
This will continue until the bit rate increases to 21,600 bps. At this bit rate two channels will be returned. This will occur automatically. Page 190 Tieline T E C H N O L O G Y... -
Page 191: Manual Default Dual Program
Manual Default Bonded Mono Please note: This profile has been replaced by automatic bonding and is explained in the section of this reference manual titled Dialing Bonded Mono Connections. Page 191 Tieline T E C H N O L O G Y... -
Page 192: Creating A New Profile
Manual Default Presets changed within Individual profile settings can be changed by viewing a profile’s ‘active’ tabs when a profile is selected. (Related Topics: Manual Default Profiles.) Page 192 Tieline T E C H N O L O G Y... -
Page 193: How Do I Utilize Profile Masks
Then click Edit Profile Copy on the button to reveal the drop-down menu. Select from this Copy/Paste Profile menu and the menu will be displayed. Page 193 Tieline T E C H N O L O G Y... -
Page 194: Deleting A Profile
Each tab in the contains the many parameters required to configure your codec. These parameters fall under the following general tab headings. Page 194 Tieline T E C H N O L O G Y... - Page 195 Matrix Map (Advanced). View Matrix. Global Unit Settings. Profile Editor A detailed discussion of each of the tabs, and the elements within them, will follow in this manual. Page 195 Tieline T E C H N O L O G Y...
-
Page 196: Connection Setup
It is up to the user to ensure that there is a receiving codec at the other end for the dialing codec to call. Figure 56: The Connection Setup (Advanced) Menu in the Profile Editor Page 196 Tieline T E C H N O L O G Y... -
Page 197: Connection No
The bonded POTS and ISDN connections that are available using codecs are ieline described in detail in the following section. Page 197 Tieline T E C H N O L O G Y... -
Page 198: Dialing Bonded Mono Connections
If you are connecting to a non- codec ieline ieline MP2 Mono then bonding will only work effectively using . This algorithm use CCS bonding. Page 198 Tieline T E C H N O L O G Y... -
Page 199: Isdn 3B And 4B Bonding (Commander Codecs Only)
Bonding Type Algorithm No. of Connections Bonding Used Mono, Auto Stereo, J-Stereo Mono, Auto More than 2 Tieline Stereo, J-Stereo Music Auto 2 or more Tieline ieline Voice G3 Auto 2 or more Tieline... -
Page 200: Configuring 4B Channel Connections (Commander Codecs Only)
If you are connecting using Codec channel a mono profile check one and if you are connecting using a Codec channels. stereo profile, check two Page 200 Tieline T E C H N O L O G Y... -
Page 201: Connection Type
If you change a setting for a manual default profile, you need to ensure that this setting is also changed on the remote codec you are dialing. Page 201 Tieline T E C H N O L O G Y... -
Page 202: Figure 61: Tieline Gsm Plug
(For cable pin configurations please see the Connector Wiring section of this reference manual.) Figure 61: Tieline GSM Plug-in Module 22.7.4. Phone Coupler (on i-Mix codecs) Plug your RJ-11 POTS line into on the rear panel of an Coupler Line 2 codec to utilize this function. - Page 203 POTS, ISDN or GSM. Otherwise if you have both POTS and ISDN connections available for example, the connection you wish to use may not be selected. Page 203 Tieline T E C H N O L O G Y...
- Page 204 14,400, you can bond them to get one 28,800 bps connection. This would achieve better quality for mono audio. (Related Topic: Phonebook Numbers) Page 204 Tieline T E C H N O L O G Y...
-
Page 205: Coding And Algorithms
To understand these concepts we also need to understand the relationship between ‘sampling’ and ‘quantization’. Page 205 Tieline T E C H N O L O G Y... - Page 206 Please Note: Data compression is in no way related to audio compression for limiting the dynamic range of audio signals. Page 206 Tieline T E C H N O L O G Y...
-
Page 207: Mpeg Explained
For example, there is little doubt that MP3 is the dominant compression algorithm for creating music files for domestic consumption and many decoders/players exist for this particular algorithm. Page 207 Tieline T E C H N O L O G Y... - Page 208 This enables mono and stereo audio to be encoded using fewer bits and requiring less connection bandwidth. Musicam is a registered trademark of Musicam USA. Page 208 Tieline T E C H N O L O G Y...
- Page 209 15 kHz stereo audio signal over a single B-channel, with a delay of only 70 ms… pretty impressive huh! Page 209 Tieline T E C H N O L O G Y...
-
Page 210: Tieline Algorithms Available
Please see the section titled Connection Bit-rate and Algorithm Options in this reference manual for more detailed information on bit-rates of connections based on algorithms selected and connection types. 22.10. Tieline Algorithms Available The algorithm settings in codecs vary according to ieline Connection type selected. - Page 211 16,800 bps we recommend you use the algorithm. For more information on connection bitrates, please see the section in this manual titled Overview of the Manual Default Profiles. 22.10.2. Tieline Music Plus Music Plus offers 20kHz mono from 48kbps upwards. It can also ieline deliver 15-20kHz stereo from 64kbps upwards.
- Page 212 This can be solved by turning off the ‘session data’ stream sent by the Tieline codec. To do this select [Menu] > [Configuration] > [System Settings] > [Session Data] > [Disable]. Please note that this is a global setting and will also affect all POTS, and IP connections on the codec.
- Page 213 POTS, ISDN and GSM connections Comrex Vector, Matrix and BlueBox are all products of Comrex Devens, MA 01432 ® ® ® USA info@comrex.com Page 213 Tieline T E C H N O L O G Y...
-
Page 214: Samplerate
By extrapolating this information, you will be able to decide which is the best algorithm to use for your broadcast requirements. Page 214 Tieline T E C H N O L O G Y... -
Page 215: Table 10: Algorithmc
Using Voice G3, there is no need to negotiate higher than 14.4 or 16.8kbps to maximize audio quality. Staying at lower bit-rates improves link stability over TCP. Only available over a point-to-point crossover cable (i.e. CAT 5) and using high quality LAN switching. Tieline Page 215... - Page 216 Voice G3 algorithm Please note: See the section titled ‘Connection Bit-rate and Algorithm Options’ in this reference manual for more detailed information on UDP/IP and MPEG connection bitrates. Tieline Page 216 T E C H N O L O G Y...
-
Page 217: Ports And Codec Channels: An Overview
22.13.3.2. ISDN Port 1 If you are using two ISDN B channels, refers to Channel 1 and Port 2 refers to Channel 2. Tieline Page 217 T E C H N O L O G Y... - Page 218 When configuring IP connections only one is used for each Port 1 connection. The connection on your codec will use and the Port 2. connection on your codec will use Tieline Page 218 T E C H N O L O G Y...
-
Page 219: Phonebook Numbers
Please note that you can only recall numbers and type in numbers for custom profiles, not manual default profiles. Tieline Page 219 T E C H N O L O G Y... -
Page 220: Automatic Redial
Using the parameters shown in the previous image, the codec will automatically dial a maximum of ten times or until a link is established. There is a delay of ten seconds set between dialing attempts. Tieline Page 220 T E C H N O L O G Y... -
Page 221: Failover Profile In Detail
Failover profile If you are using the function with your codec, we recommend Auto reconnect that you don’t activate the function as they will conflict with each other. Tieline Page 221 T E C H N O L O G Y... - Page 222 With the new it is also possible to change the ieline profile by dialing a new phone book entry that has a different profile associated with it. Tieline Page 222 T E C H N O L O G Y...
-
Page 223: Figure 62: Simple Failover
Please ensure that you don’t set reconnect if you are creating a User Function as previously shown – otherwise it will conflict with the Connection Manager settings. Tieline Page 223 T E C H N O L O G Y... - Page 224 Connection No 2 is set up in of the ISDN main profile as the POTS Standby connection failover profile that you have set, and check it as the Tieline Page 224 T E C H N O L O G Y...
-
Page 225: Figure 63: Failoverc
POTS failover same profile as the profile. This is so that the profile will be loaded onto both codecs as required in the event of failover being activated. Tieline Page 225 T E C H N O L O G Y... -
Page 226: Figure 65: Main Profile With
Figure 65: Main Profile with Remote and Failover Profile Settings Tieline Page 226 T E C H N O L O G Y... - Page 227 ( ) in the event of a failover connection being Music initiated. The remote profile can change automatically if you use the Voice G3 algorithms. Tieline Page 227 T E C H N O L O G Y...
-
Page 228: Remote Profile
(master) unit and the answering unit the remote (slave) codec. The codec that initially made the successful link-establishing call will redial a number to reconnect should a link failure occur. Tieline Page 228 T E C H N O L O G Y... -
Page 229: Pots Tab
POTS G3 module, the codec will ‘retrain’ upwards, not renegotiate like the original POTS modules. Retraining takes significantly longer than renegotiation – up to 30 seconds. Tieline Page 229 T E C H N O L O G Y... -
Page 230: Select Pots Interface
23.3.3. Voice Select this operation mode when connecting using a standard voice call. If Voice POTS is selected then redundant settings in the tab will be greyed out. Tieline Page 230 T E C H N O L O G Y... -
Page 231: Auto Renegotiate: Overview
Reducing this value can improve connection reliability on poor quality lines. The search for a higher bit rate will stop when either of the following happens: Tieline Page 231 T E C H N O L O G Y... -
Page 232: Monitor Enable
When this box is checked the modem will attempt to connect at the highest bit- rate automatically. If this box is not checked the modem will attempt to connect initially at 19,200 bps and then negotiate the highest bit-rate. Tieline Page 232 T E C H N O L O G Y... -
Page 233: Dial Method
This pull-down menu allows the user to enable or disable automatic answering of incoming calls to start operation. The number of rings before answering can also be set from between zero and ten rings. Tieline Page 233 T E C H N O L O G Y... -
Page 234: Dial Pause Time
The setting will also be used by custom profiles with connections that use the Algorithm Connection Setup setting within the drop-down menu in the tab. Algorithms (Related Topics: Manual Default Profiles and Tieline Page 234 T E C H N O L O G Y... -
Page 235: Section 24. Gsm Ll/Gsm/Usb-3G Tab
GSM cell-phone attached to the RS232 port on the rear panel of the codec. Alternatively, you could try a GSM phone or a 3G cell-phone in GSM mode with a USB module. ieline Tieline Page 235 T E C H N O L O G Y... -
Page 236: Gsm Connections
The preceding image shows a codec with two COMMANDER POTS modules installed. An codec will display the on-board POTS connection and a right-hand POTS module if this is installed. Tieline Page 236 T E C H N O L O G Y... -
Page 237: Operating Mode
GSM connection, i.e. try to connect at the GSM end and see what the connection bit rate is. Then enter the bit rate Tieline Page 237 T E C H N O L O G Y... -
Page 238: Manual Default Gsm Landline Algorithm
To select the most appropriate connection scenario for your situation, simply click on the right-hand blue arrow, highlight the desired setting and click on it to select it. Tieline Page 238 T E C H N O L O G Y... -
Page 239: Wireless Network Type
1-2 seconds is usually sufficient to avoid any problems but the delay can be set up to 9 seconds if required. Program signals will be delayed by the amount Tieline Page 239 T E C H N O L O G Y... -
Page 240: Gsm Bitrate (For A Codec Connecting With A Gsm Connection)
A Final Note on GSM Configuration For more detailed information on configuring your codec by using the menus on the codec itself, please see the GSM Operation section within this reference manual. Tieline Page 240 T E C H N O L O G Y... -
Page 241: Isdn Tab
ISDN sync information until an ISDN connection is detected. If you try to dial an ISDN connection and the line is not connected, the codec will display No signaling data. Check wiring Tieline Page 241 T E C H N O L O G Y... -
Page 242: Select Isdn Interface
If your codec is connected to an NT-1 device with a four-wire cable (common configuration outside North America), you need to have an S/T interface ISDN module installed in your codec. Tieline Page 242 T E C H N O L O G Y... -
Page 243: Isdn Line Type
Any call associated with that line can be assumed to apply only to that customer’s Directory Number and Service Profile. When a single ISDN device is connected and serviced this way, the configuration is said to be point-to-point. Tieline Page 243 T E C H N O L O G Y... -
Page 244: Spid1, Spid2 (Service Profile Id)
AT&T 5ESS custom point-to-point, you may need to leave both s blank - even though they have been provided by the phone company. Tieline Page 244 T E C H N O L O G Y... -
Page 245: Auto Answer
The recommended maximum you should set it at is 32,000bps for this type of Samplerate connection. The default for MP2 algorithms is 32,000 bps. Tieline Page 245 T E C H N O L O G Y... -
Page 246: Section 26. Ip/Lan And Sip Tabs
Please see the “IP & 3GIP Streaming Reference Manual” for more information relating to programming and dialing 3GIP, IP and SIP IP connections and for the latest Box software changes for LAN connections. Tool Tieline Page 246 T E C H N O L O G Y... -
Page 247: Section 27. X.21Tab
X.21 Link Type codec X.21 modules currently only support connections via an ISDN ieline X21 < - > ISDN Terminal Adapter (TA). Ensure that you select in this menu. Tieline Page 247 T E C H N O L O G Y... -
Page 248: Bit Rate
The recommended maximum you should set it at is 32,000bps for this type of Samplerate connection. The default for MP2 algorithms is 32,000 bps. Tieline Page 248 T E C H N O L O G Y... -
Page 249: X.21 Call Control Type
If you require more information on session data and how it works, please see the section titled Data Transfer & Using 3 Party Devices. Tieline Page 249 T E C H N O L O G Y... -
Page 250: Section 28. Inputs Tab
PPM ieline Displays. 28.2. Input Types Following are some suggested input settings for various sources that can be plugged into codecs. ieline Tieline Page 250 T E C H N O L O G Y... -
Page 251: Additional Input Settings
Swap HP/Inp Lvl pots This swaps the functionality of these two features so that the level digipot will INPUT control the headphone levels and vice versa. Tieline Page 251 T E C H N O L O G Y... -
Page 252: Phantom Power
IGC Auto Lvl This response is linear. The channel on light will flash while activated. Tieline Page 252 T E C H N O L O G Y... -
Page 253: Routing Voice Calls To A Codec S Analog Outputs
In other words, a caller can dial into or out of the codec, and by using the Tieline Page 253 T E C H N O L O G Y... - Page 254 PHONE COUPLER ON/OFF 3. Incoming and outgoing audio will be monitored in PHONE COUPLER the right side of the headphones in HEADPHONE 1 Tieline Page 254 T E C H N O L O G Y...
- Page 255 You will note that the Phone Aux incoming audio level will ‘duck’ when audio is sent from the codec. Tieline Page 255 T E C H N O L O G Y...
-
Page 256: Auxiliary Input
Normal ieline potentiometers are controlled by rotating a shaft. Digipots are potentiometers with digital control and behave similarly to VCAs (Voltage Controlled Amplifiers). Tieline Page 256 T E C H N O L O G Y... -
Page 257: Figure 72: Virtual Inputf
To adjust the audio levels of the individual channels just click and drag the virtual fader slider on each input. Figure 72: Virtual Input Faders in a Commander G3 Codec Tieline Page 257 T E C H N O L O G Y... -
Page 258: Remote Control Tab
The local codec may have a PC connected to it using ieline Box software. Tool Tieline Page 258 T E C H N O L O G Y... -
Page 259: Remote Control Of Input Gains
With the use of virtual faders it also provides a convenient way to control both the local (master) and remote (slave) input gains. Tieline Page 259 T E C H N O L O G Y... -
Page 260: Profile Requirements For Remote Control
‘master’ codec and is used to select which channel on the local (master) codec will control which channel on the remote (slave) codec. Tieline Page 260 T E C H N O L O G Y... -
Page 261: Configuring The Local (Master) Codec To Control The Remote Codec
Remember, for this to work you need to make sure that the remote codec has Enable rem level ctrl Enable rem been ‘enabled’ by the checking of the on/off ctrl functions on the remote codec. Tieline Page 261 T E C H N O L O G Y... -
Page 262: Adjusting Local (Master Codec) And Remote (Slave Codec) Input Levels When In Remote Control Channel Mode
As a Accept remote cue default it is checked. When Remote Cue checked on a codec, it enables the Tieline Page 262 T E C H N O L O G Y... -
Page 263: Figure 75: Active Cue Softkey
The only manual default profile that has a matrix attributed to the Matrix Map Manual Default Mono/IFB Remote Cue function in . These settings are displayed in the preceding image. Use this profile for sending program and IFB. Tieline Page 263 T E C H N O L O G Y... -
Page 264: Gang To Knob
Gang to Knob Rem Ctrl function in the menu and use one of the INPUT digipots to control the input levels. Tieline Page 264 T E C H N O L O G Y... -
Page 265: Section 30. Outputs Tab
PPM settings can be adjusted by using the menu on the Audio codec itself. (This can be accessed by pressing and using the SOFTKEY 1 to select either MENU SELECTOR PPM1 PPM2 Tieline Page 265 T E C H N O L O G Y... -
Page 266: Figure 77: Codec Ppm Meters
If you put 0 vu into the codec, when the codec input digipot is set at the one o’clock position, the nominal operating reference level is 0 vu. An Tieline Page 266 T E C H N O L O G Y... -
Page 267: Pa Controls
SEND RETURN is then controlled by the knob. This BALANCE control does not affect the level of the transmitted Tieline Page 267 T E C H N O L O G Y... - Page 268 Previously this was only affecting the headphone balance of (Send/Return) Pan Matrix settings. Now it is also actively able to impact upon the balance of what is sent to analog Output Channels 1 Tieline Page 268 T E C H N O L O G Y...
-
Page 269: Automatic Gain Control
If is enabled in codecs it is enabled at +14dBu. ieline Enabling avoids hard clipping of signals, which occurs in the digital input Tieline Page 269 T E C H N O L O G Y... -
Page 270: Talk Back Level Adjustment
This is a great safety feature to ensure continuity of communications. (Related Topic: Talkback) Tieline Page 270 T E C H N O L O G Y... -
Page 271: Functions Tab
We recommend that you read this section in full to understand the concepts behind User Functions and how they are programmed. Figure 80: The Functions Menu within the Profile Editor Tieline Page 271 T E C H N O L O G Y... -
Page 272: Creating A New User Function
– Activation Rule Task Rule Activation Rule defines what actions will initiate Task Rule a User Function and sets what the effect of that action will be. Tieline Page 272 T E C H N O L O G Y... -
Page 273: Activation Rule
User Function. There are five categories in the drop-down menu as shown below. Figure 82: Functions Menu - Category Drop-down Menu Tieline Page 273 T E C H N O L O G Y... -
Page 274: Table 13: Functions Menu
. It is simply a matter of specifying which internal input, FUNCTION KEY, SOFTKEY, HOTKEY, external input or connection event will actually be used to execute a User Function. Tieline Page 274 T E C H N O L O G Y... -
Page 275: Table 14: Functions Menu
User Function. In the case of the Category Connection Events called refers to selecting various modem and ISDN connection states. These are described in detail in the following table. Tieline Page 275 T E C H N O L O G Y... -
Page 276: Table 15: Key Menu
The bit-rate needs to be set in the Parameter menu item Status Allows the use of an element of the (connection) connection process to trigger a User Function. Table 15: Key Menu Tieline Page 276 T E C H N O L O G Y... -
Page 277: 31.2.4. Trigger Menu
User Function. Activation Rule Trigger The complete options for the pull-down menus are included in the table in following pages: Tieline Page 277 T E C H N O L O G Y... -
Page 278: Table 16: Functions Menu
Parameter Status Connecting When modem connection is initiated a User Function will be executed. Connected When the modem connects a User Function will be executed. Tieline Page 278 T E C H N O L O G Y... - Page 279 User Function is triggered. Deactivated When the codec is streaming audio a User Function is triggered when streaming is deactivated. Continued on next page… Tieline Page 279 T E C H N O L O G Y...
- Page 280 When ISDN connection ceases connected User Function will initiated. Ringing When the codec begins to call a User Function is initiated. Table continued on the next page… Tieline Page 280 T E C H N O L O G Y...
- Page 281 User Function will be initiated. Ringing When the codec begins to call, in any connection mode, a User Function is executed. Table continued on the next page… Tieline Page 281 T E C H N O L O G Y...
- Page 282 User Function is Category Connection Events activated for the called . A User Function can be set to trigger either above or below the figure that is set within Tieline Page 282 T E C H N O L O G Y...
-
Page 283: Some Activation Rule Examples
HOTKEY 2. In the following example, a User Function has been programmed to POTS 1 execute once the modem has connected to the remote codec. Tieline Page 283 T E C H N O L O G Y... -
Page 284: Task Rule
How you want it to be affected is set with the Operation Parameter Relay 1 menus. In the example above, in external Tieline Page 284 T E C H N O L O G Y... -
Page 285: Table 17: Functions Menu
LCD screen on the codec. Table 17: Functions Menu - Task Rule Category Menu Following is a description of the various menu settings that can be set Categories within the six Tieline Page 285 T E C H N O L O G Y... - Page 286 This will be done subsequently in the menu. Full descriptions of the Category, Type options available for each via the menu, are displayed in the table that follows. Tieline Page 286 T E C H N O L O G Y...
-
Page 287: Table 18: Functions Menu
IP call. X.21 – 1 & 2 (Only Program the codec to dial a one module available phonebook entry, renegotiate or on i-Mix codecs) hang up/answer a call. Tieline Page 287 T E C H N O L O G Y... - Page 288 Task Rule menu for each we will provide a detailed table Object Operation showing how each setting in the associated menus Task Rule can impact on your settings. Tieline Page 288 T E C H N O L O G Y...
-
Page 289: Functions Menu
The input will be on for the duration a key is pressed i.e. a Activation Rule (The SOFTKEY Trigger setting should Momentary Table continued on the next page… Tieline Page 289 T E C H N O L O G Y... - Page 290 The Cue function will be inactive on an input for the duration a key is pressed i.e. a (The CONTROL Activation Rule Trigger setting Momentary should be Tieline Page 290 T E C H N O L O G Y...
- Page 291 Mute Return Inv Key will be inactive while a key is pressed i.e. a CONTROL Activation Rule (The Trigger setting should Momentary Table continued on the next page… Tieline Page 291 T E C H N O L O G Y...
- Page 292 Memory conjunction with the inactive. (phone entry #) setting, a number Phonebook Editor from the will be dialed. Answer This setting will answer an incoming call. Tieline Page 292 T E C H N O L O G Y...
- Page 293 Activation . (The CONTROL KEY Rule Trigger setting should be Momentary Pulse The relay will close for the duration in milliseconds set in the Parameter menu. Tieline Page 293 T E C H N O L O G Y...
- Page 294 CONTROL KEY Pulse The relay will close for the duration in milliseconds set in the Parameter menu. Table continued on next page… Tieline Page 294 T E C H N O L O G Y...
- Page 295 The LED is programmed to turn Blink off once (from an illuminated state) for a pre-programmed Parameter time-frame. Use the setting in the menu to select the blink time in milliseconds. Tieline Page 295 T E C H N O L O G Y...
- Page 296 RU codec. The COMMANDER setting in this circumstance is used to enter the blink time in milliseconds of the LED that is being programmed via a user function. Tieline Page 296 T E C H N O L O G Y...
-
Page 297: Connection
FUNCTION KEYS When you execute a User Function on a remote codec, no indication is given on the local codec that the User Function has been initiated. Tieline Page 297 T E C H N O L O G Y... -
Page 298: Preset User Functions
This User Function will allow an announcer at the remote codec to use a Piezo Alarm to alert the studio if TB/comms is not available. It is activated by pressing the button and then on the remote codec’s keypad. Tieline Page 298 T E C H N O L O G Y... - Page 299 This User Function would be used if line conditions have improved and you would like increase the connection bit rate to improve the quality of your connection. To activate the User Function simply press the key and then Tieline Page 299 T E C H N O L O G Y...
- Page 300 To toggle simply press PPM2 and then on the local codec’s keypad. Each time this is done the next selection will be activated sequentially. Tieline Page 300 T E C H N O L O G Y...
- Page 301 Each time you activate this User Function the codec will negotiate upwards to the next bit rate setting. If you have two IP connections active then they will both attempt to renegotiate upwards. Tieline Page 301 T E C H N O L O G Y...
- Page 302 Inputs 1 & 2 Cue/Comms 1 & 2 as per the matrices selected for these functions in the Matrix Map Profile Editor menu within the Tieline Page 302 T E C H N O L O G Y...
-
Page 303: Edit Function
Programmed functions MENU SELECTOR will be displayed for two minutes and then disappear. To remove the displayed Tieline Page 303 T E C H N O L O G Y... -
Page 304: A Final Note
MENU SELECTOR seconds. 31.9. A Final Note… Ultimately User Functions are an extremely flexible way for you to program your codec to perform in whatever way you want. Tieline Page 304 T E C H N O L O G Y... -
Page 305: Section 32. Matrix Map
(Please note that matrices for the TLR300 are different to the TLR300B rack unit codec matrices). Matrix Editor For more information on the field unit , please consult the Field Unit reference manual. COMMANDER Tieline Page 305 T E C H N O L O G Y... -
Page 306: Matrix Mapping - A Noverview
-Mix A set of reference matrices is provided with the , to enable users to set the codec up for the most common functions that are required. Tieline Page 306 T E C H N O L O G Y... -
Page 307: 'Mapping' Matrices For Codec Functions
Matrix Editor discussed further in the section of this manual. ue/Comms Cue/Comms The C matrices are used to define how the functions will -Mix work in codecs. Tieline Page 307 T E C H N O L O G Y... -
Page 308: Cue: An Overview
Operational Tip: which is programmed to operate for SOFTKEY talkback, cue or intercom purposes will operate even if a mic input’s button is not switched on. CHANNEL ON Tieline Page 308 T E C H N O L O G Y... -
Page 309: Cue/Comms In Prefade Or Off-Line Monitoring Mode
The matrices used in the preceding example were 1 & 2 . These matrices have been applied, as displayed above, in all the manual Man Dflt Mono/IFB Man Dflt Stereo default profiles except Tieline Page 309 T E C H N O L O G Y... -
Page 310: Using Cue/Comms As 'Local' Intercom In Stereo
Effectively, commentators can listen to their own intercom, send talkback simultaneously to another codec and monitor audio levels being sent. The Manual Default Rem Intercom 1 & matrices shown in the preceding example are Tieline Page 310 T E C H N O L O G Y... -
Page 311: Talkback
(talkback receive) is also ‘discreet’ in that incoming audio is routed to HP1R HP2R Decoder 2 either commentator 1 or 2 ( ) as required via shown in the following image. Tieline Page 311 T E C H N O L O G Y... -
Page 312: Remote Cue
Manual Default Remote Cue matrix. This matrix is only preprogrammed into the Man Dflt Mono/IFB profile because this is the only manual default profile set to utilize communications. Tieline Page 312 T E C H N O L O G Y... -
Page 313: Phone As Talkback
File for later retrieval or to program onto other codecs. To do this click on Save Config the top left corner of the Box menu and click on . Name the file Tool Save and then click Tieline Page 313 T E C H N O L O G Y... -
Page 314: Section 33. View Matrix
Input 1 routing for is, simply click on the button adjacent to and this will turn yellow and show the routing as displayed in the following image. Tieline Page 314 T E C H N O L O G Y... -
Page 315: An Example: Integrated Communications With A Tieline Broadcast Codec
As a default, Cue is always an outgoing send (except Remote Cue which displays Rx settings). 33.2. An Example: Integrated Communications with a Tieline Broadcast Codec The following is an example of a typical setup at a sports COMMANDER event. - Page 316 Operational Tip: which is programmed to operate for talkback, SOFTKEY cue or intercom purposes will operate even if a mic input’s button CHANNEL ON is not switched on. Tieline Page 316 T E C H N O L O G Y...
-
Page 317: Section 34. Unit Options
Powerup Profile Powerup Profile To set the for the codec please see within the Global Unit Settings Profile Editor menu in the Tieline Page 317 T E C H N O L O G Y... -
Page 318: Auto Reconnect
This drop-down menu is used to fix audio level incompatibility between a codec and another ieline brand of codec. 34.4.1. -18dB Full Scale (Tieline Codecs) This is the default setting for codecs. ieline 34.4.2. -14dB Full Scale (Other Codecs) This setting solves audio level incompatibility between a... -
Page 319: Section 35. Global Unit Settings
35.2. Speed Dial Phonebook Profile Speed Select between dialing with the Dial menu. See the How does Speed Dialing Work? section for more information about speed dialing. Tieline Page 319 T E C H N O L O G Y... -
Page 320: Powerup Profile
. To view the matrices for these profiles look Matrix Editor in the or once you have loaded a View Matrix profile view the settings in the section Profile Editor of the Tieline Page 320 T E C H N O L O G Y... -
Page 321: Serial Port Mode
Check the box to enable this function. (Related topic: Configuring GSM Connections via the RS232 Serial Port). Tieline Page 321 T E C H N O L O G Y... -
Page 322: Section 36. Phonebook Editor
An announcer with no knowledge of how to operate a codec can load a profile and dial the studio by simply recalling a stored memory number and pressing on the codec. ENTER/DIAL Tieline Page 322 T E C H N O L O G Y... -
Page 323: Name And Number
To program phonebook speed dialing press and select SOFTKEY 4 Menu [Configuration] > [System Settings] > [Speed Dial Memory] > [Phonebook]. Press several times to return to the main menu screen. CLEAR Tieline Page 323 T E C H N O L O G Y... -
Page 324: Figure 93: Speed Dialp
If you select by pressing , the codec SOFTKEY 2 will disconnect any current calls, load the new profile settings and all you Tieline Page 324 T E C H N O L O G Y... -
Page 325: Programming Profiles Using Toolbox
Following is an image of the Box software. This Tool software can be used to program numbers and profiles into your codec easily. Figure 95: Phonebook Editor in ToolBox Tieline Page 325 T E C H N O L O G Y... -
Page 326: Storing The Phonebook
Paste Ph Book: Loads the phone book from a PC file into the Tool Phonebook Editor screen, for inspection and editing. Phonebook file format: Phonebook files are stored as a Codec Phonebook (*.cpb) File. Tieline Page 326 T E C H N O L O G Y... - Page 327 If you wish to save these entries you must save your profile settings to a Configuration File. Tieline Page 327 T E C H N O L O G Y...
-
Page 328: Section 37. Troubleshooting Tips
For more information please see the sections Automatic Redial Auto reconnect in this manual. Tieline Page 328 T E C H N O L O G Y... -
Page 329: Isdn Troubleshooting
5. If your ISDN line has two B channels, try to ring each codec from itself. It must get connected instantly and remain connected for a few seconds. This way you can see which side the problem is from. Tieline Page 329 T E C H N O L O G Y... -
Page 330: Gsm Troubleshooting
37.5. IP Troubleshooting Please check our website regularly for updates to the IP knowledge base at www.tieline.com/IP . Consult the “IP and 3G Streaming Reference Manual” for detailed troubleshooting and connection information. Tieline Page 330 T E C H N O L O G Y... -
Page 331: Troubleshooting
If this test works, it is likely that you have a network problem and we recommend you contact us at support@tieline.com for more assistance. -
Page 332: Section 38: Glossary
Internet access and e-mail on the move. (Information courtesy of GSMworld.com) Page 332 Tieline T E C H N O L O G Y... - Page 333 Local Exchange Provides ISDN services - the Network side of the ISDN loop. Local Exchange Carrier A local phone company such as regional Bell operating companies. Page 333 Tieline T E C H N O L O G Y...
- Page 334 A technique used by cell-phone networks where the up link and the down link use the same frequencies for transmission. A transport layer protocol which sends data between two hosts which can be received out-of-order. Page 334 Tieline T E C H N O L O G Y...
- Page 335 (Common in the U.S.A.) Wireless Application Protocol (WAP) is the leading standard for information services on wireless terminals such as digital mobile phones (see also CSD and HSCSD). Page 335 Tieline T E C H N O L O G Y...
-
Page 336: Section 39. Portable Powering Solutions
Go to Table of Contents Section 39: Portable Powering Solutions Section 39. Portable Powering Solutions 39.1. Tieline Battery Module battery module is the ideal ieline wireless powering solution if you on the road and need to power your codec in remote locations. -
Page 337: The 12 Volt Vehicle Power Supply Cable
Connecting with the engine of the vehicle running may interfere with the performance of your codec or your mobile connection. 4. We take no responsibility for unforeseen damage to a vehicle’s battery. Page 337 Tieline T E C H N O L O G Y... -
Page 338: Appendix 1. Connector Wiring
The entire implementation of the balanced to unbalanced is the epitome of the time worn don’t fix it if is not broken rule. In other words, if it works and doesn’t hum it must be wired satisfactorily. Page 338 Tieline T E C H N O L O G Y... -
Page 339: Ppendix 1.2. Rts Headphone Connector
PC DB 9 female, you would connect Pin 2 RxD on the male connector to Pin 2 TxD on the female connector. Following are diagrams of the pin configurations of the DB9 and DB25 connectors that connect to a codec. Page 339 Tieline T E C H N O L O G Y... -
Page 340: D9 (Rs 232) Data And Interface Connectors
Table 23: X.21 Pin-outs for D-15 Connectors With this pin configuration all signals are balanced. The DCE (Typically ISDN TA) provides Signal Timing, ensuring X.21 data is synchronous. Page 340 Tieline T E C H N O L O G Y... -
Page 341: Figure 96: Female D15 I
Go to Table of Contents Appendix 1: Connector Wiring Figure 96: Female D15 Interface Connector Figure 97: Male D15 Interface Connector Page 341 Tieline T E C H N O L O G Y... -
Page 342: Appendix 1.6. X.21 Connections
X.21 plug-in module and a DCE modem with a DB25 female ieline connector. This is a fairly common pin configuration but please check the user manual of your modem to ensure it is compatible with your device. Tieline Tieline Pin- Signal Pin–outs for Modem (DTE) -
Page 343: Xlr 4 Pin Power Connectors
They are rated to 350 volts peak across the contact closure and they have a maximum current rating of 120 milliamps. The contact closure resistance is approximately 35Ω. Page 343 Tieline T E C H N O L O G Y... -
Page 344: Can Cable Wiring Configuration
Go to Table of Contents Appendix 1: Connector Wiring Appendix 1.10. CAN Cable Wiring Configuration Page 344 Tieline T E C H N O L O G Y... -
Page 345: Appendix 2. Software License
(RAM) for purposes of using the Software Product. b. Storage. You may copy the Product into the local memory or storage device of Tieline Hardware. c. Copying. You may make archival or backup copies of the Software Product, provided the copy contains all of the original Software Product's proprietary notices and that it is used only for backup purposes. - Page 346 8. CONSENT TO USE OF DATA. You agree that Tieline and its affiliates may collect and use technical information you provide in relation to support services related to the Software Product. Tieline agrees not to use this information in a form that personally identifies you except to the extent necessary to provide such services.
-
Page 347: Appendix 3. Warranty
Appendix 3: Warranty Appendix 3. Warranty TIELINE TECHNOLOGY (Manufacturer) warrants that this product is free of defects in both materials and workmanship. Should any part of this product be defective, the Manufacturer agrees, at its sole option, to: a) Repair or replace any defective part free of charge for a period of two years from the date of the original purchase, provided the owner returns the equipment to the manufacturer. -
Page 348: Appendix 4. Compliances
Changes or modifications not expressly approved by Tieline Pty Ltd could void the user’s authority to operate the equipment. If this equipment does cause harmful interference to radio or television reception,... -
Page 349: Appendix 4.3. Ic
Telephone Company will provide advance notice for you to make the necessary modifications in order to maintain uninterrupted service. If you experience problems with this equipment, contact TIELINE Pty Ltd, 25 Irvine Drive, Malaga. Western Australia, 6090. Ph +61 8 9249 6688 Fax +61 8 9249 6858 email info@tieline.com (web page www.tieline.com) for repair and... -
Page 350: Appendix 5. Codec Specifications
Go to Table of Contents Appendix 5: Codec Specifications Appendix 5. Codec Specifications Page 350 Tieline T E C H N O L O G Y... -
Page 351: Appendix 6. Credit Notices
Services LLC or its affiliates in the United States and/or other countries. Other product names mentioned within this document may be trademarks or registered trademarks, or a trade name of their respective owner. Page 351 Tieline T E C H N O L O G Y... -
Page 352: Index
Compliances........ 9, 348 Algorithms, manual default profile CE & CE Tick......349 settings ........ 238, 248 FCC Part 68........ 348 Algorithms, Tieline Music Plus ..211 IC of Canada....... 349 Antennae..........20 REN..........348 Arrows, Module Indicators..2, 10, 29 Configuration File System..4, 17, 18,... - Page 353 Leased lines, operation and GSM, using two connections ... 56 configuration...... 233, 328 Lightning, Safety Notice....13 Line Checks........2, 65 Headphone Connector ....9, 339 Line Quality ........2, 64 Page 353 Tieline T E C H N O L O G Y...
- Page 354 Object and Operation Menus . 12, 289 296, 300, 302, 311, 312, 317, 318, Operating the Codec ....3, 95 319, 320, 322, 325, 326 Profiles, copy and paste functions..5, PABX..........64 Page 354 Tieline T E C H N O L O G Y...
- Page 355 Go to Table of Contents Index Profiles, creating new ..5, 192, 325 Thunderstorms, Safety Notice ..13 Profiles, deleting ......5, 194 Tieline Battery Module....9, 336 Profiles, renaming.......5, 194 Toolbox Profiles, Selecting......2, 34 Defaults........171 Set factory defaults ..... 171 ToolBox software...
Need help?
Do you have a question about the i-Mix G3 TLM 600 and is the answer not in the manual?
Questions and answers