Advertisement
Quick Links
Advertisement

Subscribe to Our Youtube Channel
Related Manuals for SpeakerCraft RSA-1.0

Summary of Contents for SpeakerCraft RSA-1.0
- Page 1 INSTALLATION INSTRUCTIONS RSA-1.0 Remote Serial Adaptor...
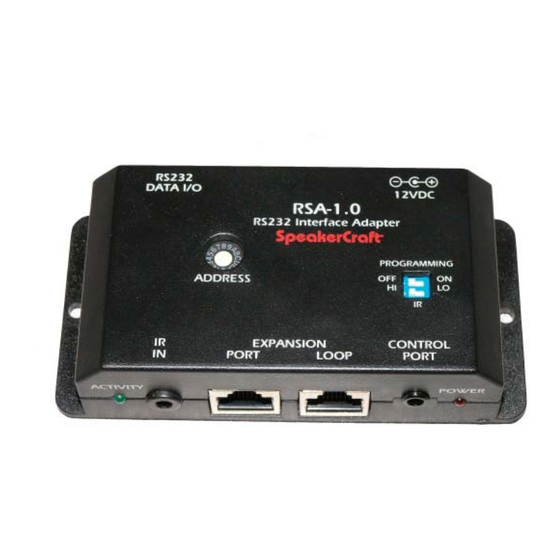
- Page 2 8. EXPANSION LOOP - RJ45 jack primarily used to connect to the Expansion Port on additional RSA-1.0(s) when mul- tiple RSA-1.0’ s are used to control multiple RS232 devices in a single system. The Expansion Loop and Expansion Port jacks are parallel. Up to 16 RSA-1.0’ s can be used in a single system.
-
Page 3: Installation
SpeakerCraft MZC-66/88 to the Expansion Port on a RSA-1.0. (Refer to Figure 2) 2. Using a properly confi gured DB9 cable to connect the RS 232 DATA I/O Port on the RSA-1.0 to an appropriate RS 232 Data I/O Port on the device being controlled. (Refer to Figure 2) 3. - Page 4 2. When using multiple RSA-1.0’ s set the Address Switch on each RSA-1.0 to a different address. Up to 16 different addresses can be confi gured. When using multiple RSA-1.0’ s keep a written record of each RSA’ s Address Switch setting and the device it is intended to control. This information will be critical during programming.
- Page 5 Page 5 5. Select an Address from the Address pull-down. (Refer to Figure 4) If using only one RSA-1.0 use the default of ‘0’. If using multiple RSA-1.0’ s , set each to a different address. 6. Left click OK in the Expansion Device Setup Window to set the Address.
- Page 6 ‘RSA-1.0 Add. 0 RS232’ indicating that the command has been properly associated with the RSA-1.0. If an EZ-Pad button press does not properly execute control functions, this is a good place to look in troubleshooting to confi rm Zone/ EZ-Pad/Button/RSA-1.0/RS232 command confi...
- Page 7 RSA-1.0 Installation Instructions Page 7 9. Left click Modify in the Com Port Settings box, to make any changes necessary to: Baud Rate, Data Bits, Parity and Stop bits, per the manufacturer’ s protocol. The Serial Port Settings pop-up will appear. Make necessary changes and click OK.
-
Page 8: Specifications
RSA-1.0 Installation Instructions Page 8 SPECIFICATIONS Dimensions: 4.3”L x 2.125”W x 1”H Power Requirement: 12V DC; 200mA (SpeakerCraft PS-1.0 Power Supply) Connectors Power: 2.1mm coaxial jack IR In: 3.5mm mini jack Network: 2 x RJ45 RS232: DB9M Control Port: 3.5mm mini jack (4-circuit) -
Page 9: Limited 2-Year Warranty
SpeakerCraft Inc. or a SpeakerCraft Inc. Authorized Dealer has been advised of the possibility of such damages, or for any claim by any other party. - Page 10 RSA-1.0 Installation Instructions Page 10 940 Columbia Avenue, Riverside, CA 92507 (800) 448-0976 Fax (951) 787-8747 www.speakercraft.com LIT07105...
Need help?
Do you have a question about the RSA-1.0 and is the answer not in the manual?
Questions and answers