Table of Contents
Advertisement
Advertisement
Table of Contents

Related Manuals for DynaVox EyeMax


Summary of Contents for DynaVox EyeMax
- Page 2 United Kingdom United Kingdom DynaVox® is a registered trademark of DynaVox Systems, LLC. DynaVox EyeMax and DynaVox Vmax+ are registered trademarks of DynaVox Systems LLC. All other brand and product names mentioned are trademarks or registered trademarks of their respective holders.
-
Page 3: Table Of Contents
Connecting EyeMax to Maestro ........ - Page 4 General Issues ............69 DynaVox...
-
Page 5: Chapter 1: Introduction
This document describes the installation and use of the DynaVox EyeMax for eye tracking. The EyeMax enables a user to make selections by fixing his or her gaze at specific objects on the device screen. Once the EyeMax is properly connected and calibrated, conversation, environmental control, and even email and the Internet are only a blink (or gaze) away. -
Page 6: System Requirements
See the picture on the previous page for reference. • DynaVox Series 5 Software: No matter if you use a Maestro or a Vmax+, your speech generating device must be running version 1.07.2 (or later) of the Series 5 Software. -
Page 7: Emergency Use (Intended Use Of This Product)
EyeMax and rest until you feel well again. The length of time that the EyeMax can be used before feeling strain or fatigue will vary from person to person. You should listen to your body and rest when it tells you. -
Page 8: Light Exposure
• The EN 60825-1 Laser Product Safety Standard The maximum level possible with the EyeMax in any setting never gets close to the emission limits set by these standards. A person using the EyeMax during regular operation is exposed to less than 0.1% of the accepted long-time exposure according to EN 60825-1/A1-A2. This exposure is also well within the safety guidelines given in the book, 1996 TLVs and BEIs, by the American Conference of Governmental Industrial Hygienists. -
Page 9: Chapter 2: Hardware Overview
Hardware Overview This section describes the physical features of the EyeMax, including each of the items in the shipping box. It also identifies each part of the device and its purpose, and also contains tips on properly handling and cleaning the EyeMax. -
Page 10: Hardware Features
Camera: The camera is mounted in the center of the EyeMax. It works with the IR transmitters to track the movement of the user’s eyes. • Eye Lock LEDs: These green LEDs will light up when the EyeMax has a lock on the position of the user’s eye. •... -
Page 11: Left Side
Chapter 2: Hardware Overview Left Side The left side of the EyeMax contains a variety of connector ports that you can use to connect it to your Maestro/Vmax. It also contains power and charging indicators. Refer to the picture below:... -
Page 12: Product Care & Handling
You may need to ship the devices to DynaVox for repairs. AUTION Never, under any circumstances, disassemble any of your DynaVox hardware - Maestro, Vmax, or EyeMax. Doing so for any reason will void the warranty, and you will be responsible for the cost of any required repairs. DynaVox... -
Page 13: Chapter 3: Installation & Setup
Since the device mount and mounting plate may be shipped separately, you may receive your EyeMax kit from DynaVox before you receive the mount. If that is the case, the caregiver can still connect the EyeMax to your Maestro/Vmax, charge the batteries, and begin to get familiar with the Series 5 software. - Page 14 4. Slide the battery "up" (towards the front of the Maestro). Make sure that the battery is in complete contact with the Maestro, along the entire front wall of the battery well. 5. While holding the battery securely in this position, slide the 2 battery buttons to the "inside" (locked) position. DynaVox...
- Page 15 ACK OF AESTRO 2. Connect the EyeMax to the bracket, below the Maestro. Use a Phillips-head screwdriver to tighten the 4 screws in the back of the EyeMax (circled in the picture below). ONNECTED TO RACKET 3. Connect the mounting plate to the bracket, just below the handle. Use a Phillips-head screwdriver to tighten the 2 screws at the top of the mounting plate (circled in the picture below).
- Page 16 Making the Power & USB Connections - EyeMax to Maestro 1. Connect the cable coming from the USB port on the EyeMax to one of the USB ports on the right side of your Maestro (as indicated in the picture below).
-
Page 17: Connecting Eyemax To Vmax
ONNECTING AX TO EFERENCE If you want to connect your EyeMax to a Maestro device, see Connecting EyeMax to Maestro on page 9. Installing/Replacing the Vmax Battery When your Vmax is shipped, the battery is not installed. Before you can turn on your Vmax, you must install and charge the battery. - Page 18 The battery should lie flat in the battery well. At this point, you must connect the battery door that is attached to the EyeMax, and make the necessary cable connections between the two devices. Continue with Connecting EyeMax to Vmax on page 14.
- Page 19 Making the Power & USB Connections - EyeMax to Vmax 1. Connect the cable coming from the USB port on the EyeMax to one of the USB ports on the left side of your Vmax (as indicated in the picture below).
-
Page 20: Charging The Batteries
CON IN THE ITLE If the EyeMax battery begins to run out of power, the charging indicator LED on the left side of the EyeMax will blink (see Left Side on page 7). You should recharge the batteries as soon as possible. -
Page 21: Charging Indicator
Charging Indicator Charger Port AUTION Never connect any other power adapter to your EyeMax. Doing so could cause serious damage to your device. 3. Plug the adapter into an electrical outlet. 4. When the batteries are charging, the amber charging indicators will light up. These indicators are located just above the touch screen on your Maestro/Vmax and on the left side of the EyeMax. -
Page 22: Mounting The Eyemax System
If you are connecting your EyeMax to a Vmax, you should remove the support leg from the back of the Vmax if you intend to keep the EyeMax attached to it for a long time. Refer to Installing/ Replacing the Vmax Battery on page 13. - Page 23 NGLE FOR SERS WITH LASSES For users leaning to the side, it is helpful to tilt the EyeMax System sideways as well. Rotating the EyeMax System to match the user’s head angle will greatly increase the allowed head movement. ROPER...
-
Page 24: Eye Track Status Window
Eye Track Status Window The Series 5 software provides an Eye Track Status window that dynamically displays if the EyeMax System and the user are both positioned properly for optimal use. An example of an Eye Track Status window is shown below. -
Page 25: Mounting Options
System. There are also several other mounting options available. Because of this range of options, mounts are not included in the EyeMax kit that you received from DynaVox. For more information about the mounting options available from DynaVox, please contact DynaVox Customer Care and Sales Support. - Page 26 Chapter 3: Installation & Setup DynaVox...
-
Page 27: Chapter 4: Series 5 Software Settings
The software default settings may differ from those that were determined as “ideal” during the user’s trial session with the EyeMax. It may be helpful to contact the person who led the evaluation session, to obtain those software settings. These software settings can also be modified over time, as the user gains experience with the EyeMax, or as the user’s access... - Page 28 ETTINGS 4. Select the Track Eye drop-down menu and select which eye(s) should be traacked by the EyeMax: Both Eyes, Left Eye, or Right Eye. 5. Select the Select With drop-down menu and then choose one of the available options:...
- Page 29 Adjust the sliders to increase or decrease the time frames for each of the selection options: • Select and drag the Blink Time slider to adjust the time that you must maintain the blink to make a selection (the primary action). EyeMax User’s Guide Part # 401216-C...
- Page 30 If you are using an open EyeMax device, you may select the Additional Desktop Settings button to define the settings used when this selection method is extended to the Windows desktop. Refer to Additional Desktop Settings for Selection Methods (Eye Tracking) on page 8 for more information.
- Page 31 13. Many individuals who use eye tracking equipment depend on seeing the screen cursor. Select the Show Cursor check box if you want the cursor to be visible on the touch screen. Otherwise, make sure the Show Cursor check box is not selected. EyeMax User’s Guide Part # 401216-C...
- Page 32 The Eye Tracking selection method only recognizes input from Switch 1. You cannot use two switches during eye tracking. 14. Select the Click check box if you want your EyeMax device to make an audible sound when it selects an object. You may also use the Volume slider to increase or decrease the volume of the click.
-
Page 33: Modify Zoom Settings
2. Select the Zoom Area drop-down menu and choose how much of the touch screen will show the magnified area: • Entire Screen - Shows the magnification on the entire screen and displays the Zoom Toolbar. EyeMax User’s Guide Part # 401216-C... - Page 34 The Zoom Toolbar provides controls that help you move around the zoomed portion of the page, increase or decrease the zoom actor, or even cancel the zoom and start over. The Zoom Toolbar has several settings that you can modify from within the Zoom Settings menu. DynaVox...
- Page 35 When you have chosen the desired color, select OK to close the Color Selector menu. 12. When you are finished customizing the zoom settings, select OK to save the settings and close the Zoom Settings menu. EyeMax User’s Guide Part # 401216-C...
-
Page 36: Modify Highlight Rules Settings
Fill Type Use the Fill Type drop-down menu to select the type of fill you want to use for the currently highlighted object: None, Bottom Up, or Contract (Preferred for EyeMax), which is from the outside edges in). DynaVox... - Page 37 The Drain options give users the option of not losing their current efforts in selecting an object if their gaze briefly leaves the object. This may allow certain users to successfully select objects of a smaller size than they would otherwise be able to access. EyeMax User’s Guide Part # 401216-C...
-
Page 38: Modify Eye Tracking Assistance Settings
If the visual bumpers are enabled, they will display a “red haze” on the perimeter of the screen when the user’s head moves too close to a particular side of the screen. Refer to the following examples: DynaVox... - Page 39 4125551212@provider.com (where “4125551212” is the phone number, and “provider.com” is the cellular service provider) may send a text message to the phone, rather than an email message. Check with your cellular service provider for more information about this possibility. EyeMax User’s Guide Part # 401216-C...
- Page 40 • When Gaze Pause is enabled, all the user has to do is look beneath the EyeMax camera (between the LEDs) for a brief time. The Pause Hotspot will appear, containing a the Gaze Pause “red eye” icon (refer to the picture below), and the software will not track eyes to make a selection.
-
Page 41: Modify Advanced Eye Tracking Settings
ETTINGS 5. Select the check box at the top of the menu. 6. Select the Timeout drop-down menu and choose the time interval that your eyes are ‘lost’ before the software should take action. EyeMax User’s Guide Part # 401216-C... - Page 42 Dashboard Hotspot on page 46). Alarm The device will sound an audible alarm to alert a caregiver or others nearby that your eyes have been “lost” by the EyeMax. Open Dashboard The software will open your Dashboard popup and sound an and Alarm audible alarm.
-
Page 43: Modify Eye Tracking Calibration Settings
They can rest or re-position themselves while the target is paused, and can use the external switch to take the calibration reading when they are properly positioned and prepared to continue. EyeMax User’s Guide Part # 401216-C... - Page 44 9. Repeat step 8 if you want to use more custom symbols in the calibration process. 10. If you want to remove a symbol (or custom photo) from one of the calibration buttons, complete this step: Select the button that you want to clear. The Select a Symbol menu will open. DynaVox...
- Page 45 Chapter 4: Series 5 Software Settings Select No Symbol. The Select a Symbol menu will close, and the button will be cleared in the Calibration Settings menu. 11. Select OK to close the Calibration Settings menu. EyeMax User’s Guide Part # 401216-C...
-
Page 46: Modify Additional Desktop Settings (Open Devices Only)
6. Select Additional Desktop Settings. The Additional Eye Tracking Desktop menu will open. DDITIONAL RACKING ESKTOP 7. Select the Show Dwell Time Animation drop-down menu and choose the style for the dwell time animation when making a selection on the Windows desktop: Clock, Contract (Preferred for EyeMax), or None. DynaVox... - Page 47 (Selecting this text box will open the DynaVox system keyboard, so you can use the larger keyboard to enter text. Selecting OK on the system keyboard will place your text in the text box.)
-
Page 48: Using Hotspots
The following example screen shows all three hotspots, active around the touch screen. The example shows all three hotspots at their largest size. Hotspots can be sized smaller, so that they do not occupy as much room on the screen. DynaVox... - Page 49 Chapter 4: Series 5 Software Settings HREE OTSPOTS EXAMPLE Zoom Hotspot Dashboard Hotspot Pause Selection Hotspot (left position) (center position) (bottom right position) EyeMax User’s Guide Part # 401216-C...
-
Page 50: Using The Dashboard Hotspot
Assistance Settings menu, the Dashboard Hotspot may display a yellow circle in the middle. This would indicate that the user may need to improve their eye tracking calibration. Refer to Modify Eye Tracking Assistance Settings on page 34 for more information. DynaVox... - Page 51 The Navigator Dashboard popup has been assigned as the default Dashboard popup, because it is optimized for eye tracking - it provides immediate access to eye tracking status tools, eye tracking calibration, and an alarm. ASHBOARD OPUP EXAMPLE RACKING ASHBOARD EyeMax User’s Guide Part # 401216-C...
-
Page 52: Using The Pause Selection Hotspot
To activate the Pause Selection Hotspot, simply select it. A large pause icon will briefly appear in the middle of the touch screen, and then fade away, and the icon in the center of the Pause Selection Hotspot will turn red. Refer to the following example. & R AUSE AUSE ELECTION OTSPOT EXAMPLE DynaVox... -
Page 53: Using The Zoom Hotspot
Pause Selection Hotspot icon will return to its normal color (blue). If Gaze Pause is currently active, you can turn it off by either selecting the Pause Hotspot on the touchscreen, or by looking at a point below the EyeMax camera (typically right between the two LEDs). -
Page 54: Define The Hotspot Settings
Select the Show Dashboard Hotspot check box to display the Dashboard Hotspot on the touch screen of your device. Select the Position drop-down menu in the Dashboard group box and choose the area along the edge of the touch screen where you want the Dashboard Hotspot to be displayed. DynaVox... - Page 55 You can choose for the software to display a large icon in the middle of the screen whtn the Pause is activated or deactivated (this icon will fade away after a few seconds). To do so, select the Show Fading Icon check box. EyeMax User’s Guide Part # 401216-C...
- Page 56 Show Full-Size Hotspots on Desktop check box (see Adjusting Hotspot Size on the Desktop in the Searchable Help for more information). 9. Select OK to close the Hotspot Settings menu. Keep selecting OK to close all open menus. DynaVox...
-
Page 57: Speak Button In The Message Window
1. Select Main Menu > Setup > Setup Menu. The Setup menu will open. 2. Select Interface Features. The Interface Features menu will open. 3. Select the Show a Speak Button check box. 4. Select Speak Button Settings. The Speak Button Settings menu will open. EyeMax User’s Guide Part # 401216-C... - Page 58 OK when finished. The new value will be displayed on the slider thumb. 7. Select OK to close the Speak Button Settings menu. Keep selecting OK to close all open menus. The Speak button will appear on the right side of the Message Window on every page. DynaVox...
-
Page 59: Chapter 5: Calibration
Calibration The EyeMax should be properly calibrated in order to accurately track the user’s eyes and make the desired selections on the Maestro/Vmax screen. The following sections describe the process for calibrating the EyeMax. The first method uses the default Dashboard popup, and the second method uses the Eye Tracking Settings menu (available from the Setup menu). -
Page 60: Calibrate Eye Tracking (Via Eye Tracking Dashboard)
RACKING ASHBOARD The EyeMax should be calibrated in order for the Eye Tracking selection method to work as accurately as possible. It must be able to find your eyes and track their movements. You may need to recalibrate the EyeMax throughout the day, for a number of reasons (e.g., fatigue, shifting positions, etc.). - Page 61 If you are calibrating with a switch, the target will complete its animation, and then pause. Make sure that both of the EyeLock LEDs on the front of the EyeMax are a steady green color (not blinking), and select your switch. The calibration reading will not take place until you select the switch.
-
Page 62: Calibrate Eye Tracking (Via System Menus)
The Series 5 software menus provide a simple process for calibrating the EyeMax. If this is your first time calibrating the EyeMax, please make sure that all of the options in the Eye Tracking Settings menu have been set appropriately (refer to Adjusting the Eye Tracking Selection Method Settings on page 23 for more information). -
Page 63: Chapter 6: Navigator User
Navigator User The EyeMax will work with all existing page sets that are available on the Maestro/Vmax, even custom pages. However, the Series 5 software includes a user that was uniquely designed to work with the Eye Tracking selection method. This user is named Navigator. - Page 64 AVIGATOR NTRO OPUP After you calibrate the EyeMax, you are given the option to test your calibration. • Choosing Yes will take you through a series of test pages that will display a target symbol on a button. Use your eyes to select the target. When you finish with one page of testing, you may choose to continue testing on a page with smaller buttons (to determine the size and number of buttons you can successfully access), or you may stop testing.
-
Page 65: Select A Keyboard Layout
The Series 5 software will automatically set the following elements of the Navigator user so that they compliment your keyboard layout choices: • Navigator home page • Dashboard Hotspot placement • Dashboard Onscreen Keyboard • Navigator main page EyeMax User’s Guide Part # 401216-C... - Page 66 (see Navigator Introduction on page 59) for the first time. • From the Dashboard (see Dashboard Popup (example - EyeTracking Dashboard Main) on page 47), select the Settings button. Then select Advanced Settings, and then select Keyboard Layout Selection. DynaVox...
-
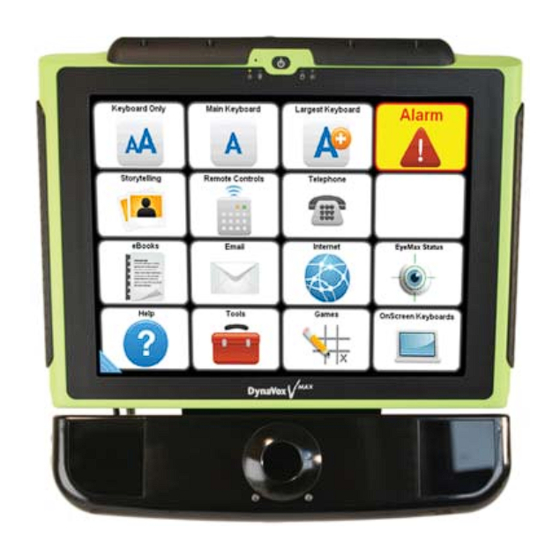
Page 67: Navigator Main Page
It provides a good framework for telling stories. • Remote Controls - Opens the remote control master page, which allows you to use your Maestro/Vmax to control electronic appliances like TVs, DVD players, radios, and more. EyeMax User’s Guide Part # 401216-C... - Page 68 Internet connection to use this page.) • EyeMax Status - This button opens the Dashboard, which provides links to Improve Eye Tracking, Test Eye Tracking, and eye tracking Settings (which provide the means to adjust calibration, assistance, and other parameters without having to open the system menus).
-
Page 69: Opening The Navigator User
5. Select the Yes button to confirm that you want to change users. 6. Select the Exit DynaVox button to confirm that you want to restart your device software. The Series 5 software will restart. A series of splash screens may be presented for a few moments. - Page 70 Chapter 6: Navigator User DynaVox...
-
Page 71: Chapter 7: Troubleshooting
Dashboard) to ensure that the device is positioned properly and that the eyes are in view of the EyeMax camera. There should be a large green “+” mark on each pupil, and two smaller green “+” marks below each pupil. If there is a bright glint in another location (e.g., on wire-rim glasses rims), you may need to reposition the device or the user. - Page 72 • Try tilting and angling the device so that any reflections of the EyeMax lights on the glasses are as far away from the user’s pupil as possible.
-
Page 73: General Issues
ENERAL SSUES Each time the EyeMax cannot locate the user’s pupil(s), it considers that a "blink" (even if the user may not have actually blinked). Dwell may therefore be a better selection method setting for users with excessive head movement. - Page 74 Encourage the user to take occasional breaks (at least once every hour). • Encourage the user to make a conscious effort to blink more often. • Use artificial tears to moisten the user’s eyes. • Typically, this fatigue will decrease in a few days. DynaVox...
Need help?
Do you have a question about the EyeMax and is the answer not in the manual?
Questions and answers