
Summary of Contents for Blyss BLY1
- Page 1 Wireless Alarm System BLY1 Barcode 5397007039283 Wireless Alarm System.indd 1 01/06/2012 10:57...
-
Page 2: Table Of Contents
BLY1 Wireless Alarm System Let’s get started... These instructions are for your safety. Please read through them thoroughly before use and retain them for future reference. Getting started... Introduction and Safety Overview of System Planning your Installation Installing your System... -
Page 3: Getting Started
BLY1 Wireless Alarm System Getting Type box started... Introduction and Safety Overview of System Planning your Installation Installing your System 9-15 Wireless Alarm System.indd 3 01/06/2012 10:57... - Page 4 Introduction & Safety BLY1 Wireless Alarm System INTRODUCTION The wireless alarm system is designed to protect your home. It is a simple to use, easy to install unit. No special tools or training are required, all fixings are included. IMPORTANT: Please read this manual carefully, in full, before commencing installation.
-
Page 5: Overview Of System
Overview of System BLY1 Wireless Alarm System This wireless alarm system is based on wireless radio technology to give exceptional levels of protection and reliability. It has the ability to control up to eight detectors, three remote keys (optional accessory) and one wireless siren. -
Page 6: Overview Of System
Overview of System BLY1 Wireless Alarm System System features • Detector /Key /External Siren learning – Every wireless device (detector, Key, External Siren) contains an unique identification code. During installation, the control unit will learn which devices belong within your system by receiving coded radio transmissions from each detector. -
Page 7: Planning Your Installation
Planning your Installation BLY1 Wireless Alarm System Location of components Control unit – Location In choosing a suitable location you should bear in mind: • The need to reach the control unit easily, within the 30 seconds, when entering and leaving the premises, ideally passing only one detector. -
Page 8: Planning Your Installation
Planning your Installation BLY1 Wireless Alarm System Planning the location of system components Example of a domestic layout The 2 sample layouts below are intended as guides only but demonstrate two examples of how a house can be protected with the system. -
Page 9: Planning Your Installation
Planning your Installation BLY1 Wireless Alarm System The PIRs have been separately placed in bedroom 1, bedroom 2, bedroom 3, and the area where the control panel is installed, to protect these areas. The Door/Window contact detectors have been positioned to protect the front door, back door and windows on the 1st floor. -
Page 10: Installing Your System
Installing your System BLY1 Wireless Alarm System Installing the Control unit • Remove and retain the two holding screws from front cover of ST3x25KA control unit and screw carefully hinge off the front cover. Hole depth ˃22mm Fitting 5~6mm protrude surface •... - Page 11 Installing your System BLY1 Wireless Alarm System Power up the Wireless Devices and learning to the CU Before powering up the devices please read through this information regarding batteries: 1. An adult must carry out battery replacement and installation. 2. Remove exhausted batteries from this product.
- Page 12 Installing your System BLY1 Wireless Alarm System Powering up the Wireless PIR Detector(s): 1. Remove battery cover and insert two LR03 “AAA” size alkaline batteries incorrect polarity as shown. 2. Replace battery compartment cover. AAA 1.5V AAA 1.5V When the PIR is first powered up it will take 2 minutes for it to warm-up before it can be linked to the control unit.
- Page 13 Installing your System BLY1 Wireless Alarm System 2.2 a PIR Detector, trigger the PIR detector by simply moving your hand in front of the detector. Learn PIR When a PIR Detector has been learnt successfully, Z5, Z6, Z7 or Z8 zone LED depending on which next zone is unprogrammed) will flash.
- Page 14 Installing your System BLY1 Wireless Alarm System 3. Trigger the next device within 10 seconds to learn it and repeat for additional devices. If the system has reached its maximum capacity and no more devices ca be added. The control unit will not beep any more.
- Page 15 Installing your System BLY1 Wireless Alarm System 4. Locate the detector on the back plate and replace the retaining screw at the base of the unit. 5. Align the magnet as described above and fix in position with the two screws provided.
-
Page 16: Installing Your System
Installing your System BLY1 Wireless Alarm System Movement Detector/PIR final setup IMPORTANT: To extend the battery life, wireless PIR detectors are designed to detect once only before entering a “Sleep” condition for two minutes during which the unit will not trigger. Any movement seen by the PIR during this period would cause “Sleep”... -
Page 17: In More Detail
BLY1 Wireless Alarm System Getting more started... detail... Using the System 17-19 Maintenance Extending the System Specifications 20-21 Troubleshooting Guide Disposal and Recycling Wireless Alarm System.indd 17 01/06/2012 10:57... -
Page 18: Using The System
Using the System BLY1 Wireless Alarm System Control unit When the control unit is powered up, it will remain in standby mode. The PIN code can also disarm the system and put it into standby mode. a) Changing the user PIN code The User PIN code is factory set to 1234. -
Page 19: Using The System
Using the System BLY1 Wireless Alarm System g) Part Arm the alarm system while at home Press “Part-Arm” button at the control unit or press “PARTIAL ARM” button at the remote key, (optional accessory) close the door and leave the house within the exit delay time (30 seconds at factory setting,) both PIR and magnetic contact are activated for protection after the exit delay time elapsed. -
Page 20: Using The System
Using the System/ BLY1 Wireless Alarm System Maintenance/ Extending the System Default settings Parameter Ex-factory Value User PIN code 1234 Entry/Exit delay 30 seconds Siren Duration 3 minutes Zone allocation for PIR and MC Detectors Zone 1 to 4 Magnetic Contact... -
Page 21: Specifications
Specifications BLY1 Wireless Alarm System Control unit Type Microprocessor based wireless control unit Housing material Zones 8 Alarm Zones–1 detector maximum per zone (8 detectors capacity) Entry/Exit Delay 30 seconds Siren Duration 3 minutes RF Receiver Frequency: 433MHz Power Supply 15V 500mA 50Hz AC/AC mains adaptor and 1 x 9V DC PP3 Alkaline for back-up power. -
Page 22: Specifications
Specifications/ BLY1 Wireless Alarm System Troubleshooting Control Panel Power Supply Adaptor Type AC/AC Adaptor with 3-pin UK style Housing material Rated Supply 230VAC 50HZ supply Output Extra Low Voltage (AC15V max at 500mA AC) Troubleshooting 1) Control unit (CU) Symptoms Possible causes and cures No power supply to unit. -
Page 23: Disposal And Recycling
Check with your local authority or retailer for recycling advice. Declaration B&Q hereby declares that this wireless product BLY1 is in compliance with the essential requirements and other relevant provisions of the Radio and Telecommunications Terminal Equipment (R&TTE) directive, 1995/5/EC. -
Page 24: Appendix
BLY1 Wireless Alarm System Appendix Appendix LED Alarm Indication Zone - Location Table Wireless Alarm System.indd 24 01/06/2012 10:57... -
Page 25: Led Alarm Indications
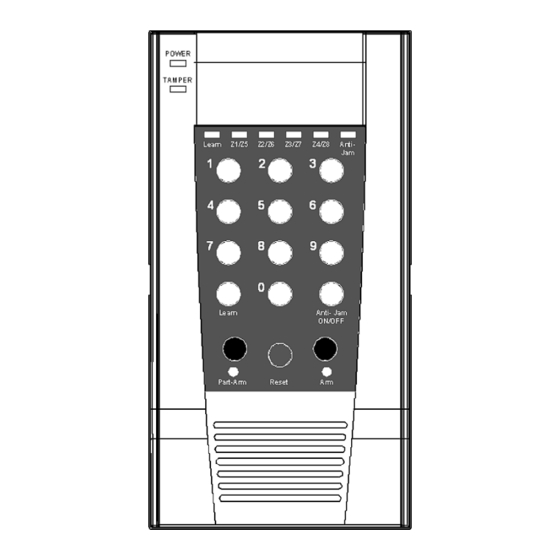
Appendix B BLY1 Wireless Alarm System LED Alarm Indication: Power Tamper Z1/Z5 Z2/Z6 Z3/Z7 Z4/Z8 (GREEN) (RED) (RED) (RED) (RED) (RED) STATUS Power Ready AC Failure Low Battery Flashing Z1 Alarm Z2 Alarm Z3 Alarm Z4 Alarm Z5 Alarm Flashing... -
Page 26: Zone-Location Table
BLY1 Wireless Alarm System Zone - Location Table: Zone Number Location B&Q, Chandlers Ford, Hants, SO53 3LE United Kingdom EAN 5397007039283 www.diy.com Customer Helpline 0844 736 9169 BLY1 Wireless Alarm System - Version 01 Wireless Alarm System.indd 26 01/06/2012 10:57...
Need help?
Do you have a question about the BLY1 and is the answer not in the manual?
Questions and answers