Advertisement
Table of Contents
- 1 Dolby Prologic
- 2 Table of Contents
- 3 Precautions
- 4 Front Panel and Rear Panel Illustration
- 5 Remote Control
- 6 Connections
- 7 Function Buttons on the Remote Control
- 8 Function Operation
- 9 MP3/WMA/MPEG4 Playing
- 10 Kodak Picture CD Playback
- 11 System Setup
- 12 Audio Setup
- 13 Troubleshooting
- 14 Technical Specification
- Download this manual
Advertisement
Table of Contents

Related Manuals for Nortek NDVX2105

Summary of Contents for Nortek NDVX2105
- Page 1 User Manual NDVX2105 DVD PLAYER...
- Page 2 WARNING: TO REDUCE THE RISK OF FIRE OR ELECTRIC SHOCK, DO NOT EXPOSE THIS APPLIANCE TO RAIN OR MOISTURE. CAUTION: TO REDUCE THE RISK OF ELECTRIC SHOCK, DO NOT REMOVE COVER (OR BACK). NO USER SERVICEABLE PARTS INSIDE. REFER SERVICING TO QUALIFIED SERVICE PERSONNEL.
-
Page 3: Dolby Prologic
holes are not covered to avoid overheating and malfunction. 8.Clear the panel and case with soft dry cloth only, do not apply any kind of thinner, alcohol or sprays. 9. The apparatus shall not be exposed to dripping or splashing and that no objects filled with liquids, such as vases, shall be placed on the apparatus 10. -
Page 4: Table Of Contents
Contents Precautions-----------------------------------------------------------------------------------------4 Front Panel and Rear Panel Illustration ------------------------------------------------------------5 Remote Control------------------------------------------------------------------------6 Connections------------------------------------------------------------------------------------8 Function Operation-------------------------------------------------------------------------------------11 MP3/WMA/MPEG4 Playing ------------------------------------------------------------------------15 Kodak Picture CD Playback--------------------------------------------------------------------------17 System Setup--------------------------------------------------------------------------------------------18 Troubleshooting-----------------------------------------------------------------------------------------22 10. Technical Specification--------------------------------------------------------------------------------24 GB-3... -
Page 5: Precautions
1. PRECAUTIONS Before using this unit, be sure to read the applicable items of the operating instructions and these safety suggestions carefully. Afterwards keep them handy for future reference. Take special care to follow the warnings indicated on the unit itself as well as in the operating instructions. -
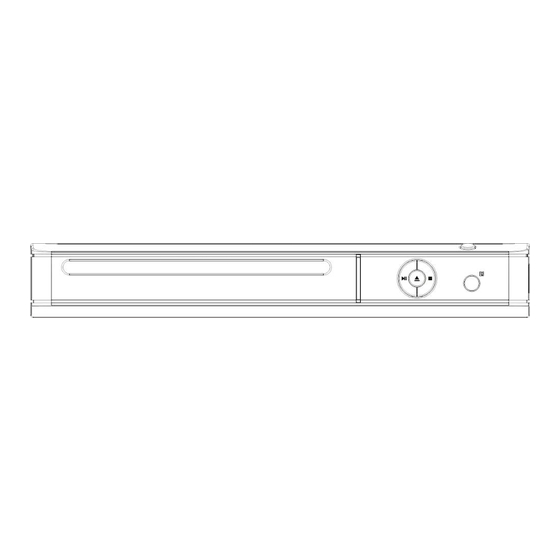
Page 6: Front Panel And Rear Panel Illustration
2. FRONT PANEL AND REAR PANEL ILLUSTRATION Front panel ① Disc Tray ② Play /Pause ③STOP ④ Power ⑤ Open/Close ⑥ Sensor Rear panel ① Component Video Output ② Composite Video Output ③ Downmix Left/Right ④ Coaxial Output ⑤ S-video Output ⑥... -
Page 7: Remote Control
3. REMOTE CONTROL 1. Power 2. Repeat 3. N/P 4. Subtitle 5. Angle 6. Language 7. Setup 8. Up button 9. Left button 10.Enter button 11.PBC 12.Volume - 13.Zoom 14.Return 15.L/R 16.Program 17.Clear 18.PREV 19.Next 20.V-Mode 21.Stop 22.Open/Close 23.A-B 24.Numeric Button 25.Time 26.Title 27.Right Button... - Page 8 Using the Remote Control Unless stated other wise, the remote control can operate all the features of the DVD Player, Always point the remote control directly at the remote sensor on the front of the DVD Player, not the TV. Battery Installation Remove the battery compartment lid on the rear of the remote control by sliding the lid down, then off.
-
Page 9: Connections
4.CONNECTIONS Turn off the power before connection. ● Turn on the power after finishing connection. ● Wires must be firmly connected; especially the plug shall be fully inserted. DVD+TV Notes: There are the following ways of connecting the player AV output to the TV set: S-video cable and left/right audio cable (set the video type to S-VIDEO) Composite video cable and left/right audio cable Component video cable and left/right audio cable (set the video type to component, if... - Page 10 DVD+ AV Amplifier: Notes: There are the following ways of connecting the player with amplifier: Left/Right audio output Coaxial audio output GB-9...
- Page 11 Warning: Do not connect any amplifier with coaxial connector that does not contain Dolby digital AC 3 or DTS decoder. Any attempt to do so and play of DVD disc will result in damaging your speakers and causing possible hearing injury. Other than DVD disc, VCD and CD can be operated normally without conforming to the above restriction.
-
Page 12: Function Operation
5. FUNCTION OPERATION 5.1 Function Buttons On the Front Panel These button’s function is the same as the corresponding buttons on the remote control. For the detail information, please see the following texts. 5.2 Function Buttons On the Remote Control POWER Press the button to switch the power between ON and OFF. - Page 13 DISPLAY Press the button to show the information of the current playing disc. TITLE Press the button to enter the appointed title. (Requires disc support) Direction key(UP/DOWN/RIGHT/LEFT) Press the keys to move the highlighted bar or cursor on any menu to your selection. ENTER Press the button to confirm your choice on screen.
- Page 14 VOLUME +/- Press + to increase volume and press – to decrease volume. REPEAT Each press of the REPEAT button will change the repeat mode. During VCD,CD playback, there are three modes: repeat Single, repeat All and Off. During DVD, playback, there are three modes: Repeat Chapter, Repeat Title and Off. Note: During VCD playback, the PBC mode must be set to Off During playback, press A-B to select point A, press it again to select point B.
- Page 15 RETURN When SVCD/VCD disc playing, press RETURN button to the main menu(PBC ON only). PROGRAM The Program Playback option allows entering the order in which the chapters or tracks will be played, up a maximum to 16. Press Program button to display the Program Menu. According to the highlight, move the cursor to the chapters / tracks you want to play, then press ENTER to confirm .
-
Page 16: Mp3/Wma/Mpeg4 Playing
6. MP3/WMA/MPEG4 PLAYING The MP3/WMA/MPEG4 disc has such a directory structure as shown in the right picture. Press Direction key to choose the root directory and then press ENTER button to enter into the sub directory. Press Direction key to choose the desired track and then press ENTER or PLAY to enjoy the music or movie. - Page 17 Shuffle: Shuffle mode enabled. When playback reaches the end of the current chapter/track, playback jumps to a random chapter/track. As the end of each chapter/track is reached, another random chapter/track will be played until all tracks/chapters have been played or the Shuffle mode is cancelled by toggling to a different "Mode"...
-
Page 18: Kodak Picture Cd Playback
7. KODAK PICTURE CD PLAYBACK The KODAK PICTURE CD disc has such a directory structure as shown in the right picture. Press Direction key to choose the root directory and then press ENTER button to enter into the sub directory. Press Direction key to choose the desired picture and then press ENTER or PLAY to enjoy the picture. -
Page 19: System Setup
8. SYTSTEM SETUP DVD menu setup Press the SETUP button on the remote control, the SETUP MENU (main) will be displayed. After accessing the setup menu, press the direction buttons for up and down movement to select an item desired, then press the ENTER button to confirm .Press LEFT direction button return to the menu of upper level. - Page 20 8.2 VIDEO SETUP Select Video in the setup menu, and display the Video submenu: 8.2.1 Aspect Ratio 4:3 : Choosing this setting if your DVD player is connected to a normal ratio TV. You can fill the movie to the entire screen of your TV. This might mean that parts of the picture (the left and right edges) won’t be seen.
-
Page 21: Audio Setup
RGB: Set the video output to SCART output. If you select SCART connection, you should set up the play mode as RGB state, then it will output normally. 8.3 Audio setup Select Audio in the setup menu, and display the Audio submenu. 8.3.1 Digital output Selecting the Digital Output setting allows the user to adjust the audio output on S/PDIF ports to work in harmony with the audio... - Page 22 Note: A certain sampling rate is used to record disks (measured in kHz); the higher this sampling rate, the better the sound quality. If you turn it off, make sure that the amplifier that you are using is compatible with 96kHz digital signals. 8.4 RATING SETUP Select Rating in the setup menu, and display the Rating submenu: Note: Not all DVDs support ratings.
-
Page 23: Troubleshooting
9. Troubleshooting Please read the user s manual carefully before using the DVD player. If you have any troubles in using this player, try to solve the problems by the suggestions mentioned below. If you can not remove the trouble after using all the suggestions, please contact the company or the technical service center authorized by us. - Page 24 Check the batteries of remote control and make sure that they are to be powerful and good conductivity. Direct the remote control to the IR sensor of the player. Check whether there are some obstacles between the remote control and IR sensor. ABNORMAL FUNCTION OPERATION Turn off the power, and then turn on again.
-
Page 25: Technical Specification
10. Technical specifications Signal system PAL/AUTO/NTSC Frequency 20Hz-20KHz ( at 1KHz 0 dB) Response Signal-to–Noisy ≥90 dB ( at 1KHz 0 dB) Ratio(Audio) Audio Distortion + ≤-60dB ( at 1KHz0dB) Noise Audio Output Vrms -1.0 (Analog audio) Video Output Composite: 1.0±0.2Vp-p Load impedance: 75Ω, imbalance, negative polarity Power Supply ~110-242V... - Page 26 GB-25...
- Page 27 P/N: 301-74056-01 GB GB-26...
Need help?
Do you have a question about the NDVX2105 and is the answer not in the manual?
Questions and answers