
Summary of Contents for Ozark BBQ1922
- Page 1 Owner’s Manual Model: BBQ1922 WARNING: FoR outdooR use oNly do not store or use combustable materials near this applicance use only ozark Mountain BBQ pellets with this smoker grill...
- Page 2 Introduction Congratulations on your purchase of your new Ozark Mountain Wood Fire Pellet Smoker Grill. With proper set-up, operation and maintenance, this applicance will provide you with years of delicious food and cooking enjoyment. IMPORTANT When you un-pack your grill, remove all parts and packaging material from the box and inside the grill.
-
Page 3: Parts And Tools List
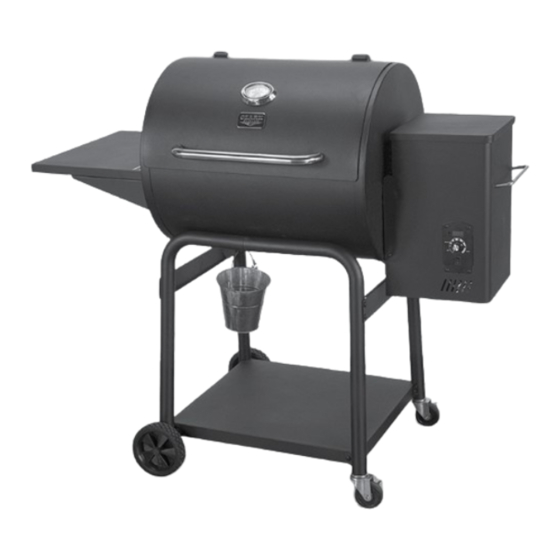
Parts and Tools List Part # Part Name Grill Pre-assembled side shelf with brackets Caster legs Wheel legs Casters Wheels Bottom shelf Side bars Door Door handle Hardware kit see next page for components Paddle vent Porcelain grill Grease drain pan Heat baffle Grease bucket Grill cover... - Page 4 Hardware Kit Components Part # Part Name Screws 1/4" Flat washers 1/4" Nuts 1/4" Axle pins Axle washers Spring washers 1/4" Wheel axles Bolts 1/4" Tools Supplied Part # Part Name Open end wrench for installing casters, legs and grill...
- Page 5 Assembly Instructions Follow these step-by-step instructions and you’ll be cooking in no time! OveRvIew Some components come pre-assembled, but you will need to complete the following assembly: • Connecting the legs • Attaching the side bars to the legs • Attaching the wheels and castors to the legs •...
- Page 6 ATTACH THe LegS To THe BoTTom SHeLf Parts required: Bottom shelf (10) Hardware required: 8 x Screws 1/4" (32) leg assembly Align the holes in the brackets of the caster legs and wheel legs with the holes in the bottom shelf (10).
- Page 7 With the convex centre part of the wheel towards the inside, insert a wheel axle (38) through each wheel (9) and wheel leg (6/7). Put an axle washer (36) on the other side, then insert the axle pin (35) caster leg through the hole in the wheel and wheel axle.
- Page 8 ATTACH THe Side SHeLf ASSemBLy To THe griLL Hardware required: screw 4 x Screws 1/4" (32) Align the four holes in the side shelf bracket (2/3) with the holes in the grill (1). Put a 1/4" screw (32) through each hole and tighten it.
- Page 9 Fill the pellet hopper with Ozark Mountain BBQ pellets. Never use other BBQ pellets, as Ozark Mountain BBQ pellets are the only ones designed specifically to work with this grill. Do not use heating fuel pellets as they may contain hazardous materials.
- Page 10 POsITION The PORCelAIN GRIll Position the porcelain grill (16) on the grill supports that run the length of the cooking area (not shown). POsITION The GReAse buCKeT Locate the grease drain tube, extending from the grill below the side shelf (3) on the left end.
- Page 11 Fill the pellet hopper with Ozark Mountain BBQ pellets. Never use other BBQ pellets, as Ozark Mountain BBQ pellets are the only ones designed specifically to work with this grill. Do not use heating fuel pellets as they may contain hazardous materials.
-
Page 12: Safety Instructions
Operating Instructions The temperature dial can be changed at any time to increase or decrease the cooking temperature of the grill. See the table below for recommended temperatures. HIGH/HIGHER for grilling MED/MID RANGE for slow cooking SMOKE for smoking and adding smoke flavour to food for holding foods at about 180º–200º... -
Page 13: Cleaning And Maintenance
Cleaning and Maintenance regularly clean grease from the pieces of the unit to prevent grease fires. It is easier to clean off grease when the grill is warm. DO NOT BUrN YOUrSeLF. • Change the aluminum foil on the grease drain pan. •... -
Page 14: Troubleshooting
Troubleshooting The GRIll FAIls TO IGNITe if the grill does not ignite or the fire goes out in the firebox While cooking, first try re-firing the grill: Turn the power switch to OFF. remove the porcelain grill, grease drain pan and heat baffle. Also remove any food. remove all unburned pellets and ash from the firebox. - Page 15 Plug the power cord into an appropriate, grounded electrical outlet and turn the power switch to ON. If the auger drive motor is working, the problem is the digital control, which will need to be replaced. If the auger drive motor is not working, but the draft inducer fan is working, the problem is the auger system, which needs to be checked: •...
-
Page 16: Wiring Diagram
Wiring Diagram WIRING DIAGRAM CONTROL SENSOR WHITE BLACK FIBERGLASS POWER WIRING CORD FUSE FOR HOT ROD Smoke HIGH ON BACK OF CONTROL WHITE PURPLE WHITE WHITE ORANGE HOT ROD MOLEX CONNECTOR TYPICAL DRAFT INDUCER AUGER DRIVE FIREBOX MOTOR... -
Page 17: Replacement Parts
Replacement Parts If you are missing or require replacement parts, please call customer service at 1-800-459-4409 (Monday–Friday, 8:30 am–5:00 pm EST). identify the required part(s) and have the replacement part number ready when you call. The following parts are available for replacement: •... -
Page 18: Warranty Claim Procedure
Warranty This product is warranted to be free from defect in materials and workmanship under residential use for a period of one year from date of purchase. If the unit should fail to operate correctly, call customer service at 1-800-459-4409 (Monday–Friday, 8:30 am–5:00 pm EST) or contact us through our website at www.qualitycraft.com.
Need help?
Do you have a question about the BBQ1922 and is the answer not in the manual?
Questions and answers