Table of Contents
Advertisement
Quick Links
Advertisement
Table of Contents

Related Manuals for Rocket Espresso Limited Giotto

Summary of Contents for Rocket Espresso Limited Giotto
-
Page 2: Table Of Contents
Operating instructions Dispensing steam Dispensing hot water How to make great espresso How to texture milk How to clean your Giotto/Cellini How to disassemble/dismantle the machine Espresso glossary and recipes Trouble shooting For European Community countries: declaration of CE conformity... -
Page 3: General Data
General data Manufacturer: Rocket Espresso Limited Viale Delle Industrie 26 20090 Settala Milano Italy Email: info@rocket-espresso.com Model: Giotto and Cellini Distributed by:... -
Page 4: Important Safeguards
Important Safeguards 1. Read all Instructions 2. Do not touch hot surfaces. Use handle or knobs. 3. To protect against electric shock do not immerse cord and plugs in water or other liquid. 4. Close supervision is necessary when any appliance is used by or near children. 5. -
Page 5: Introduction
Introduction Please read this technical handbook carefully since it provides important information on the correct installation, use and maintenance of your coffee machine. The information contained in this manual is necessary for the safe installation and operation of your coffee machine. It should be retained in a safe place for future reference. -
Page 6: Instructions For Use
Instructions for use This machine has been designed for the sole purpose of producing coffee, hot water and steam for hot beverages. All other uses are outside of the scope of this machine and, therefore, dangerous and hazardous. The machine has been designed from safe, accessible, durable components and materials and manufactured to the highest standards for use only in home / domestic environment. - Page 7 All spare parts fitted to the machine must be original Rocket Espresso Ltd. components. Before any cleaning or maintenance the machine should be disconnected from the electric supply. Never pull the electrical supply cable. When cleaning the machine never use caustic or abrasive cleaning chemicals. To avoid electric shocks: get in touch with liquids.
-
Page 8: Description Of External Components
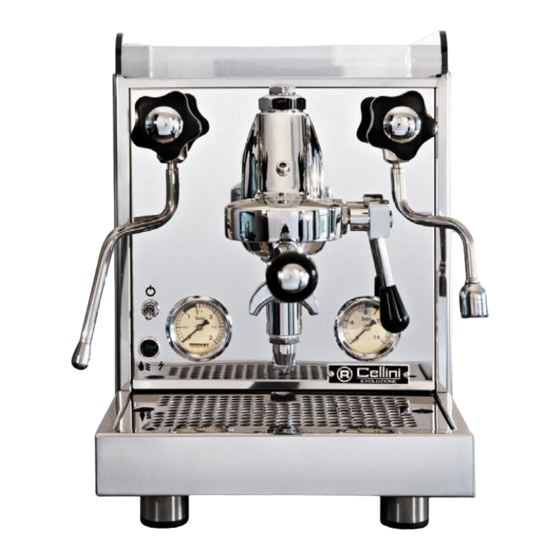
Description of external components 1. Steam valve handle. Turn left to open steam; turn right to shut. 2. Steam wand. Can become hot and cause burns. Caution! 3. Boiler pressure gauge. Boiler pressure should be around 1 Bar. 4. Machine’s on/off switch. Position “0” = off; position “1” = on. 5. -
Page 9: Installation
Installation All machines are designed to ensure maximum possible user safety. It is, however, an important responsibility of the user to observe the following safety codes to further enhance safe installation and operation. to prevent accidental injury to children or other persons. should be notified immediately so that remedial action can be taken... -
Page 10: Technical Data
Technical Data Brewing groups: Hot steam wands: Hot water wands: Coffee portion control: Manual Boiler water level control: Automatic Voltage: Please see machines data plate Frequency: Please see machines data plate Wattage: 1300 W Dimensions: Width 330 mm (13 inches) Depth 425 mm (16.8 inches) Height 350 mm (13.8 inches) Weight:... -
Page 11: Start Up
Start up Parts which can become hot and cause injuries. Caution! Never touch the following parts. They are or can become hot and could cause burns: 1. Metal parts of steam handle 2. Hot steam wand and spout 6. Coffee brewing group 7. - Page 12 We assume the machine is properly installed Before starting using the machine, please control the following: 1. Lever (A-9) is completely down. 2. Steam handle (A-1) is closed. 3. Hot water handle (A-12) is closed. 4. On/off switch (A-4) is on position “0” =machine switched off 5.
- Page 13 Now please proceed as follows: 1. Remove the cover from the water reservoir Fig. B-2 2. Remove the water reservoir (Fig. B-2 and clean it carefully with food quality cleaning products. It’s very important that the water reservoir is always clean! Please repeat this operation every day and whenever necessary. 3.
- Page 14 5. Put on the cover on top of the water reservoir. 6. Plug in the machine. 7. Turn the on/off switch (A-4) to the on position “1” and open the steam handle (A-1). Boiler water fill starts (you will hear the pump’s noise). 8.
-
Page 15: Operating Instructions
Operating Instructions The below shown components are supplied with your machine (the one cup filter holder comes typically on special order) (A) Tamper (B) Measuring spoon (C) Two cups metal filter basket (D) Two cups filter handle (E) One cup metal filter basket (F) One cup filter handle Suggestion: We strongly suggest that you train how to tighten the filter holder (with the metal filter basket firmly plugged in) into the brewing head (A-6). - Page 16 Preparing one or two cups of espresso. For the correct espresso preparation technique see page 30 Preparing a single espresso 25ml 1. Use one cup filter handle (with 1 spout) 2. Position the metal one cup filter basket firmly inside the filter holder 3.
- Page 17 Preparing TWO cups or a double espresso coffee. 50 to 60 mls. 1. Use the two cup filter handle (with 2 spouts) 2. Position the metal two cups filter basket firmly inside the filter holder 3. Fill the single filter basket with freshly ground coffee and tamp the coffee until the finished height, is level with the internal reference line in the filter basket.
-
Page 18: Dispensing Steam
Dispensing steam to froth or heat up liquids 1. Fill a suitable ideally stainless steel pitcher (used for food only) with an insulated grip with the liquid to be heated up or frothed. 2. Position the steam nozzle of the steam wand (A-2) just below the surface of the liquid inside the liquid in the recipient. -
Page 19: Dispensing Of Hot Water
5. When enough foam is achieved, submerge nozzle (going sidewise) and keep it in that position finishing heating milk until the pitcher is too warm to touch. Please remember that milk should never be steamed over app. 76°C (168°F). Milk steamed to over this temperature is scalded. -
Page 21: How To Make Great Espresso
How to make great espresso. This is the one method of making coffee that Your Espresso machine needs to be borders on being an art form. The better the CLEAN, VERY, VERY CLEAN. Use machine you have (yes, often the more expensive) filtered water if you can and fresh the better result you will achieve. -
Page 22: How To Texture Milk
How to texture milk. If making espresso is an art form this is like learning a craft, The milk texture that you are aiming for is best described as but once mastered it’s easy enough. velvet. That means it’s about 70°C with a nice fine bead of bubbles. - Page 23 HEATING. Once you have the milk texture temperature of approximately 90°C. correct, lower the steam wand into When you heat your milk it will be the milk and complete the heating about 70°C - any hotter and it will process. scorch, ruining the taste.
-
Page 24: How To Clean Your Giotto/Cellini
How to clean your Giotto or Cellini. The importance of a clean espresso machine can not be under flavour of the espresso you make, if they are allowed to build estimated when trying to produce great espresso. up and become rancid when exposed to the environment. - Page 25 THE GROUP. With a small hard brush, give the inside of the group a good scrub. Scrub inside of group. The group should be back flushed Regularly. This means after each day, firstly, remove the filler basket and then fit the blind filter into the handle. Next fit the handle into the espresso machine.
-
Page 26: How To Disassemble/Dismantle The Machine
How to disassemble/dismantle the machine The machine has to be disassembled and dismantled by an authorized technician. Disassembling of the machine: Operations to be effected with machine in working conditions at operating temperature. 1. Place a recipient (with insulated grip) under the hot water wand (A-11). 2. - Page 27 How to disassemble/dismantle the machine Simple, routine care of your espresso machine is your best defence against poor quality shots, as well as preventing breakdowns or, even worse, personal injuries. After each use: 1. Wipe the steam wand (A-2) immediately after using with a non abrasive clean damp towel without touching it directly with any part of the body to avoid injury or damage due to the hot surface of steam wand end nozzle.
-
Page 28: Espresso Glossary And Recipes
Espresso Glossary and recipes Please use for the following, properly ground and portioned espresso coffee. Please use app. 6, 5 to 7 grams for each shot. You should consider a brewing time of app. 25” for a proper shot of espresso (or the part of espresso in a latté... -
Page 29: Trouble Shooting
Trouble Shooting Problem Possible causes Solutions Light flashing Low water level in the reservoir Add water No water / coffee from the group Coffee grind is to fine and/or Use a coarser ground coffee and reduce or coffee pouring slowly coffee is tamped too much tamping pressure Group shower screen is clogged... - Page 30 Trouble Shooting Problem Possible causes Solutions Pump is not running Pump is faulty Switch off and unplug machine and contact your authorized service rep Water from water nozzle is brown Milk in boiler Switch off and unplug machine and and smells bad contact your authorized service rep Steam pressure is low to recover Low voltage at power supply...
- Page 31 Declaration of CE conformity Manufacturer: Rocket Espresso Limited Italian Branch Viale Delle Industrie 26 20090 Settala Milano Italy This is to confirm that the Giotto series of espresso machines has been manufactured according to the following standards: DIR. 89/336 DIR. 73/23 DIR. 89/392...
-
Page 32: For European Community Countries: Declaration Of Ce Conformity
www.rocket-espresso.com...
Need help?
Do you have a question about the Giotto and is the answer not in the manual?
Questions and answers