Table of Contents
Advertisement
Elgar Electronics Corporation
9250 Brown Deer Road
San Diego, CA 92121-2294
1-800-73ELGAR (1-800-733-5427)
Tel: (858) 450-0085
Fax: (858) 458-0267
Email: sales@elgar.com
This document contains information proprietary to Elgar Electronics Corporation. The information contained herein is
not to be duplicated or transferred in any manner without prior written permission from Elgar Electronics Corporation.
November 2, 2007
P60, P80, D3 Series
DC Power Supplies
Operation Manual
©2007 by Elgar Electronics Corporation
www.elgar.com
Document No. M550001-01 Rev F
Advertisement
Table of Contents

Subscribe to Our Youtube Channel
Related Manuals for Powerten P60 Series

Summary of Contents for Powerten P60 Series
- Page 1 P60, P80, D3 Series DC Power Supplies Operation Manual Elgar Electronics Corporation 9250 Brown Deer Road San Diego, CA 92121-2294 1-800-73ELGAR (1-800-733-5427) www.elgar.com Tel: (858) 450-0085 Fax: (858) 458-0267 Email: sales@elgar.com ©2007 by Elgar Electronics Corporation This document contains information proprietary to Elgar Electronics Corporation. The information contained herein is not to be duplicated or transferred in any manner without prior written permission from Elgar Electronics Corporation.
- Page 5 Safety Notice Before applying power to the system, verify that the unit is configured properly for the user's particular application. CE and UL recognition status of this series of power supplies is based on rack mounted application only. Use of the power supplies outside of a rack mount enclosure will expose the user to high voltage and/or high current sources.
- Page 6 SERVICE SAFETY NOTICES WARNING! HAZARDOUS VOLTAGES IN EXCESS OF 480 V RMS, 700 V PEAK MAY BE PRESENT WHEN COVERS REMOVED. QUALIFIED PERSONNEL MUST USE EXTREME CAUTION WHEN SERVICING THIS EQUIPMENT. CIRCUIT BOARDS, TEST POINTS, AND OUTPUT VOLTAGES MAY BE FLOATING ABOVE CHASSIS GROUND.
-
Page 7: Fcc Notice
FCC NOTICE This equipment has been tested and found to comply with the limits for a Class A digital device, pursuant to part 15 of the FCC Rules. These limits are designed to provide reasonable protection against harmful interference when equipment operated in a commercial environment. -
Page 8: About This Manual
About This Manual This manual has been written expressly for the Power Ten “P” Series of power supplies which have been designed and certified to meet the Low Voltage and Electromagnetic Compatibility Directive Requirements of the European Community. Since the Low Voltage Directive is to ensure the safety of the equipment operator, universal graphic symbols (see below) have been used both on the unit itself and in this manual to warn the operator of potentially hazardous situations. -
Page 9: Table Of Contents
TABLE OF CONTENTS Chapter 1 DESCRIPTION OF EQUIPMENT............1-1 1.1 PURPOSE AND CAPABILITIES ..................1-1 1.2 TECHNICAL CHARACTERISTICS ................1-1 Chapter 2 INSTALLATION ..................2-1 2.1 INSPECTION........................2-1 2.2 INPUT/OUTPUT CONNECTORS.................2-1 2.3 LOCATION AND MOUNTING ..................2-2 2.4 WIRE SIZING.........................2-5 2.5 OUTLINE DRAWINGS ....................2-6 Chapter 3 OPERATING INSTRUCTIONS.............. -
Page 10: List Of Figures
LIST OF FIGURES Figure 2-1 P62 Outline Drawing, 2kW to 3kW (Output Voltage <=60 V) ........2-6 Figure 2-2 P62 Outline Drawing, 2kW to 3kW (Output Voltage >=80 V) ........2-7 Figure 2-3 P63 & D3 Outline Drawing, 3.3KW to 10KW (Output Voltage <=60 V)....2-8 Figure 2-4 P83 Outline Drawing, 5.0KW to 15KW (Output Voltage >=80 V) ...... -
Page 11: Chapter 1 Description Of Equipment
Chapter 1 DESCRIPTION OF EQUIPMENT PURPOSE AND CAPABILITIES The Power Ten P60, P80, and D3 Series power supplies are general purpose power supplies designed specifically for laboratory test and systems applications requiring variable DC sources with good ripple and regulation characteristics. The P60 power supplies include five separate series: P62, P63, P66, P83, and P86. -
Page 12: Table 1-1 P62 Series Technical Characteristics
Table 1-1 P62 Series Technical Characteristics PARAMETERS SPECIFICATIONS PHYSICAL CHARACTERISTICS: 19.00 in. Width 18.00 in Depth 3.50 in. Height 45 lbs max. Weight ELECTRICAL CHARACTERISTICS: Input Power (Standard) 190-253 VAC Voltage 47 to 63 Hz Frequency Single, 2-wire plus gnd Phases Regulation (Line or Load) 0.1% of max. - Page 13 Table 1-1 P62 Series Technical Characteristics – Continued PARAMETERS SPECIFICATIONS Remote Programming Resistive: Constant Voltage (0-100%) 0 - 5k ohms Constant Current (0-100%) 0 - 5k ohms Voltage: Constant Voltage (0-100%) 0 - 5/10 VDC Constant Current (0-100%) 0 - 5/10 VDC Remote Sensing Terminals are provided to sense output voltage at point of load.
-
Page 14: Table 1-2 P63, P66, P83, P86, And D3 Series Technical Characteristics
Table 1-2 P63, P66, P83, P86, and D3 Series Technical Characteristics PARAMETERS SPECIFICATIONS PHYSICAL CHARACTERISTICS: P63, D3 19.00 in. 19.00 in. Width 22.00 in 22.00 in. Depth Height 5.25 in. 10.5 in. Weight 120 lbs max. 163 lbs max. ELECTRICAL CHARACTERISTICS Input Power Voltage 208-230 VAC (tested to 190-253 VAC) - Page 15 Table 1-2 P63, P66, P83, P86, and D3 Series Technical Characteristics - Continued PARAMETERS SPECIFICATIONS Remote Programming Resistive: Constant Voltage (0-100%) 0 - 5k ohms Constant Current (0-100%) 0 - 5k ohms Voltage: Constant Voltage (0-100%) 0 - 5 VDC or 0 -10 VDC Constant Current (0-100%) 0 - 5 VDC or 0 -10 VDC Remote Sensing...
-
Page 16: Table 1-3 Available Voltages And Currents
Table 1-3 Available Voltages and Currents V Out 3.3W 6.6W 10KW 13.3W 16.6W 20KW 10KW 15KW 20KW 25KW 30KW 1000 1500 2000 2500 3000 1200 1600 2000 2400 1000 1300 1650 2000 12.5 1060 1325 1600 1100 1320 1000 Output P-P Ripple - Typical Note: RATING 3300... -
Page 17: Chapter 2 Installation
Chapter 2 INSTALLATION INSPECTION Inspect the shipping carton for possible damage before unpacking the unit. Carefully unpack the equipment. Save all packing materials until inspection is complete. Verify that all items listed on the packing slips have been received. Visually inspect all exterior surfaces for broken knobs, connectors, or meters. -
Page 18: Location And Mounting
LOCATION AND MOUNTING The “P” Series models are intended for mounting in a standard 19.0-inch equipment rack. Four screws, two on each side of the front panel, should be used to secure the unit in place. NOTICE The unit should be provided with proper ventilation. -
Page 19: Table 2-2 5Kw To 15Kw And 16Kw To 30Kw Series Input/Output Connectors
Table 2-2 5kW to 15kW and 16kW to 30kW Series Input/Output Connectors CONNECTOR FUNCTION CONNECTS TO FL1 - AC Prime Power Input 200-240 VAC (Std) FL1 - AC 47-63 Hz FL1 - AC 360-440 VAC (option) CHASSIS - GND 432-528 VAC (option) Output Power Pos. -
Page 20: Table 2-3 Output Connection Descriptions
Table 2-3 Output Connection Descriptions SUPPLY TYPE CONNECTION DESCRIPTION 2kW to 3kW <=60V Bus Bar with hole for 3/8” bolt 3.3kW to 15kW <=60V Bus Bar with two holes for 3/8” bolts 16kW to 30kW <=60V Bus Bar with three holes for 3/8” bolts 2kW to 3kW >=80V Terminal Block with 10-32 screws... -
Page 21: Wire Sizing
WIRE SIZING Care must be taken to properly size all conductors for the input and output of the power supply. Table 2-5 below gives minimum recommended wire size for the input. This table is derived from the National Electrical Code and is for reference only. Local laws and conditions may have different requirements. -
Page 22: Outline Drawings
OUTLINE DRAWINGS The following pages (figures 2-1 through 2-6) show the outlines and overall dimensions for the “P” product lines. VOLTAGE CURRENT POWER Figure 2-1 P62 Outline Drawing, 2kW to 3kW (Output Voltage <=60 V) M550001-01... -
Page 23: Figure 2-2 P62 Outline Drawing, 2Kw To 3Kw (Output Voltage >=80 V)
VOLTAGE CURRENT POWER Figure 2-2 P62 Outline Drawing, 2kW to 3kW (Output Voltage >=80 V) M550001-01... -
Page 24: Figure 2-3 P63 & D3 Outline Drawing, 3.3Kw To 10Kw (Output Voltage <=60 V)
VOLTAGE CURRENT POWER VOLTAGE CURRENT POWER VOLTAGE CURRENT Figure 2-3 P63 & D3 Outline Drawing, 3.3KW to 10KW (Output Voltage <=60 V) M550001-01... -
Page 25: Figure 2-4 P83 Outline Drawing, 5.0Kw To 15Kw (Output Voltage >=80 V)
VOLTAGE CURRENT POWER Figure 2-4 P83 Outline Drawing, 5.0KW to 15KW (Output Voltage >=80 V) M550001-01... -
Page 26: Figure 2-5 P66 Outline Drawing, 13.3Kw To 20Kw (Output Voltage <=60 V)
VOLTAGE CURRENT POWER Figure 2-5 P66 Outline Drawing, 13.3KW to 20kW (Output Voltage <=60 V) M550001-01 2-10... -
Page 27: Figure 2-6 P86 Outline Drawing, 20Kw To 30Kw (Output Voltage >=80 V)
VOLTAGE CURRENT POWER Figure 2-6 P86 Outline Drawing, 20KW to 30KW (Output Voltage >=80 V) M550001-01 2-11... - Page 28 This page intentionally left blank. M550001-01 2-12...
-
Page 29: Chapter 3 Operating Instructions
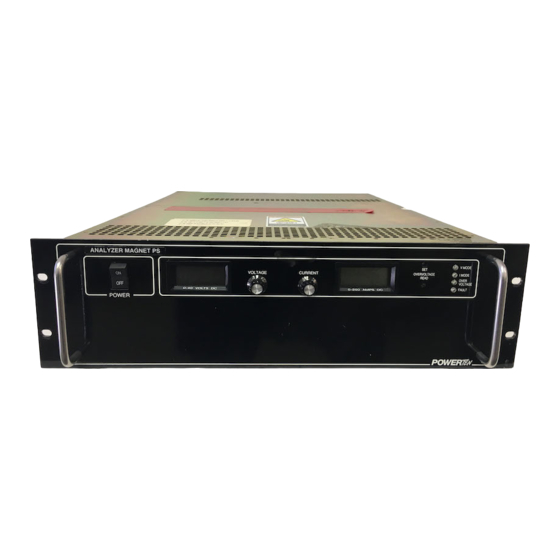
Chapter 3 OPERATING INSTRUCTIONS CONTROLS AND INDICATORS Front panel controls and indicators for the ‘P’ Series are identified in Figure 3-1. Although different models may have different heights, the controls remain the same across the entire series. Table 3-1 provides a description of all operator controls and indicators. -
Page 30: Table 3-1 P62, P63, P66, P83, P86, And D3 Series Controls And Indicators
Table 3-1 P62, P63, P66, P83, P86, and D3 Series Controls and Indicators FIGURE & CONTROL/INDICATOR FUNCTION INDEX NO. 3-1 & 3-2 VOLTAGE Meter Measures voltage output. CURRENT Meter Measures current output. Overvoltage Potentiometer Adjusts overvoltage trip level. Voltage Mode Indicator Indicates the power supply is operating in the voltage mode. -
Page 31: Table 3-2 Connector J1 Designations And Functions
Table 3-2 Connector J1 Designations and Functions SCHEMATIC FUNCTIONAL DESIGNATOR SYMBOL DESCRIPTION Isolated remote on/off. Externally supplied AC/DC voltage ON/OFF source for on/off control. A positive(+) voltage will turn on the supply. This input control is optically isolated from the power supply circuit up to 500 VDC. -
Page 32: Table 3-3 D-Shell Connector J1 Designations And Functions - Continued
Table 3-3 D-Shell Connector J1 Designations and functions – Continued SCHEMATIC FUNCTIONAL DESIGNATOR SYMBOL DESCRIPTION VP 10V Remote voltage programming using a 0-10 VDC source. IP 10V Remote current programming using a 0-10 VDC source. FAULT Fault state. A high state indicates a converter, temperature or bias supply fault, and the LED on the front panel will illuminate. -
Page 33: Local Operation
The following paragraphs provide setup and operating procedures for the P62, P63, P66, P83, P86, and D3 Series. The power supply may be configured via connector J1 on the rear panel for different operating configurations: local and remote current programming, local and remote voltage programming, normal parallel, auto-parallel, normal series, auto-series, and auto-tracking. -
Page 34: Remote Voltage Programming
coefficient for 5V remote current programming is 50 millivolts = 1% of rated output, i.e., for a 300 amp model, each 50 millivolts of programming voltage equals 3 amps of output current. The voltage coefficient for 10V remote current programming is 100 millivolts = 1% of rated output, i.e., for a 300 amp model, each 100 millivolts of programming voltage equals 3 amps of output current. -
Page 35: Remote Output On/Off Control
CAUTION If the power supply is operated with load power lines disconnected and sensing line connected, internal power supply damage may occur. (Output current then flows through sensing terminals.) Connect sensing leads from the load positive to J1-13 and the load negative to J1-12. A shielded, twisted-pair, hookup wire is recommended to avoid potential noise interference. -
Page 36: Auto-Parallel Operation
AUTO-PARALLEL OPERATION In the auto-parallel mode of operation, a master/slave configuration is established. Up to four power supplies may be paralleled using this configuration. CAUTION When using two supplies in parallel, damage may occur to slave(s) crowbar circuits if slave overvoltage level set is not higher than the master overvoltage level set. - Page 37 For equal voltage supplies with volt-per-volt tracking, Rx = 0 ohms. For other ratios or different voltage supplies, Rx can be calculated by using the following formulas: Rx(kohms) = (10/SMR) - 10 SMR(Slave/Master Ratio) = SR(Slave Ratio)/MR(Master Ratio) where SR = slave desired Vout/rated Vout MR = master desired Vout/rated Vout Example: It is desired to have a slave power supply...
-
Page 38: Figure 3-3 Remote Current Programming Using Resistance
COM 6 22 IP RES 23 IP RTN 0-5 Kohms PROGRAM Figure 3-3 Remote Current Programming Using Resistance 16 IP 10V COM 6 IP 5V 10 23 IP RTN 0-5 VDC 0-10 VDC VOLTAGE VOLTAGE SOURCE SOURCE Figure 3-4 Remote Current Programming Using 0-5 VDC or 0-10 VDC Voltage Source M550001-01 3-10... -
Page 39: Figure 3-5 Remote Voltage Programming Using Resistance
20 VP RTN COM 6 21 VP RES 0-5 Kohms PROGRAM Figure 3-5 Remote Voltage Programming Using Resistance 15 VP 10V COM 6 20 VP RTN VP 5V 9 0-10 VDC VOLTAGE 0-5 VDC SOURCE VOLTAGE SOURCE Figure 3-6 Remote Voltage Programming Using 0-5 VDC or 0-10 VDC Voltage Source M550001-01 3-11... -
Page 40: Figure 3-7 Remote Sensing Operation At The Load
LOAD − SUPPLY OUTPUT TERMINALS Figure 3-7 Remote Sensing Operation at the Load ON/OFF 5 Figure 3-8 Remote On/Off Control by Contact Closure M550001-01 3-12... -
Page 41: Figure 3-9 Remote On/Off Using Isolated Ac Or Dc Voltage Source
ISO ON/OFF 1 ISO RTN 2 AC OR DC SOURCE Figure 3-9 Remote On/Off Using Isolated AC or DC Voltage Source 14 ISO TTL/CMOS ISO RTN 2 Figure 3-10 Remote On/Off Using Isolated TTL/CMOS Voltage Supply M550001-01 3-13... -
Page 42: Figure 3-11 Remote Overvoltage Set Using Dc Voltage Source
REM OV SET 3 0-5.5 VDC COM 6 VOLTAGE SOURCE Figure 3-11 Remote Overvoltage Set Using DC Voltage Source LOAD MASTER SLAVE 16 IP 10V − OUTPUT IMON 7 25 IP RTN − OUTPUT ADDITIONAL SLAVES (UP TO FOUR TOTAL) MAY BE CONNECTED IN SAME MANNER AS FIRST Figure 3-12 Auto-Parallel Operation... -
Page 43: Figure 3-13 Auto-Series Operation
LOAD MASTER SLAVE 15 VP 10V − 20 VP RTN OUTPUT − OUTPUT RX (K ohms) = 2(PS1 RATED Vout + PS2 RATED Vout) - 20 EXAMPLE: FOR A 20 VOLT RATED PS1 AND A 10 VOLT RATED PS2 RX = 2(20+10)-20 = 40K ohms Figure 3-13 Auto-Series Operation LOAD... - Page 44 This page intentionally left blank. M550001-01 3-16...
-
Page 45: Chapter 4 Calibration
Chapter 4 CALIBRATION INTRODUCTION This chapter contains calibration procedures for the P62, P63, P66, P83, P86 and D3 Series. CALIBRATION AND ADJUSTMENTS To perform the following calibration and adjustment procedures, the cover must be removed from the power supply. Because removal of the cover allows access to potentially hazardous power voltages (up to 253 VAC or 450 VDC) and because of the importance of accurate readings to performance, only technically trained personnel should perform calibration procedures. - Page 46 5V Reference Calibration The 5V reference for the front panel voltage and current control must be calibrated first. Refer to Figure 4-7 for locations of components on the control assembly. a. With prime power removed, remove jumper J9 on the converter assembly. b.
-
Page 47: P63, P66 And D3 Series Calibration Procedures
8. Remove prime power from the power supply, and wait three minutes (minimum) for the filter capacitors to discharge. Current Feedback Amplifier Zero Calibration. 1. Remove jumper J9 on the converter board. 2. Connect a DMM between the output of U8, pin 1, and the common return (on converter assembly A2). - Page 48 5V Reference Calibration The 5V reference for the front panel voltage and current control must be calibrated first. Refer to Figure 4-6 for locations of components on the control assembly. a. With prime power removed, remove jumper J7 on all converter assemblies.
- Page 49 7. Once the converter is delivering 105% of rated current and the current mode indicator on the front panel is illuminated, rotate R54 counterclockwise until the current mode indicator just extinguishes. Do not adjust beyond this point. 8. Remove prime power from the power supply and wait three minutes (minimum) for the filter capacitors to discharge.
-
Page 50: P83 And P86 Series Calibration Procedures
4.2.3 P83 and P86 Series Calibration procedures In this section refer to Figures 4-4 and 4-5 for locations of assemblies and potentiometers. 5V Reference Calibration The 5V reference for the front panel voltage and current control must be calibrated first. Refer to Figure 4-3 for locations of components on the control assembly. - Page 51 8. Rotate front panel current control fully counterclockwise. 9. Apply prime power to power supply, and push the front panel switch to the ON position. Adjust the variable transformer until the DMM indicates the minimum rated power supply input voltage across the AC input terminals.
- Page 52 If the fault light lights before the output reaches 5% over the maximum rating adjust the internal current limit. To adjust the internal current limit set R45 so the fault light just goes off at 5% over maximum rating. 7. Once the converter is delivering 105% of rated current and the current mode indicator on the front panel is illuminated, rotate R45 counterclockwise until the current mode indicator just extinguishes.
-
Page 53: Control Assembly Calibration
8. Adjust potentiometer R40 of converter assembly being calibrated until DMM across external current shunt indicates one-third the full-rated output current for 15 kW power supply models. 9. Remove prime power from power supply and wait 3 minutes (minimum) for filter capacitors to discharge. 10. - Page 54 3. Set front panel current control fully clockwise. 4. Set front panel voltage control fully counterclockwise. 5. Apply power to power supply, and push the front panel switch to the ON position. 6. Adjust R39 until DMM reads zero. Do not continue adjustment once the DMM reads zero millivolts.
- Page 55 5. Rotate front panel voltage control clockwise until DMM indicates 5.000 VDC between J1-6 and J1-8. 6. Adjust R37 until output voltage reading is 100% of rated output voltage DC between the output terminals of the power supply. 7. Remove power from power supply. 8.
-
Page 56: Figure 4-1 P62 Internal Layout
Figure 4-1 P62 Internal Layout M550001-01 4-12... -
Page 57: Figure 4-2 P63, P66, D3 Internal Layout
CONVERTER BIAS ASSEMBLIES CONTROL ASSEMBLY ASSEMBLY DISTRIBUTION BOARD POWER POWER POWER SWITCH SWITCH SWITCH BOARD BOARD BOARD Figure 4-2 P63, P66, D3 Internal Layout M550001-01 4-13... -
Page 58: Figure 4-3 P63, P66, D3 Converter Card
Figure 4-3 P63, P66, D3 Converter Card M550001-01 4-14... -
Page 59: Figure 4-4 P83, P86 Internal Layout
Figure 4-4 P83, P86 Internal Layout M550001-01 4-15... -
Page 60: Figure 4-5 P83, P86 Converter Card
Figure 4-5 P83, P86 Converter Card M550001-01 4-16... -
Page 61: Figure 4-6 P63 & P66 Converter Card
Figure 4-6 P63 & P66 Converter Card M550001-01 4-17... - Page 62 This page intentionally left blank. M550001-01 4-18...
-
Page 63: Chapter 5 Maintenance
Chapter 5 MAINTENANCE INTRODUCTION This chapter contains preventive maintenance for the power supplies. WARNING All maintenance that requires removal of the cover of the unit should only be done by properly trained and qualified personnel. Hazardous voltages exist inside the unit. Disconnect the supply from the input power before performing... -
Page 64: Table 5-2 Inspection And Corrective Action
Table 5-2 Inspection and Corrective Action ITEM INSPECT FOR CORRECTIVE ACTION External Connector Looseness, bent or corroded Clean contacts with solvent plugs and jacks contacts, damage or improper moistened cloth, soft bristle brush, seating in mating connector small vacuum or low compressed air. -
Page 65: Fuses
FUSES There are no user replaceable components in the power supply. WARNING Only proper trained and qualified personnel should remove the cover from the power supply. Service, fuse verification, connection of wiring to the chassis must be accomplished at least five minutes after power has been removed via external means;...
Need help?
Do you have a question about the P60 Series and is the answer not in the manual?
Questions and answers