Table of Contents
Advertisement
Quick Links
M
u
l
t
i
-
I
n
t
e
M
u
l
t
i
-
I
n
t
e
M
o
d
e
l
s
M
o
d
e
l
s
M
o
d
e
l
s
3
P
M
o
d
e
l
s
3
P
r
f
a
c
e
P
C
r
f
a
c
e
P
C
(
R
S
-
2
3
2
/
R
S
-
(
R
S
-
2
3
2
/
R
S
-
3
P
C
I
U
2
,
3
P
C
I
U
2
,
(
N
o
n
-
I
s
(
N
o
n
-
I
s
a
n
a
n
C
I
O
U
1
,
3
C
I
O
U
1
,
3
(
I
s
o
l
a
(
I
s
o
l
a
Document Number 3PCI-0712m
I
B
u
s
S
e
r
I
B
u
s
S
e
r
4
2
2
/
R
S
-
4
8
5
)
4
2
2
/
R
S
-
4
8
5
)
3
P
C
I
U
4
,
3
3
P
C
I
U
4
,
3
o
l
a
t
e
d
)
o
l
a
t
e
d
)
d
d
P
C
I
O
U
2
,
P
C
I
O
U
2
,
t
e
d
)
t
e
d
)
i
a
l
C
a
r
d
s
i
a
l
C
a
r
d
s
P
C
I
U
8
P
C
I
U
8
3
P
C
I
O
U
4
3
P
C
I
O
U
4
Advertisement
Table of Contents
Troubleshooting

Summary of Contents for B&B 3PCIU2
- Page 1 Document Number 3PCI-0712m...
- Page 2 International Headquarters B&B Electronics Mfg. Co. Inc. 707 Dayton Road Ottawa, IL 61350 USA Phone (815) 433-5100 -- General Fax (815) 433-5105 Website: www.bb-elec.com European Headquarters B&B Electronics Westlink Commercial Park Oranmore, Co. Galway, Ireland Phone +353 91-792444 -- Fax +353 91-792445 Website: www.bb-europe.com ©...
- Page 3 CAUTION: This is an Electrostatic Sensitive Device. Use ESD precautions for safe handling. Before removing the card from the anti-static protective packaging: Discharge any static electricity buildup on your body by touching a large grounded metal surface or the metal chassis on equipment connected to earth ground by a 3-wire power cord.
-
Page 4: Table Of Contents
TABLE OF CONTENTS ...................II CHAPTER 1: GENERAL INFORMATION ............1 ......................1 NTRODUCTION ........................1 EATURES ................2 PORT ODELS AND EATURES ......................4 PECIFICATIONS CHAPTER 2: SERIAL CARD SETUP..............5 ....................... 5 ETUP TEPS ESD Precautions ....................5 Initial Configuration ....................5 ................. - Page 5 Uninstalling the MIport Card ................25 Uninstalling the COM ports ................. 25 Removing INF and PNF Driver Files ..............25 CHAPTER 7: RS-232 CONNECTIONS/OPERATION......... 28 RS-232 M ......................28 RS-232 S DB-9 P ..........28 IGNAL ESIGNATIONS AND INOUT RS-232 Signal Designations................. 29 DCE ......................
- Page 6 DIP Switch 1 (RS-422/485 only) ................5 DIP Switch 2 (RS-422/485 only) ................6 APPENDIX B: CONNECTOR PINOUTS ............... 1 RS-232 P ......................1 INOUTS RS-422/485 P ....................2 INOUTS APPENDIX C: TROUBLESHOOTING WITH COMTEST ......... 5 ....................5 EATURES ....................
-
Page 7: Chapter 1: General Information
General Information Introduction MIport PCI serial interface cards allow you to add RS-232, RS-422 and RS-485 interfaces to Windows based computers equipped with a PCI bus. Depending on your choice of card one, two or four optically isolated serial ports, or two, four or eight non- isolated serial ports, can be added. -
Page 8: Miport Models And Features
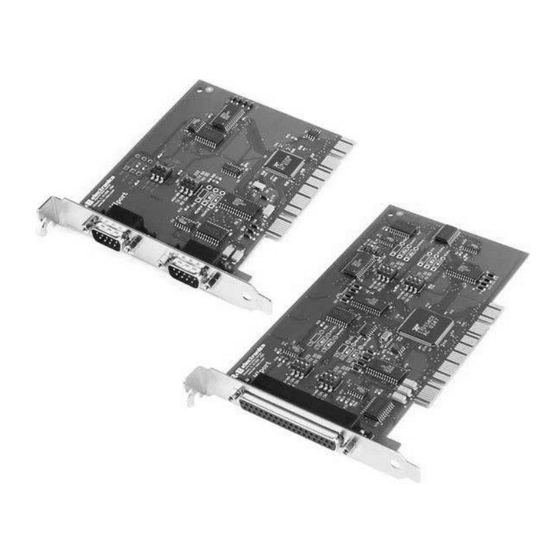
General Information MIport Models and Features Model Ports Interface Connectors Number 3PCIOU1 RS-232/422/485 DB-9 male 3PCIOU2 RS-232/422/485 DB-9 male 3PCIOU4 2 RS-232/422/485 ports 2 x DB-9 male 2 RS-422/485 ports 2 x DB-9 male use 2 expansion slot Figure 2. MIport Optically Isolated PCI Cards Chapter 1 Document Number 3PCI-0712m... - Page 9 General Information Model Ports Interface Connectors Number 3PCIU2 RS-232/422/485 2 x DB-9 male 3PCIU4 RS-232/422/485 DB-37 female (plus DB-37 to 4x DB-9 male cable) 3PCIU8 4 RS-232/422/485 ports DB-78 female 4 RS-232 ports (plus DB-78 to 8x DB-9 male cable) Figure 3.
-
Page 10: Specifications
3PCIOU4: 2 – DB-9 male via ribbon cable on 2 expansion slot bracket (RS-422/485 ports) 2 – DB-9 male 3PCIU2: 1 – DB-37 female with DB-37 to 4 x DB-9 male 3PCIU4: cable 3PCIU8: 1 - DB-78 female with DB-78 to 8 x DB-9 male... -
Page 11: Chapter 2: Serial Card Setup
3PCIOU1 one port optically isolated PCI serial card 3PCIOU2 two port optically isolated PCI serial card 3PCIOU4 four port optically isolated PCI serial card 3PCIU2 two port non-isolated PCI serial card 3PCIU4 four port non-isolated PCI serial card 3PCIU8 eight port non-isolated PCI serial card Any deviations from the procedure for specific models are noted. -
Page 12: Overview Of Operational Modes
Serial Card Setup Overview of Operational Modes RS-232 Mode In RS-232 Mode MIport serial ports function as buffered standard PC serial ports and operate as DTEs (Data Terminal Equipment). RS-232 interfaces are commonly used for communications with modems, serial printers, and computer-controlled devices such as security equipment, bar code scanners and point-of-sale devices. -
Page 13: Operating Mode Selection
Serial Card Setup Operating Mode Selection The hardware address and IRQ for the serial card is set by the Windows Operating System using driver information files and the Plug and Play OS. The Operating Mode is set using DIP switches, Device Manager Driver Settings and by your cable connections and software. -
Page 14: Setting The Dip Switches On Rs-422/485 Only Ports
Serial Card Setup multipoints) the transmitter can be enabled all the time. Placing the middle DIP switch in the TX ON position accomplishes this. For RS-485 operation the middle DIP switch is placed in the TX SD position. In this position the transmitter is only enabled when data is being sent. - Page 15 Serial Card Setup DIP Switch 1 (RS-422/485 only) The top DIP switch (1) configures the port for RS-485 or RS-422 operation. For RS-422 operation (which uses two wire pairs and sends point-to-point or point-to-multipoints) the transmitter can be enabled all the time. Placing the middle DIP switch in the TX ON position accomplishes this.
-
Page 16: Installing The Serial Card
Serial Card Setup Installing the Serial Card CAUTION: This is an Electrostatic Sensitive Device. Use ESD precautions for safe handling. Before removing the card from the anti-static protective packaging: Discharge any static electricity buildup on your body by touching a large grounded metal surface or the metal chassis on equipment connected to earth ground by a 3-wire power cord. -
Page 17: Chapter 3: Driver Software Installation
Driver Software Installation Installing Windows 7 Driver Software Windows 7 does not have a ―Found New Hardware Wizard.‖ Therefore the MIPort Driver must be installed manually. Install the MIPort Card and place the CD in the CD ROM Drive Open Device Manager PCI Serial Port will be listed under ―Other Devices.‖... -
Page 18: Pre-Installation Steps
Driver Software Installation Pre-Installation Steps Configure the port(s) on the card for the desired mode (RS-232, RS-422 or RS-485) using the three DIP switches on the card. If configuring for RS-422 or RS-485 Modes, and bias or termination resistors are needed, add them at this time. Note: Refer to Chapter 2 of information on DIP switch settings and bias/termination resistors. - Page 19 Driver Software Installation You may want to check to verify that the new B&B COM ports are now available. From the Widows Desktop, click Start → Control Panel →System and Maintenance → Device Manager In the Device Manager, click Multi-port serial adapters. All serial adapter cards should appear in the list.
-
Page 20: Chapter 4: Setting Driver Options
Setting Driver Options Configuring Port Settings By entering the Properties dialog a variety of information can be obtained and several port parameters can be configured. On the Ports (COM & LPT) list, double-click the name of the port to be configured. -
Page 21: Setting The Fifo Buffers
Setting Driver Options Advanced Port Settings Figure 8. Setting the FIFO Buffers MIport cards use UARTs that contain 64-byte transmit and receive FIFO (first in, first out) buffer registers. The transmit buffer holds the data to be sent; the receive buffer holds the data received. -
Page 22: Setting The Hardware Handshaking Level
Setting Driver Options Note: For proper operation the DIP switches on the PCI card must be set for the same mode. Refer to Chapter 2 for more information on configuring the DIP switches. box allows you to set the Direction control delay (bit times) length of time the Transmit driver continues to be enabled after the last bit of data in the transmit register has been sent. - Page 23 Setting Driver Options Figure 9. Changing the COM Port Name/Number After selecting a new COM name/number, Click OK, then click OK again on the Settings page. After returning to the Device Manager screen, it should refresh automatically. The name/number of the port in the Device Manager list should now show the change.
-
Page 24: Chapter 5: Installing Linux Driver Software
Installing Linux Driver Software Installing MIport Driver on Ubuntu 10.04 Ubuntu 10.04 Desktop (32-bit and 64-bit) 1. Install the MIport serial card in the computer. 2. Open a terminal window. This can be found on the desktop menu under Application | Accessories | Terminal. - Page 25 Installing Linux Driver Software make -C /lib/modules/2.6.32-24-generic/build M=/home/username/MIport- 3.0.0 modules make[1]: Entering directory `/usr/src/linux-headers-2.6.32-24-generic' CC [M] /home/username/MIport-3.0.0/MIport.o Building modules, stage 2. MODPOST 1 modules /home/username/MIport-3.0.0/MIport.mod.o LD [M] /home/username/MIport-3.0.0/MIport.ko make[1]: Leaving directory `/usr/src/linux-headers-2.6.32-24-generic' 7. Determine the present working directory. The output may be different than shown below.
- Page 26 Installing Linux Driver Software username@computer$ dmesg | grep MIport ↲ 271.828182] B&B Electronics PCI MIport serial driver Revision: 4.5 314.159265] MIport 0000:07:05:05.0: PCI INT A -> GSI 26 (level, low) -> IRQ 26 11. [optional] If recording was started in Step 2, stop recording. The file ~/MIport.script contains all output recorded from the terminal.
- Page 27 Installing Linux Driver Software Ubuntu 10.04 Server (32-bit and 64-bit) 1. Determine which version of GCC built the current Linux kernel. username@computer$ cat /proc/version ↲ Linux version 2.6.32-21-server (buildd@yellow) (gcc version 4.4.3 (Ubuntu 4.4.3-4ubuntu5) ) #32-Ubuntu SMP Fri Apr 16 09:17:34 UTC 2010 The current Linux kernel was built using GCC v4.4.3.
- Page 28 Installing Linux Driver Software username@computer$ sudo apt-get install linux-headers-2.6.32-21-server ↲ Setting up linux-headers-2.6.32-25 (2.6.32-25.45) Setting up linux-headers-2.6.32-25-server (2.6.32-25.45) 5. Create a folder for mounting the CD-ROM. username@computer$ sudo mkdir -p /media/cdrom ↲ 6. Check that the folder was created for mounting the CD-ROM. username@computer$ ls /media ↲...
- Page 29 Installing Linux Driver Software 11. Change the current working directory to where the MIport driver source code is located. username@computer$ cd MIport-3.0.0 ↲ 12. Compile the MIport device driver. username@computer$ make ↲ make -C /lib/modules/2.6.32-24-generic/build M=/home/username/MIport- 3.0.0 modules make[1]: Entering directory `/usr/src/linux-headers-2.6.32-24-generic' CC [M] /home/username/MIport-3.0.0/MIport.o Building modules, stage 2.
- Page 30 Installing Linux Driver Software Searching for MIport driver in: ... The MIport driver was found in: ... The MIport driver is loaded. Making special nodes for MIport. Making /dev/ttyM0 /dev/cum0 Making /dev/ttyM1 /dev/cum1 Making /dev/ttyM2 /dev/cum2 Making /dev/ttyM3 /dev/cum3 Making /dev/ttyM4 /dev/cum4 Making /dev/ttyM5 /dev/cum5 Making /dev/ttyM6 /dev/cum6 Making /dev/ttyM7 /dev/cum7...
-
Page 31: Chapter 6: Removing Drivers, Ports And Cards
Removing Drivers, Ports and Cards Windows 7 Uninstalling the MIport Card In the Device Manager, under Multi-port serial adapters, right-click the card to be uninstalled. NOTE: The card must still be physically installed in the computer, otherwise it will not show up in the Device Manager. In the pop-up menu that appears, click Uninstall. - Page 32 Removing Drivers, Ports and Cards Finding the INF files in Windows Explorer Figure 10. To find these files you may need to set your Views (under My Computer) to show all files and folders if the INF directory and .inf files are not visible. Chapter 6 Document Number 3PCI-0712m...
- Page 33 Removing Drivers, Ports and Cards Figure 11. Setting the Folder Options to Display Hidden Files Delete the oemx.inf and oemx.pnf files found in Step 2.. CAUTION! Be careful to delete only the files associated with the PCI card you are trying to uninstall. Document Number 3PCI-0712m Chapter 6...
-
Page 34: Rs-232 Signal Designations And Db-9 Pinout
RS-232 Connections/Operation RS-232 Mode In RS-232 Mode MIport serial ports function as buffered standard PC serial ports and operate as DTEs (Data Terminal Equipment). RS-232 interfaces are commonly used for communications with modems, serial printers, and computer-controlled devices such as security equipment, bar code scanners and point-of-sale devices. -
Page 35: Rs-232 Signal Designations
RS-232 Connections/Operation RS-232 Signal Designations The primary RS-232 signals are TD (transmit) and RD (receive). Together with GND (ground), they often are referred to as a ―3-wire‖ interface. The RTS (Request to Send) and CTS (Clear to Send) signals are handshaking lines used to indicate to the other device that data can be sent or received. -
Page 36: Handshaking
RS-232 Connections/Operation The standard specifies that RS-232 inputs accept voltage levels between –3 volts and – 25 volts for a Mark (asserted handshake) and between +3 volts to +25 volts for a Space (de-asserted handshake). Typically RS-232 voltages will be between +3V to +11V and – 3V to –11V. -
Page 37: Rs-422/485 Mode
RS-422/ 485 Connections/Operation RS-422/485 Mode In RS-422/RS-485 mode MIport serial ports provide two sets of differential signal pairs and signal ground for each port. The RS-422 and RS-485 standards use balanced differential drivers and receivers for each signal. This facilitates greater communication distances than unbalanced systems such as RS-232. -
Page 38: Rs-422/485 Differential Signals
RS-422/485 Connections/Operation RS-422/485 Differential Signals In RS-422 and RS-485 interfaces signals are sent on differential pairs. In the idle, or Mark, state, the TDA(-) line will be 0V with respect to (wrt) ground and the TDB(+) line will be about 4.4V wrt ground. Sensing differentially across the two lines, the voltage will be –4.4V (representing a Mark state). -
Page 39: Send Data Control
RS-422/ 485 Connections/Operation RS-422 Limitations The limitation of RS-422 operation is that only one transmitter can be connected to a wire pair because the transmitter is active all the time. Even when the transmitter is not sending data it will assume the idle, or Mark, state in which TDA(-) is at 0V with respect to ground and TDB(+) line is at about 4.4V with respect to ground. -
Page 40: Rs-485 Termination Resistors
RS-422/485 Connections/Operation Figure 17. Setting RTS Control for RS-485 The RS-485 mode is set by configuring the DIP switch setting on the MIport card and by selecting RS-485 Mode under RTS Control in the Advanced COM port settings dialog box. Note: For more information on COM port settings refer to Chapter 2 and Chapter 5 RS-485 Termination Resistors... - Page 41 RS-422/ 485 Connections/Operation It is important to maintain the Mark state for all RS-485 receivers when no data is being sent. Maintaining the line in the Mark state minimizes noise (that would otherwise be picked up by a high impedance line). It also provides the starting point so that when a transmitter begins to send data the leading edge of the start bit can transition from the Mark to Space state.
-
Page 42: 2-Wire Rs-485 Connections
RS-422/485 Connections/Operation Figure 19. Termination and Bias Resistor Placement Note: For more information on termination, biasing and how to calculate resistor values download the RS-422/485 Application Note from www.bb-elec.com 2-Wire RS-485 Connections The following diagram shows how to wire the DB-9 connector that will plug into your MIport card for 2-wire RS-485 operation. -
Page 43: 4-Wire Rs-422 And Rs-485 Connections
RS-422/ 485 Connections/Operation 485, using the A connection for ―+‖ and the B for ―-―. In such cases, reversing the line pair permits operation. 4-Wire RS-422 and RS-485 Connections RS-422 Point to Point Connection For RS-422 point to point communications connect the MIport card and to one RS-422 device only. -
Page 44: 4-Wire Rs-485 Connection
RS-422/485 Connections/Operation 4-Wire RS-485 Connection In a 4-wire RS-485 system, each receive line connects to the same receive terminal on all slaves, and each transmit line connects to the same transmit terminal on all slaves. The master to the first slave is connected as above. Figure 22. -
Page 45: Chapter 9: Troubleshooting Miport Cards
DIP Switch / Mode Settings Your MIport card should be fully functional when you receive it from the factory. Operational problems encountered on first use will typically be the result of incorrect connections or operation. The following procedure will assist you in locating the source of you problems. -
Page 46: Checking The Miport Card
DIP Switch / Mode Settings Make sure you have RTS Control set to the correct mode: Normal for RS- 232, RS-485 Mode for RS-485. RS-422 mode works in either setting if the mode jumpers are set correctly. Checking the MIport Card Using ComTest and a loopback connection, you can check the operation of your MIport card separate from the rest of your communications system. - Page 47 DIP Switch / Mode Settings To check 2-wire RS-485 RS-422 or 4-wire RS-485 Loopback Connections, you must either enable the receiver by moving the receive jumper to RX ENABLE mode, or use one port to transmit to another 2-wire RS-485 port or converter by cross connecting and loading ComTest twice, one copy for each port.
-
Page 48: Setting The Dip Switches On Rs-232/422/485 Ports
DIP Switch / Mode Settings Setting the DIP Switches on RS-232/422/485 Ports Set the DIP switches to configure the desired operating mode as follows: Switch 1 422/485 Switch 2 TX On TX SD Switch 3 RX SD RX On RS-232 Mode 422/485 TX On TX SD... -
Page 49: Dip Switch 3 (Rs-232/422/485 Ports)
DIP Switch / Mode Settings stated when not sending data, allowing other transmitters on the communications line to transmit without interference. DIP Switch 3 (RS-232/422/485 ports) The bottom DIP switch (3) configures the port for half-duplex (two-wire) RS-485 operation or full-duplex (four wire) RS-422/RS-485 operation. Placing the bottom DIP switch in the RX ON position configures the port for four wire operation. -
Page 50: Dip Switch 2 (Rs-422/485 Only)
DIP Switch / Mode Settings stated when not sending data, allowing other transmitters on the communications line to transmit without interference. DIP Switch 2 (RS-422/485 only) The bottom DIP switch (2) configures the port for half-duplex (two-wire) RS-485 operation or full-duplex (four wire) RS-422/RS-485 operation. Placing the bottom DIP switch in the RX ON position configures the port for four wire operation. -
Page 51: Rs-232 Pinouts
Connector Pinouts RS-232 Pinouts Name Description Direction DB-9M (DTE) Data Carrier Detect Input Receive Data Input Transmit Data Output Data Terminal Ready Output Signal Ground ------ Data Set Ready Input Request to Send Output Clear to Send Input Ring Indicator Input Figure 27. -
Page 52: Rs-422/485 Pinouts
Connector Pinouts RS-422/485 Pinouts Name Description Direction DB-9M Receive Data A (-) Input RDA( ) TDB(+) Transmit Data B (+) Output Transmit Data A (-) Output TDA( ) Signal Ground ------ RDB(+) Receive Data B (+) Input Figure 29. RS-422/485 Signal Designations and DB-9 Pinout With 2-wire RS-485 mode operation, your connection cable must jumper TDA(-) to RDA(-) and TDB(+) to RDB(+). - Page 53 Connector Pinouts Figure 31. 2-Wire RS-485 Wiring Document Number 3PCI-0712m Appendix B B -1...
-
Page 55: Appendix C: Troubleshooting With Comtest
ComTest is a simple 32-bit Windows (Windows 98, 2000, 2003 Server, ME, XP, NT 4.0 and Vista) COM port test program included on the MIport CD. (It can also be downloaded from the B&B Electronics website at: www.bb-elec.com. The program allows multiple ports at any address and IRQ, to be opened at any given time. -
Page 56: Loopback Testing With Comtest
Declaration of Conformity Figure 32. Loading ComTest Run Setup.exe to install ComTest on your program menu under B&B Electronics. Loopback Testing with ComTest To familiarize yourself with the operation of ComTest connect a loopback plug to a COM port on your PC and perform the following procedure: Make any required loopback connections on the port to be tested. - Page 57 Figure 33. RS-232 Loopback w/Handshaking Connections From the Windows Desktop click Start → Programs → B&B Electronics → ComTest → ComTest. ComTest will start and then open the Select Port dialog box. Select the COM port you want to access or test. (The drop down box shows available ports that are not currently in use).
Need help?
Do you have a question about the 3PCIU2 and is the answer not in the manual?
Questions and answers