
Summary of Contents for Piney PORTAGE & MAIN OUTDOOR WATER FURNACE
- Page 1 PORTAGE & MAIN OUTDOOR WATER FURNACE Optimizer 250 Wood Gasification Unit Installation and Operation Manual Please save these instructions and refer to them for safe and efficient performance...
-
Page 2: Table Of Contents
Table of Contents Page Letter to Customer ......................3 The P & M Outdoor Water Furnace System ................ 4 Location .......................... 4 Placement ........................5 Chimney .......................... 5 Clearances ........................5 Pipe Trench ........................5 Water Fill-Up ........................6 Corrosion Control ......................6 Electrical Connections ...................... -
Page 3: Letter To Customer
PORTAGE & MAIN OPTIMIZER 250 WATER FURNACE Manufactured by Piney Manufacturing Ltd. Box 130, Piney R0A 1K0, MB Canada Thank you for purchasing an Optimizer Water Furnace which has been tested and approved by the Canadian Standard Association. Please observe the instructions contained in this Manual and affixed to the unit to enjoy the full benefits of heating your home, other buildings and your domestic water in a safe and efficient way. -
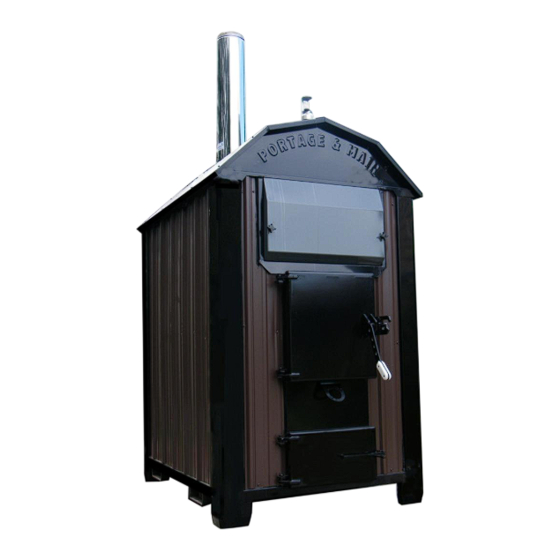
Page 4: The P & M Outdoor Water Furnace System
THE OPTIMIZER 250 OUTDOOR WATER FURNACE The Optimizer 250 outdoor (or indoor*) water furnace is safe and highly efficient, conveniently installed outside your house to give you the comfort you desire all year round using the oldest and most environmentally friendly fuel of all: WOOD. (* inside outdoor buildings such as barn, shop, shed etc.) This unique system has a fire pot and a multiple pass heat exchanger which are totally immersed in a water jacket that keeps its components from overheating and warping. -
Page 5: Placement
PLACEMENT We recommend a concrete or cement (noncombustible) slab for placing the Optimizer Water Furnace. The slab should be at least four (4) inches thick, sixty two (55) inches wide and sixty (70) inches long with a well packed sub-base. The unit weighs 3030 pounds plus 1980 pounds of water. CHIMNEY We recommend the use of insulated stainless steel pipe as a stack to minimize creosote formation. -
Page 6: Water Fill-Up
WATER FILL-UP After installing the Optimizer Water Furnace in place and connecting to it the supply and return pipe(s) to and from the various buildings to be heated, IN ACCORDANCE WITH APPLICABLE LOCAL CODES, the heating installation is ready to be filled with water. Before filling the Optimizer Water Furnace with water, make sure all valves are in “closed”... -
Page 7: Start-Up
STARTING-UP Before starting-up observe the SAFETY WARNINGS contained in this Manual. Make sure the Outdoor Water Furnace, circulating loops and existing heat exchangers or baseboard heaters are full of water and properly vented. Ensure the circulating pump(s) is properly installed according to manufacturer’s instructions. Failure to do so could void the Warranty. -
Page 8: Operation Instructions
OPERATING INSTRUCTIONS 1. The Optimizer 250 Water Furnace may be connected to an existing boiler system. Burn natural wood only. Make sure the wood is dry and split if required to dry. Cover wood to protect from fall rains and snow. 2. -
Page 9: Corrosion Control
CORROSION CONTROL To control corrosion of the Outdoor Water Furnace, we recommend the following: 1. Use proper certified boiler treatment as recommended by the furnace manufacturer. 2. Use antifreeze as described under Water Fill-Up. 3. Always maintain adequate water level. If level drops occasionally, check for leaks or boiling of boiling water and refer to the Troubleshooting Section. - Page 10 DO NOT open the loading door too quickly to avoid blowbacks which could cause severe burns. ALWAYS check water level, aquastat and damper setting for a proper and safe operation. Lock doors with your own locks as required. Never allow unauthorized opening, filling or servicing of the furnace DO NOT touch any part on the front of the Outdoor Water Furnace, which are not insinuated to avoid skin burns.
-
Page 11: Connection To Heating System
CONNECTION TO HEATING SYSTEMS The P & M Heating System is versatile and can be connected to any existing or new heating system and/or domestic water system as described below. The corresponding schematics are provided as a guideline only. ALL CONNECTINS MUST BE EXECUTED ACCORDING TO LOCAL PLUMBING AND ELECTRICAL CODES. -
Page 16: Wiring Diagram
Green Toggle switch on front off Boiler Black Ground Switch Line 1 Ground Nuetral Actuater Wiring Diagram... -
Page 17: Control Functions
The A419 control functions Set point (SP) establishes the temperature value at which the equipment is switched on or off, depending on the user selected mode of operation. Set point range is -30 to 212˚F or -34 to 100˚C (in 1-degree increments). If Set point mode is set to cut-in, set point is the temperature value at which the control closes the Normally Open (N.O.) contacts. - Page 18 Setting the A419 Control Set point Value To view and adjust Set point, follow these steps: 1. Press and hold MENU (about 2 seconds) until the display flashes SP. 2. Press MENU again to display the existing set point value. 3.
-
Page 19: Control Functions
IMPORTANT: Do not Set point and Differential values which (when totaled) fall out of A419 control’s Set point range (-30 to 212 ˚F [-34 to 100˚C]). The control will not function properly if Cut-in or Cutout values are outside of the control’s Set point range. Checkout Before applying power, make sure installation and wire connections are correct for your application. -
Page 20: Trouble Shooting
Trouble Possible Cause Solution Too Little Heat Fire is out Add wood/build fire Check leaks then ad water Low water level or water leaks Check electrical circuits Power failure Check pump Circulating pump failure Vent System Air traps in system Inspect fan/replace Fan is not running Too Much Heat... -
Page 21: Warranty Information
All gaskets, seals, etc., are warranted by Piney Manufacturing Ltd. for a period of one year from the date of purchase. Pre-cast heat treated refractory brick is guaranteed by the manufacturer to be of premium quality and free from defect at the time of shipping. - Page 22 1-306-922-1662 with a copy of the sales receipt within 20 days of sale date. “I have read, understood and accept the conditions of this Warranty.” Customers Signature: ______________________________________________________ Date: __________________________________________________________________ Warranty provided by Piney Manufacturing Ltd who reserve the right to replace or repair the parts at its sole discretion.
-
Page 23: Records
Records & Notes:...
Need help?
Do you have a question about the PORTAGE & MAIN OUTDOOR WATER FURNACE and is the answer not in the manual?
Questions and answers