Advertisement
Quick Links
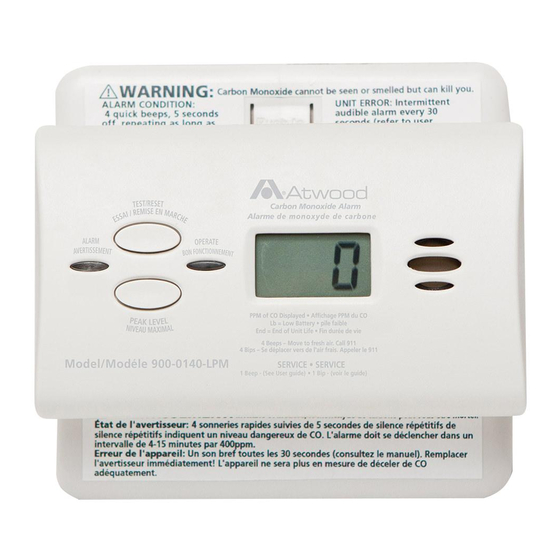
£.Atwood·
By
~Kidde
SINGLE STATION
CARBO
N
MONOXIDE
A LARM ALSO
SUITABLE FOR USE IN
RECREATIONAL V EHICLES
Carbon Monoxide
Alarm
User Guide
Models: 900-0143-LPM and
900-0140-LPM (with Digital Display)
900-0140-LPM
KN-COPP-8-LPM
with
Digital Display
900-0143-LPM
KN-C08-8-LPM
AA Battery
Operated
ATIENTION
:
Please take a few minutes to thoroughly read
th is use
r
guide
w
hich should be saved for future refe rence
and passed
on
to any subsequent owner.
Manual
PIN 2529-7220-00
Rev A
3. Installation Locations
Location
s To
A void
IMPORTANT:
Improper
location can
affect the sensitive electronic
components
in
this alarm.
To
avoid
causing
damage to
the unit, to provide
optimum performance, and
to
prevent unnecessary nuisance
alarms:
•
Do
not
install
in
kitchens, ga rages
or f
urnace rooms
t hat
may expose
t
he sensor t
o
substa
nces that could damage or
cont aminate
it.
•
Do not insta
ll in
areas where the temperature is colder t
han
4.4°C
(40°F
)
or
hotter
t han 37.8°C (100°F) such as
crawl
spaces, attics,
porches and garages.
•
Do
not
insta
ll wit
hin 5
ft.
of
heating
or cooking appliances.
(Kidde
recommends
15
ft.
to prevent nuisance alarms).
•
Do
not install near
vents, fl
ues,
chimneys
or
any forced/unforced air
ventilation openings.
•
Do not instal
l
near
ceiling
fans, doors,
windows
or
areas
directly
exposed to
the
weather.
•
Do not
install
in dead ai
r
spaces,
such
as peaks
of
vaulted ceili
ngs or
gabled roofs, where CO may not
reach
t he
sensor in
t ime to provide
early warn ing.
•
Do not
inst
all
th
is
unit
nea
r deep-cell
large batte ries.
La
rge batteries
have
emissions t hat
can cause the
alarm
to
perform
at less than
opt
imu
m
performance.
•
Do not obstruct the
vents
located on
t
he alarm. Do not place the
alarm
w
here drapes, fu
rn it
ure or
ot her
objects block t
he
flow of air
t
o the vents.
Carbon Monoxide Alarm Procedure
A
WARNING:
Act1vat1on of the
co
Alarm indicates the presence of Carbon
Monoxide
(CO)
which can
kill
you.
If ala rm sounds 4 qu ick beeps, 5 seconds off:
1)
Immed iately move to fresh air -
out
doors
or by an open
door/window. Do a head cou
nt
to check
that all
persons are
accounted for.
Do
not
re-enter
t
he prem
ises
nor move away
from the
open
door/window until t he emergency services
responders have
arrived,
t he premises have been
aired out,
and
your
ala rm remains
in
its
normal
condition.
2)
Call
your
emergency services (Fire Department
or
91 1);
I
PHONE
NUMBER:
Never restart the source of a CO problem
until
it has been
corrected. Never ignore the sound of the alarm!
If the alarm is sounding, pressing the
test/
reset button will
terminate the alarm. If the CO condition that caused the alert
in the first place continues, the alarm will reactivate. If the
unit alarms again within six minutes, it is sensing high levels
of CO which can quickly become a dangerous situation.
4. Installation Instructions
Battery Installation and Replacement
To install
or replace
the batteries in t his Kidde CO alarm, please perform
the following steps.
1.
Slide
open the bottom mtg plate to expose the battery compartment.
2.
If replacing batteries, remove t he old batteries and
properl
y dispose
of them as recom mended by the battery man ufacturer.
3.
Insta ll the new batteries. Note the polarity
illustration
in
the battery compartment.
4. Close the bottom mtg plate.
Note:
The
bottom mtg
plate
w
ill
not close
if
all
three AA batteries are
not
installed.
When
replaci ng t
he
batteries, use
one of
the fol lowing approved brands:
•
Duracell
MN1500 or MX1500
• Energizer
E91
• Gold Peak 1 SA
• Golden Power GLR6A
Battery Polarity
for the three AA batteries
Th
ese batteries ca
n
be purchased where
you
boug
ht
t he ala
rm
or at a
local
ha rdware store. Use
of
a different battery may have a detrimental
effect
on
the alarm
operat
ion.
IMPORTANT:
Const
ant exposu res to high
or
low
humidity may
reduce
battery life. A good safety measure
is
to replace the battery at least
once a yea
r,
or at t
he
same t ime as you change your clocks for dayl ight
saving t ime.
After installing or changi ng t he batteries, reinsta ll your alarm. Test
your
alarm by using t he Test/Reset button and check that the green
"
Power" LED is on.
Advertisement

