Table of Contents
Advertisement
Quick Links
O w n e r 's M a n u a l
M a n u a l # 9 8 0 0 2 1
Application Version - V69
• Internal Source - Preloaded Music
• CD Drive
• CompactFlash Card Reader
• MP3 Music File Playback - Auto Detects Audio or Pianomation
• Complete Control From the Front Panel's Rotary Dial
• Recording Capabilities - Optional Record Strip Required
• Internal Soundcard
• 20 Character Display
• NetPiano Playback Capability - Subscription Service Required
Ancho will still recognize MP3 files and now automatically detect any left
channel QRS AMI signal and direct it to Pianomation to trigger the keys.
QRS Music Technologies, Inc.
A n c h o
MPE files are no longer supported.
Advertisement
Table of Contents

Related Manuals for QRS Music Technologies Ancho

Summary of Contents for QRS Music Technologies Ancho
- Page 1 • NetPiano Playback Capability - Subscription Service Required MPE files are no longer supported. Ancho will still recognize MP3 files and now automatically detect any left channel QRS AMI signal and direct it to Pianomation to trigger the keys. QRS Music Technologies, Inc.
-
Page 2: Fcc Information
This product, when installed as indicated in the Installation Manual, meets FCC requirements. Modifications not expressly approved by QRS Music Technologies, Inc. may void your authority, granted by the FCC, to use this product. IMPORTANT: When connecting this product to accessories and/or another product use only high quality shielded cables. -
Page 3: Table Of Contents
Update SyncAlong Music Index [Demo Image File] Play a QRS CD Using the Ancho Controller Update SyncAlong CompactFlash Music From CDROM Set Up Ancho To Play from a MIDI File Player Or Computer Restoring Factory Default Settings Play Ancho from a MIDI File Player Or Computer Restoring Ancho’s Application Image... -
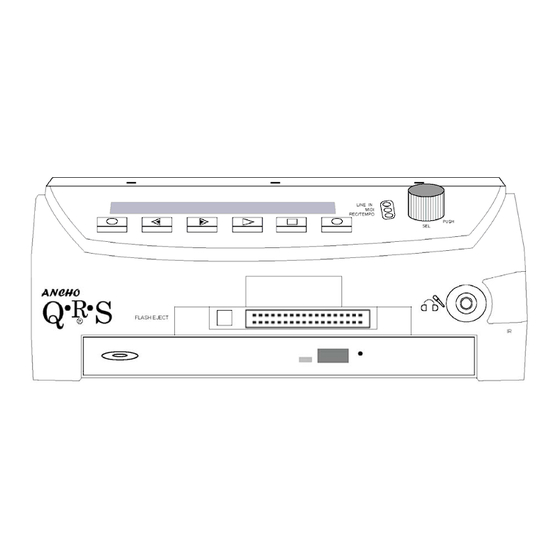
Page 4: Ancho's Front Panel Buttons
A n c h o Ancho V69_1 Ancho’s Front Panel Buttons Power “Previous” Track Left “Next” Track Right Play Stop Record Source ADJ/SEL Dial Rotate to Adjust Press to Select, PLAY, PAUSE or STOP See page 16 for the complete list of “Front Panel Features”. -
Page 5: Powering On Ancho For The First Time
Point the remote control at Ancho’s IR sensor and press the POWER button. Please wait for about 20 seconds for Ancho and Pianomation to power on. See page 47, “Power On Sequence” for the Ancho serial number and other system information. Ancho may power on to any one the following sources: If you’re not certain which source is currently selected, tap the SOURCE button to display the current source. -
Page 6: Play The Internal Source's Pre-Installed Music
If your Ancho doesn’t seem to be playing the way you think it should check below to verify the mode. For example, if the “Random” button on the remote is press by mistake, the Ancho will play one song and then stop. -
Page 7: Play From The Compactflash Source - Qrs Music Sampler
For Technical Support Call 1-800-247-6557 Ancho V69_1 Play from the CompactFlash Source - QRS Music Sampler CompactFlash Source “CF” Program (P) List Children's Music Country & Western Classical Christmas & Holiday Dinner Music International Jazz Musicals See pages 57-62, “CompactFlash Card Music New Age Sampler - Song List”... -
Page 8: Play A Qrs Cd Using The Remote Control
Select the CD Stop tapping when a “CD” displays. Source Wait for Ancho to scan the CD. The total number of songs and “QRS” will display. Press the PLAY and the first song begins to play. Play Song Use these six buttons to adjust the volume levels. -
Page 9: Play A Qrs Syncalong Series Cd
Ancho V69_1 Play a QRS SyncAlong Series CD CD Source “CD” With Ancho turned OFF, Insert the SyncAlong CompactFlash card into the CompactFlash card reader. Power ON Ancho. Press STOP to halt play. Press the CD Eject button to open the door and snap the QRS SyncAlong series CD onto the spindle. -
Page 10: Power
Tap or press and hold to adjust the volume of both the Piano and the Audio together. Range = 000 to 127 The Master Volume can also be changed by rotating the ADJust dial on the Ancho unit during song play. PIANO Volume Tap the PIANO VOLUME UP or DOWN button to display the current piano volume level setting. -
Page 11: Treble Volume
Programs are subdirectories on a CDROM or CompactFlash card where song files can be categorized and saved for playback using the Ancho controller. Ancho will recognize and playback the playable files on either the Root or within a Program on a CDROM disc or CompactFlash card, but not from both areas on the same media. -
Page 12: Tempo
A n c h o Ancho V69_1 ...Remote Control - Advanced... Refer to page 4 for button locations. TEMPO Press the TEMPO button to display the current tempo. Ω The tempo of the music on a CD or an MP3 file cannot be changed! Within two seconds after pressing the TEMPO button, press the MASTER VOLUME buttons to adjust the playback speed. -
Page 13: Playing Songs From A Program Directory
Programs are subdirectories on a CDROM disc or CompactFlash card where song files can be categorized and saved for playback. Ancho will recognize and playback the file types, listed above, on either the Root or within a Program on a CDROM or CompactFlash, but not from both areas on the same media. -
Page 14: Record A Song Using The Ancho Controller - Requires Optional Pnoscan
“RECSN002...RECSN###” up to RECSN999. “cCF” instead of a record Note: If there are ANY music files on the “root” of the CFLASH card Ancho will not recognize the source location number. files in the “RECSES99” folder. See the “CDROM & CompactFlash Root Files & Programs”... -
Page 15: How Individual Recordings Are Named When Saved To A Compactflash Card
“RECSN002...RECSN###” up to RECSN999. Note: If there are ANY music files on the “root” of the CFLASH card Ancho will not recognize the files in the “RECSES99” folder. The nine record locations can also be saved, as a group, using the “Copy Record Memory” option of the “CompactFlash Utility”. -
Page 16: Front Panel Features
CD Eject Button Press to eject a CD. Use to open the CD door when power is removed from the Ancho CD CD Emergency Eject controller. Straighten the open end of a small paper clip and gently insert it into Hole the hole to open. -
Page 17: Back Panel Features
Microphone Input / The “mixed” output sends the synthesized piano melody to the speakers. Line Out 2 See “Ancho Front Panel Navigation - Advanced” 3.5mm (1/8”) Stereo Jack Record to an analog source or transmit the MIDI signal wirelessly. Analog MIDI Output... -
Page 18: Front Panel Display - Navigation Basics
There are some functions that can only be changed from the “Setup” menu, which is accessed through the front panel display. All of Ancho’s functions can be accessed from the front panel’s “Setup” menu. This page will show you how to access the six functions available from the front panel display. - Page 19 All can be accessed by following the instructions on the previous page. To access all of Ancho’s functions you must enter the “Setup Menu”. See the following pages for details. The complete list of functions are shown in the “Setup Menu Functions - Table” on page 21.
-
Page 20: Setup Menu - Navigation Basics
A n c h o Ancho V69_1 Setup Menu - Navigation Basics Review the “Front Panel Features - Navigation Basics” sections on the previous two pages for detailed Setup Menu access instructions. With play stopped (“Play Mode” = solid square) and a solid cursor arrow, rotate the ADJust dial so “SETUP” appears in the display. -
Page 21: Setup Menu -Table Of Functions
Setup Menu -Table of Functions Function Display Options & Ranges Pages Default Remote Control Access Master Volume MAIN-VOL 000-127 8; 10; 25 Master Volume Up/Down Audio Volume AUDIOVOL -33 to +33 8; 10; 25 Audio Volume Up/Down Piano Volume PIANOVOL -33 to +33 8;... -
Page 22: Play A Qrs Cd Using The Ancho Controller
A n c h o Ancho V69_1 Play a QRS CD Using the Ancho Controller CD Source “CD” Cursor Arrow Stop Record ADJust Dial/SELect Button Power Previous Next Play Push Here to CD Eject Close Door Stop Play Press the Stop button to halt play. -
Page 23: Set Up Ancho To Play From A Midi File Player Or Computer
Refer to the “MIDI Adapter Cable Connections” section on page 54 for the proper hookup to your MIDI file player or computer. When an external device’s MIDI Out is connected to the MIDI IN cable of Ancho, the MIDI Source can be set to either play the piano or to trigger the internal soundcard instruments. -
Page 24: Play (Non-Syncalong) Qrs Cds From Your Own Cd Player
Ancho will now play from the external device connected to the rear panel’s Line Input. The red “Line In” LED will light when a QRS AMI signal is present on Ancho’s Left Line Input. The yellow MIDI LED flashes to indicate that Ancho is sending out MIDI data. -
Page 25: Setup Menu Functions - Advanced
For Technical Support Call 1-800-247-6557 Ancho V69_1 Setup Menu Functions - Advanced... Main Volume [MAIN-VOL] Adjusts the Piano and the Audio volume levels at the same time. The Main volume is easily changed using the remote control Press Stop to halt play. -
Page 26: Headphone Volume [Hphn-Vol]
A n c h o Ancho V69_1 ...Setup Menu Functions - Advanced... Headphone Volume [HPHN-VOL] Increases and decreases the Headphone volume level. The Headphone volume can also be changed during Play using the remote control, Mute mode, and from the front panel display. -
Page 27: Transpose "Music's Key - Midi Files Only!" [Transpos]
Increases the audio output for a Microphone connected to the Mic Input/Line Out 2 socket on the back panel. See the “Audio Configuration” function in this manual and select the “Karaoke” option. The Microphone is operational when Ancho is in the play mode. Press Stop to halt play. -
Page 28: Stereo Balance [Two Speaker Installation] [Balance]
A n c h o Ancho V69_1 ...Setup Menu Functions - Advanced... Stereo Balance “Two Speaker Installation” [BALANCE] Increases one of the audio channels as it decreases the other. This is useful ONLY if the player system is connected to two speakers AND a two-channel audio (SyncAlong) music is being played. -
Page 29: Treble Volume [Treble]
For Technical Support Call 1-800-247-6557 Ancho V69_1 ...Setup Menu Functions - Advanced... Treble Volume [TREBLE] Increases or decreases the high frequency audio coming out of the speaker system. The Treble Volume is easily changed using the remote control. Press Stop to halt play. -
Page 30: Metronome Volume - Record "Click-Track" [Metrovol]
Rotate the Dial to change the Metronome volume. Double-Click SEL to save and exit. Set the Delay to “Synth”, for No Delay, when connecting Ancho to a digital device via the optional MIDI adapter cable. MIDI Delay [MIDI-DLY] This keeps the background from the optional soundcard in sync with the digital device. -
Page 31: Pianomation Configuration [Pm_Confg]
For Technical Support Call 1-800-247-6557 Ancho V69_1 ...Setup Menu Functions - Advanced... Pianomation Configuration [PM_CONFG] The Pianomation Configuration settings determine how Petine and the piano will respond to MIDI data. Press Stop to halt play. Rotate the ADJ Dial to display “SETUP”. -
Page 32: How To Set The Minimum Key Force / Alignment / Test 11 [Pm_Tab11]
Rotate the Dial to put the arrow at the far right. Press SEL to “Execute” the TAB11 operation and wait for Ancho to upload the current values. Ancho is now in the calibration mode indicating the velocity percentage for the key number displayed. - Page 33 For Technical Support Call 1-800-247-6557 Ancho V69_1 ...Setup Menu Functions - Advanced..Sets Minimum Key Force / Alignment Test 11 [PM_TAB11] Continued from the previous page. Press the “PREVIOUS” button to point the arrow toward the key number. 2 Rotate the ADJust dial to play the next key.
-
Page 34: Audio Configuration [Av_Confg]
Press SEL so that the arrow is flashing. Rotate the Dial to select the desired option. See below and on the following page. Ancho will power off if option is changed. Power the system ON to the new Audio Configuration setting. Rear Panel... - Page 35 You can hear the audio “accompaniment” music through your home speaker system but, not the acoustic piano. This feature is only active when playing from the Ancho’s CD (QRS CDs) and Internal Sources. Set the Audio Configuration Option to “Mixed Output”.
-
Page 36: Compactflash Utilities [C-Flash]
Updates the Internal Source music and the Sync Along series index. Page System Update Up-Sys Restores Ancho’s Application Image. Application Update Up-App Updates or Ancho’s Application Image. 48; 49 Key List Update Up-Key Unavailable Formats a CompactFlash card. Format Format... -
Page 37: Copy Record - How Recordings Are Named When Saved As A Group
Copy Record - How Recordings are Named when Saved as a Group Ancho’s internal Record Source holds nine single track recordings. The Optional Record Strip is required. When you are satisfied with all nine recordings, use this function to copy them ALL to a CompactFlash card. - Page 38 Press SEL to acknowledge successful operation. Double-Click SEL to exit. Demo Update Up-Dmo Updates the Internal Source and the Sync Along series index. System Update Up-Sys Restores Ancho’s Application Image. Application Update Up-App Updates Ancho’s Application Image. Key List Update Up-Key...
-
Page 39: Append Syncalong Files From Cdrom To Compactflash
For Technical Support Call 1-800-247-6557 Ancho V69_1 ...Setup Menu Functions - Advanced... Append SyncAlong Files from CDROM to CompactFlash Press the STOP button to halt play. Insert the Sync Along CompactFlash card and the CDROM containing the updated MIDI files. -
Page 40: Volume & Expression Curves - Activate / Change [F-Curves]
A n c h o Ancho V69_1 ...Setup Menu Functions - Advanced... Volume & Expression Curves - Activate [F-CURVES] The F-Curve settings determine how the Audio and Piano volume levels change as the Master volume level changes. The default option is “Disabled” and the F-Curve settings cannot be accessed during playback. - Page 41 Midi Expression Curves: When this function is selected, you can define the midi Audio UP expression curves... Ancho has 1000000 different expression curves. This defines how midi velocities from the source file are mapped into other velocities towards the Audio UP Pianomation.
-
Page 42: Midi Input Select [Midi-Src]
This setting changes how the MIDI Input Source responds to MIDI data received into the MIDI Input cable. When MIDI Input Select is set to “Record Strip” the MIDI data triggers Ancho’s internal soundcard voices. Note that the when the MIDI Input Source is selected the soundcard voice list is active in the display. -
Page 43: Metronome - Time Signature (Record Click-Track) [Timesign] Mixed Output Level - Soundcard Piano [Pnoshynth]
For Technical Support Call 1-800-247-6557 Ancho V69_1 ...Setup Menu Functions - Advanced... Metronome - Time Signature [TIMESIGN] Use this function to change the time signature of the “click-track” when recording using the optional record system. Press Stop to halt play. -
Page 44: Soundcard Output [Synthvol]
Double-Click SEL to exit. Main Audio Output [MAIN-OUT] Mono or Stereo. Select “Stereo” if using the QRS SyncAlong series music with two speakers connected to Ancho. Press Stop to halt play. Rotate the ADJ Dial to display “SETUP”. Press the SEL button to enter the Setup Menu. - Page 45 For Technical Support Call 1-800-247-6557 Ancho V69_1 Q R S M U S I C T E C H N O L O G I E S...
-
Page 46: Music File Types Recognized
Option record strip required. Ancho set up to trigger soundcard voices from keyboard. Option record strip required. MIDI Input Ancho set up to play from external MIDI signal from computer or other MIDI device. Q R S M U S I C... -
Page 47: Power On Sequence [Serial And Application Version Numbers]
Parameter’s Level The Ancho controller will power on ready to play from the last played source. If the last played source was the CD Drive (CD), the CompactFlash Reader (CF) or the Internal Source (IN), the total number of songs currently on that media will be displayed. -
Page 48: Auto-Update Utility - Application Versions V0.38 Or Later
Updating Ancho’s Demo Image and Updating Ancho’s Application Image.. To see what version is currently installed, go to the “Ancho’s Power ON Sequence” page at the beginning of this manual. Download the current Application and/or Demo images files from the QRS website. -
Page 49: Updating Ancho's Application Image
Ancho V69_1 Update Ancho’s Application Image The current Application Image, or operating system, version displays each time Ancho is turned on. See “Ancho’s Power ON Sequence” at the beginning of this manual. Download the new image file from the QRS Music website and copy to a CompactFlash card or CDROM disc. -
Page 50: Update Syncalong Music Index [Demo Image File]
Ancho V69_1 Update SyncAlong Music Index [Demo Image File] The demo image file contains the pre-programmed music located in the Internal Source of Ancho. It also contains a hidden index file used to synchronize the Sync-Along series music. Download the new image from the QRS Music website and copy to a CompactFlash card or CDROM disc. -
Page 51: Update Syncalong Compactflash Music From Cdrom
For Technical Support Call 1-800-247-6557 Ancho V69_1 Update SyncAlong CompactFlash Music From CDROM Press the STOP button to halt play. Insert the Sync Along CompactFlash card and the CDROM containing the updated MIDI files. m C D Rotate the SELect Dial, point the arrow at the counter, so that “SETUP” displays in the screen. -
Page 52: Restoring Factory Default Settings
Restoring The Application Image The Application Image file (appl.ima) holds the program code, or operating system, for the Ancho controller’s user function set. It allows the user to operate the Pianomation player piano system using all of Petine’s functions and settings. The System Image file (syst.ima) holds the “core”... -
Page 53: Optional - Sliding Mounting Bracket
980007A Repeat on the other side. Bracket Place a plastic latch [4] over the plastic slide [3] with the catch [E] facing Ancho. See Figure 990050 Plastic Slide The larger hole of the latch aligns over the screw [C] that was inserted in the previous step. -
Page 54: Connecting Ancho To The Pianomation Engine
Interface Box #70213 Cable: MIDI Adapter #99140 IN-Record / MIDI OUT To avoid damage to the Ancho controller this jumper must be removed from inside the Ancho controller whenever the MIDI Adapter cable is removed. “To Pianomation” socket on Ancho’s... -
Page 55: Ancho Parts / Ancho Options / Updating Pianomation
Current version Released in the year 2000 Note: After installing Ancho on the piano flip switch #3 ON. Dip switches are located on the side of the Year 2000 processor and inside the enclosure on the previous years enclosures. Q R S... -
Page 56: Troubleshooting
Not playing the music that I expect. See “Powering ON Ancho for the First Time” See “Changing Sources” Press & Hold the ADJ/SEL dial to shut down if Ancho stops responding. Ancho wont’ power OFF. Q R S M U S I C... -
Page 57: Compactflash Card Music Sampler - Song List
CompactFlash Card “Sampler” Music Children's Music The Wizard of Oz 401004 Children's Music Bill Blodgett Children's Music Muppet Show Theme 401004 Children's Music Martin & Berkman Children's Music Animaniacs Theme 401005 Children's Music II George Bogatko Children's Music The Sound of Music II 401005 Children's Music II Rudy Martin Country/Western... - Page 58 CompactFlash Card “Sampler” Music Allegro con brio, from Sonata in C, Op 3 No 3 Classical 801227 Piano Classics Barnabas Fekete (Beethoven) Classical Adagio, from Sonata in C, Op 3 No 3 (Beethoven) 801227 Piano Classics Barnabas Fekete Classical Liebesleid (Kreisler/Rachmaninov) 801257 Rachmaninov Plays Sergei Rachmaninov Classical...
- Page 59 CompactFlash Card “Sampler” Music Dinner Music Dancing In The Dark 801258 Late Night Songs Larry Kass Dinner Music Don’t Take Your Love From Me 801258 Late Night Songs Larry Kass Dinner Music Everything I Have Is Yours 801258 Late Night Songs Larry Kass Dinner Music Love Walked In...
- Page 60 CompactFlash Card “Sampler” Music Jazz The Birth Of The Blues 801223 Way Blue Joe Augustine Jazz Georgia On My Mind 801223 Way Blue Joe Augustine Jazz Some Other Time 801222 When I Fall In Love Joe Brancato Jazz Autumn In New York 801222 When I Fall In Love Joe Brancato Musicals...
- Page 61 CompactFlash Card “Sampler” Music Nostalgic I Don’t Want To Walk Without You 400703 Forties II Frank Milne Nostalgic The Hut Sut Song 400903 Forties III J. Lawrence Cook Nostalgic Smoke Smoke Smoke 400903 Forties III J. Lawrence Cook Nostalgic Medley No. 1 801212 The Forties Hour Emily Rose Shaffer Nostalgic...
- Page 62 CompactFlash Card “Sampler” Music Sacred Morning Has Broken 801260 Chapter And Verse Joe Augustine Sacred Battle Hymn/How Great Thou Art 801246 Divine Devotions I Bob Geresti Sacred Blessed Assurance 801246 Divine Devotions I Bob Geresti Sacred Jesus, The Very Thought Of You 801276 Divine Devotions II Bob Geresti Sacred...
-
Page 63: General Midi Sounds List
For Technical Support Call 1-800-247-6557 Ancho V69_1 General MIDI Sound List This is the list of voices available from the internal soundcard. The soundcard is used when playing MIDI files, written with orchestration, from a CompactFlash card or CDROM. These voices can also be triggered from the optional record system. -
Page 64: Pianomation Two Year Limited Warranty
PIANOMATION ELECTRONICS LIMITED WARRANTY QRS Music Technologies, Inc. (“QRS”) warrants to you for the Warranty Period that there are no defects in the materials of this Product (as identified at the end of this warranty certificate). The “Warranty Period” expires (except as explained below) Two (2) years from the date of your purchase of the Product. - Page 65 Exclusions There is no express warranty on the Product and this warranty is void if: 1) You did not purchase this Product from an authorized Pianomation reseller 2) This Product has been serviced, modified or tampered with by anyone other than an QRS Authorized Service Representative 3) The name, trademark or serial number has been modified, defaced or removed from the product, 4) This Product has been damaged as a result of abuse, abnormal force or strain, failure to reasonably maintain and...
-
Page 66: Pianomation Accessories
2 Females: USE: For splitting 70213 striking the strings. the outputs of CD, Video & 56022 Use: In conjunction with the Ancho’s DVD players. $6.00 sound module and headphones so that $240.00 you can practice without disturbing Mini Stereo cable to Left &... -
Page 67: Notes
For Technical Support Call 1-800-247-6557 Ancho V69_1 Notes Setup Menu Functions Display Defaults Note Your Settings Note Your Settings Note Your Settings Master Volume MAIN-VOL Audio Volume AUDIOVOL + 00 Piano Volume PIANOVOL + 00 Headphone Volume HPHN-VOL Tempo TEMPO... - Page 68 QRS Music Technologies, Inc. For Technical Support Call 1-800-247-6557...
Need help?
Do you have a question about the Ancho and is the answer not in the manual?
Questions and answers