Table of Contents
Advertisement
Quick Links
Advertisement
Table of Contents

Summary of Contents for Inawise TPMS-4WD series
- Page 1 Inawise (Australia) Pty Ltd TPMS-4WD series Tyre Pressure Monitoring System (TPMS) User and installation guide Product features and installation instructions for the TPMS-4WD-V2 tyre pressure and temperature monitoring system. Document Number: 913-9001 Rev G 11/July/2012...
-
Page 2: Table Of Contents
Pty Ltd TPMS-4WD-V2 User and installation guide Document 913-9001 Rev G 11/July/2012 TABLE OF CONTENTS INTRODUCTION ..........................1 PRODUCT APPLICATION AND FUNCTIONALITY..............1 TPMS-4WD-V2 PRODUCT OVERVIEW .................. 1 PRODUCT FEATURES ........................ 3 ........................ 3 EATURES SUMMARY ......................4 HEORY OF OPERATION INSTALLATION ........................... - Page 3 Pty Ltd TPMS-4WD-V2 User and installation guide Document 913-9001 Rev G 11/July/2012 OPERATING PROCEDURE...................... 16 ..........................16 ENERAL LCD B ....................16 URNING ON ACKLIGHT ................... 17 ISPLAYING EMPERATURE ID ....................17 ISPLAYING ENSOR ................. 17 ISPLAYING CURRENT PRESSURE RANGE ......................
-
Page 4: Introduction
Product application and functionality 1. TPMS-4WD-V2 Product overview Thank you for choosing an Inawise Tyre Monitoring product. Not only will this product make your vehicle safer, but you are also helping the environment by using less fuel and increasing the life of your tyres. Such is the impact that this... - Page 5 Additional sensors can be purchased and fitted to spare tyres, however only 4 wheels can be monitored at any one time. Tyres can be easily rotated along with spare tyres due to Inawise’s unique sensor ID technology. (See section on Tyre Rotation)
-
Page 6: Product Features
Pty Ltd TPMS-4WD-V2 User and installation guide Document 913-9001 Rev G 11/July/2012 2. Product Features Features summary Display and monitor tyre pressure and temperature of 4 wheels simultaneously “On-Road” and “Off-Road” selector switch on back of display module ... -
Page 7: Theory Of Operation
Pty Ltd TPMS-4WD-V2 User and installation guide Document 913-9001 Rev G 11/July/2012 Theory of operation The Sensor/Transmitter modules are mounted inside each wheel rim and are held in position by a special aluminium stem tyre valve, which replaces the existing tyre valve. The sensors monitor the tyre pressure and transmit this information at predetermined intervals via RF (Radio Frequency) to the display module. -
Page 8: Installation
Pty Ltd TPMS-4WD-V2 User and installation guide Document 913-9001 Rev G 11/July/2012 3. Installation Installation instructions for the TPMS-4WD-V2 Premise: The Display unit does not require professional installation, however it is recommended that the Display unit be “hard wired” to the vehicles electrical systems (rather than the 12V Cigarette lighter output), as such a general aptitude with the ability to identify, cut, strip and join wires is required. -
Page 9: Power Source Determination
Pty Ltd TPMS-4WD-V2 User and installation guide Document 913-9001 Rev G 11/July/2012 3.1.2 +12V power source determination At this stage you now need to determine if you intend to hard wire the 12V power (recommended), or use the 12V Cigarette lighter adaptor. If you are going to use the Cigarette lighter go to Step 3.1.2.1 if you are going to hard wire the 12V supply, go to Step 3.1.2.2 3.1.2.1 Cigarette lighter power option:... -
Page 10: Rf Antenna
Pty Ltd TPMS-4WD-V2 User and installation guide Document 913-9001 Rev G 11/July/2012 3.1.3 RF Antenna The Antenna is used to receive the RF signal from the four individual sensors/transmitter modules fitted to each wheel rim. The TPMS-4WD-V2 is equipped with two long coaxial wire antennas hard wired into the display module. -
Page 11: Fixing Display Module Into Place
Pty Ltd TPMS-4WD-V2 User and installation guide Document 913-9001 Rev G 11/July/2012 3.1.4 Fixing display module into place Fix the display module into place using the double sided adhesive supplied. Ensure both surfaces are clean and if necessary clean with methylated spirits. 3.1.5 Reconnect vehicle battery The vehicle battery can now be reconnected. -
Page 12: Installing Sensor/Transmitter Modules
Pty Ltd TPMS-4WD-V2 User and installation guide Document 913-9001 Rev G 11/July/2012 Installing Sensor/Transmitter modules The sensor/transmitters need to be installed to each of the 4 wheels. The modules include a new tyre valve, meaning that the existing tyre valve needs to be removed and discarded. -
Page 13: Sensor Disassembly
Pty Ltd TPMS-4WD-V2 User and installation guide Document 913-9001 Rev G 11/July/2012 Once the ID codes for the sensor/transmitters have been identified they can be fitted to the rims. 3.2.2 Sensor Disassembly Remove the Valve Cap and the Retaining Nut from the valve stem. -
Page 14: Fix Sensor
Pty Ltd TPMS-4WD-V2 User and installation guide Document 913-9001 Rev G 11/July/2012 3.2.4 Fix Sensor The valve stem fixing nut incorporates a self retained plastic washer. Fit the nut to the valve stem and tighten only by hand, ensuring the washer is in place on the nut. 3.2.5 Adjust head angle Now adjust the angle of the electronics module so it sits as close as possible to the rim surface,... -
Page 15: Mount Tyre
Pty Ltd TPMS-4WD-V2 User and installation guide Document 913-9001 Rev G 11/July/2012 3.2.7 Mount tyre The tyre can now been mounted back onto the rim. Lubricate 3.2.7.1 Apply lubricant to both the tyre bead and the rim. Position tyre 3.2.7.2 The lower bead must be mounted with the mounting head of the changer located at 12o’clock while the position of the tyre valve is at 7 o’clock. -
Page 16: Setting Pressure Range
Pty Ltd TPMS-4WD-V2 User and installation guide Document 913-9001 Rev G 11/July/2012 Setting pressure range The final step is to set the pressure range for your tyres. On this model the pressure range is set using the “Road” / “Off Road” push button switch at the back of the display module. -
Page 17: Turning On The Sensor/Transmitters
Pty Ltd TPMS-4WD-V2 User and installation guide Document 913-9001 Rev G 11/July/2012 Turning on the Sensor/Transmitters The sensor units are shipped in a powered down sleep mode to conserve battery life and ensure maximum battery life once they are put into service. The sensors are activated from the “power down shipping mode”... -
Page 18: Tyre Removal
Pty Ltd TPMS-4WD-V2 User and installation guide Document 913-9001 Rev G 11/July/2012 4. Tyre Removal If the rim is already fitted with a sensor/transmitter module, a specific procedure is required to break the bead and remove the old tyre from the rim, in order to avoid the sensor/transmitters being damaged. -
Page 19: Operating Procedure
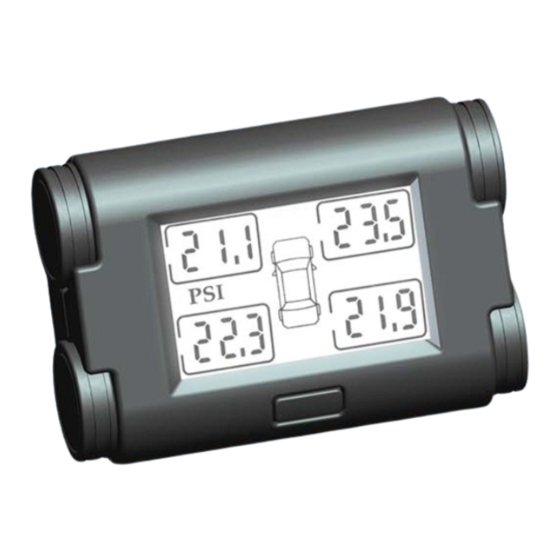
Pty Ltd TPMS-4WD-V2 User and installation guide Document 913-9001 Rev G 11/July/2012 5. Operating Procedure General The typical operating mode of the TPMS-4WD-V2 is “set and forget”. The system will monitor the tyres and in the event of a problem, will sound an alert, turn on the LCD backlight and highlight the tyre with the problem. -
Page 20: Displaying Tyre Temperature
Pty Ltd TPMS-4WD-V2 User and installation guide Document 913-9001 Rev G 11/July/2012 Displaying Tyre Temperature Tyre temperature can be displayed by pressing the function button twice. The first press turns on the backlight the second press causes the display to swap to the temperature display. -
Page 21: Setting Base Pressure
Pty Ltd TPMS-4WD-V2 User and installation guide Document 913-9001 Rev G 11/July/2012 Setting Base Pressure The “Base” pressure (also referred to as BASELINE pressure) is hard programmed into the TPMS-4WD-V2 and cannot be changed. By switching between “ON- Road” and “OFF-Road” modes two different pressure ranges are provided. Off-Road: 11.6psi to 55psi On-Road:... -
Page 22: Disabling Monitoring Of Specific Wheels
Replacing Sensors If a sensor fails it can be replaced. Replacement sensors are available from Inawise Pty Ltd. Step 1) Remove the wheel from the vehicle and remove the tyre as described in Section 4 “Tyre Removal”... -
Page 23: Displays And Warnings
Pty Ltd TPMS-4WD-V2 User and installation guide Document 913-9001 Rev G 11/July/2012 6. Displays and Warnings Low Pressure Warning Warning Threshold Alerts 1) Audible “beep” Below 11.6psi in “Off-Road” mode 2) Display Backlight turns ON 3) Problem indicator ICON is displayed Below 27.5psi in “On-Road”... - Page 24 Pty Ltd TPMS-4WD-V2 User and installation guide Document 913-9001 Rev G 11/July/2012 High Temperature Warning Warning Threshold Alerts 1) Audible “beep” Temperature above 80DegC 2) Display Backlight turns ON 3) Problem indicator ICON is displayed 4) Border around low reading is removed Fast Leak Warning Warning Threshold...
-
Page 25: Trouble Shooting
Pty Ltd TPMS-4WD-V2 User and installation guide Document 913-9001 Rev G 11/July/2012 7. Trouble shooting Problem Possible reasons Solution Initial setup of systems requires sensors to be activated from Drive vehicle at 25km/h or shipping sleep mode more for 5 minutes "000"... -
Page 26: Questions And Answers
TPMS sensors. Read the manual for the tyre sealant carefully to confirm compatibility. 5. Will Inawise TPMS operate well in extremely cold or hot conditions? The sensor’s operating temperature range is between -40 degC to +125 degC, while the display can operate between -20 DegC to +70 DegC. - Page 27 Excessive continuous distortion of the tyre’s sidewalls will cause temperature build-up. This temperature build-up can then cause catastrophic tyre failure known as a “Blowout”. Since the Inawise TPMS can alert the driver to not only low tyre pressure which is the primary cause of blowouts, but also to...
- Page 28 Pty Ltd TPMS-4WD-V2 User and installation guide Document 913-9001 Rev G 11/July/2012 12. Can I re-install the Inawise TPMS on a new vehicle after it has been removed from another vehicle? Of course you can. But we suggest you replace the valve core/cap/sealing grommet whenever you replace the tyres or move the sensors onto another rim.
- Page 29 TPMS-4WD-V2 User and installation guide Document 913-9001 Rev G 11/July/2012 18. Why is the pressure reading from the Inawise TPMS always different to a reading I get with an external tyre pressure gauge? Every measuring instrument has a defined tolerance. This tolerance defines the accuracy of the instrument.
-
Page 30: Warranty And Support
The dealer, Inawise Pty Ltd or Shanghai Baolong Industries Corporation are not liable for any direct, consequential, indirect or punitive damages what so ever. The Inawise TPMS is a driving aid only and should only be used as such. The Inawise TPMS does not substitute for proper vehicle maintenance and servicing which includes regular inspection of wheels and tyres. -
Page 31: Technical Specification
Pty Ltd TPMS-4WD-V2 User and installation guide Document 913-9001 Rev G 11/July/2012 10. Technical Specification Display Unit -Monitor ^nd displ^y re^dings for ^ll 4 tyres simult^neously -Front p^nel “Function” button -Power Consumption: 12m@ Typic^l (20m@ M^x) -Supply Volt^ge: 12VDC -Weight 75g (2.65oz) -Dimensions: 52.0mm x 75.59mm x 38.56mm -Oper^ting Temper^ture: -20degC to +70DegC -Pressure Resolution: 0.1 PSI... -
Page 32: Safety Warning
14. Disclaimer While every attempt has been made to ensure all information in this manual is accurate, ‘Inawise Pty Ltd’ or any of its associated companies or subsidiaries will not be held liable in any way what so ever for any errors or omissions which may be present in this document.
Need help?
Do you have a question about the TPMS-4WD series and is the answer not in the manual?
Questions and answers