Table of Contents
Advertisement
Advertisement
Table of Contents

Subscribe to Our Youtube Channel
Summary of Contents for B&G Network V50 VHF
- Page 1 V50 VHF H50 Handset Installation Instructions ENGLISH bandg.com...
- Page 2 Copyright © 2013 Navico All rights reserved. B&G® is a registered trademark of Navico No part of this manual may be copied, reproduced, republished, transmitted or distributed for any purpose, without prior written consent of B&G Electronics. Any unauthorized commercial distribution of this manual is strictly prohibited. B&G Electronics may find it necessary to change or end our policies, regulations, and special offers at any time.
-
Page 3: Table Of Contents
Table of contents 1 Installation preparation ................6 1.1 Checklist..............................6 1.2 Tools needed for installation ......................6 2 VHF installation ....................7 2.1 Location requirements ........................7 2.2 LCD viewing angle ..........................7 2.3 Choose an installation type ......................7 2.3.1 Mounting bracket installation ....................8 2.3.2 Recessed installation ........................9 2.4 V50 dimensions .......................... -
Page 4: Important Safety Information
Important safety information DISCLAIMER: It is the owner’s sole other information relating to the product responsibility to install and use the (Documentation) may be translated to, instrument and transducers in a manner that or has been translated from, another will not cause accidents, personal injury or language (Translation). - Page 5 RF Emissions notice This equipment complies with FCC radiation exposure limits set forth for an uncontrolled environ- ment. This device’s antenna must be installed in accordance with provided instructions; and it must be operated with minimum 96 cm spacing between the antennas and all person’s body (excluding extremities of hands, wrist and feet) during operation.
-
Page 6: Installation Preparation
1 Installation preparation 1.1 Checklist Check that you have all the following items before starting the installation. Contact your dealer if an item is missing: • V50 base station, with microphone • Handset mic wall hanger, with: attached 2 self-tapping screws 2 flat screws •... -
Page 7: Vhf Installation
2 VHF installation 2.1 Location requirements Please check these before doing any cutting or drilling. Whichever installation method you choose, ensure that the chosen location: • Is at least 3’ (1 m) from the antenna • Allows easy connection to (at least) a 10 Amp fused 13.6 V DC electrical source and the antenna • Is at least 1.5’... -
Page 8: Mounting Bracket Installation
2.3.1 Mounting bracket installation Hold the supplied mounting bracket at the chosen location and use a soft pencil to mark the 4 screw hole positions onto the mounting surface. Drill the 4 screw holes where marked. Drill completely through the mounting surface. Note: If you are drilling into fiberglass, use a small drill bit to drill pilot holes before drill- ing the screw holes. -
Page 9: Recessed Installation
2.3.2 Recessed installation Tape the supplied mounting template to the chosen location. Ensure that the template is smooth and taut. Drill the 2 screw holes where marked. Drill completely through the mounting surface. Note: If you are drilling into fiberglass, use a small drill bit to drill pilot holes before drill- ing the screw holes. -
Page 10: V50 Dimensions
2.4 V50 dimensions B&G - V50 & H50 Installation Instructions... -
Page 11: Handset Mic Wall Hanger
2.5 Handset mic wall hanger Hold the handset mic wall hanger at the chosen location and use a soft pencil to mark the 2 screw hole positions onto the mounting surface. If the mounting surface is: • non-metallic, use the 2 self-tapping screws and 2 plain washers to attach the handset mic wall hanger to the mounting surface. -
Page 12: Vhf Electrical Installation
3 VHF electrical installation 3.1 Connect the radio Both NMEA 0183 and NMEA 2000 is supported by this radio. Use the GPS connector cable to connect NMEA 0183, or the N2K connector for NMEA 2000 connections. 1 - VHF antenna A suitable radio antenna (not supplied) must be mounted and connected before you can operate the radio. - Page 13 Pin / Socket Wire color Function (NMEA 2000) Green Can-D, Drain wire, Shield Can-S, Power, +12 V DC Black Can-C, Ground White Can-H, Data High Blue Can-L, Data Low 3 - GPS Connector and cable NMEA0183 OUT (+) 2 (Orange) NMEA0183 IN (-) NMEA0183 IN (+) 4 (Green)
- Page 14 4 - Hailer Horn Wire color Function Details White Connect to hailer speaker + Shield (-) Shield Connect to hailer speaker - Important: Do not short circuit these 2 wires. Install the hailer horn in a forward-facing loca- tion on the boat because the hailer horn will transmit the FOG horn sounds and will ‘listen back’...
-
Page 15: Wiring Diagram - Nmea 2000 Connections
3.2 Wiring diagram - NMEA 2000 connections Multifunction Display STBY AUTO VHF Antenna MARK GOTO MENU PAGES GPS Antenna Fuse 5A Switch 12 VDC Power 12 VDC only T-Connectors NMEA 2000 Network Link8 VHF B&G - V50 & H50 Installation Instructions... -
Page 16: Wiring Diagram - External Speaker And Hailer
3.3 Wiring diagram - External speaker and hailer VHF Antenna VHF Antenna External Speaker Hailer Speaker Link8 VHF Shield White B&G - V50 & H50 Installation Instructions... -
Page 17: Wiring Diagram - Nmea 0183 Connections
3.4 Wiring diagram - NMEA 0183 connections STBY AUTO MARK GOTO MENU PAGES Fuse Switch Black 12 VDC Power 12 VDC only B&G - V50 & H50 Installation Instructions... -
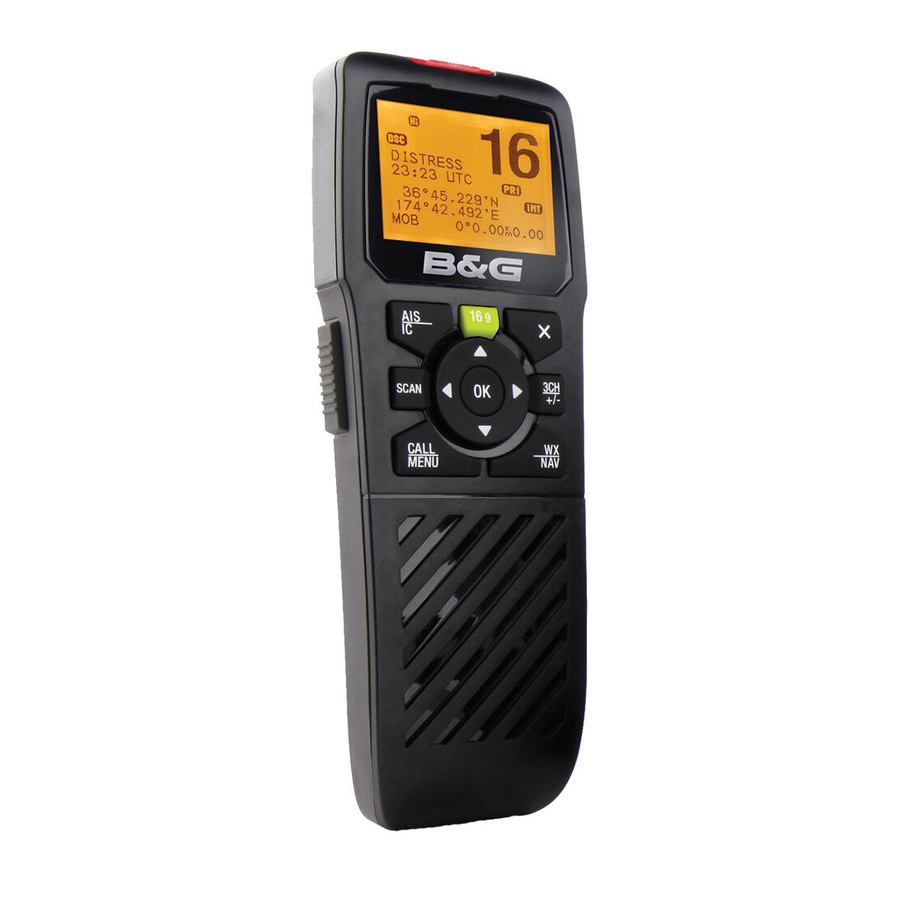
Page 18: H50 Handset Installation
4 H50 Handset installation Drill 3 x 04.0mm mounting holes 122.0mm [4.80] Drill 1 x 03.5mm Wire hole 13.0mm [0.51] Choose a suitable location that ensures sufficient room is allocated to allow the H50 handset to fit securly in the charging bracket. Hold the supplied mounting bracket at the chosen location and use a soft pencil to mark the 3 screw holes and 1 wire hole positions onto the mounting surface. - Page 19 Feed the DC connection wire through the wire hole (lower hole). Use the flat screws, spring washers, plain washers, and nuts to attach the mounting bracket to the location site OR, if you cannot reach behind the mounting surface to attach the nuts, use the self-tapping screws instead of the flat screws.
-
Page 20: Setup Your Radio - Your User Mmsi
5 Setup your radio - Your user MMSI CAUTION You can’t make any DSC transmissions until you’ve obtained a user MMSI and entered it into your radio. You must enter your User MMSI before the DSC functions of this radio will work. See the Setup section in the V50 User Guide for full setup details. - Page 22 1177...
Need help?
Do you have a question about the V50 VHF and is the answer not in the manual?
Questions and answers