Table of Contents
Advertisement
Advertisement
Table of Contents

Related Manuals for RaidSonic IB-NAS5520

Summary of Contents for RaidSonic IB-NAS5520
- Page 1 Manual IB-NAS5520 1 ...
-
Page 2: Table Of Contents
Manual IB-NAS5520 ONTENT 1. Introduction .................................. 4 1.1 General Information ............................. 4 Hardware .................................... 6 2. IB‐NAS5520 .................................. 6 2.1 Technical Details .............................. 6 2.2 Front View ................................ 7 2.3 Rear View .................................. 7 HDD Installation .............................. 8 2.4.1 HDD Setup Guide ............................ 8 Software/Firmware ................................ 9 ... - Page 3 Manual IB-NAS5520 6.2.2 Adding and Modifying an Account ...................... 1 8 6.2.2 Server ................................ 1 9 7. Extra Features and Examples .......................... 2 1 File Access ................................ 2 1 7.1.1 Folder ................................ 2 1 7.1.2 File Access on a PC ............................. 2 1 7.1.3 File Access on a Mac .......................... 2 3 Extra Features .............................. 2 4 7.2.1 BitTorrent .............................. 2 4 ...
-
Page 4: Introduction
Manual IB-NAS5520 1. I NTRODUCTION NAS is short for "Network attached Storage", which is used to name a specialized device that offers mass storage towards a data network. SOHO NAS like the ICY BOX IB‐NAS5520 are small devices that simply share data from HDDs to an Ethernet. There are many approaches; some are using custom shaped methods in offering the storage space to the network participants. This approach needs special software to be installed on the network clients and in most cas es is limited to one particular operating system. ... - Page 5 Manual IB-NAS5520 1.1.5 Disposing of the player When you dispose of the device, be sure to dispose it appropriately. Some countries may regulate disposal of electrical device, please consult with your local authority. 1.1.6 Broadband internet Make sure that you have broadband internet access to use the internet functions of the product. The IB‐NAS5520 is a network device and requires some knowledge about network issues, in order to connect the IB‐NAS5520 perfectly to your home network. Make sure the perfect ...
-
Page 6: Hardware
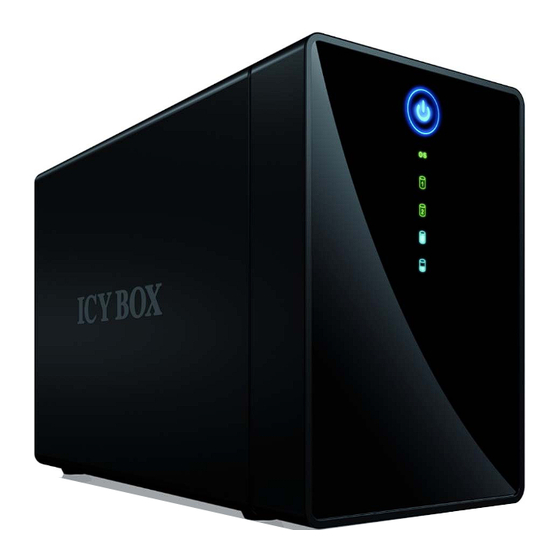
Manual IB-NAS5520 ARDWARE 2. IB-NAS5520 This dual‐bay hybrid enclosure is a fully functional network drive (NAS) that allows users to login over the internet plus a USB 3.0 direct attached storage device (DAS) for super‐speed file transfers. The hardware RAID supports JBOD, RAID 0 and RAID 1, offering large storage capacity, performance and data protection. Our free iPhone, iPad and Android Apps allow for easy access on mobile devices. Comes with built‐in UPnP‐AV media server. 2.1 T ECHNICAL ETAILS CPU 300 MHz Memory 32 MB DDR1 SDRAM 2 MB SPI flash Internal hard Two 3.5” SATA‐I, SATA II or SATA‐III hard drives (1.5 Gbit/s or 3 Gbit/s drive compliant) Capacity 80 GB – 3 TB (supports large volumes in excess of 2 TB) exFAT (maximum size for single files on NAS/DAS is 127 GB) Front I/O 1 x Power button with back‐light indicating power status 1 x LED indicating the system status (OS) 2 x LEDs indicating the HDD status and data access (HDD1 and HDD2) 2 x LEDs indicating the current storage capacity (50% and 100%) Rear I/O 1 x Power receptacle 1 x RJ45 connector (10/100/1000) with two LEDs for link and activity 1 x USB 3.0 device port 1 x Reset button 1 x Firmware update button 1 x Firmware update LED 1 x Rotary switch for RAID mode selection ... -
Page 7: Front View
Manual IB-NAS5520 2.2 F RONT Power button Blue = Power is ON OS Green = System is running and ready Flashing green = System is starting up or shutting down Flashing red = System cannot obtain IP address or system is currently starting up or shutting down Green = OK Flashing green = Data access Used storage space in percentage (50% and 100%) 2.3 R USB 3.0 port Ethernet port Green = Network link Orange = Network access FW When the LED is lit, press the button to update the firmware. 7 ... -
Page 8: Hdd Installation
Manual IB-NAS5520 Note: (Function currently not enabled). Please follow firmware installation instruction inside corresponding chapter inside this manual. DC 12V Power receptacle (DC +12V) RESET Press and hold the button during startup to reset the settings. RAID 0 / RAID 1 / JBOD RAID mode selector CONFIRM Press for 3 seconds to set the RAID mode. 2.4 HDD I NSTALLATION Unlock the switch at the bottom of the case and remove the front panel. Install the hard drives and mount them with the two screws from the bottom. Replace the front panel and lock the switch. Plug in the Ethernet cord and connect it with your network switch or router. Plug in the power cable and connect it to a power outlet. 2.4.1 HDD S ETUP UIDE With computer and web browser ‐ Connect the device to the network and turn on the power. ‐ Wait until the OS LED lights up green, indicating that the system is ready. ‐ Set the RAID selector switch to your preferred RAID mode (JBOD for maximum capacity, RAID 0 for performance, RAID 1 for data protection). ‐ Press and hold the CONFIRM button for 3 seconds to save the new RAID mode. ‐ Open the web browser (e.g. Safari, Firefox, Chrome, IE) and go to http://www.myakitio.com. ‐ Enter the MAC Address of your unit (printed on the bottom label). ‐ Click Settings. ‐ Login as administrator, using admin as username and admin as password. ‐ Go to System settings and select Maintain. ‐ Select the Disk tab and click Format to format the hard drives. For more detailed instructions, please go to NAS Setup Instructions. ... -
Page 9: 3.1 Nas
Manual IB-NAS5520 ‐ Once the drives have been formatted, the LED indication should be as follows: ‐ The blue LED behind the power button is ON (not flashing) ‐ The green system LED is ON (not flashing) ‐ The blue LEDs for the capacity are OFF ‐ Replacing a faulty HDD in a RAID 1 array ‐ In a RAID 1 array, under normal circumstances, both HDD LEDs light up green. If a drive is defective, the LED for the corresponding drive is OFF. We strongly recommend to replace the faulty hard drive as soon as possible. ‐ Turn off the power. ‐ Replace the faulty hard drive. ‐ Turn on the power. ‐ The system automatically starts to rebuild the RAID array. During this process, the LEDs for HDD1 and HDD2 are flashing. ‐ Once the RAID array is rebuilt, the HDD LEDs stop flashing. Note: You can also follow the rebuild process in the web GUI. Login and go to Settings. In the left sidebar under Interface Information, you can see how much has been rebuilt already. Please note that the number for the percentage does not change unless you refresh the browser (F5). OFTWARE IRMWARE 3. S YSTEM EQUIREMENTS The following table describes specific requirements for the operating system and web browser. 3.1 NAS Operating System Web Browser Windows XP, Windows Vista, Windows Internet Explorer 7.0+, Firefox 3.1+, Safari 4+, Chrome 7 10+ MacOS X 10.5 or above Safari 4+, Firefox 3.5+, Chrome 10+ 3.2 DAS Operating System ... -
Page 10: Supported Devices
Manual IB-NAS5520 3.3 S UPPORTED EVICES Type Device UPnP Client Xbox 360, PlayStation 3, iTunes, WMP12, DLNA compatible clients 3.4 F IRMWARE PDATE Start your network drive, open the web browser and login as administrator. Go to Settings and the current firmware will be shown on the left hand side under “Firmware Version”. Check at the following web page http://www.raidsonic.de if any newer version of corresponding device will be available. If so, please download to your computer’s hard drive. Never turn off your unit during the firmware update procedure. This may damage your device! If the upgrade fails (e.g. power supply failure during firmware update), you may not be able to operate your device anymore. How to update the firmware Download the latest firmware and save it on your local disk. Unzip the *.zip file to extract the *.bin file. ‐ Turn on your network drive, use the web browser and log in as administrator. ‐ Go to “Maintain” in the “Server settings” menu and select Firmware. ‐ Click Browse and locate the new firmware (*.bin file) on your computer. ‐ Click OK to confirm the pop‐up dialog . Wait until the page is refreshed automatically and the pop‐up dialog confirms the update has completed. This might take a couple of minutes, so make sure the device is not interrupted until the update is completed! ‐ Click OK to confirm the pop‐up dialog . ‐ Go to “Reboot” and click Reboot to restart the system. 4. NAS S... -
Page 11: Login
Manual IB-NAS5520 the instructions below you will need to reformat the hard drive before using the NAS functions and therefore lose all data stored on the hard drive. 4.2 L OGIN 4.2.1 L OGIN WITH NTERNET CCESS ‐ Use your computer and open the web browser to login to http://myakitio.com ‐ Enter the MAC Address of your unit (printed on the bottom label) ‐ Click Enter on the webpage If you are unable to login using the web portal, use the Nettool and search for the device on the local network. For more details, see Nettool for Windows or Nettool for Mac. 4.2.2 L OGIN ON OCAL ETWORK ‐ Use your computer and open the web browser (IE, Firefox, Safari, etc.) ‐ Clear the address bar (remove the http://) ‐ Input the MAC Address of your unit (printed on the bottom label) into the browser's address bar followed by .local. ‐ Click Enter on your keyboard If you are unable to login using just the web browser and the MAC address, use the Nettool and search for the device on the local network. For more details, see Nettool for Windows or Nettool for Mac. 4.2.3 H OW TO... - Page 12 Manual IB-NAS5520 Your default server name is the MAC address. You can find this number on a sticker either on the retail packaging or the device itself. After you click the Enter button it will open the web interface of your NAS. You can also login directly by using this syntax: http://xxx.myakitio.com. The “xxx” should be replaced by your server name (MAC address without colon). Click on any of the icons for further settings and a pop‐up window will ask for your login credentials. If the checkbox “Remember me” is checked, the web browser will remember the username that was just typed in. The next time you go to myakitio.com, the username box will be filled in automatically. Nettool on Windows Use the Nettool application to locate the network drive on the local network. Download the Nettool for Windows at http://cloudlandisk.myakitio.com/nettool_pc.zip The Nettool application requires the Java Runtime Environment (JRE). If JRE is not already installed on your computer, go to www.sun.com and download it. Double click on the *.EXE file to start the application. The device will be listed automatically and it will display its IP address, device name and group name. If the information is not automatically displayed, make sure the network drive and your computer are connected to the same local network and assure that the Nettool is not blocked by the firewall (javaw.exe requires UDP out at port 14675). If you have more than one device connected at the same time and the current device is not the correct one, click Search Next. Otherwise, click Connect to open the web browser and login to configure your device. Enter the user name and password to login. By default, the name and password is admin. Nettool on Mac Use the Nettool application to locate the network drive on the local network. Download the Nettool for Mac OS at http://cloudlandisk.myakitio.com/nettool_mac.zip Double click on the Nettool to start the application. The device will be listed automatically and it will display its IP address, device name and group name. If it is not automatically displayed, make sure the network drive and your computer are connected to the same local network and assure that the Nettool is not blocked by the firewall (javaw.exe requires UDP out at port 14675). If you have more than one device connected at the same time and the current device is not the correct one, click Search Next. Otherwise, click Connect to open the web browser and login to configure your device. Enter the user name and password to login. By default, the name and password is admin. 12 ...
-
Page 13: Format Hard Drive
Manual IB-NAS5520 4.3 F ORMAT RIVE ‐ Click on the “Settings” icon (far right) ‐ Input the default username: admin ‐ Input the default password: admin (we highly recommend that you change the default username and password after finishing these steps) ‐ Hover over the “System Settings” icon (2nd from left) and click Maintain from the dropdown menu ‐ Click on the Disk tab (far left) ‐ Click Format ‐ You will be asked to click OK three times ‐ Click OK three times ‐ You will see a “Format Successful” message Note: You are now using the NAS function of this device. In order to use the DAS (USB 3.0) function, please turn off the device, unplug the Ethernet cable and attach the USB 3.0 cable. Please do not attach both cables at the same time as the system will only recognize one of the two cables (Ethernet or USB 3.0) at any given time. The system must be turned off and restarted each time the cables are changed. Important: DO NOT FORMAT THE HARD DRIVE WHEN CONNECTED VIA USB! If you connect it via USB before formatting the hard drive through the web interface of the network drive, you will need to reformat the hard drive before using the NAS functions and therefore lose all data stored on the hard drive. See NAS Setup Instructions for more details. 5. S YSTEM ETTINGS 5.1 S YSTEM NFORMATION 5.1.1 I DENTIFICATION Host Name By default, the host name is set to use the MAC address. This name is used to identify your device on ... -
Page 14: Network
Manual IB-NAS5520 This should be the same name as your workgroup. In general, the default WORKGROUP will work, but if your workstation belongs to a different group, change it and clickApply to save it. 5.1.2 Administration Administrator This is the account used to manage your network drive. The user name “admin” cannot be changed but we strongly recommend changing the password as soon as you have logged in for the first time, to prevent any unauthorized access. To change the password, enter your new password, verify it and click OK to apply the changes. 5.1.3 Date and Time Automatic If internet access is available, we recommend setting the renew mode to “Automatic”. Select a time server from the list, enable daylight savings if required and then clickSave to apply the new settings. It will automatically synchronize the date & time over the internet with a time server. Manually When set to “Manually”, you can enter the date & time manually and click Save to apply the settings. You can also click on Sync with PC to synchronize the time with your computer. The date and time settings are only accurate as long as the power is turned on. If the renew mode is set to “Manually” and you turn off or remove the power supply, the date and time are reset! If the renew mode is set to “Automatic” and a time server is selected, it will automatically synchronize the time at start up. 5.2 N ETWORK 5.2.1 IP Setting By default, the IP Setting is set to Automatic IP. This is the recommended setting and will allow the network drive to obtain its IP address automatically. If you prefer setting it manually, select the Static IP option, enter your own values and click Apply to confirm the new settings. Setting it manually is useful when you need to have a static IP address in order to mount the network drive or set up port forwarding. To find out the correct settings for a static IP setup, refer to your network router settings or ask your system administrator. 5.2.2 PPPoE If you are using DSL or a cable modem to connect to the Internet and your network hub, switch or ... - Page 15 Manual IB-NAS5520 Password Enter your password provided by your ISP (Internet Service Provider) Service On The PPP daemon will ONLY connect to your ISP on demand, when a LAN user Demand attempts to send data to the Internet. When there is no data traffic, it will close the connection to the ISP. 5.2.3 DDNS DDNS (Dynamic Domain Name Service) allows you to create an easy‐to‐remember domain name in order to access your network drive remotely. It points to your network drive even when your Internet connection has a dynamic IP address and there is no need to remember an IP address. ‐ Enable the DDNS function. ‐ Select one of the available service providers from the drop‐down list. ‐ For DYNDNS go to www.dyndns.com. ‐ Create a free account with the service provider and register your preferred name. ‐ Enter the host name, user name and password into the corresponding fields. ‐ Click Apply. The network drive will connect to your DDNS account and update its IP address whenever it changes. To establish remote access to your network drive when it is connected to a network router or switch, you need to configure port forwarding (e.g. Web UI port 8000 or WebDAV port 8080). For more info about how to set up port forwarding on your router, see http://portforward.com. You are now ready to enter your newly registered domain name in the web browser and access your network drive remotely. Remote login is already enabled and setup by default. Go to http://myakitio.com, enter the MAC address (12 digits, all in one word). No further configurations are needed. The DDNS service for this NAS was designed to be used with a PPPoE connection. If your NAS is behind a network router and not connected directly to the external IP, this function will not work. Instead, please use our web portal at http://myakitio.com for remote login. 5.2.4 Portal Service This service is required for remote logins to the web interface and for remote file access via WebDAV. The Host Name displays the server name for remote login. When the portal service is enabled and running, the status shows OK, otherwise it shows None. Do not disable the portal service if you want to login to your network drive via the web portal athttp://myakitio.com. If you only use the device on the local area network, we recommend to ...
-
Page 16: Maintain
Manual IB-NAS5520 For file access via WebDAV, set up a redirect for TCP traffic from WAN port 8080 to LAN port 80. Because you have to redirect the network traffic to a certain IP address (the internal IP of your NAS), it's best if you set a fixed IP address for your NAS. Otherwise, it might change the next time you restart your router or your NAS and the port forwarding will not work anymore. Port Numbers By default, the administration port is set to 8000 and the WebDAV port is set to 8080. If you have more than one network drive installed in the same local network or if you run into conflicts with other network devices, change the port number to a different number and click Apply to save the settings. Remember to change the port forwarding if you make any changes to the port numbers here. For Windows XP users to mount the network drive, the port number for WebDAV has to be set to port 80. Make sure to set up port forwarding accordingly. 5.3 M AINTAIN 5.3.1 Disk Sleep Time To save energy and keep the drive cool, we recommend setting the sleep time. Select a time from the list between 10 to 60 minutes. When the drive is idle for longer than the set time, it will automatically go into stand‐by mode and spin down. If you need immediate access to the drive, set it to “Disable” and the drive will keep spinning at all times. Format Disk Use this tool to format your hard drive and prepare it for the network drive. When you format the hard drive using this disk utility, it will create a single partition using the exFAT file system. If you create other partitions or choose a different file system when connected through USB, keep in mind that the network drive is only able to recognize the first partition and it has to be exFAT! In order to access the exFAT partition when the device is connected via USB, Windows XP requires Service Pack 2 or later and Windows Vista requires Service Pack 1 or later. exFAT driver update for Windows XP and Server 2003 http://support.microsoft.com/kb/955704 exFAT driver update for Windows Vista is part of SP1 http://support.microsoft.com/kb/935791 Formatting the drive will erase all data and settings, as well as deleting the SMB folders and FTPaccounts! 5.3.2 Firmware Here you can update the firmware for your network drive. ... -
Page 17: Server Settings
Manual IB-NAS5520 During the update process, take no other actions and make sure the power is left on! This might take a few minutes. Once the update process is completed you will be prompted to reboot the system. ‐ Click OK to close the pop‐up window. ‐ Go to Reboot and click Reboot to restart the system. ‐ Click OK three times to confirm the restart. The system is now restarting. Please wait for about 60 seconds and then login again to check if the firmware version has been uploaded correctly. If there is a new update available, the FW update LED lights up green and you can push the FW update button to update the firmware. The light turns off as soon as you push the button but wait about 30 seconds for the firmware update to complete and the system to restart. Never turn off your device or remove the power during the firmware update procedure as it may cause irreparable damage! 5.3.3 Reset If you experience unexpected problems and after updating the firmware, we recommended to reset all settings. Resetting the device will set all settings, except the SMB andFTP accounts, back to its original factory default settings. ‐ Click Reset. ‐ Click OK three times to confirm and reset all settings. ‐ Click OK to close the confirmation window and reboot the device. Resetting the device does not delete any of your media files that are stored on the network drive. 5.3.4 Reboot This can be used to restart the network drive after a firmware update. Make sure all current operations are completed before rebooting the device. ‐ Click Reboot to restart the system. ‐ Click OK three times to confirm the restart. The system is now restarting. Please wait for about 60 seconds and then login again. 6. S ERVER ETTINGS 6.1 S... -
Page 18: Smb/Ftp/Webdav Service
Manual IB-NAS5520 6.1.2 SMB/FTP/W DAV S ERVICE By default, Samba, FTP and WebDAV services are enabled, allowing you to view files directly in your browser (WebDAV Service), transfer files with an FTP application (FTPService) or by mounting the network drive via SMB (SMB Service). If you only use one of these services, we recommend disabling the others for security reasons. You can always enable it again later. 6.1.3 M EDIA ERVICE The UPnP‐AV media server can be used to share your photos, music and videos that are stored on the network drive with an Xbox 360, PlayStation 3 video game console, WMP12 or other DLNA compatible devices that are connected to the same local network as well as stream music to iTunes media players. 6.2 S HARE ANAGEMENT 6.2.1 A CCOUNT You can create a maximum of 16 accounts. For folders and account names, use only the English alphabet, without any special characters or spaces. The default account is created automatically. The user name is “guest” and no password has been set. Like any other account, you can modify, delete or disable it. Only the folders on the sharing list will be accessible on the network. Click on an account and then use the arrow buttons to add and remove the folders from that list. Deleting a folder will also erase all the files that are stored inside that directory! 6.2.2 A DDING AND ODIFYING AN CCOUNT To create a new account, click the green plus sign. ... -
Page 19: Server
Manual IB-NAS5520 6.2.2 S ERVER 6.2.2.1 WebDAV Server The WebDAV server section displays the current port number and IP address of your WebDAV server. When you access the network drive from the local network, use the “Internal URL”. When accessing the network drive remotely, meaning not in the same local network as the device is connected to, use the “External URL”. The “Folder” icon on the landing page is a shortcut to open the WebDAV connection, so you don't have to login to “Settings” just to find out the correct URL. On Windows, when mounting the network drive via WebDAV, the file size for a single file is limited to 50MB! This is a limitation of the Operating System and not the network drive. Use the web browser to download the files instead or see http://support.microsoft.com/kb/900900 for more information about how to modify the registry on your Windows machine. 6.2.2.2 FTP Server The standard port for the FTP service is 21. If required, you can change it and use any port number from 1025‐65500, however generally, we recommend using the default port 21. When you change the port number for the FTP server, remember to adjust your firewall, otherwise, the FTP access will likely be blocked. By default, the encoding is set to English. If you want to store or transfer files with a different encoding (different language), choose the corresponding language from the drop down menu list. Click Apply to confirm the selection and change the language setting. If you are unclear about which encoding to select, click help for further details. In order to transfer and store the files, it is important that you select the correct language! Central Europe (CP1250) shqipe, hrvatski, čeština, Magyar, polski, română, srpski, slovenčina, slovenski Cyrillic (CP1251) Азəрбајҹан, Беларускі, български, македонски јазик, Қазақ, Кыргыз, Монгол хэл, русский, српски, Татар, україньска, Ўзбек Latin I (CP1252) Afrikaans, euskara, català, dansk, Nederlands, English, føroyskt, suomi, français, galego, Deutsch, íslenska, Bahasa Indonesia, italiano, Bahasa Malaysia, norsk (bokmål), norsk (nynorsk), Português, Español, Kiswahili, svenska Greek (CP1253) ελληνικά Turkish (CP1254) Azərbaycanılı, Türkçe, U'zbek Hebrew (CP1255) עברית... - Page 20 Manual IB-NAS5520 Korean (CP949) 한국어 Traditional Chinese (CP950) 中文(繁體) 6.2.2.3 Media Server The UPnP‐AV media server can be used to share your photos, music and videos that are stored on the network drive with an Xbox 360, PlayStation 3 video game console, WMP12 or other DLNA compatible devices that are connected to the same local network as well as stream music to iTunes media players. From the drop‐down list of the corresponding list, select the folder where your media files (e.g. photos, music, videos) are stored. Repeat the previous step for each media type (photo, music, video). Depending on the video game console, only certain media files can be accessed. For the Xbox 360, you can play JPG, MP3 and WMV files. For the PlayStation 3, you can play JPG, MP3, MPEG‐1 andMPEG‐2 files. iTunes will only be able to play MP3 music files. 6.2.2.4 iTunes Playlist Whenever you add or remove MP3 files to the music directory, click Build to refresh the database. If for some reasons, iTunes lists files that no longer exist or some files are missing, click Remove to clear the database and then click Build to build a new database. 6.2.2.5 BT Download Here you can manage your torrents. Before you add the first torrent, set the download path to your preferred folder. Also, you might want to click Settings and set the server port plus a limit for the upload and download speed according to your network’s bandwidth. After changing the settings, click Apply to save the new configuration. To be notified when a torrent is stopped or removed, you can set up e‐mail notification. Click Settings, scroll down to “BT Mail Notifications”, check Enable and fill out the configuration for your e‐mail. To find out the correct settings for the mail server, ask your system administrator or your e‐mail provider. After changing the settings, clickApply to save the new configuration. To download media files, download a torrent from the internet and upload the *.torrent file to the network drive. Once the torrent has been added, you can start the download. The downloaded media files will be stored in the folder that is set as “Download Path”. The BitTorrent™ client can download 4 files at a time with a maximum of 40 files in the queue. The download speed may not be as fast as a BitTorrent™ client on the computer but once the torrent has been added to the queue, it can download the files by itself and you can turn off the computer. ...
-
Page 21: Extra Features And Examples
Manual IB-NAS5520 7. E XTRA EATURES AND XAMPLES 7.1 F CCESS 7.1.1 F OLDER Folder opens the available directories on the network drive via WebDAV connection. You can access, view and download your files directly in your web browser. Default Login Username guest Password “blank” (no password required) Open your web browser, connect to the network drive and click the first icon Folder on the landing page. Login either with the guest account or your own if you have set up another user account already. All available directories and files are displayed in list view directly in your web browser. The Preview mode will show large icons and in case of images (JPG, PNG, GIF, TIF), it will display a small preview of the actual image. Preview only works for images with the following file extension: *.jpg, *.png, *.gif, *.tif Instead of using the “Folder” link on the home page, you can also go to “Share Management” in the “Server Settings” menu. Select the “Server” tab and there you can copy either the internal or the external URL, depending on where your computer is currently located, and paste it directly into the URLfield of your web browser. If you would like to upload, delete and manage the files via WebDAV connection, mount the network drive. Mounting the network drive is done similarly to how you would do it for a SMB connection. The main difference is that for SMB, both the network drive and the computer have to be on the same local network, whereas for WebDAV it also works when done remotely (loading and transfer speed are usually slower when done outside the local network). For more details, see Mapping a Network Drive on a PC or see WebDAV on a Mac. ... - Page 22 Manual IB-NAS5520 7.1.2.1 Windows Explorer Use Windows Explorer and enter \\IP, where IP stands for the IP address or type \\MAC, where MAC stands for the MAC address (all in one word) into the address field and click Enter. It will list all available folders on your network drive. To create a permanent link to your network drive, see “Mapping a Network Drive”. You can copy files to the network drive as if it were a folder on your local drive. Depending on the bandwidth, you can also open and play the files directly. If you experience lag when accessing certain files, we recommend transferring the data to your local drive first. When you have to access multiple folders with different passwords or have modified the settings without a computer restart, go to “Tools” and disconnect the temporary network drive first, before accessing a new folder. 7.1.2.2 Mapping a Network Drive Mapping the network drive will allow you to create a permanent link that will be present even after restarting the computer. This permanent link provides convenient access to your network drive and can be used to store file within other applications. If you experience problems when trying to access the shared folders, disconnect all network drives, reboot your computer, restart your network drive and then try again. Double click on My Computer, go to the Tools menu and select “Map Network Drive…”. Follow the setup wizard and fill in the path to your network drive. For SMB, when entering the IP address, also add the shared folder name (e.g.\\192.168.11.11\public). For WebDAV, copy the internal or external URL and enter that URL (e.g. http://59.124.25.118:1200/webdav/). We recommend selecting the “reconnect at logon” option when you map the network drive, otherwise you will have to map it again after a restart. Once the drive has been mapped, you are able to find and access it under My Computer. When mounting the drive on Windows XP, the system does not accept a custom port number for WebDAV. Instead, the port number 80 is used by default. Enter the URL without port number (e.g.http://59.124.25.118/webdav/) and when accessing it remotely from outside the LAN, make sure the external port is set to port 80 (see Portal Service in Network menu) and set up port forwarding accordingly. On Windows, by default, the file size for a single file when transferred via WebDAV is limited to 50MB! This is a limitation of the Operating System and not the network drive. Please seehttp://support.microsoft.com/kb/900900 for more information. ...
-
Page 23: File Access On A Mac
Manual IB-NAS5520 Using Windows Explorer, type ftp:// followed by the IP address of your network drive into the address field. Add the user name and password in front of the IP address with an @ sign in between like this ftp://demo:demo@192.168.11.26. After login, you can access the available folders and transfer your files. Files cannot be opened directly when using FTP. You always have to transfer the files to your computer 7.1.3 F CCESS ON A For file access on the local network, mounting the drive via SMB is the most convenient solution. However, if you like to access the network drive in the same way from outside the local network, the drive has to be mounted via WebDAV. If you are using an FTP application, use the FTP connection instead. Default Login Username guest Password “blank” (no password required) 7.1.2.1 SMB To mount and access the network drive on the local network via SMB, use the “Connect to Server” command. Click Go and select “Connect to Server”. Type smb:// followed by the IP address of your network drive and click Connect. Select “Registered User” and enter your user name and password. Click Connect to continue. Choose a folder from the list and click OK. The mounted drive appears in your finder under Shared devices. You can access the network drive and transfer your files. When no longer needed, click eject to disconnect the drive. 7.1.2.2 WebDAV To mount and access the network drive via WebDAV, use the “Connect to Server” command. Click Go and select “Connect to Server”. Enter either the internal or external URL of your network drive, depending on how you are connected and click Connect. You can find the correct URL under “Settings” of your network drive. Go to “Share Server”, select the WebDAV tab and copy either the internal or external URL. ... -
Page 24: Extra Features
Manual IB-NAS5520 Click Go and select “Connect to Server”. Type ftp:// followed by the IP address of your network drive and then click Connect. Enter the correct username and password. The FTP folder appears in your finder under Shared devices, where you can download the files. When no longer needed, click on the eject button to disconnect the drive. The native FTP utility on the Mac will only be able to read the data on the network drive but cannot upload new data to it. We recommend installing and using a dedicated FTP application instead. 7.2 E XTRA EATURES 7.2.1 B ORRENT Used in conjunction with its built‐in BitTorrent™ client, the network drive can be set to download media files from the Internet and have them saved directly to the internal hard drive. Once the torrent has been added to the download queue, the computer can be turned off and the network drive downloads the files on its own. Starting a Download Before you add the first torrent, set the download path to your preferred folder, set the server port and set a limit for the upload and download speed according to your network’s bandwidth. After changing the settings, save the new configuration. Use a search engine (e.g. Google) and browse the internet for the media files you would like to download. Download and store the torrent file(s) on your computer. Login to your network drive and go to the BitTorrent menu. Click Browse and locate your torrent file on the computer. The file is added to the download queue and the download starts automatically. You can now turn off your computer if desired. Use the buttons “Continue”, “Pause”, “Stop” and “Delete” to manage the files. Once the download process starts, further information about the selected file will be available at the bottom of the window under “General” and “Detail”. Once the download is completed, you can delete the file from the download queue and access the file via SMB, WebDAV or FTP connection in the directory that you have previously set under “Download Path”. The BitTorrent™ client can download 4 files at a time with a maximum of 40 files in the queue. The download speed of the built‐in BitTorrent™ client may not be as fast as a client on the computer, but once the Torrent has been added to the queue, it can download the files by itself and the computer can be turned off. ... -
Page 25: Usb Device
Manual IB-NAS5520 7.2.2.1 Xbox 360 On your network drive, open the “Settings” menu, go to “Share Server” and select the “Media Service” tab. Make sure that the path for each of the folders is set to the correct directory where the corresponding media files are stored. On your Xbox 360, go to “media”, select “Music”, “Pictures” or “Videos” and press A to continue. Press X to change the source and select your network drive. Inside the shared folder, you can access your pictures (JPG), music (MP3) or videos (WMV), depending on which mode you are currently using. 7.2.2.2 PlayStation 3 On your network drive, open the “Settings” menu, go to “Share Server” and select the “Media Service” tab. Make sure that the path for each of the folders is set to the correct directory where the corresponding media files are stored. On your PS3™, open the “Settings” menu, go to “Network Settings”, select “Media Server Connection” and enable it. This will allow the PS3 to detect the media server. When you turn on the PS3™, media servers on the same local network are automatically detected and a shortcut appears under each category for Photo, Music and Video. Select the network drive to access the media server and playback your photos (JPG), music (MP3) and videos (MPEG‐1, MPEG‐2). 7.2.2.3 iTunes When a shared folder for the music directory on the media server has been set, the network drive will automatically appear on iTunes under shared devices and MP3 files can be played. On your network drive, open the “Settings” menu, go to “Share Server” and select the “Media Service” tab. Make sure that the path for the music folder is set to the directory where your MP3 music files will be stored. Upload all your MP3 music files to the folder you have set in the previous step. You can upload the files via SMB, WebDAV or FTP connection. On your network drive, go back to the “Media Service” menu. Under iTunes Playlist, click Build to scan for all the new MP3 music files and build the database for iTunes. Start iTunes and your music files will be available under “SHARED” devices. Whenever you add or remove MP3 files to the music directory, click Build to refresh the database. If for some reasons, iTunes lists files that no longer exist or some files are missing, click Remove to clear the database and then click Build to build a new database. 7.2.3 USB D EVICE When the device is not connected to the network, it can also be used as a simple USB mass storage ... -
Page 26: Mobile Devices
Manual IB-NAS5520 Turn on the power. The USB drive will automatically appear under “My Computer” for Windows users or on the desktop for Mac users. The device has to be turned off to change it from acting as USB drive to a network drive and vise versa. When both USB cable and Ethernet cable are connected, the USB connection has priority and it will act as USB drive until disconnected and restarted. In order to access the exFAT partition when the device is connected via USB, Windows XP requires Service Pack 2 or later and Windows Vista requires Service Pack 1 or later. exFAT driver update for Windows XP and Server 2003 http://support.microsoft.com/kb/955704 exFAT driver update for Windows Vista is part of SP1 http://support.microsoft.com/kb/935791 Remark: Only use the disk utility of the network drive and do not format the drive on your computer! 7.3 M OBILE EVICES iPhone/iPad/iPod Search inside Apple‐App store for the following App and install to your mobile device: • AKITIO CloudHybrid This App allows users of the IB‐NAS5520 to access the digital content stored on the hard drives inside the device. Take photos or videos and instantly share them with family and friends back home. For more information, please check out description inside your App‐Store. • AKITIO CloudHybrid Manager This App provides additional and advanced functionality to the CloudHybrid App. It is used to manage and configure the settings of your IB‐NAS5520 directly from your mobile device without need of a computer. For more information, please check out description inside your App‐Store. Android Search inside an Android‐App store for the following App and install to your mobile device: • AKITIO CloudHybrid ... - Page 27 The diagrams contained in this manual may also not fully represent the product that you are using and are there for illustration purposes only. RaidSonic Technology GmbH assumes no responsibility for any differences between the product mentioned in this manual and the product you may have. All the information contained in this manual was correct at the time of publication.
- Page 28 Manual IB-NAS5520 28 ...
Need help?
Do you have a question about the IB-NAS5520 and is the answer not in the manual?
Questions and answers