Advertisement
Quick Links
Advertisement

Related Manuals for Fire By Design Automated Tiki Torch

Summary of Contents for Fire By Design Automated Tiki Torch
- Page 1 Automated Tiki Torch Installation Instructions...
- Page 2 Automated Tiki Torch with Poles (Exploded View) Automated Tiki Head 14” Tiki Pole (Powder Coated Aluminum 6’ – 8’ or Faux Bamboo Pole) Base Pole 12” (Powder Coated Aluminum) Note: Only used with Metal Poles...
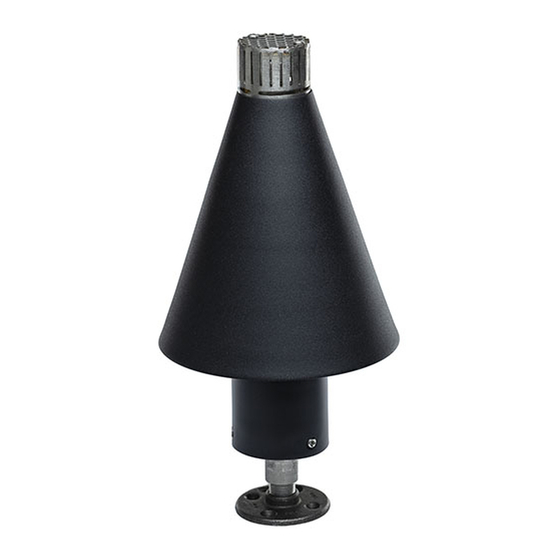
- Page 3 Automated Tiki Torch Specifications Stainless Steel Wind Cap Burner Hot Surface Igniter Thermal Sensors (2) Tiki Cone Gas Valve Programmed Solid State Controller Set Screws Power Leads (24 vac) Gas Consumption Per Tiki Head: 15K Btu/hr @ recommended gas pressure of 7” - 14” w.c.
- Page 4 Rough In Options for Automated Tiki Torches Electrical Wiring/Power Recommendations - When running ‘home runs’ to each Tiki Torch recommended wiring is min. 14 gauge - When ‘daisy chain’ wiring 12 gauge wire recommended - Tiki Torches require 24 volts AC power. Transformers are supplied with the torches - Transformers are available in 50, 75 or 100 Watts - One 50 Watt Transformer powers (1) torch, 75 Watt powers (2) and 100 Watt powers (3) - Do not daisy chain any more than 3 tiki torches...
- Page 5 Installation of Base Pole Need 8’ Step 1 Gas & Low Voltage Electric excess wire At right is a photo of ½” gas stub and an electrical Rough In conduit stubbed up inside a hole made by a post hole digger. The hole is 12” deep. The wire installed inside the conduit was low voltage landscape wire (12 gauge) and we pulled 8’...
- Page 6 Step 4 Once the Manual Gas Shutoff is installed measure from the center of the Gas Shutoff to the top of the Black Base Pole. This dimension we shall refer to as measurement “A”. Step 5 Temporarily install the longer tiki pole and measure from the seam between the Base Pole and the top of the long tiki pole.
- Page 7 Step 6 Install ½” gas line to your gas riser (or manual gas shutoff valve) such that the end of the ½” gas B – 1” line is 1” SHORTER than measurement “B” from the previous page. In addition, bring the wires previously installed up along the gas line and tape it to the gas line in anticipation of installing the longer tiki pole.
- Page 8 Installing the Tiki Torch Head Step 7 In the photo at left you are looking at a close up of the bottom of the Tiki Torch Head. Unless a custom configuration is requested there will be the 2 wires as shown along with a ½”...
- Page 9 Daisy Chain Wiring of Tiki Torches When wiring tiki torches in series (aka “Daisy Chain” Wiring) it is important to keep the polarity BETWEEN the tiki torches the same. Protruding from the bottom of the Tiki Torch head are two wires: a “White”...
Need help?
Do you have a question about the Automated Tiki Torch and is the answer not in the manual?
Questions and answers