Table of Contents
Advertisement
Advertisement
Table of Contents

Related Manuals for Tescan Vega 3 Sem

Summary of Contents for Tescan Vega 3 Sem
- Page 1 Scanning Electron Microscope Instructions For Use...
- Page 2 Offenders are liable for damages. All rights reserved. We have checked the contents of this manual for agreement with the hardware and software described. Since deviations cannot be precluded entirely, we cannot guarantee full agreement. © 2011 TESCAN, a.s., Brno, Czech Republic...
-
Page 3: Table Of Contents
VEGA 3 SEM Contents Contents Contents ........................... 3 Introduction ........................ 5 Safety Information ....................... 6 Installation and Microscope Repairs ................7 Transport and Storage ....................7 Installation Instructions .................... 7 Fuse Replacement ..................... 7 Instrument Repair and the Spare Parts Usage ............7 Description of the Microscope.................. - Page 4 Contents VEGA 3 SEM Microscope Maintenance .................... 38 Basic Microscope Accessories ................. 38 Filament Exchange ....................39 Starting up the Microscope after a Filament Exchange ..........42 Mechanical Gun Centering ..................44 Aperture Exchange ....................44 9.5.1 Exchange of the Aperture Holder..............45 9.5.2...
-
Page 5: Introduction
Vega microscopes. Since the VEGA 3 SEM is installed and maintained by trained specialists, technical details and installation procedures are limited to a short overview. In the case of necessary maintenance, reinstallation, hardware changes, etc. -
Page 6: Safety Information
Safety Information VEGA 3 SEM 2 Safety Information The user is liable to make himself familiar with the care of the device and with the safety rules valid in the country of the user. The microscope works with electric voltages that can be dangerous to life. -
Page 7: Installation And Microscope Repairs
VEGA 3 SEM Installation and Microscope Repairs 3 Installation and Microscope Repairs 3.1 Transport and Storage The method of delivery is defined in the contract and is determined individually according to the destination territory. The method of delivery must be approved by the manufacturer. -
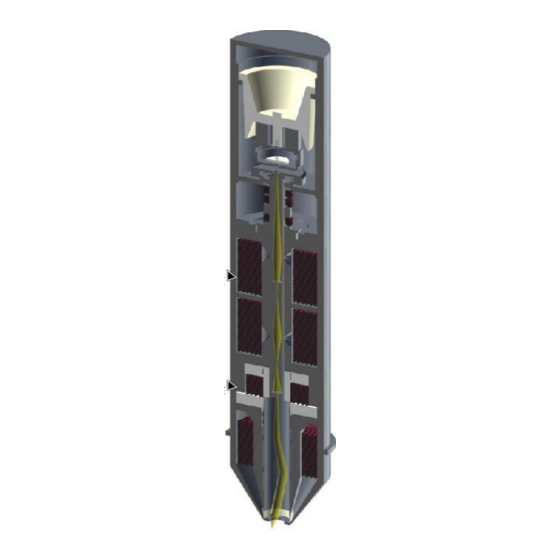
Page 8: Description Of The Microscope
Description of the Microscope VEGA 3 SEM 4 Description of the Microscope 4.1 Electron Column The scanning electron microscope displays the examined object by means of a thin electron probe. The column forms the electron probe (beam) and sweeps the beam over the examined specimen located in the microscope chamber. - Page 9 VEGA 3 SEM Description of the Microscope The VEGA 3 SEM cross section and schematic representation of the optical elements The column of the microscope consists of the following main parts: The electron gun is a source of accelerated electrons. It consists of a cathode, ...
- Page 10 Description of the Microscope VEGA 3 SEM function gun alignment. The gun is correctly centered if the most intensive part of the electron beam is selected and the brightness of the image is the highest. The spray aperture is placed under the centering coils of the gun. It is intended for ...
-
Page 11: Electron Column Displaying Modes
VEGA 3 SEM Description of the Microscope 4.1.1 Electron Column Displaying Modes RESOLUTION Mode This is the basic and most common displaying mode. The IML lens is switched off, the OBJ lens is excited and it focuses the final electron beam. - Page 12 Description of the Microscope VEGA 3 SEM DEPTH Mode The DEPTH mode differs from the previous mode by the auxiliary lens IML being switched Characteristics: good resolution increased depth of focus The aperture of the final beam is lower, but the spot size is bigger in comparison with the RESOLUTION mode.
- Page 13 VEGA 3 SEM Description of the Microscope FIELD Mode The FIELD mode utilizes the intermediate lens IML for the electron beam focusing while the objective OBJ is off. Characteristics: large field of view high depth of focus worse resolution ...
- Page 14 Description of the Microscope VEGA 3 SEM WIDE FIELD Mode The WIDE FIELD mode uses the intermediate lens IML for focusing the electron beam, while the objective OBJ is excited to a high value. Characteristics: extra large field of view ...
- Page 15 VEGA 3 SEM Description of the Microscope CHANNELING Mode In the CHANNELING mode, the scanning and lens focusing is controlled so that the electron beam touches the same point of the specimen surface all the time. By means of scanning the beam, only the angle of incidence of the electron beam is changed, i.e.
-
Page 16: Electron Column Microscope Centering
Description of the Microscope VEGA 3 SEM 4.1.2 Electron Column Microscope Centering It is necessary to centre the electron optics of the column to reach high quality images. The goal is to ensure that the beam is as close as possible to the optical axis of the column and thus minimize optical aberrations. - Page 17 VEGA 3 SEM Description of the Microscope Automatic Centering The automatic procedure of column centering is very fast and suitable for low magnifications. For very precise work at high magnifications manual centering is more suitable. 1. Insert the centering specimen.
-
Page 18: Chamber And Sample Stage
Description of the Microscope VEGA 3 SEM 4.2 Chamber and Sample Stage The chamber is a sealed space under the column where specimens are placed for examination. The specimen is fixed on the sample stage which allows movement of the sample during the examination process. -
Page 19: Vacuum Modes
VEGA 3 SEM Vacuum Modes 5 Vacuum Modes The microscope allows the investigation of specimens in a pressure range of 0.005 Pa to 2000 Pa. It is necessary to use the medium or the low vacuum mode to investigate non- conductive samples. -
Page 20: High Vacuum Mode
Vacuum Modes VEGA 3 SEM Configuration of the apertures in the electron column high and medium vacuum mode low vacuum mode 5.1 High Vacuum Mode In high vacuum mode, it is possible to investigate both conductive and non-conductive samples; however non-conductive samples require previous metal coating (Cr, Au, Au-Pd, Pt). -
Page 21: Low Vacuum Mode
VEGA 3 SEM Vacuum Modes 1. Press the UniVac button on the Low Vacuum Mode panel. 2. Only SBU models: Close the manual valve, which divides the specimen chamber and the pumping line. The valve can be closed by turning the handle clockwise and pushing it towards the specimen chamber. -
Page 22: Detectors
6.2 LVSTD Detector The detector works in low vacuum only. Low Vacuum Secondary Tescan Detector The LVSTD detector ( ) is a detector of secondary electrons, specially designed for low vacuum mode. It is suitable for the investigation... -
Page 23: Bse Detector
VEGA 3 SEM Detectors The LVSTD consists of a standard Everhart-Thornley detector situated in a separated detector chamber. This detector chamber is pumped by a small turbo molecular pump. Switching on 1. Check if the UniVac mode is switched on and check if the required value of the pressure in the chamber has been set lower than ~500 Pa. -
Page 24: Cl Detector
Detectors VEGA 3 SEM scintillator to the cathode of the photo-multiplier. They are then processed in the same way as the signal coming from the secondary electrons. The BSE detector is manufactured in an R-BSE (Retractable BSE) version. This modification allows the retraction of the detector from under the pole piece position if the detector is not used. -
Page 25: Other Detectors
VEGA 3 SEM Detectors 6.5 Other Detectors TESCAN provides other special detectors which can be attached to the microscope. It is possible to obtain a list from the manufacturer. -
Page 26: Control Elements
Control Elements VEGA 3 SEM 7 Control Elements 7.1 Keyboard The keyboard is used for text and numeric input. Its usage does not differ from the Windows system practice. Keyboard shortcut Command Ctrl + O Open... Ctrl + S Save As... -
Page 27: Trackball
7.4 Control Panel The Control Panel has several knobs and a colour touch screen. It was developed by TESCAN exclusively for SEM control. It is not a standard SEM part. The manual knob set provides the user with a simple and straightforward way of operating the microscope. -
Page 28: Getting Started
Getting Started VEGA 3 SEM 8 Getting Started Only conductive samples can be explored in a high vacuum, so the specimen must be conductive or must be made conductive using one of the methods described in the technical information. Furthermore, the conductive surface of the specimen must have a conductive contact to the stub. -
Page 29: Images At Low Magnification
VEGA 3 SEM Getting Started interior part of the chamber. Contact between the specimen and the chamber will be indicated by an acoustic buzzer. WARNING: Before closing the chamber, make sure that the specimen inside does not touch the chamber, objective pole piece or any of the detectors. The collision of the specimen with any of the parts of the chamber interior can cause damage to the microscope. - Page 30 Getting Started VEGA 3 SEM Note: Note the difference between SE and BSE images below (Figure 3). Figure 3 BSE Detector SE Detector 3. Select the accelerating voltage (30 kV recommended) using the combo box on the Electron Beam panel (Figure 4).
- Page 31 VEGA 3 SEM Getting Started Figure 5 Figure 6 7. Clicking on the WD icon on the Toolbar and turning the Trackball from left to right (or vice versa) focus the image (alternatively use the Auto WD function for focusing (see Figure 5)). Double-clicking in the SEM Scanning window opens the Focus window.
- Page 32 Getting Started VEGA 3 SEM Figure 8 11. Placing the cursor over the SEM Scanning window and clicking the mouse wheel moves that area on the stage into the centre of the image. See chapter 7.2 for other mouse actions.
-
Page 33: Imaging Of Non-Conductive Samples Without Coating
An ordinary SE detector is not available in low vacuum operations (see chapter 6), therefore Tescan have developed the LVSTD detector (Low Vacuum Secondary Tescan Detector), which gives topographical information from the sample in low vacuum. The BSE detector is available for both modes (LowVac, HiVac) and gives compositional information. - Page 34 Getting Started VEGA 3 SEM 4. To switch between detectors (BSE or LVSTD) use the list box in the Detectors & Mixer panel (see Figure 2). 5. Turn on high voltage by clicking on the HV button on the Electron Beam panel (see Figure 4).
-
Page 35: Images At High Magnification
VEGA 3 SEM Getting Started 8.5 Images at High Magnification 1. Insert an appropriate sample for high magnification images (e.g. tin on carbon sample, Figure 17). 2. The best resolution is available with the highest accelerating voltage (30 kV) of the primary electrons. - Page 36 Getting Started VEGA 3 SEM Figure 15 Figure 16 8. Each time that the image is too dark or light it is necessary to use the Auto Signal function (see Figure 5 or use the icon ). To set the contrast and brightness manually, click on the icon and use the Trackball.
-
Page 37: Stopping The Microscope
VEGA 3 SEM Getting Started 11. Clicking on the icon opens the dialogue for saving the current adjustment of the microscope. It is possible to restore the saved adjustment of the microscope later. Figure 18 8.6 Stopping the Microscope 1. Switch off the high voltage by clicking on the HV button in the Electron Beam panel. -
Page 38: Microscope Maintenance
Microscope Maintenance VEGA 3 SEM Microscope Maintenance 9.1 Basic Microscope Accessories This document describes the use of the most important tools included in the microscope accessories. The exact list is attached to the packaging list of the microscope. 1. Hexagonal screwdriver, size 3.0 mm – general use, mainly various flange screws, the most common size used for screws. -
Page 39: Filament Exchange
VEGA 3 SEM Microscope Maintenance 13. Tungsten cathode. 14. Bent tweezers – used for the aperture holder disassembly and the titanium tube removal. 15. Flat tweezers – general use. 16. Setting rod for the aperture holder. Note: This document contains only the special and the most important types of accessories to show which kind to use. - Page 40 Microscope Maintenance VEGA 3 SEM 7. Screw off the polished stainless cap nut. 8. Remove the removable part of the electron gun. If you have a new pre-centered filament skip to step 15 - inserting a new pre-centered filament. If you exchange the filament and you do not have a pre-centered gun go to the next point.
- Page 41 VEGA 3 SEM Microscope Maintenance 10. Remove the filament with the centering ring. Hold the filament by the contacts. 11. If necessary, clean the Wehnelt cylinder. Do not forget to remove the distance washers and then put them back before cleaning the Wehnelt cylinder.
-
Page 42: Starting Up The Microscope After A Filament Exchange
Microscope Maintenance VEGA 3 SEM 14. Centre the filament tip inside the Wehnelt cylinder by tightening and loosening the opposite centering screws in both directions. 15. Place the completed gun back onto the gun body. Ensure that the filament contacts and the centering pin fit into the appropriate holes on the gun. - Page 43 VEGA 3 SEM Microscope Maintenance 2. Set up 30 kV and wait for high voltage stability. Wait until the discharging of the high voltage ceases; it should be no longer than 10 minutes. 3. Use the Auto Gun Heating function (see Figure 6; chapter 8.3). An automatic procedure will set up the filament saturation and filament centering.
-
Page 44: Mechanical Gun Centering
Microscope Maintenance VEGA 3 SEM 9.4 Mechanical Gun Centering In the case that the mentioned absorbed current cannot be reached, or the value Gun Shift or Gun Tilt (use the combo box in the Pad panel) is higher than 60 %, it is necessary to carry out mechanical gun centering. -
Page 45: Exchange Of The Aperture Holder
VEGA 3 SEM Microscope Maintenance removed from the holder for cleaning, see the instructions in chapter 9.6. During any exchange it is necessary to maintain the principles of vacuum hygiene. Dismantling and mounting operations must be performed in a clean and dust-free environment - if possible, and by wearing gloves. -
Page 46: Cleaning The Column
Microscope Maintenance VEGA 3 SEM an optical microscope). If necessary clean the aperture using compressed dry air or nitrogen. 6. Fit the sealing ring in the groove of the aperture holder body. 7. Fit the contact spring in the groove of the aperture holder body. -
Page 47: Cleaning The Column Parts
VEGA 3 SEM Microscope Maintenance Dust particles retained on the internal surfaces. These enter into the microscope with each venting during the exchange of specimens, apertures or cathode. Dust particles retained on the apertures worsen the optical qualities. Impurities taken into the microscope through incorrect procedure during the ... - Page 48 Microscope Maintenance VEGA 3 SEM Anneal the clean aperture in an alcohol burner. Use only clean ethanol for the burner to prevent the combustion products from polluting the aperture. Cleaning the other parts of the column: Clean very dirty parts with a piece of cotton wool and fine abrasive powder.
-
Page 49: The Frequency Of Cleaning
VEGA 3 SEM Microscope Maintenance oriented, try to turn it by tapping the holder against the pad or the table. 11. Fix the aperture by screwing on the third (bottom) part of the aperture holder. Use a small screwdriver or tweezers. - Page 50 Microscope Maintenance VEGA 3 SEM Specimen holder HM113: for small round-shaped samples up to a max. diameter of ø 12 mm. Specimen holder HM116: for round-shaped samples up to a max. diameter of ø 20 mm. Specimen holder TE0038B: designed for standard ø 30 mm samples.
Need help?
Do you have a question about the Vega 3 Sem and is the answer not in the manual?
Questions and answers