Table of Contents
Advertisement
Quick Links
Advertisement
Table of Contents

Related Manuals for Odys PDV - 57010D (DE)


Summary of Contents for Odys PDV - 57010D (DE)
- Page 1 PDV - 57010D (GB) PDV - 57010D (FR) PDV - 57010D (ES) PDV - 57010D (IT) PDV - 57010D (NL) PDV - 57010D (PT) BENUTZERHANDBUCH USER MANUAL MANUEL D’UTILISATION MANUAL DEL USUARIO MANUALE PER L'UTENTE GEBRUIKSHANDLEIDING MANUAL DE INSTRUÇÕES http://www.odys.net...
-
Page 2: Table Of Contents
Table of contents Safety instructions ..........3 Product properties ..........7 Controls..............9 Remote control ............13 Connecting the DVD player ........17 5.1 Connecting to a television set ..........17 5.2 Connecting to an amplifier ............18 5.3 Connecting to an external A/V source........19 5.4 Connecting headphones............20 5.5 Power supply unit ..............20 5.6 Car adapter ................21... -
Page 4: Safety Instructions
1 Safety instructions Thank you for choosing our product. Please read this manual carefully and observe all safety and operating instructions. Store the manual in a safe place for later reference. Caution • Please note that the device may not be used while the vehicle is in motion. - Page 5 • The device is a class 1 laser product. The corresponding label is loca- ted on the rear side of the device. When the housing has been opened and the lock is not engaged, visible laser radiation can escape. Avoid looking into the laser beam by all means.
- Page 6 Note • The mains voltage must correspond to the operating voltage of the device indicated on the device housing. If you are not sure what the mains voltage is, please find out from your local electric power company. • Ensure adequate air circulation around the device. Do not place the device on soft furniture, carpets or other materials while in operation, as this may restrict the air from properly circulating around the device.
- Page 7 Note DVD players and discs are coded by region. Your DVD player will only play back discs whose region code matches that of the player. The region code of your DVD player is 0 (code-free). Note on copyrights This device is equipped with technology for the protection of copyrights that is protected by patents in the United States of America and by other laws regarding the protection of intellectual property.
-
Page 8: Product Properties
2 Product properties • Excellent sound quality: Dolby Digital technology ensures outstan- ding sound. • AV In: Input for external audio and video signals. Can be connec- ted to a variety of external AV sources. AV Out: Analogue audio/video output. •... - Page 9 Accessories 1 x remote control 1 x battery for remote control 1 x operating manual 1 x mains cable with power supply unit 1 x audio/video cable 1 x rechargeable battery pack 1 x car adapter 1 x carrying bag Note on copyrights Accessories and their corresponding part numbers are subject to change without notice due to technological progress.
-
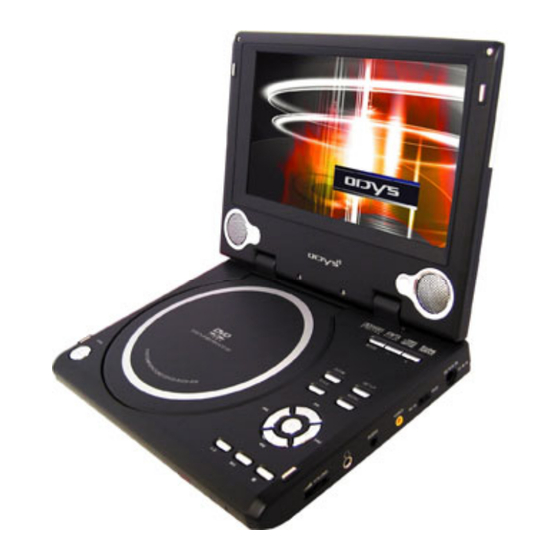
Page 10: Controls
3 Controls Front view 1. TFT LCD screen 2. Loudspeaker 3. +/– button To change the selection level 4. MODE button To change the display format, brightness, contrast, colour... - Page 11 5. ZOOM button 6. SETUP button To display the DVD settings 7. TITLE button To display the title menu of the disc 8. MENU button To display the disc menu button / : To select menu objects / : fast forward/rewind during playback button / : To select menu objects / : Jump to next/previous chapter...
- Page 12 Right view 1. Volume controller 2. Headphone jack 3. Audio In/Out and for optical digital output jack 4. Video In/Out jack 5. DVD/AV IN switch 6. Power supply jack (9.5 V DC) Left view 1. Power on/off switch...
-
Page 13: Bottom View
Bottom view 1. Connection for rechargeable battery 2. Docking terminal The device is equipped with a docking terminal on its bottom side for connexion to a docking station. This allows you to easily connect the device to a variety of peripheral devices with minimal space require- ments. -
Page 14: Remote Control
4 Remote control 1. On/Off button (PWR) 2. INFO button Displays or hides detailed information about the disc in the device. 3. TITLE button Shows the title menu if the disc contains subtitles. 4. Direction buttons Used in the selection of menu objects 5. - Page 15 6. SETUP button Shows the menu for the DVD player settings. 7. Numerical buttons (0-9) To select the corresponding number button To jump to the beginning of the current track or chapter or, if pressed twice, to the beginning of the previous track or chapter. button To jump to the beginning of the next track or chapter 10.
- Page 16 20. +10 button Enables you to enter a number higher than 9 by subsequently pressing the desired single digit. button Activates fast forward during playback. button Activates fast rewind during playback. 23. SLOW button Activates playback in slow motion. 24. AUDIO button Enables you to select a different playback language (if available on disc).
-
Page 17: Using The Remote Control
Using the remote control • Aim the remote control straight at the sensor of the player. The distance to the player should not be greater than 5m, and the angle should not exceed 60°. • The inappropriate use of the battery can lead to overheating, explosion, fire and injuries. -
Page 18: Connecting The Dvd Player
5 Connecting the DVD player • The DVD player, the television set and any other electric devices to be connected to the DVD player must be switched off and disconnected from the mains. • Observe the colour coding when connecting audio and video cables. 5.1 Connecting to a television set Audio/video connectors Using the audio/video cables, connect the DVD player to the A/V inputs... -
Page 19: Connecting To An Amplifier
5.2 Connecting to an amplifier Prior to connecting the DVD player to an external audio device, read the operating instructions for the respective device. Connect the DVD player to the A/V amplifier as shown in the illustration below. -
Page 20: Connecting To An External A/V Source
5.3 Connecting to an external A/V source Using the audio/video cables, connect the DVD player to the A/V signal source (for example, DVD or video recorder) as shown in the illustration below. Then set the DVD/AV IN switch to AV IN. Note When external audio signals are received during DVD playback, this can lead to disturbing noise in the loudspeakers. -
Page 21: Connecting Headphones
5.4 Connecting headphones Connect the headphones to the headphone jack on the right side of the device. The loudspeakers are automatically deactivated. 5.5 Power supply unit The DVD player is delivered with a power supply unit. Connect the power supply unit as described below: Connect the power supply cable to the DC 9.5V IN jack on the right side of the device as shown below. -
Page 22: Car Adapter
5.6 Car adapter Use the supplied car adapter to operate the DVD player in a vehicle. Connect the adapter cable as shown below to the mains terminal of the DVD player and the cigarette lighter of the vehicle. Note 1. The driver must not operate the device or look at the screen while driving. -
Page 23: Rechargeable Battery Pack
6 Rechargeable battery pack A rechargeable lithium ion battery is included in the scope of delivery of your portable DVD player. This battery is connected on the rear side of the device. Fully charge the battery before you use the device for the first time. -
Page 24: Connecting The Rechargeable Battery Pack
6.1 Connecting the rechargeable battery pack Connect the rechargeable battery pack as described below: 1. Place the DVD player with the bottom side up on a plain, clean surface. 2. Hold on to the device with one hand. Position the battery's plastic pins so that they are aligned with the matching notches on the DVD player, and push the battery inside the device until it audibly locks into place. -
Page 25: Removing The Rechargeable Battery Pack
6.3 Removing the rechargeable battery pack Fully charge the battery and remove it from the device when it will not be used for an extended period of time. Even a device that is turned off uses small amounts of electricity in standby mode which ultimately discharges the battery. -
Page 26: Disc Information
7 Disc information 7.1 Compatible disc formats Running time/sides/ DISC LOGO Diameter layers 133 min (SS-SL) 242 min (SS-DL) 12 cm 266 min (DS-SL) 484 min (DS-DL) 41 min (SS-SL) 75 min (SS-DL) 8 cm 82 min (DS-SL) 150 min (DS-DL) 74 min 12 cm 20 min... -
Page 27: Using Discs
7.2 Using discs Handling When inserting or removing a disc, do not touch the surface (see illustration). Cleaning Fingerprints and other contaminations can reduce the quality of the sound and the video. Use a soft, clean cloth for cleaning that can be moistened with a neutral, diluted cleaning agent if the disc is very contaminated. -
Page 28: Playback Operation
8 Playback operation Getting started 1. Connect the device to a mains socket using the power supply unit that is delivered with the device. 2. Pus the POWER ON/OFF switch on the left side of the device to the ON position. The device's power supply indicator lamp lights up green, and a welcome screen is displayed. - Page 29 General buttons MODE button To change brightness, contrast or colour. Adjust the values using the + and – buttons. If you hold down the button for 1-2 s, the aspect ration toggles between 16:9 and 4:3 (see illustration). ZOOM button For DVDs the image size is successively changed to the following values compared to the normal size: 2x, 3x, 4x, 1/2, 1/3, 1/4.
- Page 30 DVD playback Start playback Insert a disc. The DVD player automatically starts with the playback. In the initial menu, select the desired option using the buttons. Then press ENTER on the remote control or OK on the DVD player. PAUSE / Press this button once (during playback) to pause playback.
- Page 31 button To jump to the beginning of the next track or chapter. button Press this button once to fast-forward. Pressing this button repeatedly will increase the forward speed successively to 2x, 4x, 8x, 16x, 32x and then reset it to normal speed. button Press this button once to rewind.
- Page 32 Note This function is only available for DVDs that contain multiple subtitle tracks. REP button To repeat a chapter, a title or the entire disc. GOTO button Enables you to select a position (time, track or title) at which to start playback. Move the light yellow bar to the desired option using the buttons.
- Page 33 Time Display: To display the elapsed/ remaining time of a chapter or title. Press the GOTO button again to resume normal playback. SLOW button When you press this button, the playback speed is successively reduced to 1/2, 1/4, 1/8 and 1/16 of the normal forward speed and then reverses To resume playback at the normal speed, press PLAY on the remote control or...
- Page 34 CD playback PAUSE / Press this button once (during playback) to pause playback. Press this button a second time to resume playback. STOP / Press this button once (during playback) to stop playback; to resume from the same position, press (PLAY on the remote control).
- Page 35 GOTO button Enables you to select a position (time or track) at which to start playback. During CD playback the following options are displayed successively: Disc Go To:--:-- Track Go To:--:-- Select Track:--/N (N is the number of tracks on the disc) You can select the desired option directly using the buttons 0-9 on the remote control.
- Page 36 MP3 playback 1. Insert an MP3 disc. The DVD player automatically starts with the playback. 2. The root folder and various subfolders are displayed. Select a folder using the buttons on the remote control. Confirm your selection using one of the following buttons: , ENTER, PLAY on the remote control, or , OK on the DVD player.
- Page 37 button Press this button once to rewind. Pressing this button repeatedly will increase the rewind speed successively to 2x, 4x, 8x, 16x, 32x and then reset it to normal speed. button To jump to the previous page. button To jump to the next page. INFO button Press this button once to display detailed informa- tion about the disc in the player.
- Page 38 GOTO button During playback: To select the desired file or time. In folder mode: To select the desired folder. During MP3 playback: Press this button once to select a file using the numerical keys. During MP3 playback: Press this button a second time to specify the desired point in time at which you want to start playing back the file using the numerical keys.
- Page 39 PAUSE / Press this button once (during playback) to pause playback. Press this button a second time to resume playback. STOP / During playback: To display the image files as thumbnails. To resume normal playback, press the button (PLAY on the remote control). button To jump to the previous file.
- Page 40 Repeat One: Plays back the current file repeatedly. Repeat All: Repeatedly plays back all files of the current folder in the original order. Cancel Repeat: Exits the repeat mode. This function is available only in normal playback mode, and not in repeat mode. MENU button During playback: To go to the root folder.
- Page 41 Rotating pictures Your can rotate a picture that is being displayed by using the direction buttons ( Press the button to rotate the current picture clockwise as shown below. Press the button to rotate the current picture anti-clockwise as shown below.
- Page 42 DivX playback 1. Insert a DivX CD. The DVD player automatically starts with the playback. 2. The root folder is displayed. Select a folder using the buttons on the remote control. 3. Confirm your selection using one of the following buttons: , ENTER, PLAY on the remote control, or , OK on the DVD player.
- Page 43 REP button Press this button once to play back the content of a file/folder in loop mode. Press this button repeatedly to cycle through the following options: Shuffle Random Single Repeat One Repeat All Repeat Off Shuffle: Repeatedly plays back the files of the current folder in a random order.
- Page 44 GOTO button Press this button repeatedly during playback to display the following: Select:--- Go To -:--:-- INFO button Press this button to cycle through the following information: SUBT button To select a language for subtitles (if available on disc) or turn off the subtitles Note: Not all discs support the functions for subtitles, camera perspectives or audio effects.
-
Page 45: System Settings
9 System settings In this section, you will learn how to customize the default settings of the system according to your needs. To change your system settings, proceed as follows: 1. Press the SETUP button on the remote control or on the DVD player. 2. - Page 46 General Setup page The illustration shows the options available in this submenu. TV Display To set the TV display mode. Highlight the option using the buttons. Switch to the option's setting by pressing ENTER or . Possible settings are: Normal/PS, Normal/LB and Wide (default).
- Page 47 Angle Mark To activate/deactivate the camera perspectives. Highlight the option using the buttons. Switch to the option's setting by pressing ENTER or . Possible settings are: On and Off. Use the buttons to highlight the desired setting and confirm with ENTER.
- Page 48 Captions To activate/deactivate subtitles. Highlight the option using the buttons. Switch to the option's setting by pressing ENTER or . Possible settings are: On and Off (default). Use buttons to highlight the desired setting and confirm with ENTER. Press to exit the option's setting.
- Page 49 Last Memory To activate/deactivate whether the last playback position is saved. If this option is activated, playback is automatically resumed at the last playback position. Highlight the option using the buttons. Switch to the option's setting by pressing ENTER or .
- Page 50 Speaker Setup page The illustration shows the options available in this submenu. Downmix To activate the downmix mode. Highlight the option using the buttons. Switch to the option's setting by pressing ENTER or . Possible settings are: Lt/Rt and Stereo (default). Note: When Lt/Rt is selected, the audio signals are output in Dolby format, when Stereo is...
- Page 51 Dolby Digital Setup page The illustration shows the options available in this submenu. 1. Dual Mono To set the channel output mode. Highlight the option using the buttons. Switch to the option's setting by pressing ENTER or . Possible settings are: Stereo (default), L-Mono, R-Mono and Mix-Mono.
- Page 52 2. Dynamic To set the linear dynamic compression rate to achieve different compression effects. Highlight the option using the buttons. Switch to the option's setting by pressing ENTER or Use the buttons to select the desired setting and confirm with ENTER. Press to exit the option's setting.
- Page 53 Video Setup page The illustration shows the options available in this submenu. Sharpness To set the sharpness of an image. Highlight the option using the buttons. Switch to the option's setting by pressing ENTER or . Possible settings are: High, Medium and Low (default).
- Page 54 Contrast To set the contrast of an image. Highlight the option using the buttons. Switch to the option's setting by pressing ENTER or . The default setting is 00. Use the buttons to select the desired setting and confirm with ENTER. Preference page TV Type To set the TV system type...
- Page 55 Audio To set the playback language. Highlight the option using the buttons. Switch to the option's setting by pressing ENTER or . Possible settings are: English (default), French, Spanish, Chinese, Japanese, Korean, Russian and Thai. Use buttons to highlight the desired setting and confirm with ENTER.
- Page 56 Disc Menu To set the language for the disc menu. Highlight the option using the buttons. Switch to the option's setting by pressing ENTER or . Possible settings are: English (default), French, Spanish, Chinese, Japanese, Korean, Russian and Thai. Use buttons to highlight the desired setting and confirm with ENTER.
- Page 57 Password The parental control feature is password-protected. You can use this option to change the password for the parental control feature. The default password is 1369. Highlight the option using the buttons. Switch to the option's setting by pressing ENTER or .
-
Page 58: Glossary
Glossary Dolby Digital Dolby Digital is a technology developed by Dolby Laboratories. Audio material that has been recorded in Dolby Digital format can be played back on up to 5.1 separate channels with excellent quality. Letterbox image format In this format, the image of widescreen DVDs is displayed with black bars at the top and the bottom of the screen. - Page 59 JPEG JPEG is a commonly used image format with small file sizes and mini- mal loss of quality. One disc can hold several hundred pictures that are saved in this format. To create a true digital picture album, you can create a picture CD in JPEG format.
-
Page 60: Trouble-Shooting
Trouble-shooting Carry out the problem-solving measures described in the following section before contacting Customer Support. Turn off the DVD player immediately as soon as you suspect a malfunc- tion. Unplug the power plug and check whether the DVD player is unusually warm or whether smoke is rising from it. - Page 61 No video LCD screen turned Turn on LCD screen off or in wrong video and/or set correct mode video mode Device not properly Check connexions connected and connect device in the correct way Device not in DVD Set DVD/AV IN mode switch on the right to Poor video and/or...
-
Page 62: Specifications
Specifications TFT display size 17.8cm (7in.) Laser wave length 780/650nm Video standard Frequency range 20Hz – 20kHz ±2.5dB ≥ 85dB Audio S/N ratio ≤ –70dB (1kHz) Audio distortion/noise ≥ 70dB (1kHz) Channel separation ≥ 80dB (1kHz) Dynamic range Audio Out Analogue Output level: 1.5V±...
Need help?
Do you have a question about the PDV - 57010D (DE) and is the answer not in the manual?
Questions and answers