Table of Contents
Advertisement
Quick Links
Advertisement
Table of Contents

Summary of Contents for Medallion Bagger
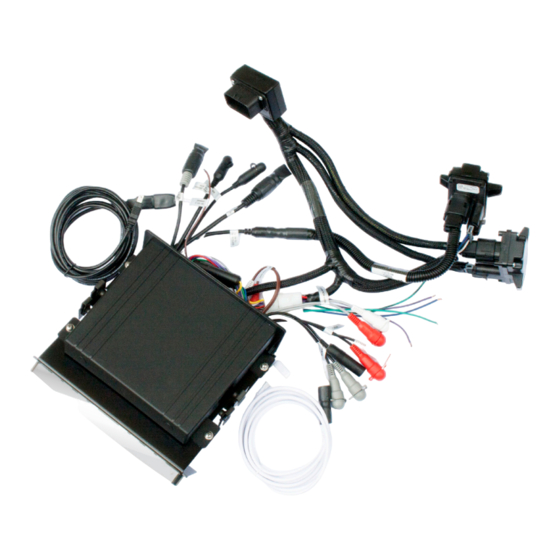
- Page 2 INSTALLATION The guide for the replacement of a factory stock radio. Installation may vary if stock radio has been replaced. Included in Kit: • Handle-Bar Control Module • Radio Antenna • Supportive Speaker Wires [HCM] • Radio Connections • USB Cable • Radio Conrtrol Module • iPod Cable • Sirius Connector [RCM] • Radio • Display Connectors • Radio Handle-Bar Control • Bracket • Black Faceplate Harness • Mux Switch • Chrome Faceplate • Interface Harness • USB Cable...
- Page 3 This kit is Sirius Satellite Radio “ready”. Sirius equipment is not included. The (4) screws used to fasten the stock radio will be used to fasten the Medallion Stereo. If you need to replace them, use ¼”-20 x ¾” long SHCS (Socket Head Cap Screws) with a flat washer and lock washer.
- Page 4 INSTALLATION Step 2: TIP: This is where having a second person to hold the outer fairing would be helpful. On FLH fairings, loosen the (3) windscreen screws and only remove the two outer screws. Leave the middle screw in place but loose. Remove the windscreen by wiggling gently and set it aside. Hang onto the outer fairings while removing the middle screw and trim. Unplug the headlamp connector [2a] and set the fairing aside. On Road Glide FLT type fairings the windscreen doesn’t need to be removed to disassemble the fairing, but it will be easier to reassemble the fairing without it. It can also prevent damaging the black decal on the windscreen during reassembly. Begin by removing the turn signals from each side of the fairing. Lift the outer fairing off the inner and disconnect the headlight [2a] and set the outer fairing aside.
- Page 5 INSTALLATION Step 4: Position the assembly into the fairing and secure it into position using the (4) ¼-20 screws that held the stock radio in place Step 5: Choose from the Chrome or Black Medallion faceplates included in the kit. Place the top edge of the faceplate onto the top edge of the switch module and align the holes in the faceplate with the buttons, then apply pressure the lower edge of the faceplate to snap it onto the lower edge of the switch module. If you wish to change the faceplate, carefully use a Flathead to pry between the space of the faceplate and the switch module. Step 6: Connect the large black electrical plug disconnected from the rear of the stock radio and connect it to the mating black connector on the Medallion harness.
- Page 6 INSTALLATION Step 7: Use wire ties to secure and dress the Medallion modules and harnesses as you wish. Step 8: Power up the unit and test functionality. Step 9: Reassemble the outer fairing. Step 10: Refer to the following pages of this guide for use and operation of the Medallion Bagger Stereo System.
-
Page 7: Tuner Mode
TUNER MODE HANDLEBAR CONTROLS (Shown in RED text) FIRST MENU PAGE < < < Power ON/OFF. Hold AUDIO in to TO AUTO TO SECOND BACK TO With ignition on, toggle between VOLUME PAGE MENU PAGE PREVIOUS power on by bass/treble, etc. RADIO PAGE holding MODE... - Page 8 TUNER MODE HANDLEBAR CONTROLS (Shown in RED text) FM & AM MODE BAND RADIO INFORMATION TO PRESET MENU < < < Volume DN with Volume UP with Station DN with Station UP with NEXT PAGE AUDIO. Press DN to AUDIO. Press UP MODE SEL.
-
Page 9: Ipod Mode
IPOD MODE HANDLEBAR CONTROLS (Shown in RED text) IPOD INFORMATION IPOD MODE Volume DN with Volume UP with Track DN with Track UP with NEXT PAGE AUDIO. Press DN AUDIO. Press UP MODE SEL Press MODE SEL Press to decrease. to increase. -
Page 10: Usb Mode
USB MODE HANDLEBAR CONTROLS (Shown in RED text) USB INFORMATION USB MODE < < < Volume DN with Volume UP with Track DN with Track UP with NEXT PAGE AUDIO. Press DN AUDIO. Press UP MODE SEL. Press MODE SEL. Press to decrease. -
Page 11: Sirius Mode
SIRIUS MODE MODE SIRIUS INFO TO PRESET MENU < < < Volume DN with Volume UP with Station DN with Station UP with NEXT PAGE AUDIO. Press DN AUDIO. Press UP SEL. Press SEL. Press MODE MODE DN/release to step UP/release to step to decrease. -
Page 12: Aux Mode
800.828.8127 techsupport@medallionis.com 6800-09507-01E Visit our website © 2012 Medallion Instrumentation Systems LLC, Spring Lake Michigan, USA Harley-Davidson ®, Street Glide®, and Road Glide® are registered trademarks of Harley-Davidson Motor Company, Milwaukee, Wisconsin, USA 12 _ iPod is a trademark of Apple, Inc., registered in the U.S. and other countries.
Need help?
Do you have a question about the Bagger and is the answer not in the manual?
Questions and answers