Table of Contents
Advertisement
Advertisement
Table of Contents

Related Manuals for Secant Cardio IIe

Summary of Contents for Secant Cardio IIe
- Page 1 SYSTEM VERSION 2.6xx User’s guide...
-
Page 2: Table Of Contents
LIMITED WARRANTY ....................1 USE OF CARDIO......................3 ................................3 NTRODUCTION ................................3 MPORTANT CARDIO.........................4 RESENTATION OF SYSTEM General ..................................4 Help ..................................4 ...................................5 IGHTING ...................................6 ECURITY ) .........................8 EMPERATURE EATING OOLING ..................................9 CENES Modification of a scene............................10 How to add new data to an already programmed scene..................11 Automatic activation of a scene ...........................12 ............................13 UTLETS... -
Page 3: Limited Warranty
SECANT Home Automation Inc. product provided under this purchase is a control device of the user’s home facilities. Its successful use and operation is dependent on the skill of the operator of the device. It is possible to incur faulty performance, such as poor lighting, false alarms or insufficient heating or air conditioning by giving inappropriate commands or instructions to the control device. - Page 4 AS IS WITHOUT WARRANTY OF ANY KIND EITHER EXPRESS OR IMPLIED BUT NOT LIMITED TO THE IMPLIED WARRANTIES OF MERCHANTABILITY AND FITNESS . SECANT H FOR A PARTICULAR PURPOSE UTOMATION INC RESERVES THE RIGHT TO MAKE CHANGES IN DESIGN OR TO MAKE ADDITIONS TO OR IMPROVEMENTS UPON ITS PRODUCTS WITHOUT INCURRING ANY OBLIGATION...
-
Page 5: Use Of Cardio
Use of CARDIO Use of CARDIO Introduction The CARDIO home automation system enables homeowners to better manage such basic functions as heating/air conditioning, security, lighting and appliance control. Through the automation of some of these functions, CARDIO also ensures a higher degree of comfort and peace of mind. Additionally, the efficient management of heating/air conditioning and lighting brings tangible savings. -
Page 6: Presentation Of System Cardio
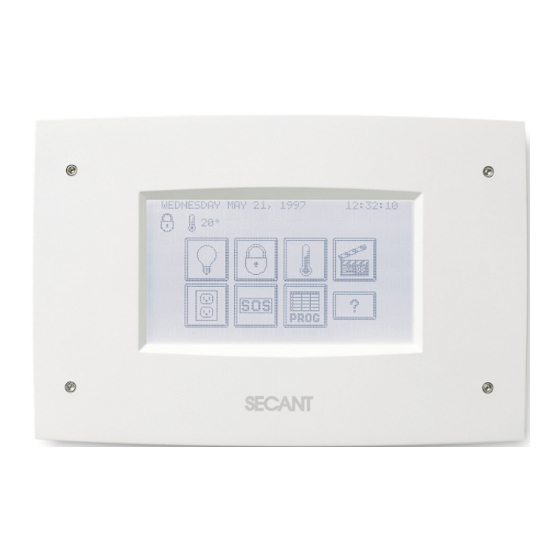
Use of CARDIO Presentation of system CARDIO CARDIO’s screen shuts down after being idle for one minute. It is easy to reactivate by pressing anywhere on it and the basic screen as shown below will then appear. Besides giving information such as date and time as well as operating status (current temperature, security, etc.), this particular screen enables the user to directly control all of the basic functions that CARDIO manages. -
Page 7: Lighting
Use of CARDIO Lighting Control groups of lights linked to CARDIO (ON/OFF, dim). Each group can be made up of many lights. From the main menu press The following screen appears: Current dim value Name of the light or group (see configuration) Quick dim control (0, 20, 40, 60, 80... -
Page 8: Security
Use of CARDIO Security Controls the arming and disarming of the alarm system. From the main menu press The following screen appears: Name of the zones Access to log book To bypass one or Keypad to enter access code more zones Press to bypass zones if necessary. - Page 9 Use of CARDIO To bypass zones, simply press the zones to be ignored (these zones are now crossed out) Press to return to the preceding screen (zones are still crossed out) To test the siren, press the button, the siren will start for 3 seconds. Make sure that all zones are ready to disarm except for bypassed zones.
-
Page 10: Temperature (Heating/Cooling)
Use of CARDIO Temperature (Heating/Cooling) This feature controls temperatures for heating and, if available, air-conditioning. Temperature readings are available either in Celsius or Fahrenheit (to be set in temperature configuration). CARDIO can also control various kinds of heating systems: heat pump, HVAC, HVAC setback, heating setback or central heating (to be defined at the time of installation). -
Page 11: Scenes
Use of CARDIO Scenes CARDIO can control many functions at a time (lighting, alarm system, temperature, outlets, etc.). For instance, when leaving the house in the morning, simply press one button to arm the alarm system, lower the temperature, turn lights off, etc.. From the main menu press The following screen appears: Name of secnes... -
Page 12: Modification Of A Scene
Use of CARDIO Modification of a scene. Press The message “CHOOSE SCENE TO BE MODIFIED” appears. Press the scene to be programmed or modified. The following screen appears: Data selection bar Delete the selected data Name of the scene Used to add data to a scene Used to add more data to a Data already in the scene... -
Page 13: How To Add New Data To An Already Programmed Scene
Use of CARDIO How to add new data to an already programmed scene Press The new screen which appears is identical to the main screen shown on page 4 except for the pictogram now appearing in the upper section of the screen. This sign indicates that CARDIO is now in recording mode and no longer in ‘direct control ‘... -
Page 14: Automatic Activation Of A Scene
• Time: activation of the scene at a preset time or at sunrise and sunset. • Buttons: activation of the scene with a keypad buttons (3 max.) connected on the SECANT EZC. • Conditions: it is also possible to add conditions in regards to the automatic activation of a scene. -
Page 15: Outlets / Appliances
Use of CARDIO Outlets / Appliances From the main menu press The following screen appears: Current outlet status On/Off Name of the commands appliance plugged into this outlet CARDIO can control appliances plugged into outlets previously identified in CARDIO (see configuring p.34). -
Page 16: Curtain / Shutter
Use of CARDIO Curtain / shutter From the main menu press The following screen appears: Current position value Name of the curtain Quick position control (0, 20, 40, 60, 80 or 100%) Precise position control (+/- 1%) Modification of the position of a curtain: Select a curtain, the name turns black. -
Page 17: S.o.s
Use of CARDIO S.O.S CARDIO can send out emergency calls in case of emergency. See “Control by telephone” section for more detail on these calls. From the main menu press The following screen appears: Press any pictogram to send out an emergency message (police, medical or fire). -
Page 18: Programming
Programming Programming In addition to direct control of basic functions, the user is able to program all of these functions to respond automatically on a weekly basis. This section also gives information regarding modifications to the system configuration. From the main menu press The following screen appears: Enter the programming code that has been programmed in the section Configuration (p.37). - Page 19 Programming After a valid user code has been entered the following screens will appear: Outlet scheduling Security scheduling Temperature scheduling Curtain scheduling Light scheduling Deterrent scheduling Reminders PROGRAMMING MENU p.1 Functions ON/OFF Date and time setting Log book Configuration PROGRAMMING MENU p. 2...
-
Page 20: Log Book
Programming Log book Indicates the last 100 events related to the alarm system (break-in, fire, medical, overheating, freezing, battery status, AC failure, access code). From programming menu press The following screen appears: Description or the event Date and time the event occurred Scrolling arrows... -
Page 21: Functions (On/Off)
Programming Functions (on/off) CARDIO allows the user to temporarily deactivate any programmed functions without erasing the programming itself, and to reactivate them just as easily. From programming menu press The following screen appears: Active function Inactive function • Reaction: Temporarily deactivate the reactions (bonds between the detectors and lighting see p.33) •... -
Page 22: Date And Time
Programming Date and time Adjustment of date and time settings. It is very important that both the time and date be set correctly because all schedules depend on these data. It is worth noting that CARDIO uses either a 12 or 24 hr basis. -
Page 23: Scheduling
Programming Scheduling How to schedule CARDIO allows the scheduling of certain functions such as deterrent reminders, in addition to those main functions which can be controlled directly. The scheduling process is the same for all the CARDIO functions. Only the lower part of scheduling screen will be specific to each function. -
Page 24: Light Scheduling
Programming Light scheduling From programming menu press The following screen appears: Name or group of lights Choose a group of lights The following screen appears: Cursor Selectionned light group To turn lights OFF To turn lights ON Position the cursor at the desired time and press to modify the intensity of the lights. - Page 25 Programming The following screen appears: Intensity. Name of the lamp or group Fast adjustment bar Precise adjustment buttons Adjust lights to the desired intensity and press. If desired, place the cursor to a new time setting and repeat the process to set another schedule. You can also press to turn the group of lights OFF.
-
Page 26: Outlets Scheduling
Programming Outlets scheduling CARDIO can also schedule outlets to be turned ON and OFF. From programming menu press The following screen appears: Pick the outlet to be scheduled. The following screen appears: Appliances scheduling OFF Appliances scheduling On Position the cursor at the right time. Press On or OFF to activate or deactivate the outlet. -
Page 27: Alarm System Scheduling
Programming Alarm system scheduling CARDIO can arm and disarm the alarm system according to previously set days and time. From programming menu press The following screen appears: To disarm the alarm system To arm the alarm system Position the cursor at the right time Press The following screen appears: During programming, CARDIO always requires a password to validate arming (bypass) or disarming of... -
Page 28: Temperature Scheduling
Programming Particularity When programming the disarming of the alarm system, the screen, which appears, does not include zones. Enter an access code. When programming the arming of the alarm system, zones will not appear. Press Bypass to ignore zones. Then press EXIT and enter either an access code or the quick arm code (easy exit). If at the time scheduled to arm the alarm system, one or many zones are not ready (open doors or windows, etc.), CARDIO will arm all zones ready to be armed and will ignore those that are not. -
Page 29: Curtain Scheduling
Programming Curtain scheduling CARDIO can also schedule curtain to be turned up and down. From programming menu press The following screen appears: Pick the curtain to be scheduled The following screen appears: Curtain close Curtain open Position the cursor at the right time Press the icon “open”... -
Page 30: Deterrent Scheduling
Programming Deterrent scheduling CARDIO can simulate a presence in the home when the alarm system is armed. It turns ON and OFF lights at scheduled times so as to make the house seem occupied from the outside. From programming menu press The following screen appears: Name or group of lights... - Page 31 Programming The following screen appears: Intensity. Name of the lamp or group Fast adjustment bar Precise adjustment buttons Adjust lights to the desired intensity and press If desired, adjust the cursor to a new time setting Press to modify the intensity and to repeat the process Press to turn the group of lights OFF Press...
-
Page 32: Reminders
Programming Reminders Just as an alarm clock, CARDIO can signal (with beeps) a variety of events at specific times. It also can call up on the screen a short description (up to 10 reminders for the week) which the user will have entered previously. -
Page 33: Configuration
Configuration Configuration The configuration menu that can be accessed from the programming menu, let the user adjust and modify some data regarding lights, outlets, telephone, and security. From the programming menu, press The following screen appears: CONFIGURATION MENU Configuration method The programming method is identical for all functions to be configured. -
Page 34: Moves
Configuration Moves Arrows to move the cursor (black triangle) forward or backward Quick move arrow (forward only) Modification of a data To change a status (yes/no); Press successively until obtaining the desired status Press when you have finish. To compose or modify text; To enter text (name, etc.): press and enter text with the keyboard that appears on the screen. -
Page 35: Light Configuration
Configuration Light configuration Used to name and configure groups of lights. From configuration menu, press “LIGHTS” button. The following screen appears: Access to others groups (if available) Press the group of lights to be modified (at start the name are #1,2,3,4 et 5). The following screen appears: •... -
Page 36: Outlet Configuration
Configuration • Sunset/sunrise reaction (yes/no): Allows to control groups of lightings according to sunset/sunrise. By entering YES in this section, this light or group of lights will be turned ON and OFF automatically at sunset and sunrise respectively. To turn off the light or outlet before dawn, simply, use a schedule (OFF) at the chosen time, 11 p.m for instance NOTE: adjustment is made according to theoretical sunrise sunset for the given day. - Page 37 Configuration The following screen appears: • X-10: Enter the X-10 code to be attached to the outlet • NAME: Press EDIT and enter name of outlet. The name of the outlet is very often the name of the appliance to which it is linked. •...
-
Page 38: Curtain Configuration
Configuration Curtain configuration Used to name and configure curtain. From configuration menu, press “CURTAIN” button. The following screen appears: Access to others groups (if available) Press the curtain to be configured. The following screen appears: • NAME: Press EDIT and enter name of curtain. -
Page 39: Codes Configuration
Configuration Codes configuration Used to name and configure security zones as well as to enter various access codes. From configuration menu, press “CODES” button. The following screen appears: • Code (1 to 8): Enter here the access codes used to arm and disarm the alarm system. •... -
Page 40: Digital Keys Configuration
Configuration Digital keys configuration Allows the configuration of the electronic keys. From configuration menu, press “KEYS” button. The following screen appears: To declare a digital key, use arrows to position the prompt on a blank spot (1 to 16) and press READ. Then apply the new key on any “digital key switch”... -
Page 41: Telephone Configuration
Configuration Telephone configuration Used to configure the control of CARDIO by telephone from anywhere outside the home. Also used for programming numbers for emergency calls. From configuration menu, press “TELEPHONE” button. The following screen appears: • Rings before answering (0..9): Used mostly when an answering machine is plugged into the same telephone line as CARDIO. -
Page 42: Zone Names/Beep Configuration
Configuration Zone names/beep configuration Used to name security zones From configuration menu, press “ZONE NAMES/BEEP” button. The following screen appears: • NAME (1 to 16): Name of the zone. • BEEP (yes/no): Beep when a detector is triggered no matter the alarm system being ON or OFF. -
Page 43: Control By Telephone
Control by telephone Control by telephone In addition to the ease of use offered by CARDIO’s touch screen, the system can also be controlled by a simple telephone call from either inside or outside the home (touch-tone and can be cordless). In either case, control by telephone allows access to direct commands (alarm system, temperature, lighting, outlets, and scenes). -
Page 44: Telephone Operation Diagram
Control by telephone Telephone operation diagram... -
Page 45: Recommendations And Maintenance
Recommandations et maintenance Recommendations and maintenance Here a list of functions and appliances that must be checked in order to secure an optimal operation of the system CARDIO. Check phone jack when CARDIO’s telephone functions do not seem to be working properly. -
Page 46: Industry Canada Warnings
Industry Canada warnings Industry Canada warnings The Industry Canada Label identifies certified equipment. This certification means that the equipment meets telecommunications network protective, operational and safety requirements as prescribed in the appropriate Terminal Equipment Technical Requirements document(s). The Department does not guarantee the equipment will operate to the user’s satisfaction. - Page 47 1744, William street, suite 401 Montréal, Québec, H3J 1R4 Tel: (514) 935-3069 Fax: (514) 935-6655 email: info@SECANT.ca www.SECANT.ca SECANT Home Automation Inc. CARDIO 2e User Manual Fifth edition 2006 All rights reserved.
Need help?
Do you have a question about the Cardio IIe and is the answer not in the manual?
Questions and answers