
Related Manuals for Amtren FlexWriter SE4

Summary of Contents for Amtren FlexWriter SE4
- Page 1 FlexWriter SE4 CD- - - - DVD PUBLISHING UNIT DVD PUBLISHING UNIT DVD PUBLISHING UNIT DVD PUBLISHING UNIT Set Up Guide...
-
Page 2: Accessory Pack
6. Printer Fan Filter—Spare 7. AC Power Cords (2) 8. Printer Power Module 9. Registration Card—Warranty 10. Discus Install CD 11. FlexWare Install CD 12. Manual 13. Input Spindles (3) and Output Spindle (1) Order replacement cartridges online www.discink.com www.amtren.com Page 1... - Page 3 There may be slight variations in the appearance of each item. www.amtren.com Page 2...
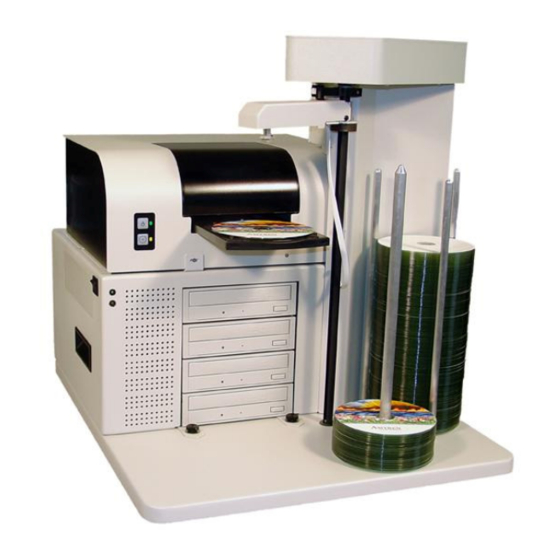
- Page 4 Disc Input Blank media and masters will go here between the three (3) input spindles. Unit Printer holds 200 discs. Controls Disc Output Burned discs and masters are placed here. Will hold Reject 200discs. Disc Area www.amtren.com Page 3...
- Page 5 You will need to install the PCI Firewire® card in your PC. Please refer to the documentation that came with your PC if necessary. Windows XP will install the necessary drivers for the Firewire® card automatically. Carefully install the provided Firewire© card in an available PCI slot in your PC. www.amtren.com Page 4...
-
Page 6: Connect The Cables And Apply Power
115V AC outlet. Plug the other end into the power connector on the rear of the printer. USB Printer Connection Power Connection Printer DC Module Control DIN Cable 1 USB to PC Connection AC Power Power Supply Firewire© Connection Switch Connection www.amtren.com Page 5... - Page 7 5. Printer control cable (5 Pin DIN) connects the base autoloader to the printer. 6. USB printer cable connects the printer to the base autoloader. NOTE: The cables listed in numbers 5 and 6were factory connected, please verify their connection. www.amtren.com Page 6...
- Page 8 The ink cartridges used by the Disc Printer can be ordered online anytime day or night. Ground Ship- ping is free and orders generally ship the same day. Go to www.discink.com for complete details. You may also call discink.com toll free 800-392-4659. www.amtren.com Page 7...
- Page 9 Gently pull the color (left) Raise the cartridge holder latch. cartridge holder latch, marked 27C forward and upward. Gently slide the color cartridge, marked Close the latch until it snaps shut. 27C, into the front of the left cartridge holder. www.amtren.com Page 8...
- Page 10 LEDs will blink and the carriage will move. After the ink cartridges are successfully installed, the yel- low LED will shine steadily. If the yellow LED continues to flash—remove and reinsert the cartridges. Order replacement cartridges online www.discink.com www.amtren.com Page 9...
- Page 11 NOTE: If your CD ROM drive is not set to auto-play, open the CD ROM and click on “click here.htm.” Verify that you have the following Install CD’s. (Discus will be needed later in the setup.) www.amtren.com Page 10...
- Page 12 Once the installation CD is deployed, you will have several options displayed on the screen. Each of these options is briefly outlined on the following pages. CAUTION!! DO NOT CLICK OR MAKE ANY SELECTIONS UNTIL THE HARDWARE DRIVERS HAVE BEEN INSTALLED IN THE NEXT STEP. www.amtren.com Page 11...
-
Page 13: Install Drivers
Click OK when Windows warns that the drivers have not passed XP certification. • If necessary, refer to the Troubleshooting section at the end of the manual for more detailed instructions for the installation of the drivers. www.amtren.com Page 12... - Page 14 SOFTWARE INSTALLATION PROCEDURES Now that you have installed the drivers the following Software Packages require installation: Please follow the instructions on the Installation CD. www.amtren.com Page 13...
- Page 15 Install FlexWare Software Suite The following screen shots indicate the typical installation process for FlexWare. Remember to reset or restart your computer once FlexWare completes installation. Click “OK” Click “NEXT” www.amtren.com Page 14...
- Page 16 Click “NEXT” Click “NEXT” www.amtren.com Page 15...
- Page 17 Click “Close” RESTART YOUR COMPUTER Remove the Installation and Support CD and reboot your computer. ATTENTION! YOU WILL NEED TO ALLOW THE PC TO RESTART ONCE FLEXWARE HAS FINISHED INSTALLING. THE SYSTEM WILL NOT FUNCTION WITHOUT THIS RESTART. www.amtren.com Page 16...
- Page 18 Discus Install CD. Type in your Discus key and click the OK button. Close Discus and remove the CDROM. You will now be able to access Discus when you are using FlexWare. FlexWare will automatically locate Discus. www.amtren.com Page 17...
- Page 19 FlexWare ICON You will see the FlexWare splash screen. CAUTION: IF FLEXWARE DOES NOT DETECT THE AUTOLOADER UNIT AN ERROR MESSAGE WILL BE DISPLAYED. MAKE SURE THAT THE AUTOLOADER IS CONNECTED WITH ALL USB DRIVERS INSTALLED PROPERLY. www.amtren.com Page 18...
- Page 20 FlexWare’s main menu window will open. Move your mouse over each of the 5 options. Details on each option are displayed in the main window. www.amtren.com Page 19...
- Page 21 In order to provide the quickest example for using your system, the following step by step guide provides detailed information on copying a disc. Step 1 Select “Duplicate and Print Discs” Step 2 Click on “Duplicate Disc from Disc” www.amtren.com Page 20...
- Page 22 The Duplicate Disc from Disc window will open. Step 3 Click on the “Wizard” to use the interactive setup guide. The wizard will guide you through setting up your duplication job. www.amtren.com Page 21...
- Page 23 Step 4 The “Wizard” will guide you, click “NEXT”. Step 5 Leave the Default drive and click “NEXT”. Step 6 Leave READ speed setting at AUTO, this allows FlexWare to automatically select the best speed settings. www.amtren.com Page 22...
- Page 24 Step 8 Enter “2” for the number of discs to produce. Step 9 Choose “Create New Print File”. FlexWare will open a SEARCH task. Click “Search” and “OK”. FlexWare will now open Discus from the main page. www.amtren.com Page 23...
- Page 25 When the Discus screen below opens, click on CD/DVD Label. Choose the CD or DVD media type. Click the full “CD/DVD” to make this first label Your FlexWriter System can produced business card and mini CD’s. Contact customer ser- vice about the card kits. www.amtren.com Page 24...
- Page 26 When you begin a label Discus will begin with the Background or Canvas folder. You can choose a canvas at the lower part of the display Place a background on the label. Click here to set a background or canvas. Choose a background. www.amtren.com Page 25...
- Page 27 Choose a background. Choose a background by clicking on the thumbnail. www.amtren.com Page 26...
- Page 28 Put TEXT on the label. Your background selection will be shown on the label. Next Click the “TEXT” folder. www.amtren.com Page 27...
- Page 29 Text box will open to allow you to enter your text. Once the label has been designed, click on “file” and save the label to a convenient location. The recommended path to save to is: My documents/Flexware Files/Print Files www.amtren.com Page 28...
- Page 30 Print the label. Click on the “Print” folder. www.amtren.com Page 29...
- Page 31 AutoGraph VII. VERY IMPORTANT Print Margin Setting. Each Media has unique print area. To prevent your label being printed off the white label area set the OD at 117mm. Default is 118mm. Verify or select “Disc Printer.” www.amtren.com Page 30...
- Page 32 For the best cost, quality and print time we recommend BEST, You can experiment with the other settings as you become familiar with your FlexWriter system. Click on the Arrow, and change the Print Quality to BEST. www.amtren.com Page 31...
- Page 33 Leave the Type as “Plain Disc”. Once you click “OK” above you will return to the Print Display. Click “Print To File”. You will see a “CHECK” once you click. Next Click Print to create the label file. www.amtren.com Page 32...
- Page 34 Output.prn is the default filename that FlexWare will try to use to print the label. By default the .PRN file will be created in the same location that the “Label File” was saved. www.amtren.com Page 33...
- Page 35 Minimize Discus and set the Print File for FlexWare. Minimize Discus. Return to the Wizard Step 6, click on “Choose” to set the print file created. Set output.prn www.amtren.com Page 34...
- Page 36 If you cannot find the problem please call customer service and one of our technical support staff will gladly assist. To learn all the features of FlexWare, use the Wizard on each module. This will provide a quick www.amtren.com Page 35...
-
Page 37: Troubleshooting
Please refer to the following pages for details about installing the drivers and hardware. If you have any problems that you cannot solve, call our toll-free service line listed in the front of this manual. www.amtren.com Page 36... - Page 38 One available USB port available for PCI slot for Firewire © card Software Requirements: Microsoft Windows XP Professional Microsoft Windows XP Home 1. Throughput performance is significantly increased if the host PC is equipped with a 10,000 RPM SATA or SCSI hard drive. www.amtren.com Page 37...
- Page 39 “1” for enabled, to a “0” for disabled. Below is a picture of this. Click OK and close the Registry Editor. Set this value to 0 www.amtren.com Page 38...
- Page 40 Support CD ROM is in your computer’s CD ROM drive. Minimize the “Installation and Support” webpage if necessary. Windows XP will ask if it should check on the Internet for the driver. Always elect, “No, not this time.” www.amtren.com Page 39...
- Page 41 CD ROM drive. Windows can install the necessary drivers automatically. Click XP will display a “warning” stating that the drivers have not passed XP Logo testing. ATTENTION: Click on “Continue Anyway” Click on “Finish” www.amtren.com Page 40...
- Page 42 Windows to check the Internet for drivers. Click “Next” to install the necessary drivers automatically. XP will display a “warning” stating that the drivers have not passed XP Logo testing. ATTENTION: Click on “Continue Anyway” Click on “Finish” www.amtren.com Page 41...
- Page 43 Windows to check the necessary drivers the installation. The driver the Internet for automatically. should automatically install. drivers. XP will display a “Warning” stating that the drivers have not passed XP Logo testing. ATTENTION: Click on “Continue Anyway.” www.amtren.com Page 42...
- Page 44 The printer driver will be installed on your computer. At the completion of the installation, XP will dis- play “Completing the Found New Hardware Wizard.” This completes the driver installation. www.amtren.com Page 43...
-
Page 45: Key Function
Your FlexWriter system with FlexWare offers a very quick and efficient method of operating each task with basic keys on your keyboard. FUNCTION Disc to Disc Write Image to Disc Write Disc to Image Print Label Enables Printing Function Enables/Disable DVD (toggle) Start/Pause www.amtren.com Page 44... - Page 46 Page 45...
- Page 47 Download manuals and software upgrades at http://www.amtren.com/support. Please register your unit by visiting http://www.amtren.com/support AMTREN CORPORATION 5320 Perimeter Parkway Montgomery, AL 36116 USA (334) 280-7100 www.amtren.com 01082007 www.amtren.com Page 46...
-
Page 48: Limited Warranty
This warranty is not transferable and shall apply only to the original buyer and the original components. AMTREN Corporation shall not be required to adjust or repair any unit or part, if it would be impractical for AMTREN Corporation’s personnel to do so because of alterations in the machines or de- vice.
Need help?
Do you have a question about the FlexWriter SE4 and is the answer not in the manual?
Questions and answers