
Summary of Contents for DJ-Tech VISA 80
- Page 1 VISA 80 full function por t able pr ofessional speaker USER MANUAL---------------------------------------------------------------------------------------------------E1-E8...
-
Page 2: Table Of Contents
CONTENTS FEATURES......................……………….......1 IMPORTANT SAFETY INSTRUCTIONS……........................2 FUNCTION DESCRIPTION............................3-4 OPERATION....……............................5-6 SYSTEM CONNECT........………....................7 SPECIFICATIONS..........……….....................8 FEATURES Slot-in anti-shock chip, LCD display, in order to have more performance effect, The configuration of wireless microphone and the accumulator cell, suits the use of travel and each kind of public situation. MP3 player can play the USB key with MP3, WMA format. -
Page 3: Important Safety Instructions
IMPORTANT SAFETY INSTRUCTIONS CAUTION The lightning flash with arrowhead symbol inside an equilateral RISK OF ELECTRIC SHOCK triangle is intended to alert User that the presence of uninsulated DO NOT OPEN hazardous voltage within the product’s enclosure, which may be of sufficient magnitude to induce a risk of electric shock to persons. -
Page 4: Function Description
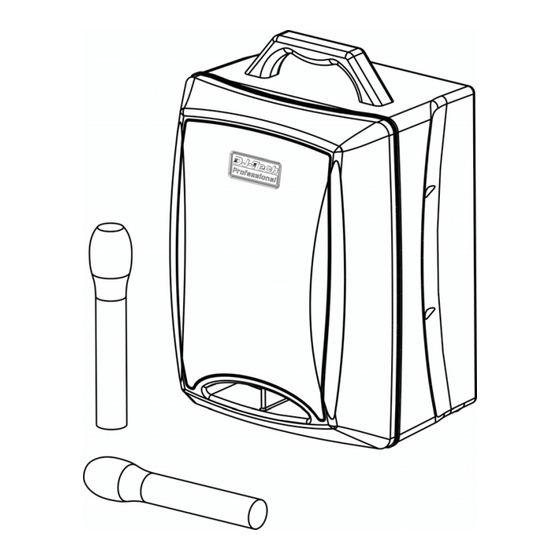
FUNCTION DESCRIPTION Handle CD Player MP3 player and wireless mic receiver Mixer Power amplifier Batteries and power supply cell AC power supply input socket NOTE: The battery shall not be exposed to excessive heat such as sunshine, fire or the like. NOTE: The mains plug is use as disconnect device, which shall remain readily operable. -
Page 5: Function Description
FUNCTION DESCRIPTION 1. CD In-and-Out 6. Play/Pause 2. LCD display 7. CD power 3. Program 8. Repeat/Shuffle/Enter 4. Folder 9. Previous track/fast backward 10. Next track/ fast forward 5. Stop/Eject USB input socket MIC 1 channel signal receiving indicator lamp Working state indicator lamp 3-channel mic audio signal indicator lamp Play/ Pause... -
Page 6: Operation
OPERATION CD PLAYER Turn the power switches to ON position, the power indicator lamp lights. Turn on “CD” player power switch to ON position and adjust the volume knob; press the “power” button on the CD panel. Insert CD disk, CD will be loaded and played automatically. Press “PLAY/PAUSE”... - Page 7 Wired mic MIC 3 Turn on the power supply switch to the ON. Plug the wired mike into the MIC3 combo socket. Turn MIC3 volume knob to adjust the volume, please don't aim at the speaker in order to prevent laser. When non-use, turns down the volume, and pulls out the mike plug.
-
Page 8: System Connect
SYSTEM CONNECT... -
Page 9: Specifications
SPECIFICATIONS Speaker Unit............................8 8 Maximum Power Output Storage battery and power supplied cell................19.5W THD=1% AC power consumption ......................38W THD= 1% Distortion..............................”0.5% S/N Ratio..............................• 80dB Frequency Response......................... 20Hz 20KHz Input Sensitivity CD............................... 500mV LINE..............................500mV MIC..............................10mV MP3..............................775mV Power Supply........................100-240V~ 50/60Hz Dimensions W×D×H .......................
Need help?
Do you have a question about the VISA 80 and is the answer not in the manual?
Questions and answers
Il led verde audio dei microfoni wireless 1-2 normalmente deve essere acceso
Yes, the lamp (LED) on the wireless microphone should be on when the mic power supply knob is pushed to ON, indicating that it is working.
This answer is automatically generated
if I turn on the 2 microphones the respective yellow LEDs light up, but I don't hear audio. The green audio LED lights up for a second when the karaoke is turned on. The microphone batteries are new. What can I do?
If the DJ-Tech VISA 80 microphones light up but do not produce audio, follow these steps:
1. Check Volume Levels – Adjust the VOL knob beside the yellow lamp channel signal to a suitable position.
2. Verify Mute Position – Ensure the microphone is not in the mute position.
3. Adjust Echo and Tone – Turn the ECHO and TONE knobs to appropriate levels.
4. Avoid Acoustic Feedback – Keep the microphone away from the speaker.
5. Check Wired Mic Connection – If using a wired microphone, ensure it is properly plugged into the MIC3 combo socket and increase the MIC3 volume knob.
6. Verify Power Status – Ensure the speaker is turned on and functioning correctly.
7. Inspect Line Input/Output – If using external audio sources, check the RCA connections and adjust the LINE volume knob.
If the problem persists, further troubleshooting or servicing may be required.
This answer is automatically generated